Companion Application
Introduction to BPO Call Logging Service
(RSI_CallLogService)
Introduction
- BPO_CallLogger Service is a server based service that checks a specified email account for emails from clients and logs calls for emails where valid details exist
- The client contact who sends the email needs to be configured on the customer screen as a contact.
- At least the Serial Number or Location Description need to be noted within the email. Contract number can be included.
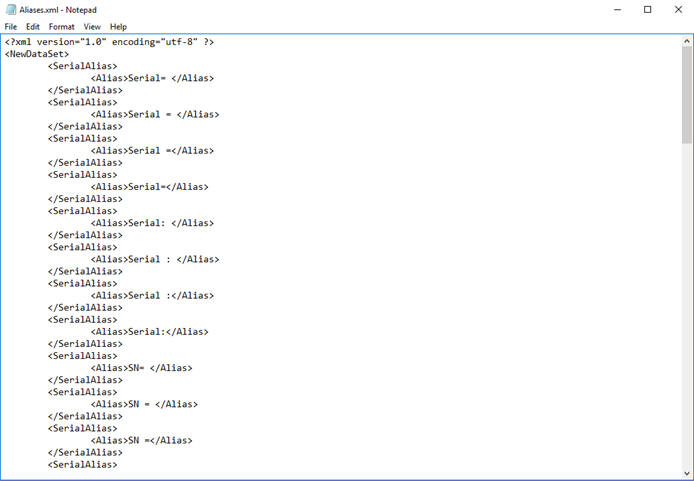
- An ‘Aliases’ xml file will enable a set of ‘allowed’ phrases for the system to pick up which text in the email is related to Serials, Locations or Contracts.
- After typing in the serial no., location or contract – the email sender will need to enter onto a new line or use a semi-colon (;)
- There should be a description regarding what needs to be done – which will be used for the call description and the email should have a subject.
- All emails are saved to tblWKOREmails. Valid emails that are logged as a call and will be marked as IsProcessed = ‘Yes’.
RSI_EmailLogViewer
- Emails not processed can be viewed in the BPO_CallLogViewer application – to be dealt with manually. Once logged, you can ‘Flag and Close’ the email from the Viewing app.
- Install the EmailLogViewer on the User’s Workstation who will be monitoring these items.
Installation
- Double click on the 'BPO_CallLogger' install file.
- Note: Check that you have the latest version.
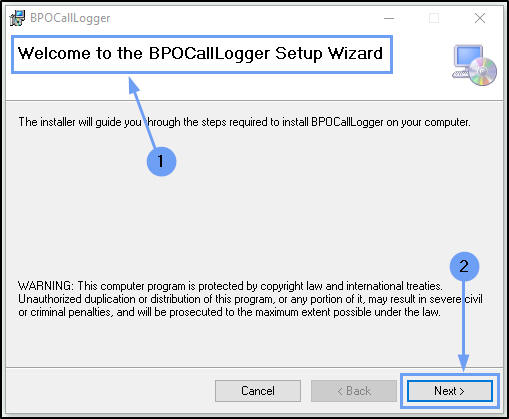
- The Installation Wizard will open.
- Click on Next.
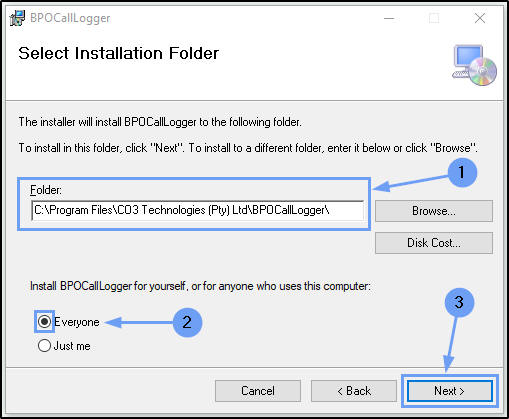
- The default location for installation is:
- C:\Program Files\CO3 Technologies (Pty) Ltd\BPOCallLogger\
-
It is recommended that you keep this default location. Keeping a standard will make upgrades easier.
- Ensure that Everyone is selected for the install.
- Click on the Next button.
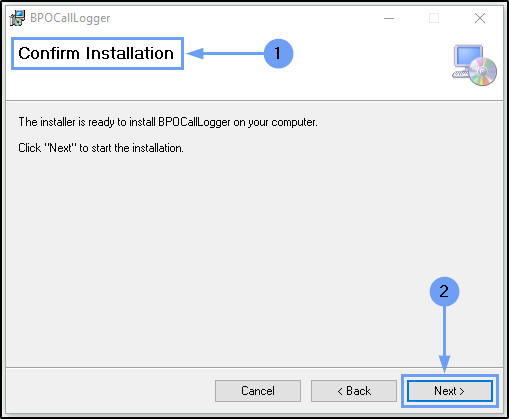
- The installer will ask you to Confirm Installation.
- Click on Next to start the installation.
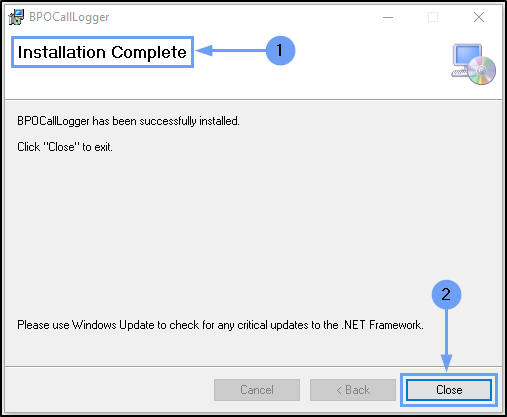
The BPOCallLogger installation will begin. Wait for it to be completed.
- Once Installation is Complete.
- Click on Close.
Environment / Settings Configuration
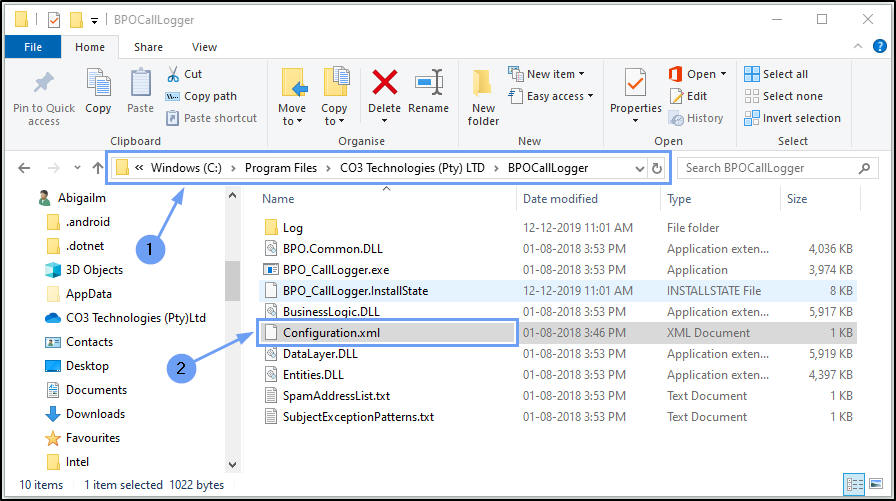
- In your File Explorer, search for the following file location:
-
C:\Program Files\CO3 Technologies\BPOCallLogger
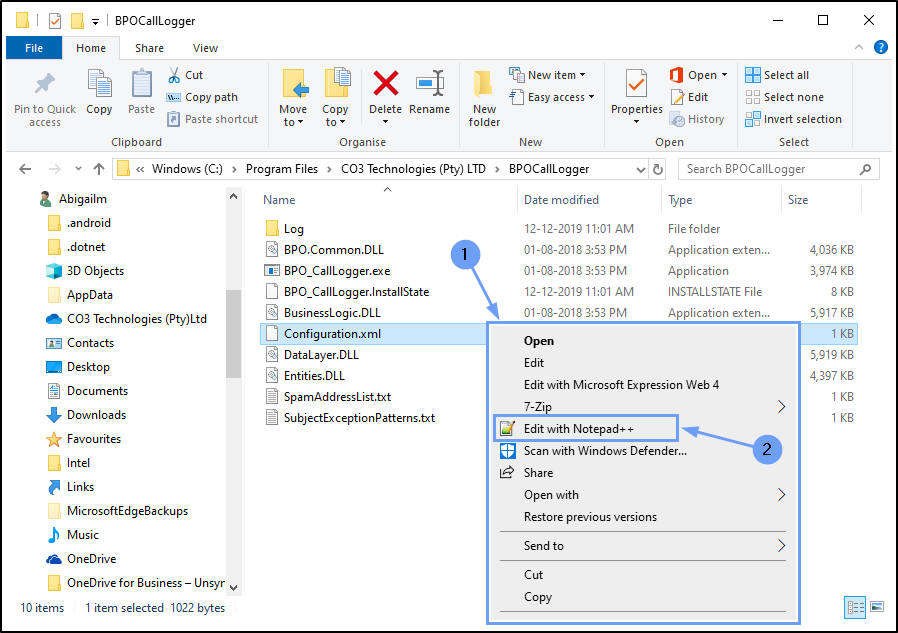
- Right click on the Configuration.xml file.
- The File menu will open.
- Select to Edit with Notepad++.
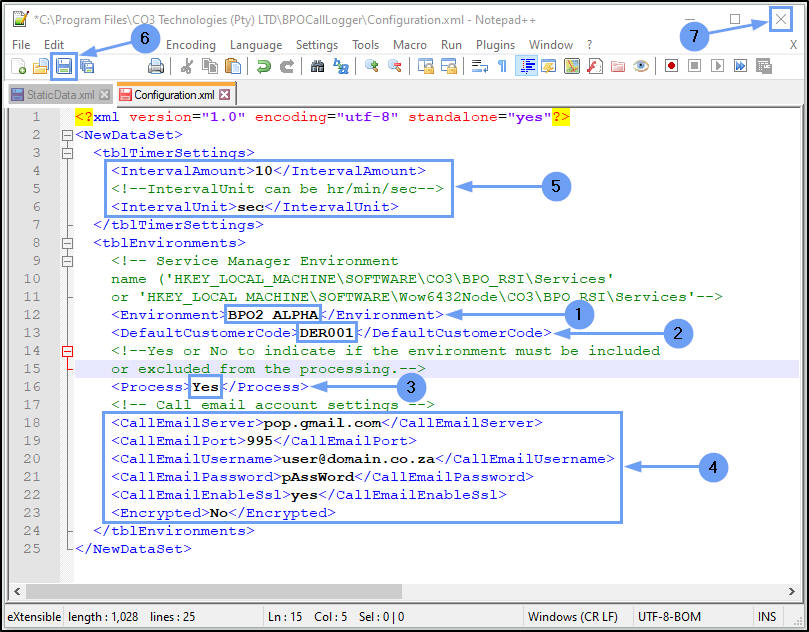
The xml file will open in Notepad++.
Type in the Environment, Database and Email Settings:
- Environment: Type in the environment name, as defined for this database, in the Service Manager.
- Default Customer Code: Type in the Default Customer Code details.
- Select Yes to Process the selected environment.
- The Email settings need to be configured:
- Call Email Server: Type in your company's Call Email Server details.
- Call Email Port: Type in your company's Call Email Port details.
- Call Email User Name: Type in your company's Call Email User Name details.
- Call Email Password: Type in your company's Call Email Password details
- Call Email EnableSsl: Type in Yes.
- Encrypted: Type in No.
Service Configuration
- Interval Amount Type in the time interval amount for this service to run e.g. 2, 10, 60.
- Interval Unit Type in the time unit the interval amount e.g. min (minutes), hrs (hours) day (days).
- In this example, the service will run once every 10 seconds.
- When you have finished editing this file, click on Save.
- Close Notepad++
Alias Configuration
- An ‘Aliases’ xml file will enable a set of ‘allowed’ phrases for the system to pick up which text in the email is related to Serials, Locations or Contracts.
Start Service
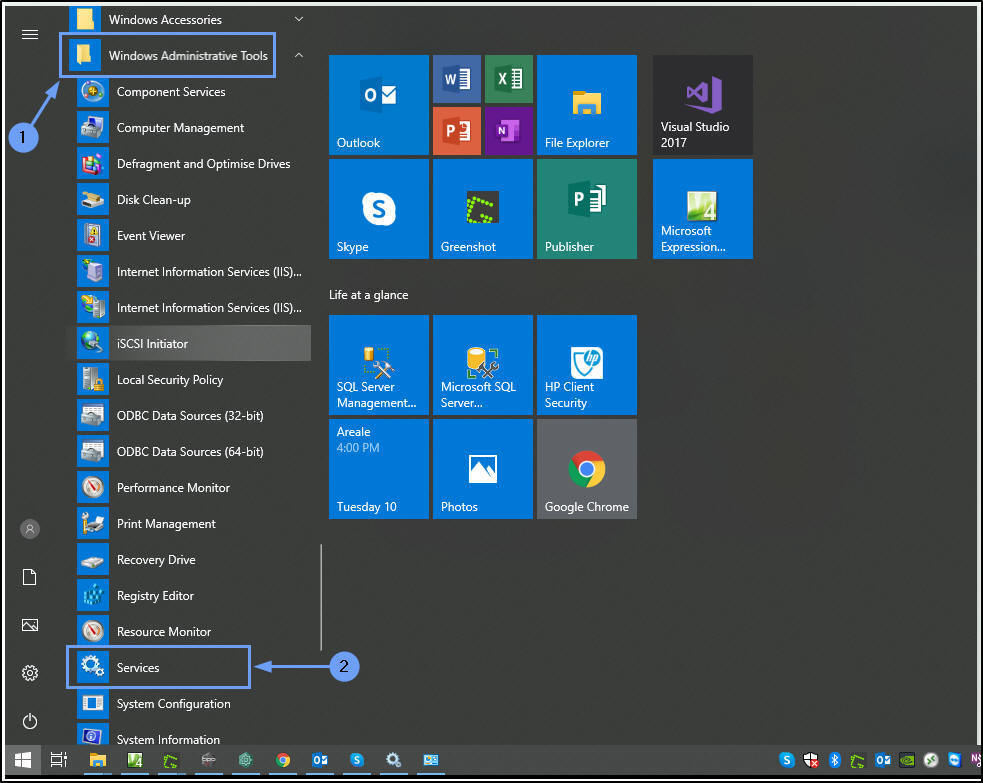
Once you have done the service configuration, you need to start the service from the Administrative Tools > Services screen in Windows.
- Select the Windows icon in your taskbar.

- Search for and single click on Windows Administrative Tools.
-
The Tools menu will expand.
- Search for and single click on Services.
- The Services screen will open.
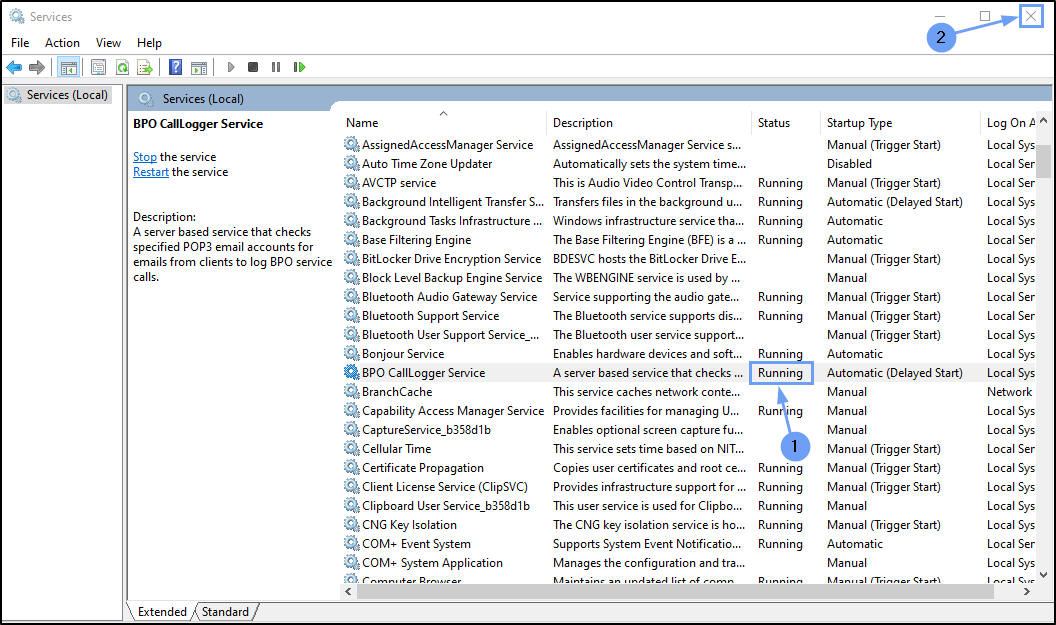
- Right click on BPO CallLogger Service.
- In the pop-up menu, click on Properties.
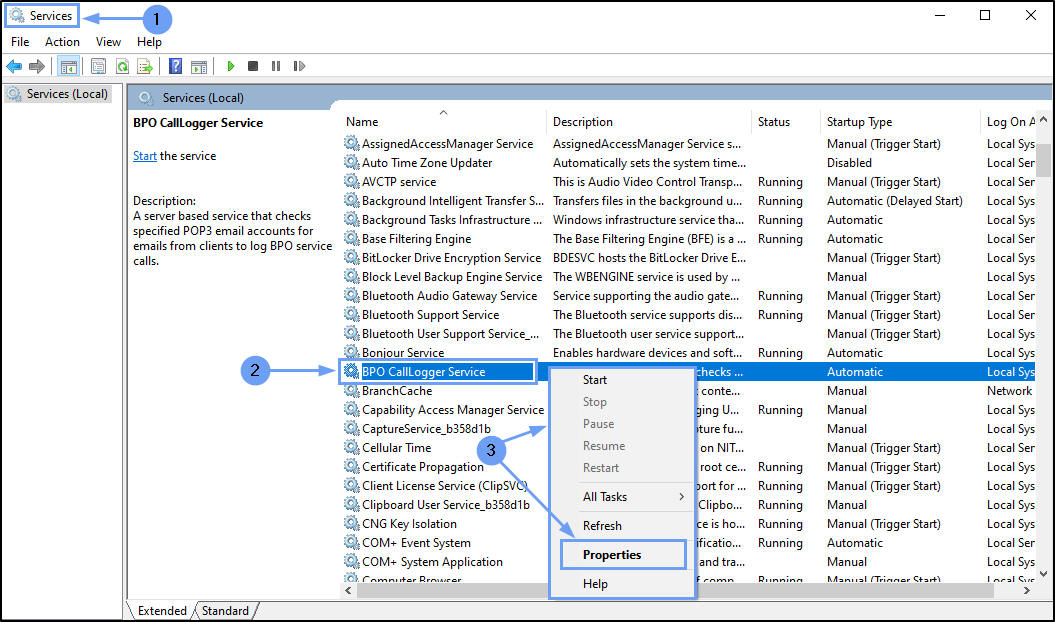
- The Properties screen will pop up.
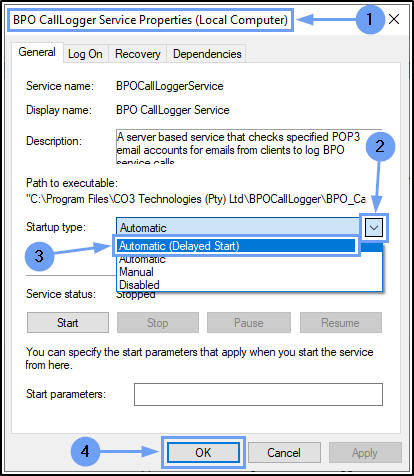
- Click on the drop-down arrow in the Startup Type field.
- Select Automatic (Delayed Start) from the menu.
- This setting will ensure the service is restarted if your server is restarted.
- Click on OK.
The Properties menu will disappear.
- In the Services screen, you will note that the service Startup Type has now changed to Automatic (Delayed Start).
- Right click on BPO Auto Close Call Service.
- In the pop up menu, click on Start.

- The service will now be Running.
- Close the Services screen.
CAP.005.001