Service
Calls - Add Expenses
If you cannot add expenses due the message 'No Items to select from' then expenses have not yet been set up. Refer to Expense Allocation and Setup.
| Ribbon Access: Service > Calls |

-
The Call Listing screen will be displayed.
- Select the site and status.
- In this image, Durban has been selected as the site and the status has been set to New.

- Click on the row selector in front of the call you wish to log expenses for.
- Click on Edit.

-
The Call maintenance screen: Call ref. - [ ] screen will be displayed.
- Click on the Work Orders tile.

-
The Work Orders for Call Ref [ ] screen will be displayed.
- Click on the row selector in front of the work order that you wish to log expenses for.
- Click on the Expenses tile.

- The Expense Claims for WO Code [ ] screen will be displayed.
- Click on Add.

-
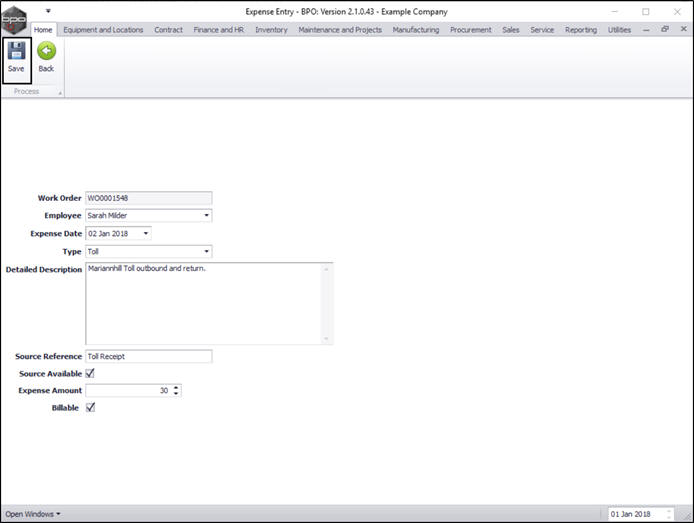
The Expense Entry screen will be displayed.
- Work Order: This will auto populate according to the work order initially selected.
- Employee: This will auto populate with the name of the person currently logged on to the system but you can click on the drop down arrow and select an alternative employee from the menu if required.
- Expense Date: This will default to the current date. You can either type in or click on the drop down arrow and use the calendar function to select an alternative date if required.
- Type: Click on the drop down arrow and select from the menu the type of expense.
- Detailed Description: Type in a description for the expenses.
- Source Reference: Type in the reference number of the receipt if applicable.
- Source Available: Select this checkbox if the receipt is available.
- Expense Amount: Type in or use the arrow indicators to select the total amount of the expense.
- Billable: Select this check box if the service is billable.
- Note: This will be set to billable by default, unless the expense is linked to the contract as an inclusion.

- When you have finished editing the Expense Entry screen, click on Save.
- You will return to the Expense Claims for WO Code [ ] screen.
- An Expense Processing message box will pop up informing you that;
- Expense Claim on WO: [ ] complete.
- Click on OK.

- You can now view the newly added expense claim in this screen.

MNU.122.015