We are currently updating our site; thank you for your patience.
Service
Calls - Add Labour Time
If the time booked is for the same day the technician was assigned, you can just click in front of the relevant technician in the 'Time' tab and 'Edit' the record.
If the time booked is for another day, use the 'Add Record' process as explained below.
| Ribbon Access: Service > Calls |

-
The Call Listing screen will be displayed.
- Select the site and status.
- In this image, Durban has been selected as the site and the status has been set to New.

- Click on the row selector in front of the call you wish to log labour time to.
- Click on Edit.

-
The Call maintenance screen: Call ref. - [ ] screen will be displayed.
- Click on the Work Orders tile.

-
The Work Orders for Call Ref [ ] screen will be displayed.
- Click on the row selector in front of the work order that you wish to log labour time to.
- Click on the Time tile.

-
The Time Bookings for WO Code [ ] screen will be displayed.
- Click on Add.

-
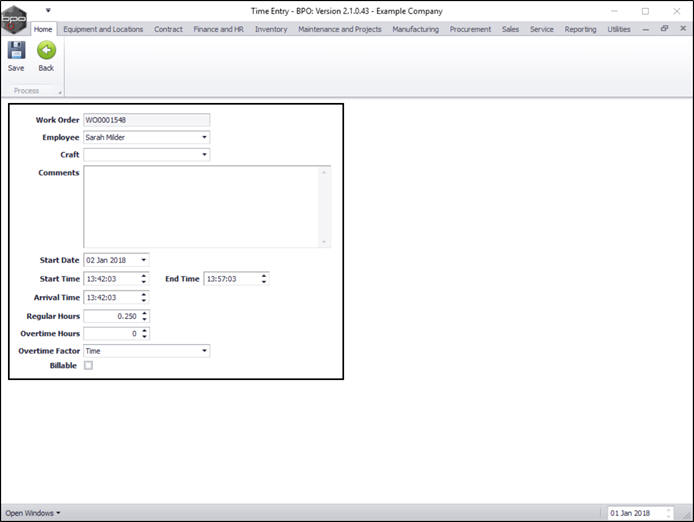
The Time Entry screen will be displayed.
- Work Order: This will auto populate according to the work order initially selected.
- Employee: This will auto populate with the name of the person currently logged on to the system but you can click on the drop-down arrow and select an alternative employee from the menu as required.
- Craft Name: Click on the drop-down arrow and select a craft from the menu. The menu will only have selections relating to the crafts of the employee selected above.
- Comments: Type in the work done for the hours logged.
- Start Date: This will default to the current date. Click on the drop-down arrow and use the calendar function to select an alternative date if required.
- Start Time, End Time and Arrival Time: These will all be set to 12:00 am by default, type in or use the arrow indicators to change to the correct times.
- Regular hours: If the Start and End Times are entered, the system will calculate this, otherwise, type in or use the arrow indicators to select the amount.
- Overtime Hours: Type in or use the arrow indicators to record any overtime hours.
- Overtime Factor: Click on the drop-down arrow, and select the overtime factor.
- Billable: Select this check box if the service is billable.
- Note: This will be set to billable by default, unless the service is linked to the contract as an inclusion.
- When you have finished editing the Time Entry screen, click on Save.

- You will return to the Time Bookings for WO Code [ ] screen.
- A Time Processing message box will pop up informing you that;
- Time Booking on WO: [ ] complete.
- Click on OK.

- You can now view the newly logged labour time in this screen.

MNU.122.014