Contract
Life Based / Prepaid Contract
This contract type is to be used where a set meter charge was paid ahead of contract creation, and meters are not billed until their usage limit / duration is reached.
Only meters are considered to be prepaid.
Fees continue to be billed based on the billing cycle.
Meters still appear in monthly usage for reading capture. This reading needs to be captured correctly, as the prepaid meter usage will determine whether the limit has been reached (regardless of meter resets).
When the duration / meter usage limit is about to be reached or is reached, an email is sent to the customer account manager. The customer account manager can review the contract if applicable.
Once the prepaid portion of the contract expires either by duration or usage, aggregate billing set up on the contract commences.
The Enforce Authorisation flag should always be selected.
Ribbon Select Contract > Contracts

The Contract Listing screen will be displayed.
Your employee user record should be linked to a default site. In this case, the site will auto populate with this default, otherwise the site must be manually selected.
Another site can be selected, if required, and if you have the security rights to access the site.
If All Sites displays here, then you do not have a default site configured on your user record, and need to select the required site.
Upon opening, this screen will default to the Active status, listing all the Active contracts for the selected site.

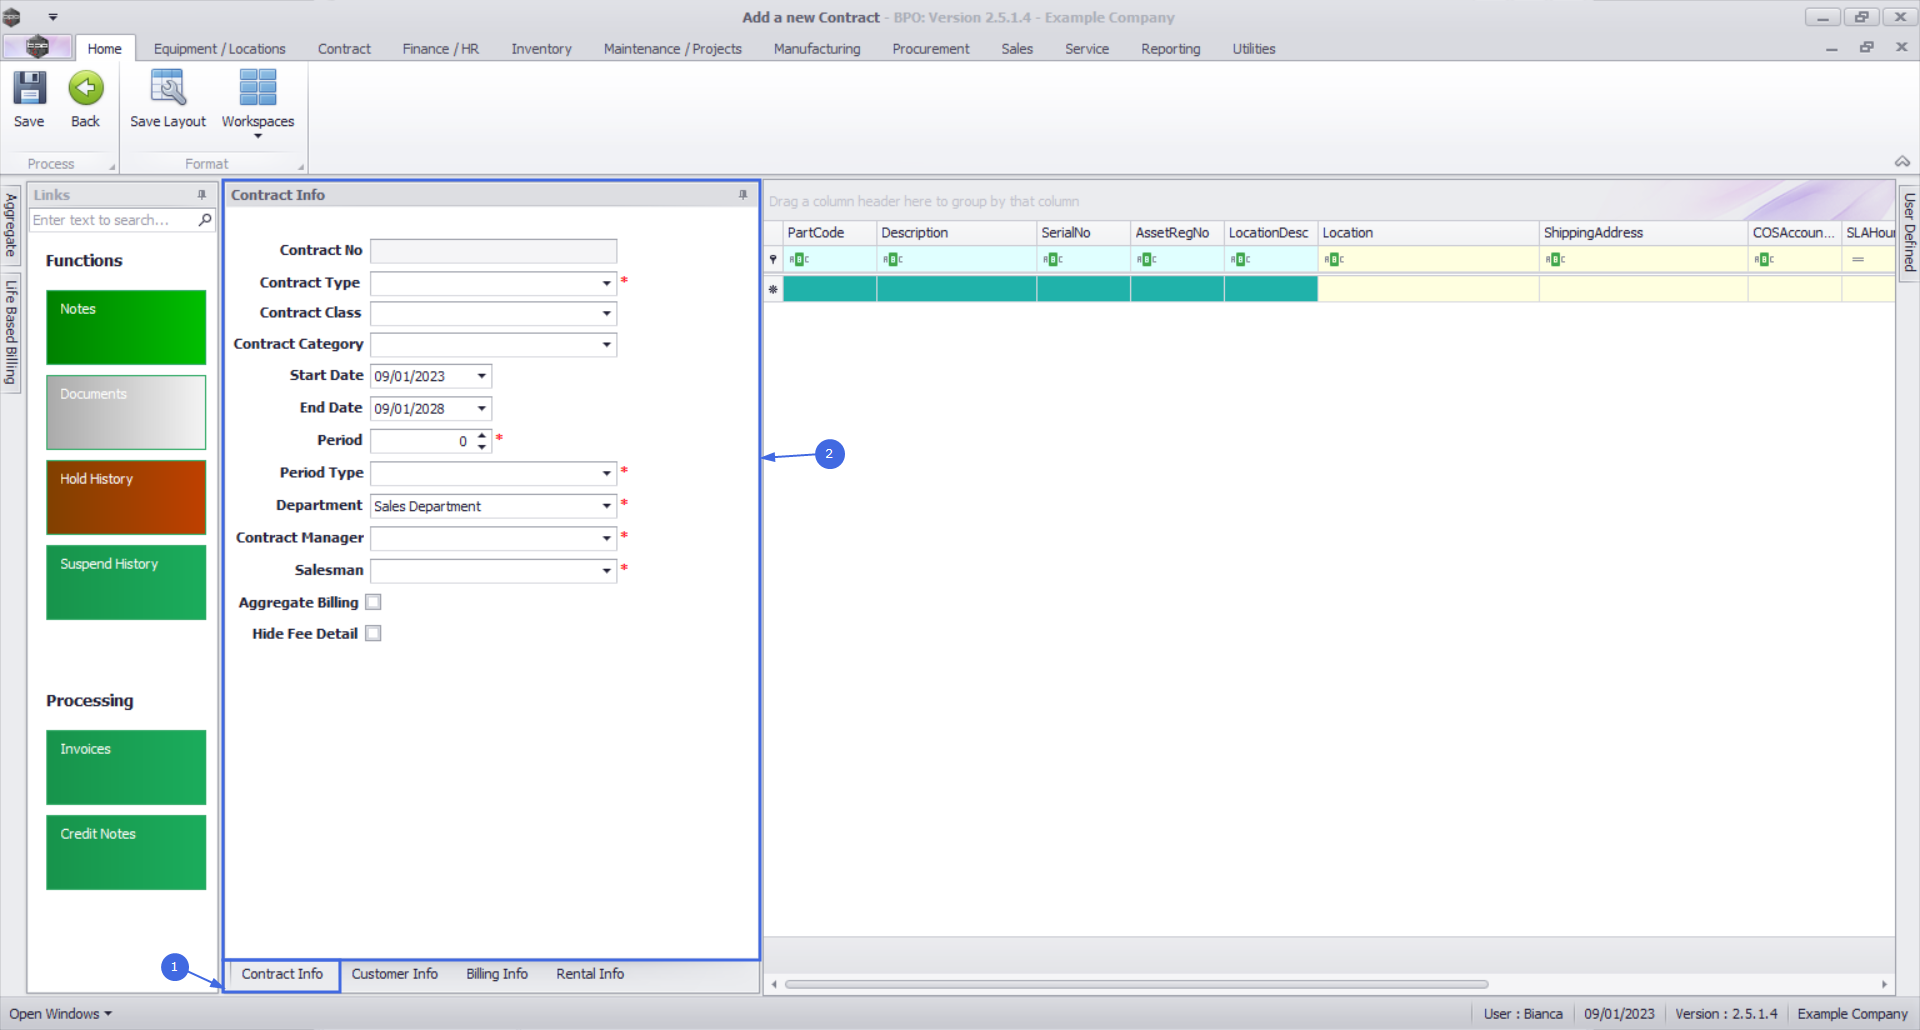
Contract Info Panel
Upon opening this screen, the Info panels are docked, with the Contract Info panel at the fore. If not, click on the Contract Info tab.
- Contract No:
- If this field is greyed out, then your system is configured to auto generate the contract number upon saving the contract. This is generated by the system (if the Auto Contract flag is selected in BPO Configurator).
- Contract Type
 User defined field to define the type of contract, which is selected when setting up the Contract Type configuration, and in turn, selected when creating a new contract. Defaults configured on the Contract Type configuration will pull through to the contract, such as contract duration, selectable fee types, invoice numbering, etc.: Click on the drop-down arrow and select the Contract Type, e.g. Cost per Copy.
- For Prepaid Contracts:
- This is used when creating a Prepaid / Life Based contract.
- Before you select the Contract Type, you will note that the Life Based Billing tab is currently docked on the left side of the screen.
- In the Contract Type field, Prepaid Contract must be selected from the drop-down menu.
- After selecting the Prepaid Contract option, the Life Based Billing tab will move to the bottom of the screen.
- Contract Class Additional user defined fields to classify the contract, which is viewable in the Period and Ad-hoc Escalation screens.: Click on the drop-down arrow and select the Contract Class
- Contract Category Additional user defined fields to categorise the contract, which is viewable in the Period and Ad-hoc Escalation screens.: Click on the drop-down arrow and select the Contract Category
- Start Date: This will auto populate with the current date, but you can click on the drop-down arrow and use the calendar function to select an alternative date.
- End Date: This will auto populate 5 years from the start date, but you can click on the drop-down arrow and use the calendar function to select an alternative end date if required.
- Note: If this is an evergreen contract, set your end date to 31/12/2999
- Period: This will auto populate when the Contract Type is selected but you can either type in or use the arrow indicators to select an alternative period (life span of the contract).
- Period Type: This will auto populate when the Contract Type is selected but you can click on the drop-down arrow and select an alternative period type (measure relating to the lifespan), e.g. months.
- Department: Click on the drop-down arrow and select the department.
- Contract Manager: Click on the drop-down arrow and select the contract manager.
- Salesman: Click on the drop-down arrow and select the salesman.
- Aggregate Billing: Click on this check box if the customer will receive aggregate billing.
- For Aggregate Billing Contracts:
- This is used when creating an Aggregate contract or Prepaid / Life Based contract.
- Note that the Aggregate tab is currently docked on the left side of the screen.
- Select the Aggregate Billing check box.
- The Aggregate tab will move to the bottom of the screen.
- Hide Fee Detail: Select this option if you don't want to show individual contract invoice fee amounts on the customer invoice.
Customer Info Panel
- When you have finished editing the contract info details, click on the Customer Info tab.

The Customer Info panel will move to the fore.
- Customer: Click on the search button and select the customer from the Select a customer for this contract pop up screen.
- Address: This will auto populate when the Customer is selected but you can click on the search button and select an alternative address from the Select an address for this contract pop up screen.
- Order No: Type in the customer order number if required.
- Required: Only select this check box if the client must supply an order number before a technician is sent to site.
- Location: Click on the drop-down arrow and select the contract location from the menu.
Billing Info Panel
- When you have finished editing the contract info details, click on the Billing Info tab.
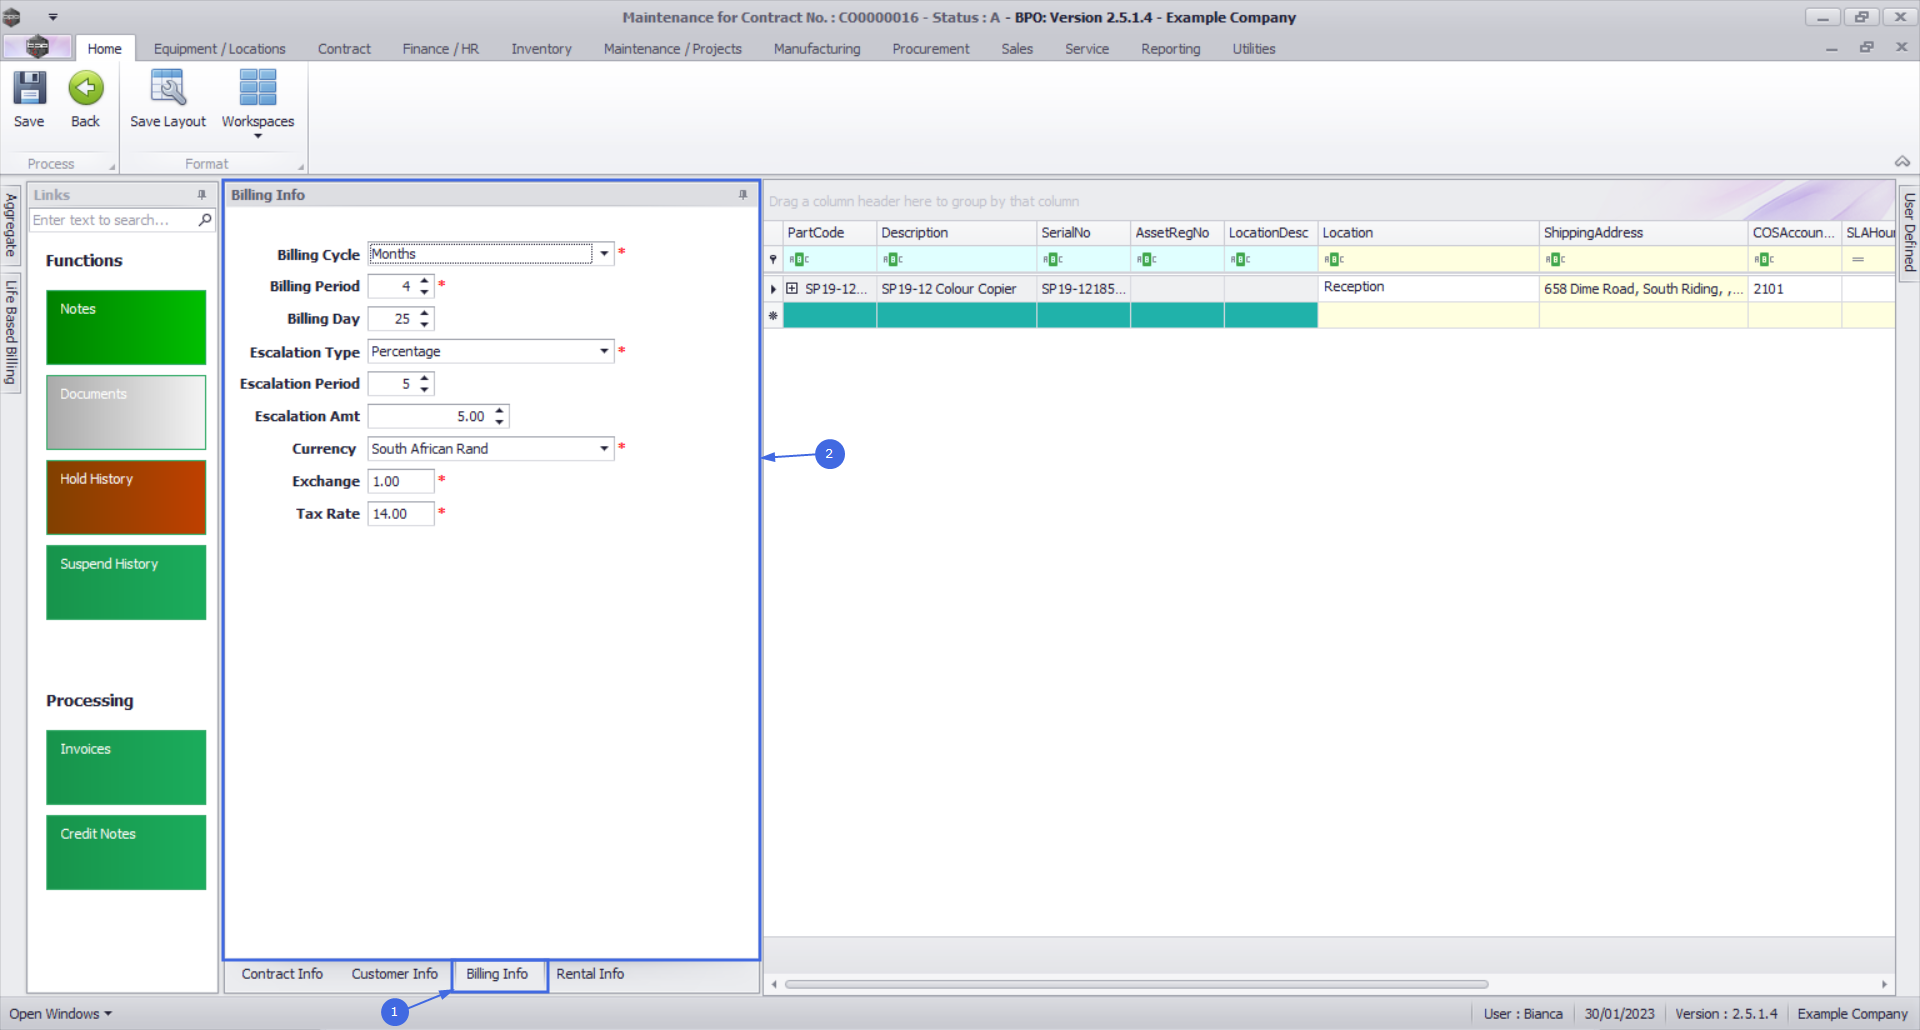
The Billing Info panel will move to the fore.
- Note: Most of these details will auto populate but they can be changed, as explained below.
- Billing Cycle: Click on the drop-down arrow and select the billing cycle (billing frequency, e.g. monthly).
- Billing Period: This is the period when the contract will be billed for the first time. Type in or use the arrow indicators to select the period number.
- Note: The Billing Period relates to the financial period of the company e.g. if the company's financial year ends on 31 December and a contract is to be billed in February, the Billing Period would be 2.
- Billing Day: The Billing Day can be used if you are billing different contracts on different days or can be used as a filter in the Contract Billing screen. The Billing Day is limited to 31. Type in the day that the customer will be billed (e.g. on the 25th of each billing cycle) otherwise leave as 0.
- Escalation Type: Search for and select an escalation type (usually percentage is used).
- Escalation Amount: Type in the escalation amount, depending on the escalation type selected (e.g. 10 if the escalation should be 10%).
- Escalation Period: Type in the financial month at which the system should escalate the contract.
- Note: The Escalation Period relates to the financial period of the company e.g. if the company's financial year ends on 31 December and a contract is to be escalated in March, the Escalation Period would be 3. If the escalation is on the anniversary of the contract, then use the same financial period as the billing period.
- Currency: The system will auto populate with the currency already set up on the customer, but you can click on the drop-down arrow and select an alternative currency if required.
- Note: For foreign currency contracts, all fee and meters charges must be set up in the currency selected e.g. type in the Dollar amount if the currency is USD.
- Exchange: The system will auto populate with the exchange rate set up in the system, but you can type in an alternative exchange rate.
- Tax Rate: The system will auto populate with the tax rate set up in the system, but you can type in an alternative tax rate.
Contract Items Frame
- Right click anywhere in the row of the Contract Items frame.

- A Process menu will pop up.
- From this menu, you can:
- Add a new machine item
- Add a new location item
- Delete a contract item

Add New Machine Item
Where you have a serialised item that requires maintenance or service, the item can be linked to the contract.
- Click on Machine - Add New Machine Item.

- The Select a new item pop up screen will appear, listing all customer assets sold to or created against this customer; or rental assets issued to this customer.
- Select the row of the item that you wish to link to this contract.
- Click on Ok.

- The following columns will auto populate according to your item selection:
- Part Code
- Description
- Category Description
- Model No if configured on the asset's part code
- Serial No
- Asset Register No if configured on the asset
Note: The LocationDesc column will not be populated as this is a Machine (asset) Contract item and not a Location Contract Item.

Add New Location Item
Instead of linking a serialised item, you have the ability to link a location to the contract. This can be used where a room or building requires maintenance or service.
- Click on Machine - Add New Machine Item.

- The Select a new item pop up screen will appear, listing all customer locations.
- Select the row of the item that you wish to link to this contract.
- Click on Ok.

- The following columns will auto populate according to your item selection:
- LocationDesc
- Description
- Category Description
- Model No if configured on the asset's part code
- Serial No
- Asset Register No if configured on the asset
Note: The PartCode, Description, Category Description, Model No, Serial Number, and Asset Register No columns will not be populated as this is a Location Contract item and not a Machine (asset) Contract Item.

Contract Item Main Details
Whether you are linking a Machine or Location, the following item details should be configured.
Link Location
This is the location of the contract item, e.g. Reception, used to assist the technician with finding the item on site.
- Click in the Location text box.
- Type in a Location for this item.

Link Shipping Address
This is the physical address where the contract item is.
A new company config flag (AutoUpdateShippingAddress) is available in BPO2 v2.5.0.8 (or higher) to control automated shipping address updates in BPO2 between contract items and equipment shipping addresses/ functional location shipping address and ensures the shipping address correlates to contract items shipping address. When you update the shipping address on a contract the shipping address will reflect on the asset or functional location. If the user updates the asset or functional location’s shipping address, the shipping address will reflect on the contract item.
- Click in the Shipping Address text box.
- An ellipsis button will be revealed.
- Click on this button to display the Select a shipping address pop up screen.
- Select the rowof the shipping address that you wish to link to this item.
- Click on Ok.

- Scroll right to view the remaining columns in the Items frame.
Link COS Account Code
- Click in the COS Account Code text box.
- Type in the Cost of Sales account code to be used for WIP (Work In Progress) transaction postings (non-billable toner and spare parts issued as contract included items).

Link SLA Hours
- Click in the SLA Hours text box.
- Type in or use the arrow indicators to select the required call response time (in hours) if applicable.
- Note 1: If this is set up, SLA will apply every time a call is logged against the contract / contract item. SLA will be calculated based on the shift pattern (customer's trading hours) e.g. if the trading hours are from 8am - 5pm and a call is logged at 4pm, SLA will start calculating at 4pm and stop at 5pm and resume the following day at 8am.
- Note 2: For SLA to work, the shift must be set up in BPO Configurator and linked to the customer.
- Note 3: The SLA Monitoring Service must be installed, configured and running to fully utilise this functionality.

Link Travel Radius and Travel Charge
If you need to ensure travel is charged each time a call is raised for the contract item, set up a Travel Radius (distance) and Travel Charge Rate (per km). Also see Travel Radii.
- Click in the Travel Radius text box.
- Type in or use the arrow indicators to select the distance in km to and from the client, if this travel is to be billed every time a call is logged. If travel is included, then set this to 0.
- Note: Travel can always be billed separately, if required.
- Click in the Travel Charge Rate text box.
- Type in or use the arrow indicators to select the travel charge rate (e.g. Rand per kilometre).
- Note: If you input a non-zero value, each time a call is logged against the contract item and the technician travels outside the specified Travel Radius, the Travel Charge Rate will be applied. You will not be able to close the call until the travel charges incurred are invoiced.

- The Is Extra flag is to indicate whether the item is an accessory to the main item on contract.
- The Status field is static and there to show you the that the item is active.
Contract Item Additional Details
Whether you are linking a Machine or Location, the following item details should be configured, where applicable.

- Here you can click on four different tabs to add or edit:
- Item Fees: periodic charges e.g. monthly
- Item Meters: meter usage charges
- Item Inclusions: non billable items that are included in the contract
- Item Contacts: the contact person - per machine.
Part Items Frame
- Click on the expand button in the row of a Part that you have linked to the contract.

The Item frames will be expanded. Here you can add details of the:
- Fees
- Meters
- Inclusions and
- Contacts linked to the selected contract item.

Add Contract Fees
- The Item Fees tab is selected by default.
- If the contract has fees, set up the fees in this frame by following the steps outlined in the item fees topic if the fees are non-aggregate or aggregate fees set up topic if the fees are aggregate.

Add Contract Meters
Aggregate Meters Set Up
- For prepaid billing to work, aggregate billing should be set up first on meters that will be included in prepaid billing.
- This is important because once the prepaid portion of the contract expires, the contract switches to aggregate billing.
- Only meters that will be included in prepaid billing should be set up as aggregate.
Item Meters Frame
- Click on the Item Meters tab.

The Item Meters frame will be displayed.
- Note 1: If there are no meters currently linked to the contract item, you can complete setting up the contract and link the meters and meter charges afterwards by following these 2 steps:
- Note 2: To avoid linking up meters to items every time you want to add items on a contract, link meters to the part codes of the items. This way, when new items are received / adjusted into stores, they will already have meters linked to them. This will not apply to items that are already in stores prior to this step.

-
In the Item Meters frame, only populate the following fields for the meters that need to be aggregate:
- Marked: Select the item meters that need to be aggregate in the Item Meters frame e.g., if the Mono meter is aggregate, select the Mono meter on all contract items.
- Start Reading: Type in the start reading of the meter.
- Reading Date: Click in this text box to display the calendar function, use this to select the reading date.
Aggregate Billing Panel
This is used when creating an Aggregate contract or Prepaid / Life Based contract.
- Note that the Aggregate tab is currently docked on the left side of the screen.
- Select the Aggregate Billing check box.
- The Aggregate tab will move to the bottom of the screen.
Aggregate Meters Frame
- Click on the Aggregate tab if this tab is currently closed.

- The Aggregate frame will expand and is divided into the following sections:
- Fees section
- Meters section

- Go to the Aggregate Meters section.

Populate the following fields:
- Marked: Select the same meter type, as you selected in the Item Meters frame.
- In this image the Mono meter has been selected.

- Min Billing: Type in the minimum billing amount.
- In this case, minimum billing is global per meter type. This means a fixed price is charged on the sum of all copies made (from 0 up to and including the Minimum Quantity) per meter type on all contract items included in prepaid billing.
- For example - in this image, a minimum billing fee of R1000 for a minimum quantity of 1000 copies on a mono meter means R1000 will be charged if the sum of mono meter copies made on serial numbers - 2020-559900 and 2020-00024 is any value from 0 up to and including 1000.
- If no minimum billing should be applied, leave the MinBilling and MinQuantity fields as 0.
- For a more detailed explanation, read the important note on Minimum Billing and Meter Charge Setup.
- Min Quantity: Type in the minimum quantity (the copies that are included in the minimum billing amount).
- Account Code: Type in the sales account code for these meter charges to post to.
- COS Account Code: Type in the cost of sale account code where this fee should be posted to.

- Escalation Period, Escalation Type and Escalation Amount: These will auto populate. Click in the text boxes, and amend the details if required.

Scroll right until you can view the remaining columns in this frame.
- Customer Code and Customer Name:
- Only populate these 2 fields if another party (a separate billing customer) is going to pay the for the charges on behalf of the customer.
- If these fields are left blank, BPO will bill the customer linked to the contract.
- Note 1:BPO only supports different billing customers on an aggregate / prepaid contract from v2.3.0.4.
- Note 2: Follow the next 4 screenshots only if you wish to link another party as the billing customer.

- Customer Code:
- Click in the Customer Code text box.

- An Ellipsis button will be revealed.
- Click on this button to display the Select a billing customer pop up screen.

- Select the rowof the Billing customer that you wish to link to this contract.
- Click on Ok.

- Customer Name: Once you have selected the customer code, the customer name will auto populate with the customer name linked to that code on the system.

- Supplier Code, Supplier Name and Finance Amount: These fields should only be populated if there is a Back to Back Deal with a third party who is set up in BPO as a Supplier.
Follow the next 5 screenshots only if you wish to link a supplier here.

- Supplier Code:
- Click on the Supplier Code text box to reveal an Ellipsis button.
- Click on this button to display the Select a finance party pop up screen.

- Select the row selector of the Supplier that you wish to link to this item meter.
- Click on Ok.

- Supplier Name: This will auto populate once the supplier code has been selected.

- Finance Amount: Click in this text box and either type in or use the arrow indicators to select the finance amount.

- Order No: Type in a customer order number relevant to this item, if required.
- Is Active: This field is set to Yes (Active) once you have clicked on the Marked checkbox.
- Amend Date: This field cannot be edited.

Add Meter Levels
- Scroll left to return to the Marked column.
- Right click in the row of the item you wish to add a meter level to. The item should be active (marked).
- In this image the Mono meter has been selected.
- A Process menu will pop up.
- Click on Add - Add a level.

- Add Meter Levels -
For a Meter with Minimum Billing
- The Aggregate Charges frame will be expanded.
- For this mono meter, there is a minimum billing set up of a R1000 charge for the first combined 1000 copies (Minimum Quantity) made on all contract items included in aggregate billing. BPO calculates the usage charges by first calculating the minimum billing set up.
- In this example, it means in BPO, a fixed charge of R1000 will be charged for any number of mono copies made across all machines (total usage) included in aggregate billing from 0 up to and including 1000, thereafter a unit charge per copy will be applied ie from 1001.
- From Quantity: This is the number from which the unit charge will be effective.
- The first row in the Meter Charges matrix, is static at 0. This means if there is minimum billing set up on the meter, the first row looks incorrect as the From Quantity field is static at 0.
- If there is minimum billing set up on the meter, BPO does not read the From Quantity in the first row as 0 (although it displays as 0) but starts counting from (Minimum Quantity + 1). In this case, since (minimum billing level) is up to and including 1000, BPO will start counting from 1001.
- For a more detailed explanation, read this important note on Minimum Billing and Meter Charge Setup.
- Unit Charge: Type in the unit charge for the meter (charge per copy when Minimum Quantity is exceeded).
- Finance Amount: This should only be populated if there is a Back to Back Deal with a third party who is set up on BPO as a Supplier.
- Amend Date: This is field cannot be edited.

- You can add additional charge levels.
Add Meter Levels - Meter with no Minimum Billing
- The Aggregate Charges frame will be expanded.
- Note: The Colour meter will be used as an example.
- There is no minimum billing set up on this meter. This means the usage calculation will only be based on what is set up in the Aggregate Charges matrix.
- From Quantity: This is the number from which the unit charge will be effective.
- The first row in the Meter Charges matrix, is static at 0.
- For a more detailed explanation, read this important note on Minimum Billing and Meter Charge Setup.
- Unit Charge: Type in the unit charge for the meter (charge per copy).
- Finance Amount: This should only be populated if there is a Back to Back Deal with a third party who is set up on BPO as a Supplier.
- Amend Date: This is field cannot be edited.

- You can add additional charge levels.
Additional Charge Level
- Right click anywhere in the row of the item that you wish to add another meter level to. (You can do this whilst the aggregate charges matrix is open / closed).
- Note: The Mono meter will be used as an example.
- The Process menu will pop up again.
- Click on Add - Add a level.

- A second level has now been added to the Aggregate Charges matrix.
- From Quantity: Type in or use the arrow indicators to select the number of copies from which this charge will be effective.
- Unit Charge: Type in or use the arrow indicators to select the unit charge for this additional meter (charge per copy). This charge will usually increase with each new level.
- Finance Amount: This should only be populated if there is a Back to Back Deal with a third party who is set up on BPO as a Supplier.
- Amend Date: This is field cannot be edited.
- Repeat this process to add more meter charges as required.

- When you have finished working in the Aggregate Charges frame, click on the Hide button to close the frame.

Life Based Billing Panel
- Before you select the Contract Type, you will note that the Life Based Billing tab is currently docked on the left side of the screen.
- In the Contract Type field, Prepaid Contract must be selected from the drop-down menu.
- After selecting the Prepaid Contract option, the Life Based Billing tab will move to the bottom of the screen.
Prepaid Meters Setup
- Click on the Life Based Billing tab.

- The Life Based Billing frame will be expanded.
- This is where the prepaid meter usage limit and duration are set.

- Marked: Click on the check box in front of the meter type(s) which should be included in prepaid billing.
- In this image the Mono and Colour meters have been selected.
- Note 1: Select the same meter type(s) as you selected in the Aggregate Frame.
- Note 2: On a contract item with different meter types e.g., mono and colour meters, its possible to have only one meter type on prepaid billing (e.g., mono meter) while the other meter type (e.g., colour meter) is on standard billing.

- The expiry of the prepaid portion of the contract is determined either by duration or usage (whichever comes first).
- The Start and End Date determines the duration of the prepaid portion of the contract. If the duration lapses first before the included usage is exceeded, the prepaid portion for that meter type expires.
- The Included Usage is the total usage per meter type included in the prepaid portion of the contract. If this value is exceeded first before the duration lapses, the prepaid portion for that meter type expires.
- Start Date: Click on the drop-down arrow and use the calendar function to select the correct start date of the prepaid portion of the contract for the selected meter type.
- Note 1: The Start Date for different meter types on the same contract does not necessarily have to be the same.
- Note 2: The Start Date does not necessarily have to be the same with the Reading Date in the Items Frame.
- End Date: Click on the drop-down arrow and use the calendar function to select the correct end date of the prepaid portion of the contract for the selected meter type.
- Note: The End Date for different meter types on the same contract does not necessarily have to be the same.
- Included Usage: Type in the total usage included in the prepaid portion of the contract for the selected meter type.
- Note: The Included Usage for different meter types on the same contract does not necessarily have to be the same.
- Rebate Charges: Type in the salesman's commission if applicable. This does not affect billing in any way.

- Scroll right to view the remaining columns.
- Free Of Charges: This will be selected by default. This should always be selected for meters included in prepaid billing.
- Status: This is a static field and defaults as A - Active.

Save the Contract
- When you are done, click on Save.

- The contract will be saved and you will return to the Contract Listing screen where the status defaults to Active, or will be set to the Status you last selected.
- Click on the drop-down arrow in the Status field and select the relevant status.

- New contracts can be found within the New contract status listing screen.
- From here, the contract will need to be Released and then Approved before it becomes active.
- Edited contracts may either remain in Active status or move to Released status in order for changes to be reviewed before Approval depending on the change made.
Important Notes
- When the duration / meter usage limit is about to be reached or is reached, based on billing run meter reading captures, an email is sent to the customer account manager via the BPO Prepaid Contract Manager console application. The customer account manager can review the contract if applicable.
- Once the prepaid portion of the contract expires, the prepaid meter(s) will be unticked automatically

- and aggregate billing will commence.

- Once the prepaid portion of the contract expires, the customer contract manager must change the Contract Type from
- Prepaid

- to the applicable Contract Type
- Note: In this image, the Contract Type was changed to Cost per Copy.
- so that the contract will no longer be monitored.

MNU.112.057