Maintenance
Work Requests - Add a Work Request
Work requests are instructions for work to be done, which can then be checked by a technical / service manager and approved or rejected as required.
| Ribbon Access: Maintenance / Projects > Work Requests |
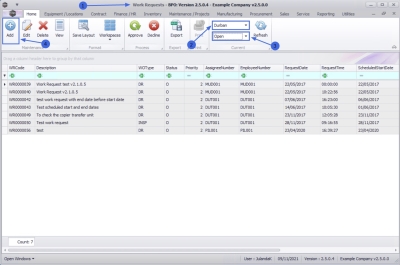
- The Work Requests listing screen will be displayed.
- Select the Site where you would like to create the work request.
- The example has Durban selected.
- You can add a work request in any Status.
- The example has Open selected.
-
Click on Add.
 Short cut key: Right click to display the All groups menu list. Click on Add.
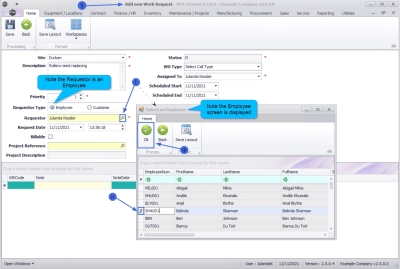
- The Add new Work Request screen will be displayed.
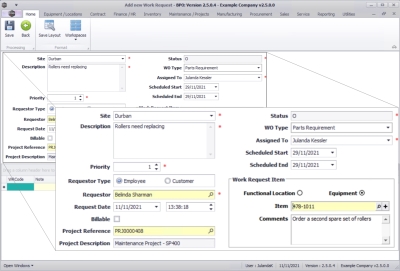
Work Request Details
- Site: This will be auto populated with the site selected in the Work Request screen but you can click on the drop-down arrow and select an alternative site if required.
- Description: Click in the text box to type in the description for the work that needs to be done.
- Priority: Set the priority level for the task.
- Requestor Type: This option will have the Employee radio button selected by default. Click on the Customer radio button if the customer has requested this work.
- To change the requestor, click on the search button to display the Select an Employee or Select a Customer screen.
 Note that the screen displayed will depend on the option you have selected as the Requester Type.
 - Click on the row of the employee name or customer name, that is requesting the task.
- Click on OK.
- Requestor: This field will populate with the name of the employee currently logged on to the system.
- Request Date and Time:
These fields will auto populate with the current date and time.
- Date:
Type in or click on the down arrow to use the calendar function to select an alternative date, if required.
- Time: Type in or use the directional arrows to adjust the time, if required.
- Billable: If this work request will be billable when the work request is converted to a work order, ensure to click in the check box to select.
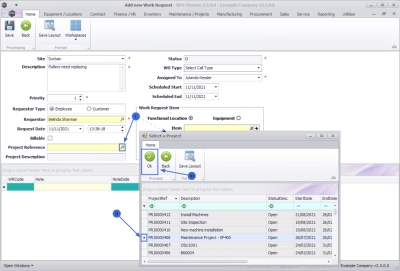
- Project Reference: If the work request is part of a project;
- Click on the search button to display the Select a Project screen.
- Click on the row of the relevant project reference number.
- Click on OK.
- Project Description: This field will populate with the description of the project selected.
- Status: The status for the work request will be O - Open by default when it is created and cannot be changed on this screen.
- Work Order Type: Click on the down arrow to select the work order type applicable from the drop-down list.
- Assigned To: Click on the down arrow to select the person responsible for this work request, from the drop-down list.
- Scheduled Start: This field will display the current date. Type in or click on the down arrow to use the calendar function to select an alternative start date, if required.
- Scheduled End: This field will display the current date. Type in or click on the down arrow to use the calendar function to select an alternative end date, if required.
Work Request Item
- Functional Location / Equipment:
Click on the radio button of the item that is affected by this work request and requires the work.
- In this example, the rollers need replacing, therefore this is an Equipment item.
- Item:
Click on the search button to select the item linked to the this work request.
 Note that the screen displayed will depend on the option you have selected as Functional Location or Equipment.
- Comments: Type in a comment regarding this work request item, if required.
Note Items
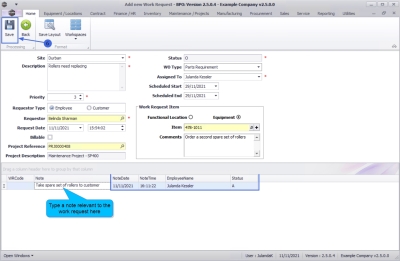
![]() Click in any of the edible fields to activate the first note item row.
Click in any of the edible fields to activate the first note item row.
- Note Date: This field will display the current date.
- Note Time: This will auto populate with the current time.
- Employee Name: This will auto populate with the person currently logged on to the system.
- Status: This will auto populate with A - Active.
- Note: In this text box, type in a note relevant to this work request, if required.
- When you have finished adding the new work request details, click on Save.
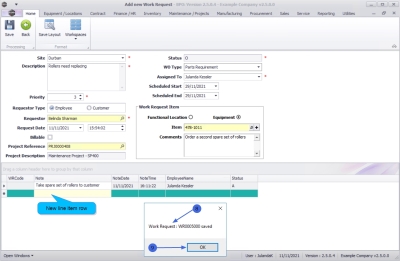
- A line item row will be added to the Notes area.
- When you receive the message to confirm that;
- Work Request: WR[work request number] saved.
- Click on OK.
-
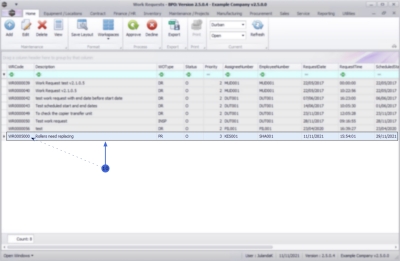
You will return to the Work Requests listing screen where you can now view the newly raised work request.
 Note that the work request code was issued by the system.
MNU.002.001

