Sales
Orders - Add Sales Order
You will encounter a Customer and a Billing Customer on both the Sales Order and the Sales Invoice.
![]() Customer (Main Customer) - is the client who is ordering the parts / services.
Customer (Main Customer) - is the client who is ordering the parts / services.
![]() Billing Customer - is the client / finance party who will be paying for the parts / services.
Billing Customer - is the client / finance party who will be paying for the parts / services.
| Ribbon Access: Sales > Orders |

- The Sales Orders listing screen will be displayed.
- Select the Site where you need to create an order.
- The example has Durban selected.
-
An Order can be Created from any Status.
- The example has New Order selected.
- Click on Add.
![]() Short cut key: Right click to display the All groups menu list. Click on Add.
Short cut key: Right click to display the All groups menu list. Click on Add.

Sales Order Header
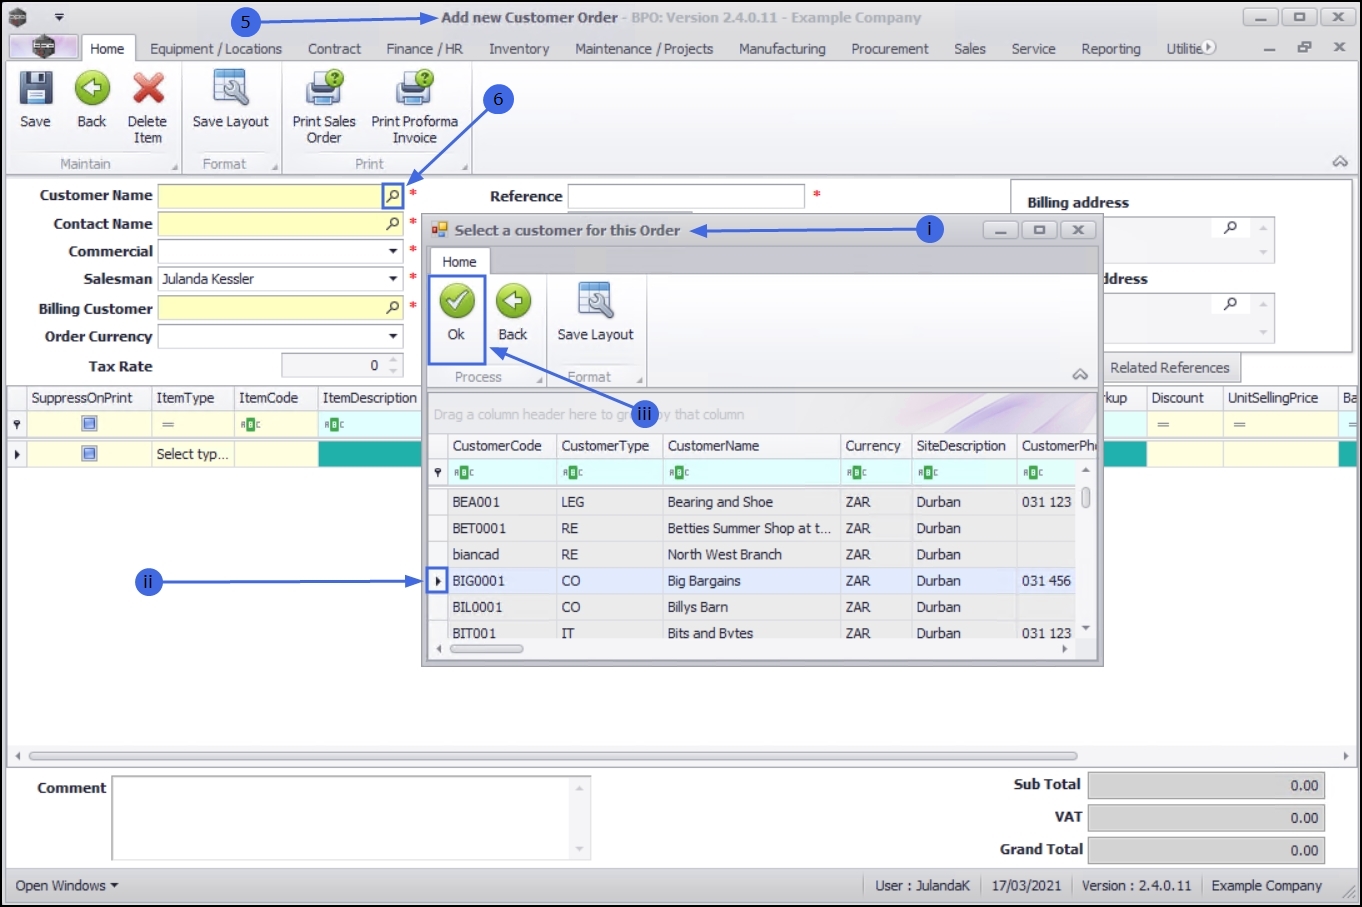
- Customer Name:
Click on the search button to select the customer.
- The Select a customer for this Order screen will display.
- Select the row of the customer you are placing the order for.
- Click on OK.
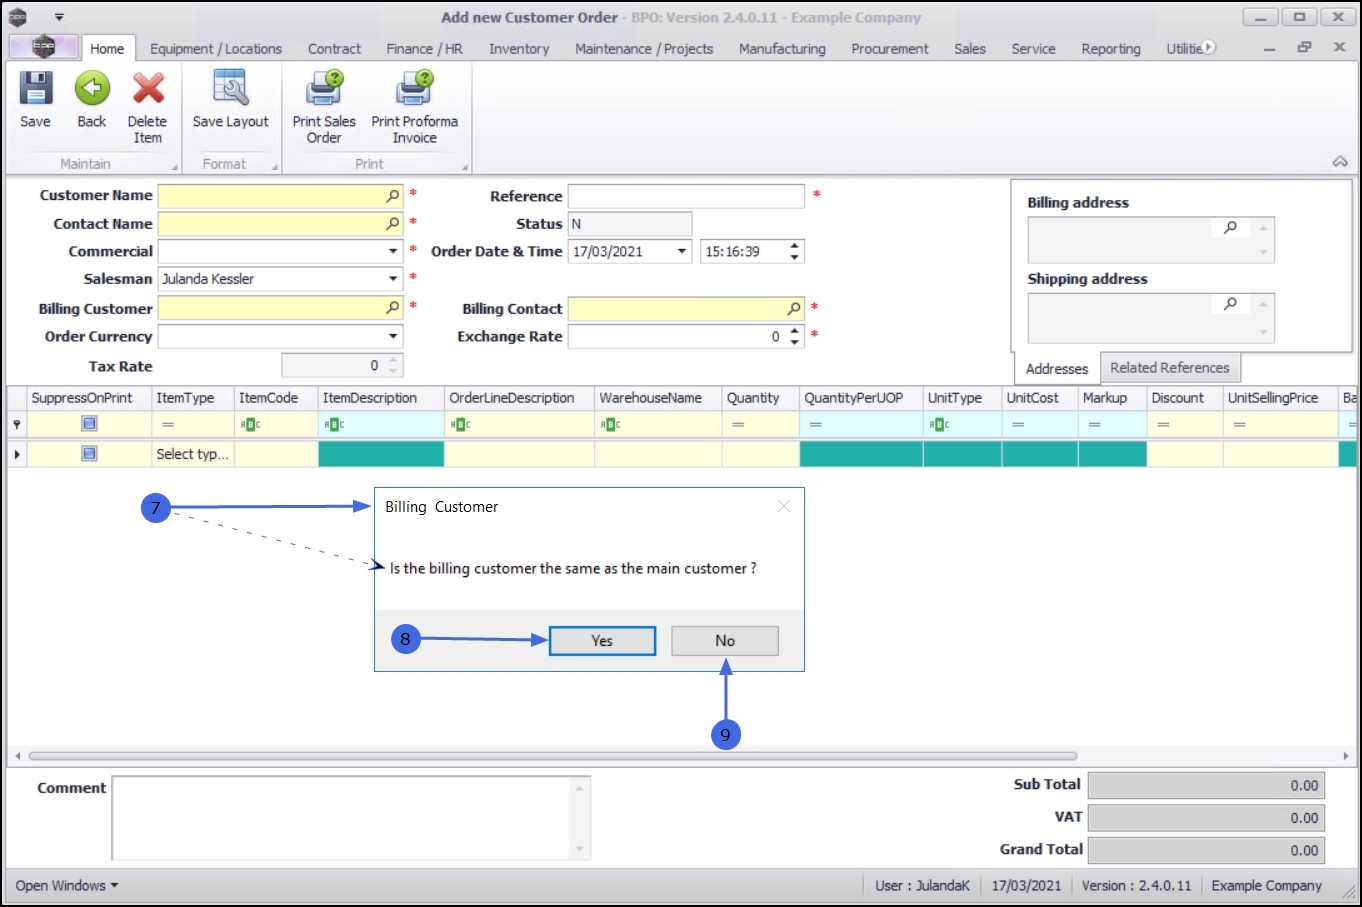
- When you receive the Billing Customer message to confirm;
-
Is the billing customer the same as the main customer?
- The Main Customer refers to where the items are being shipped.
- The Billing Customer refers to the Account Holder who will pay for the goods/services.
-
Is the billing customer the same as the main customer?
- Click Yes if the Billing Customer is the same as the Main Customer or
- Click No if the Billing Customer is different to the Main Customer.
- Contact Name: Click on the search button to select the contact name using the steps as explained above.
- Commercial:
This is the default commercial
 Commercial is the mark up structure for the item. The original price of the item, including the company profit margin configured for the customer. A different commercial can be selected by clicking on the down arrow, if required.
 - Salesman: This field will auto populate with the person currently logged in to the system. Click on the down arrow to select an alternative salesman from the list, if required.
- Billing Customer: This field will already be populated if the Customer is the same as and Billing Customer. If not, click on the search button to select the customer who will be paying for this invoice.
- Reference: Type in a reference for the sales order.
- Status: The status field will display [N] for New by default.
- Order Date and Time: The current date and time that the order has been placed, will display.
- The date can be changed by clicking on the down arrow to change the date using the Calendar function, if required.
- Click on the arrow indicators to adjust the time, if required.
- Billing Contact: Click on the search button to select the billing contact, following the steps for adding a Customer Name.

Financial Header
- Order Currency: This field will populate based on the currency set up for the customer. Use the drop-down arrow to select an alternative currency from the drop-down menu, if required.
- Tax Rate: This field will populate based on the currency set up for the customer and can not be changed on this screen.
- Exchange Rate: This field will populate based on the exchange rate set up in the system. Type in or use the arrow indicators to adjust the exchange rate, if required.

Addresses Tab
- Billing Address A Billing address is where the invoice for an order will be sent, whether it is a business-to-business (commercial) order or consumer order. You must define a billing address for any order.: The billing address need to be added to the customer before linking the order. Click on the search button to select the billing address.
- Shipping Address A shipping address is the address where an order will be sent.:
This field needs to be completed. If the Shipping Address field has not populated, click on the search button to select the address where the goods can be shipped to.

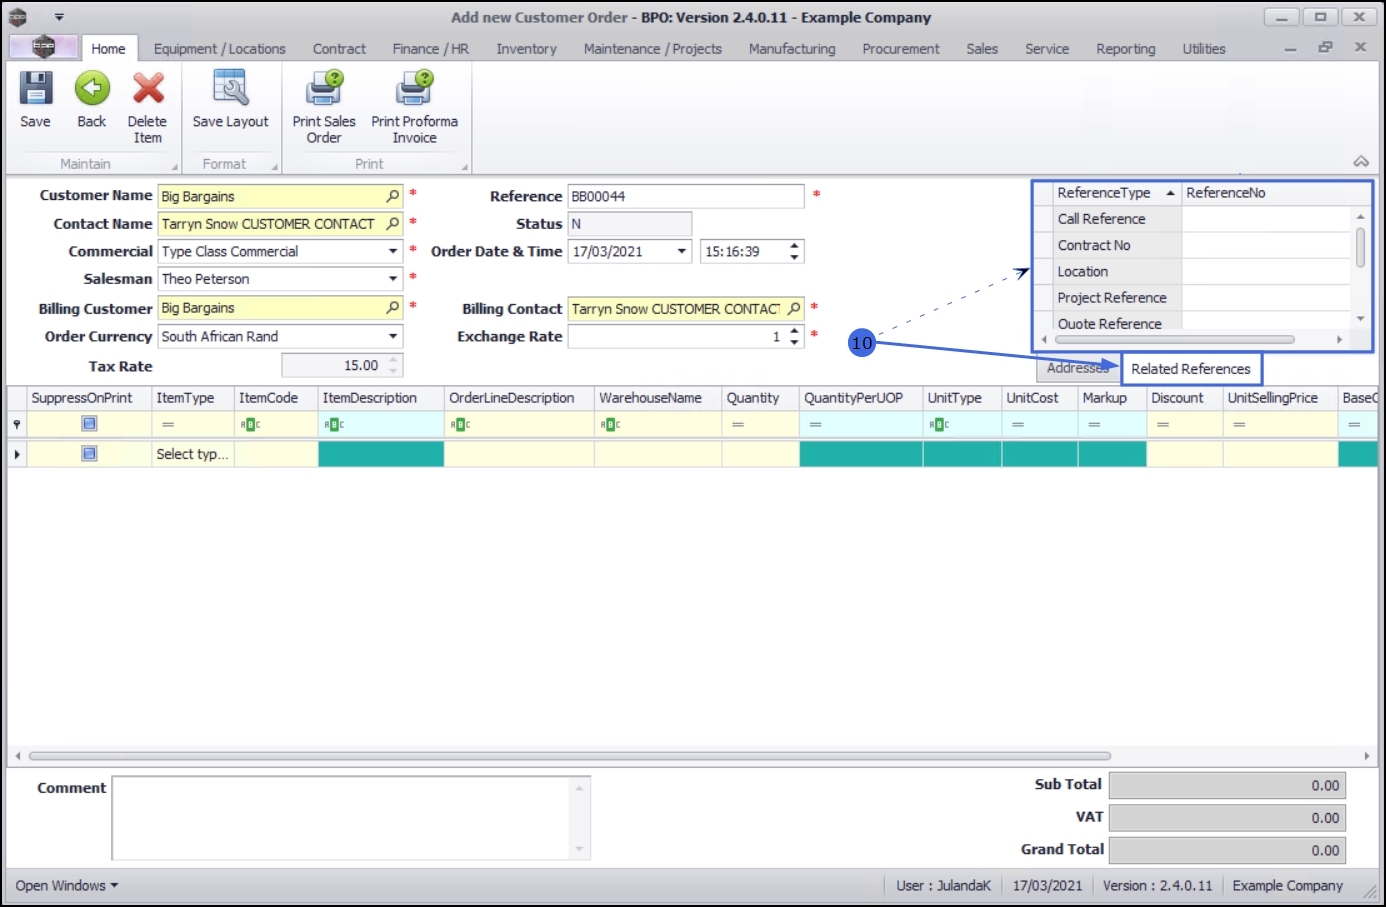
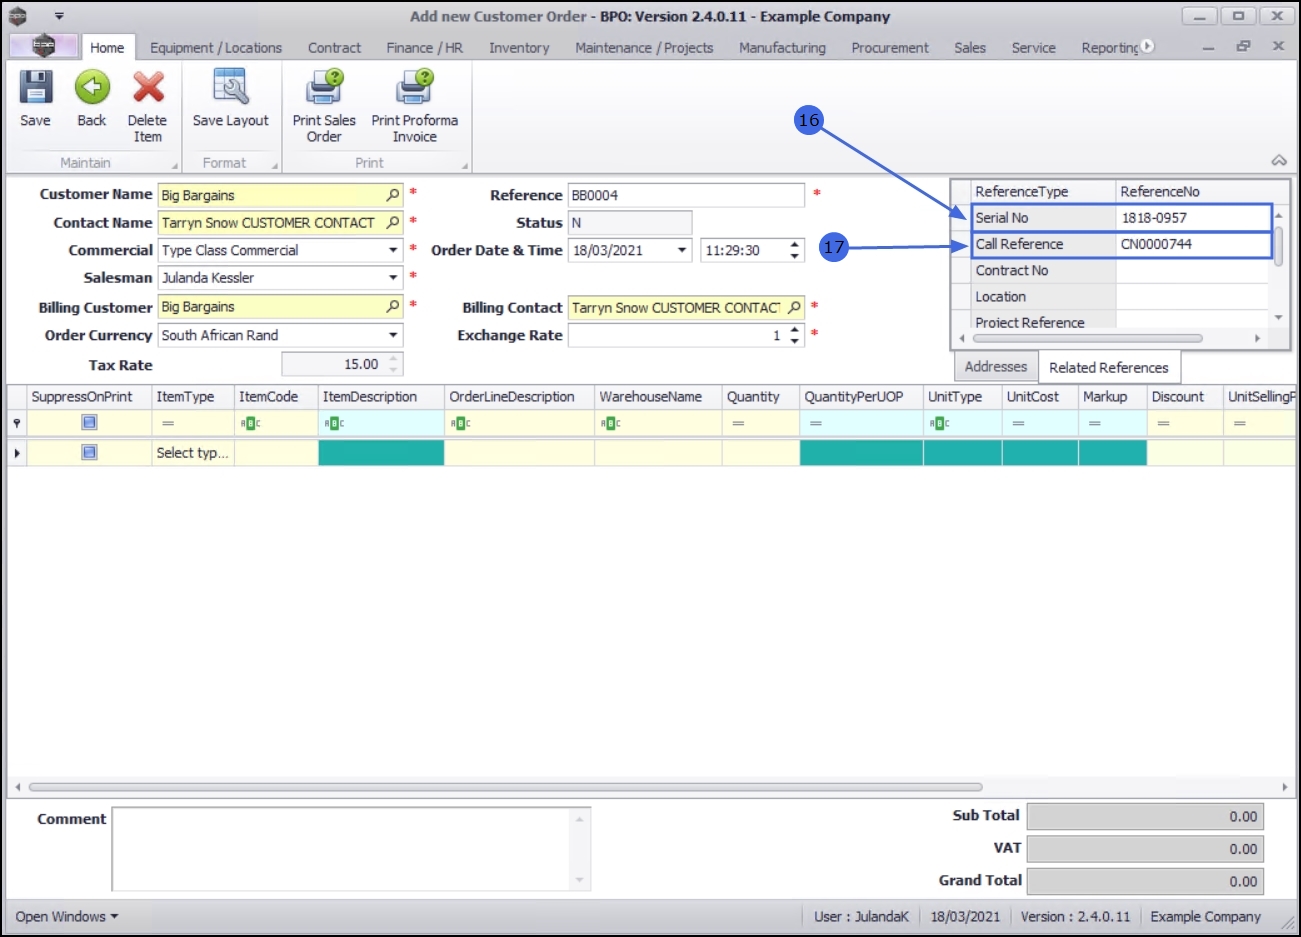
Related References Tab
- Click on the Related References tab.
- The sales order that you are creating, may be linked to one or more of the following reference types:
- Serial No
- Call Reference
- Contract No
- Location
- Project Reference
- Quote Reference
- Work Order Reference
- Note on
using the Reference No's:
- You can select a Reference Type and Reference No before you select a customer for all types, except the Call Reference Type which requests that a customer is selected first.
- With the other Types, when the Reference Type and No are selected, the linked customer details will populate the Customer and Financial heading fields.
- When the Reference Type and No are selected, other Reference No's linked to the initially selected number can also populate other Reference fields.
- Click in the Reference No field of the Reference Type you wish to link to this order.
- The example has Serial No selected.
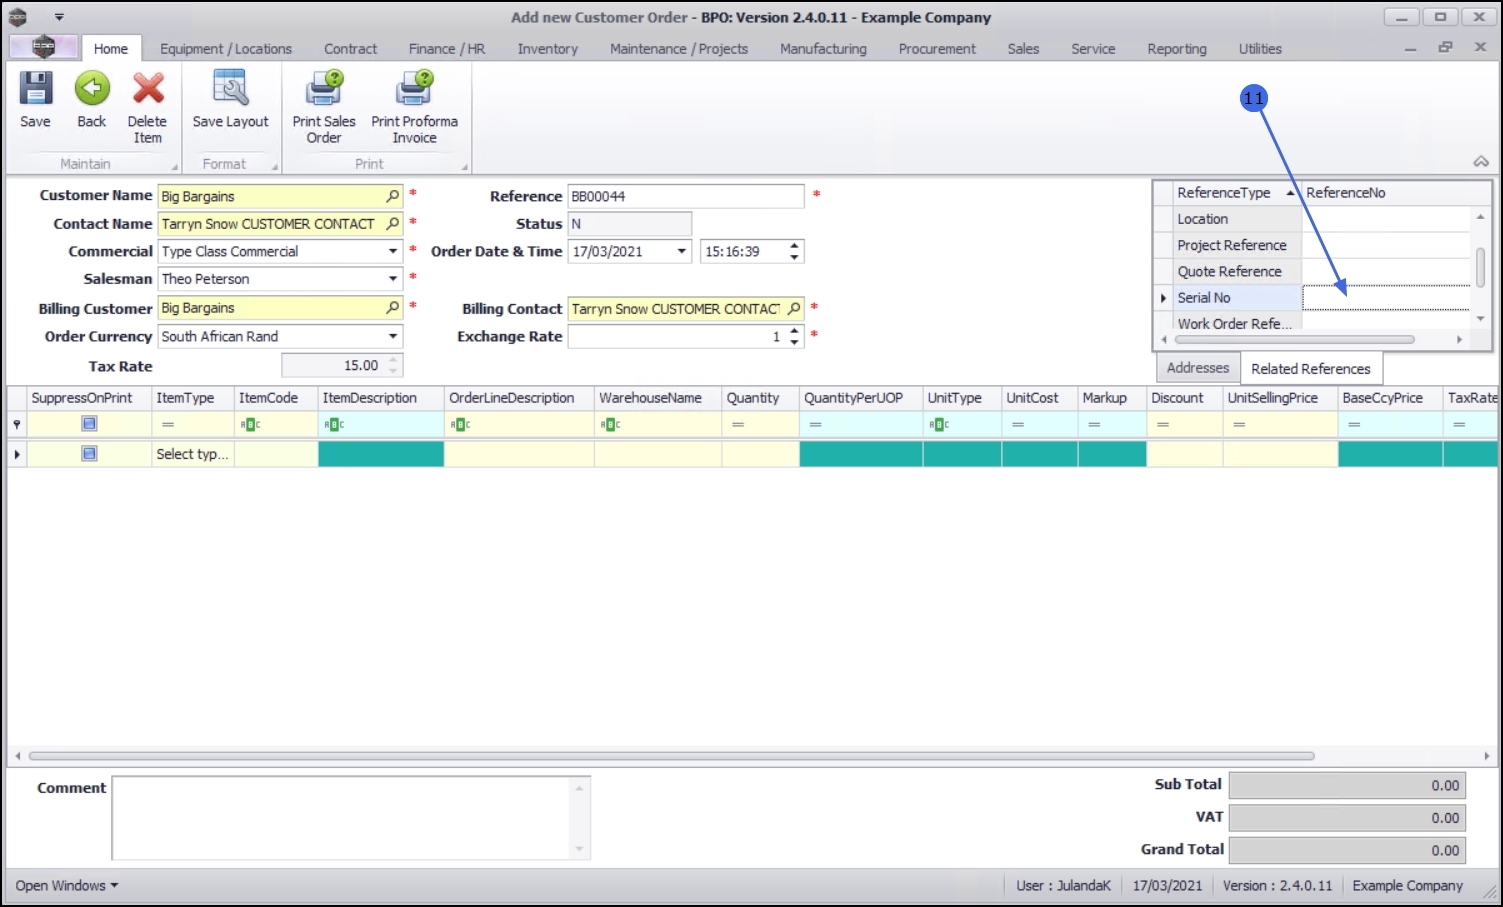
-
An ellipsis button will be available at the end of the field.
- Use the scroll bar to scroll to the left or right of the screen to display information that may be hidden.
- Click on the ellipsis button to display the Select the related equipment for this order screen.
- Click on the row of the item that you wish to link to this sales order.
- Click on OK.

- The selected Serial No will populate the Related References frame.
- The example also has a Call Reference linked to the selected serialised item as the Customer request was made from a Call.
Add Sales Order Items
- Click on the Select type... text box below Item Type to display the down arrow.
- Clicking on the arrow will display the Item Type drop-down list.
- From the list, select one of the following:
- CRFT Labour craft, i.e. Technician
- CTRT Sub Contracts / Third Party Labour/Service
- EXPS Expenses
- INVN Parts
- SERV Internal Labour/Service
- TRVL Travel
- WARR Warranty
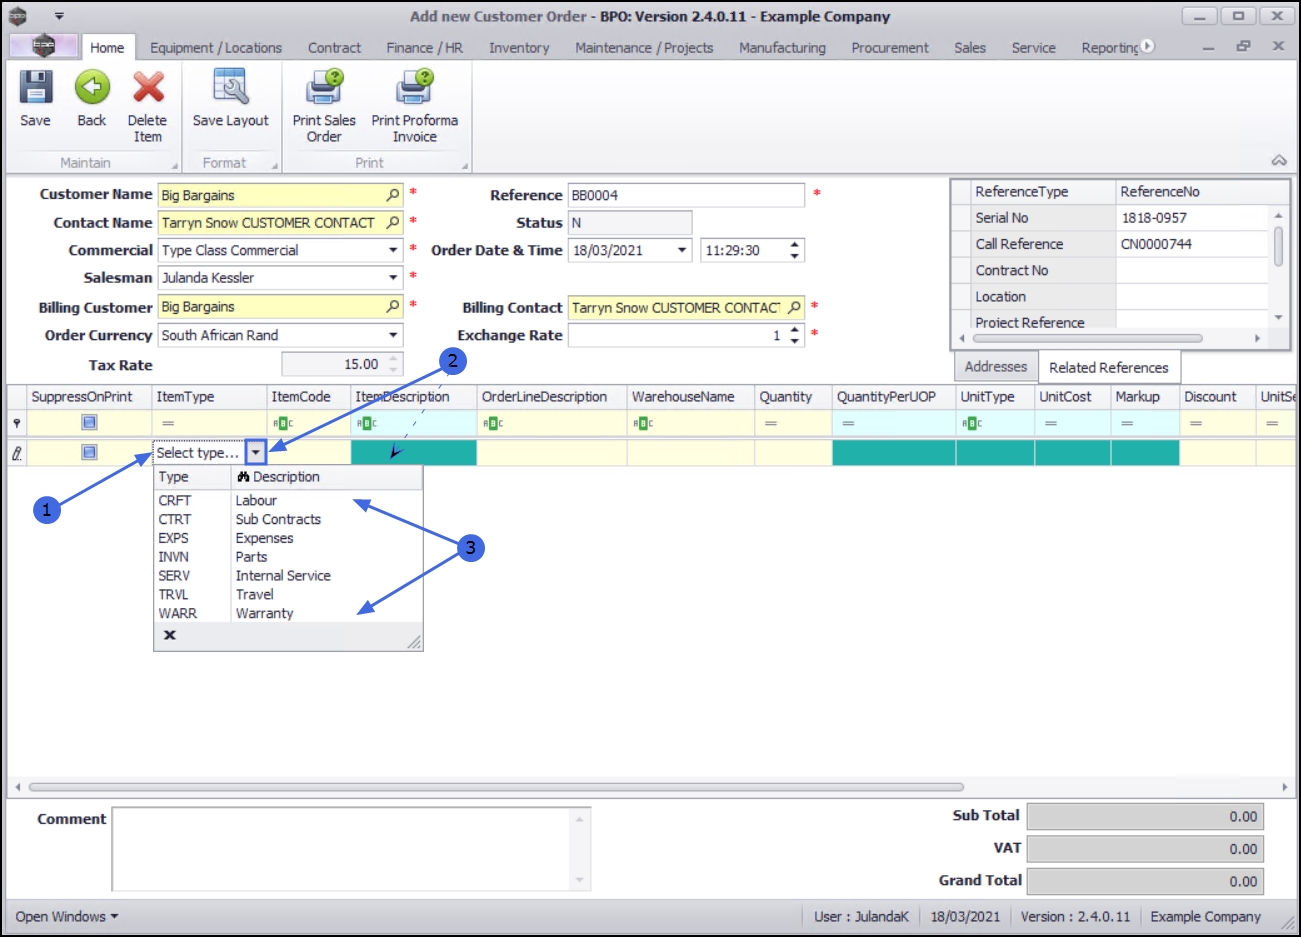
- The example has Parts as the Item Type selected.
- Click in the Item Code text box to display the ellipsis button.
- Clicking on this button will display the Select a [ ] screen.
- Click on the row of the Part you wish to select.
- Click on OK.

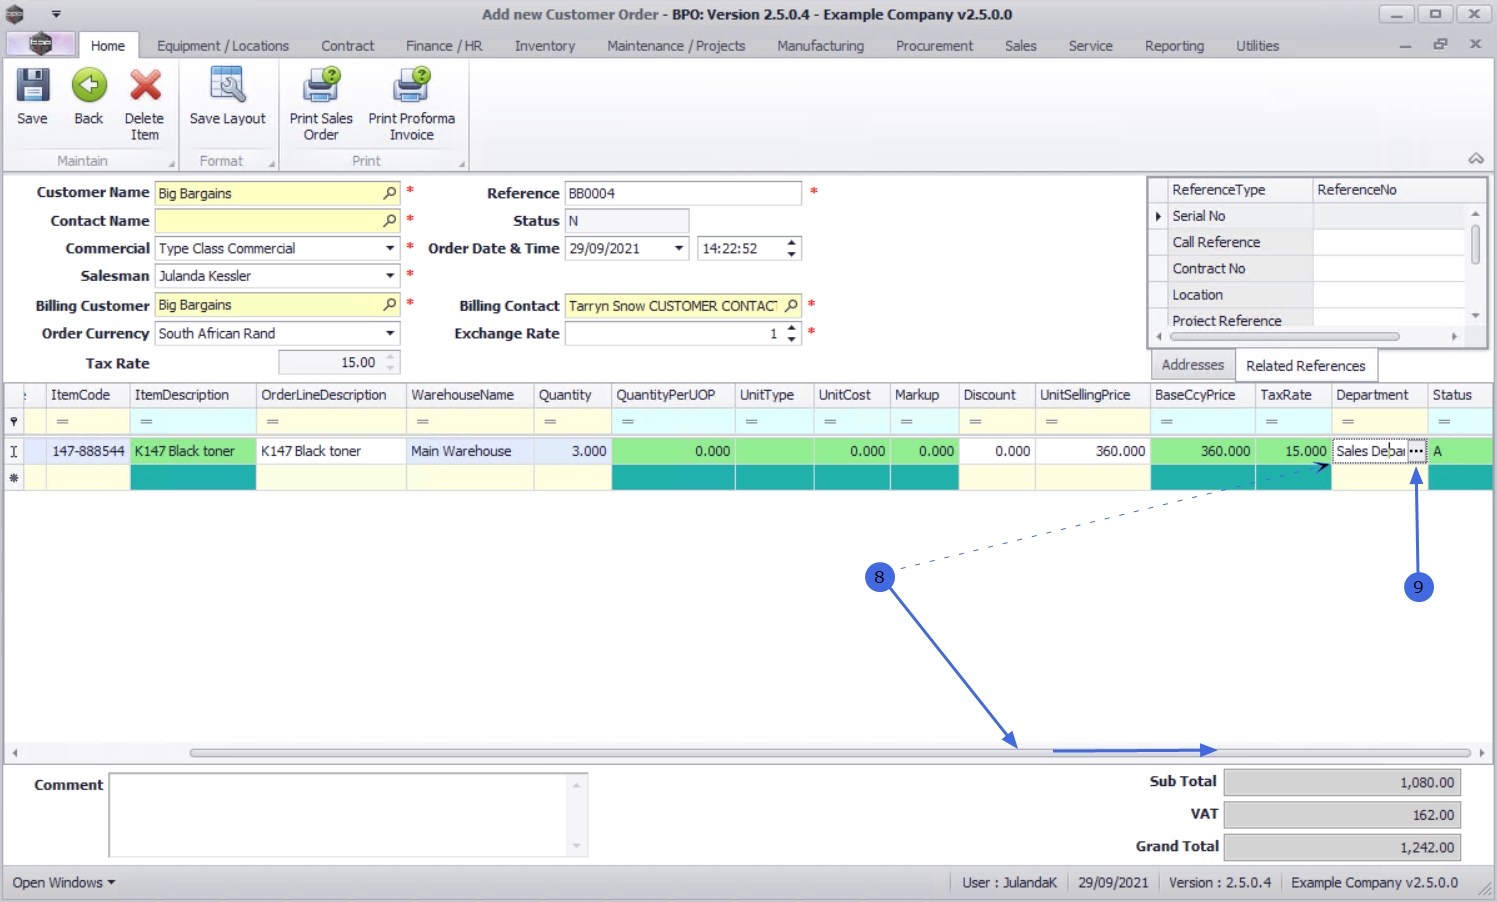
Edit the Quantity, Discount and Unit Selling Price
- To adjust the Quantity, Discount and Unit Selling Price, click in the required field and type in or use the directional arrows to select the required value.
- Suppress on Print check box: The check box must only be selected for the line items that you do not want printed on the Sales Invoice.
 The Sub/Grand Total will not be affected, but the visible selling prices will not match up
with the invoice totals.
The Sub/Grand Total will not be affected, but the visible selling prices will not match up
with the invoice totals.

- Use the scroll bar to scroll across the screen to view the Department column.
- If the department was not populated then add a Department by clicking on the ellipsis button to select the Department for this item.
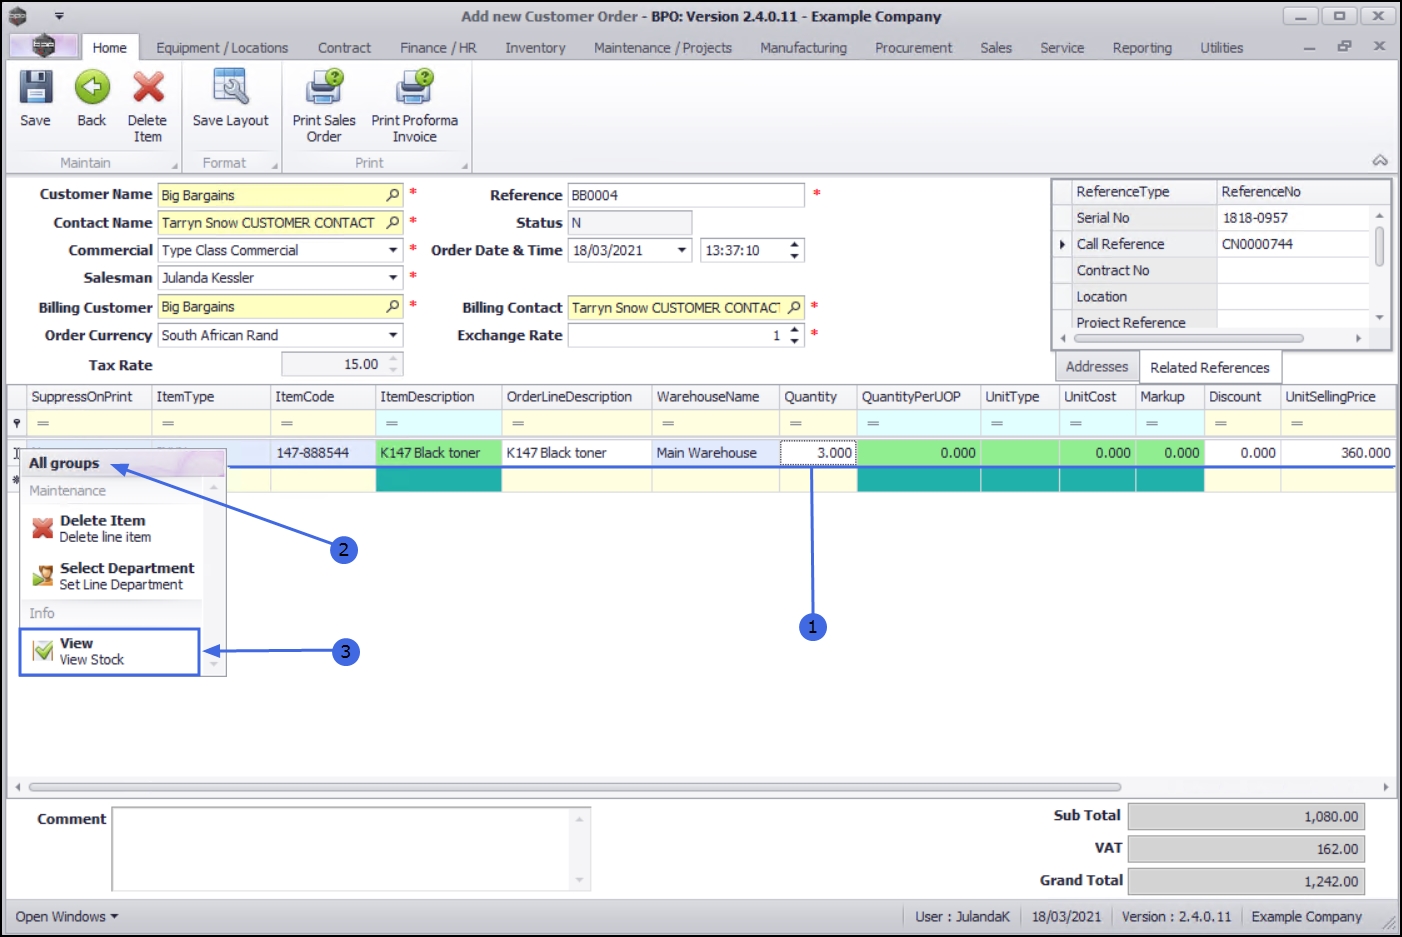
View Stock
When creating an Order, the salesman is able to check the stock quantities of items that he wishes to include in the Order. This enables him to manage the customer's expectations. For example, if there is short stock of a particular item, the customer can be informed that there may be a delay in delivery or that there is an alternative substitute item available, which the customer may prefer to ensure that an order is received timeously.
-
 Right click anywhere in the row of the item that you wish to view the stock quantity of.
 - The All groups drop-down menu will display.
- Select View - View Stock
- The Current Stock data grid will be displayed.
- Each row represents a warehouse that contains stock of the item.
- Scroll across the data grid, if necessary, until you can view the stock quantities e.g. Current Stock or Net Stock, in each warehouse.
- This list now also returns alternate parts in stock : Version Compatibility
- Click on Close or anywhere outside the Current Stock data grid to close the window.

Add additional line items
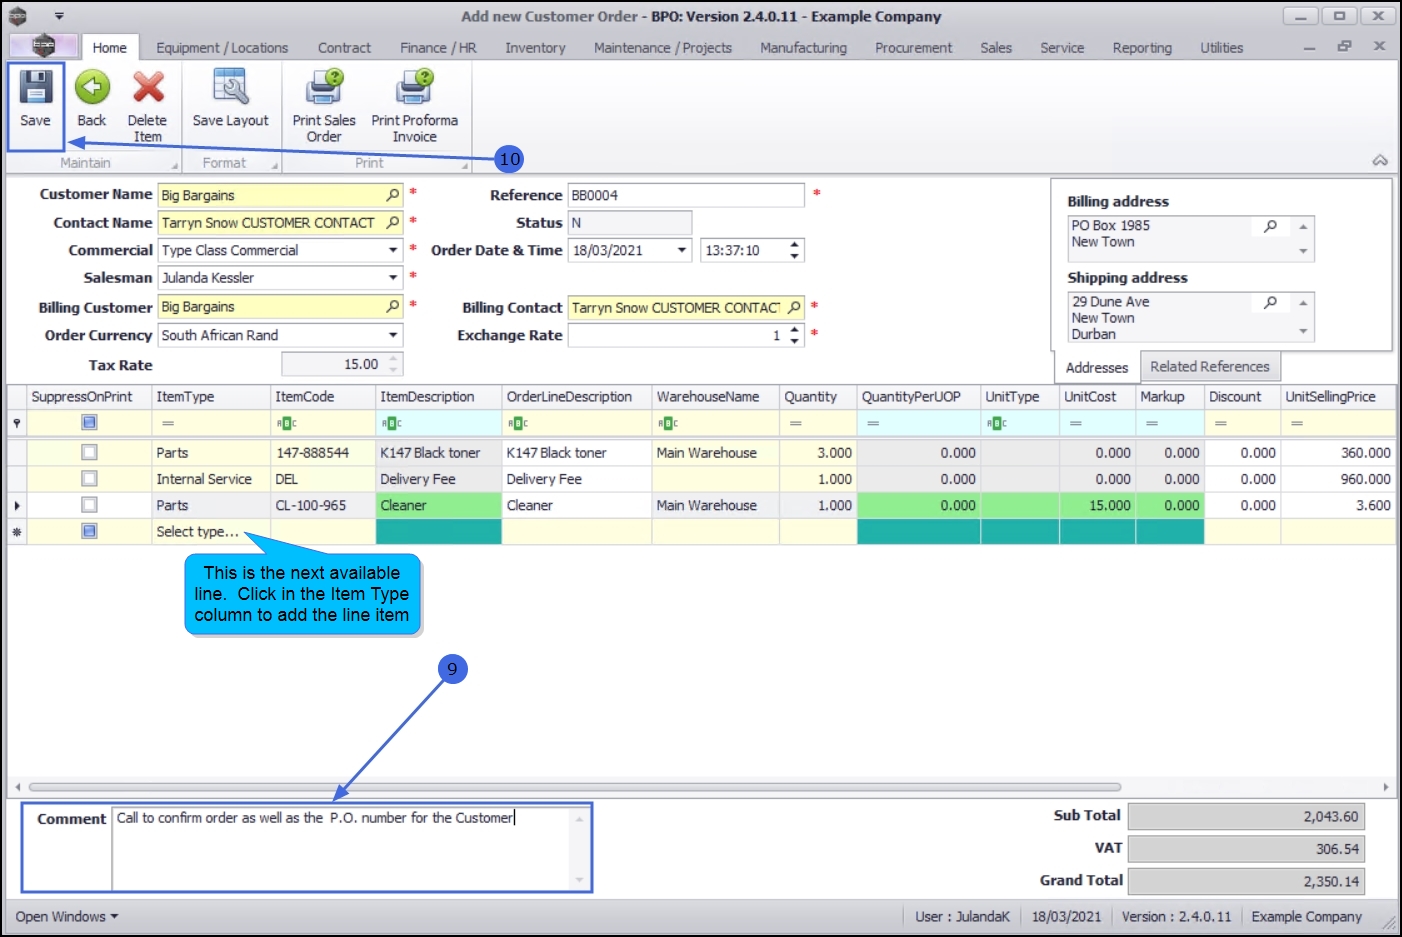
- On the next available line, click in the text box of the Item Type column below the item you have just added. Refer to Add Sales Order Items for details on how to complete the line item.
![]() Click only on the
Suppress on Print column check boxes of the items that you do not want visible on the printed Sales Invoice.
This will not affect the Sub/Grand Total but the selling prices that are visible will not match up
with the invoice totals.
Click only on the
Suppress on Print column check boxes of the items that you do not want visible on the printed Sales Invoice.
This will not affect the Sub/Grand Total but the selling prices that are visible will not match up
with the invoice totals.
Add Comments
- Click inside the Comments text box to type a comment relating to this order.
Save the Sales Order
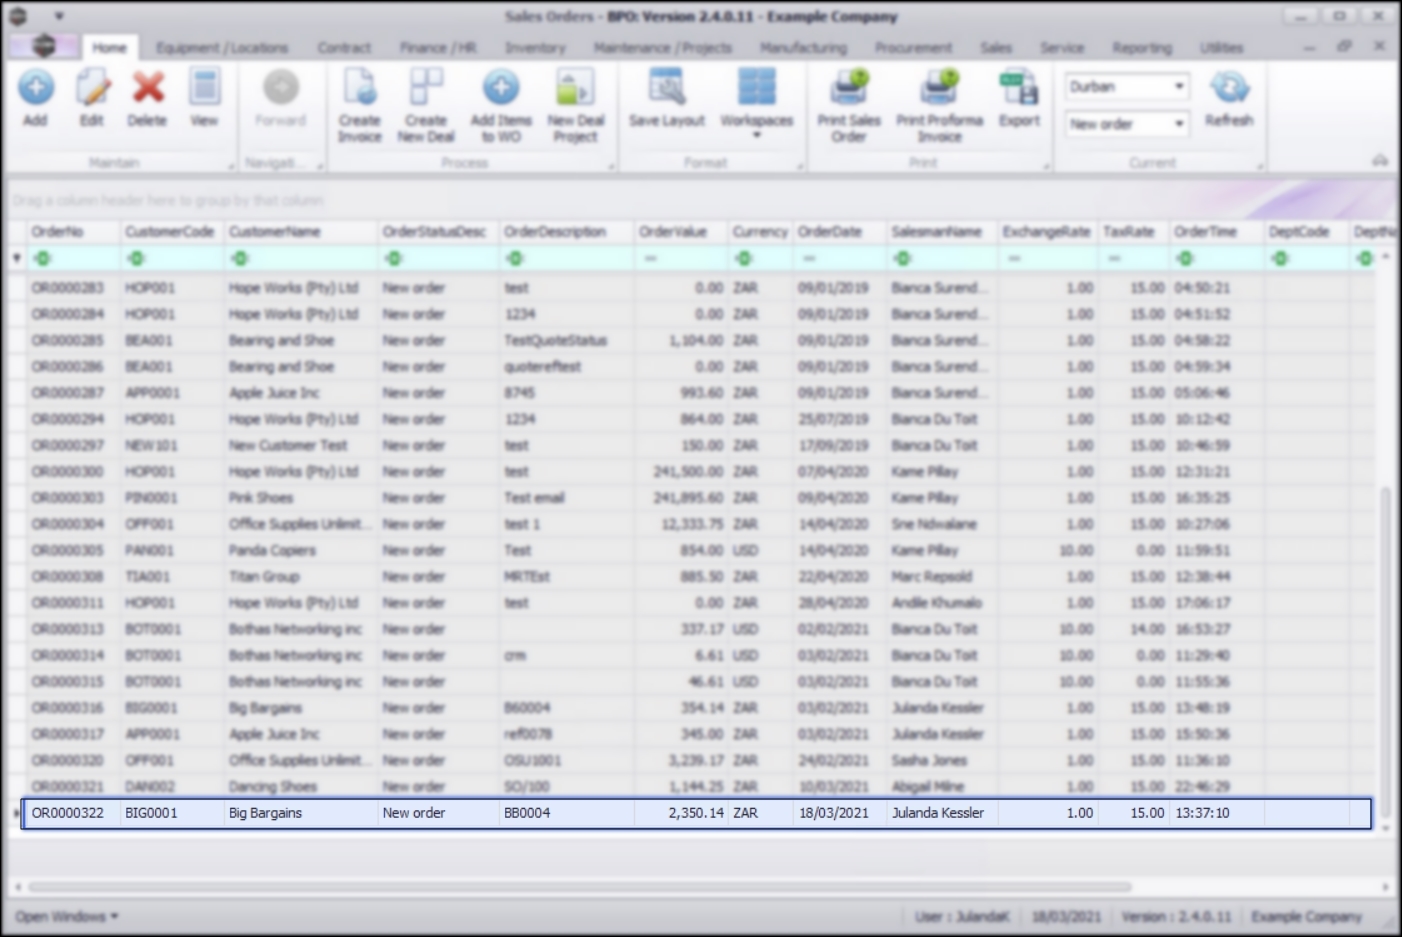
- When you have finished editing the new customer sales order, click on Save.
- The Sales Orders listing screen will be updated with the new sales order you have created.
MNU.126.001