We are currently updating our site; thank you for your patience.
Sales
Customers - Credit Notes
After a Credit Note has been created, it has to go through an approval process which includes:
- Releasing Credit Note for Approval / Removing Credit Note from Approval
- Approving / Rejecting Credit Note
- Print Credit Note (this step will post the transaction to Pastel)
| Ribbon Access: Sales > Customers |

- The Customer Listing screen will be displayed.
-
Select the Site where the Customer can be located.
- The example has Durban selected.
- Select the Status for the Customer.
- The example has Active selected.
- Select the row of the customer whose credit note(s) you wish to work with.
- Click on the Credit Notes tile.

Add Credit Note
- The Sales Credit Notes for Customer [Customer Code] screen will display.
- Click on Add.
![]() Short cut key: Right click to display the Process menu list. Click on Add.
Short cut key: Right click to display the Process menu list. Click on Add.

- The Add new Customer Credit Note screen will be displayed.
- Complete the Customer Credit Note details as required.
- Click on Related Ref tab to link any reference information related to the Credit Note, e.g. Project Reference, Reason Code, Invoice Number etc.
- Click on Save to save the credit note as a New Credit Note and return to the Sales Credit Notes for Customer screen.
 A system generated Credit Note Number will be issued for the Credit Note.
![]() For a detailed handling of this topic refer to Credit Notes - Issue a Credit Note
For a detailed handling of this topic refer to Credit Notes - Issue a Credit Note

Edit Credit Note
- From the Sales Credit Notes for Customer [Customer Code] screen;
- Ensure that the correct Site has been selected.
- The example has Durban selected.
- Ensure that the Status has been set to New. You can edit credit notes only in the New Status.
- Select the row of the Sales Credit Note you wish to edit.
- Click on Edit.
![]() Short cut key: Right click to display the Process menu list. Click on Edit.
Short cut key: Right click to display the Process menu list. Click on Edit.

- The Edit Customer Credit Note - [credit note number] screen will be displayed.
- You can make changes to the Heading Information, Addresses or Related References tabs.
- For the purpose of this manual, a Reason Code has been added to the Related Ref details.
- You can add credit note items or delete an item from the Credit Note Items frame.
- Click on Save to save the changes to the Credit Note and return to the Sales Credit Notes for Customer screen.
![]() For a detailed handling of this topic refer to Credit Notes - Edit Credit Note
For a detailed handling of this topic refer to Credit Notes - Edit Credit Note

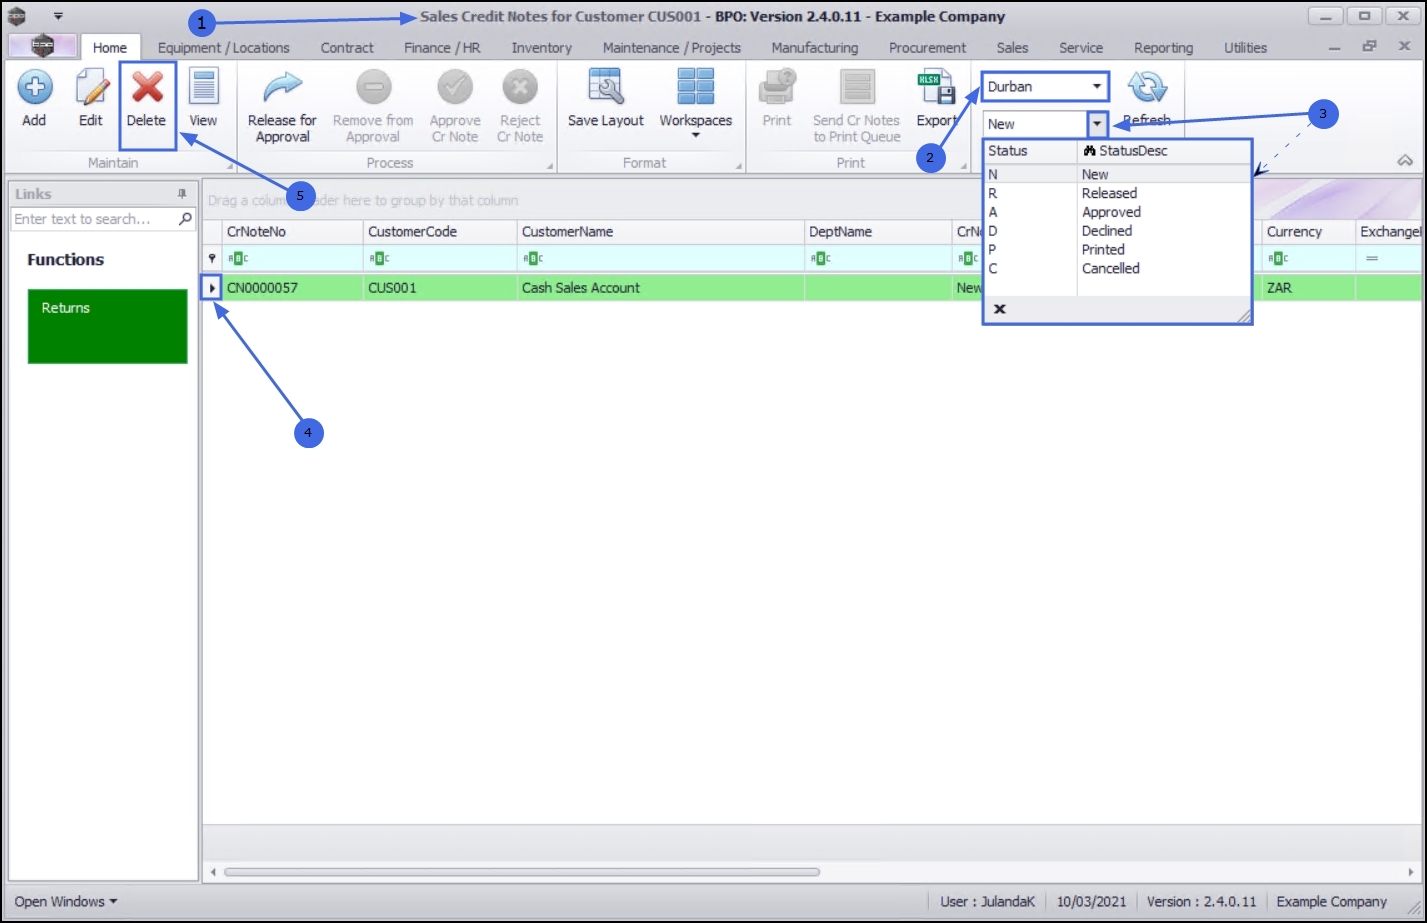
Cancel a Credit Note
- From the Sales Credit Notes for Customer [customer code];
- Ensure that the correct Site has been selected.
- The example has Durban selected.
- Ensure that the Status is set to New. You can cancel Credit Notes only in the New Status
- Select the row of the Credit Note you wish to cancel.
- Click on Delete.
![]() Short cut key: Right click to display the Process menu list. Click on Delete.
Short cut key: Right click to display the Process menu list. Click on Delete.
- When you receive the Confirm delete Credit Note message;
- Are you sure you want to delete this quote?
- Click on Yes.
![]() For a detailed handling of this topic refer to Credit Notes - Cancel a Credit Note
For a detailed handling of this topic refer to Credit Notes - Cancel a Credit Note
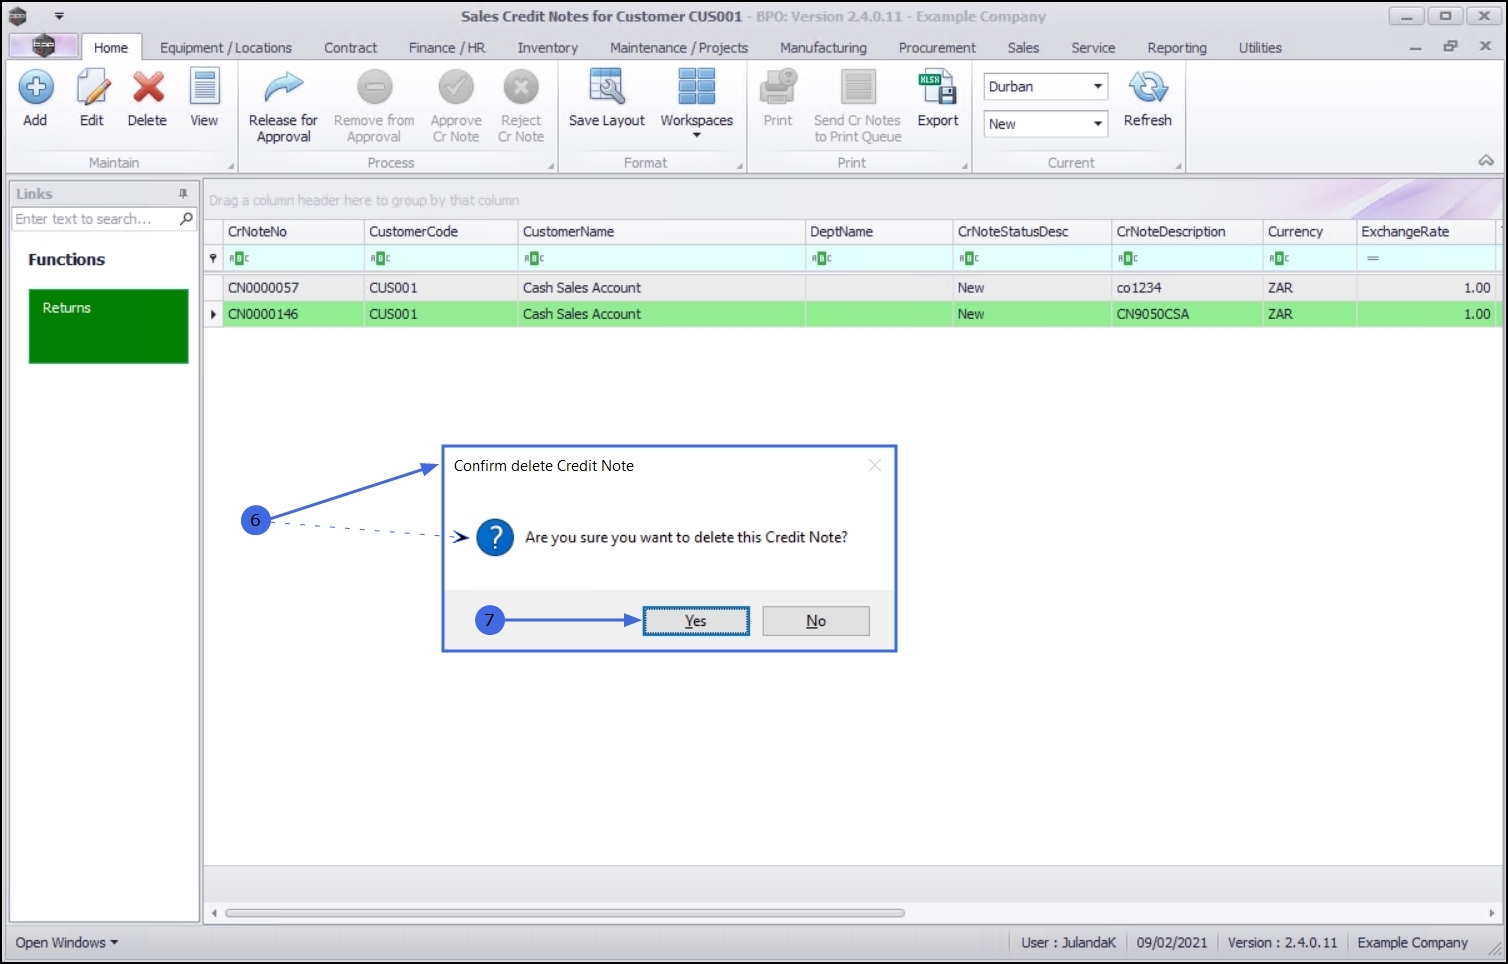
The Credit Note will be removed from the Sales Credit Notes for Customer screen.
View Credit Note
- From the Sales Credit Notes for Customer [customer code] listing screen.
- Ensure that the correct Site has been selected.
- The example has Durban selected.
- Select the Status of the Credit Notes you wish to view. You can view credit notes in the Released or New status.
- Select the row of the Credit Note you wish to view.
- Click on View.

- The View Credit Note - [credit note number] screen will display. No changes can be made to the information on the Credit note as this is a View only screen.
- Click on Back to return to the Sales Quotes for Customer screen.

Release for Approval
- From the Sales Credit Notes for Customer [customer code] listing screen,
- Ensure that the correct Site has been selected.
- The example has Durban selected.
- Ensure that the Status has been set to New.
You can release credit notes for approval only in the New status.
- Select the row of the Credit Note you wish to release for Approval.
- Click on Release for Approval.
![]() Short cut key: Right click to display the All groups menu list. Click on Release.
Short cut key: Right click to display the All groups menu list. Click on Release.
- When you receive the Sales Credit Note - Release message to confirm;
- The credit note number [credit note number], has been released for authorisation successfully.
- Click on OK.
![]() For a detailed handling of this topic refer to Credit Notes - Release for Approval
For a detailed handling of this topic refer to Credit Notes - Release for Approval
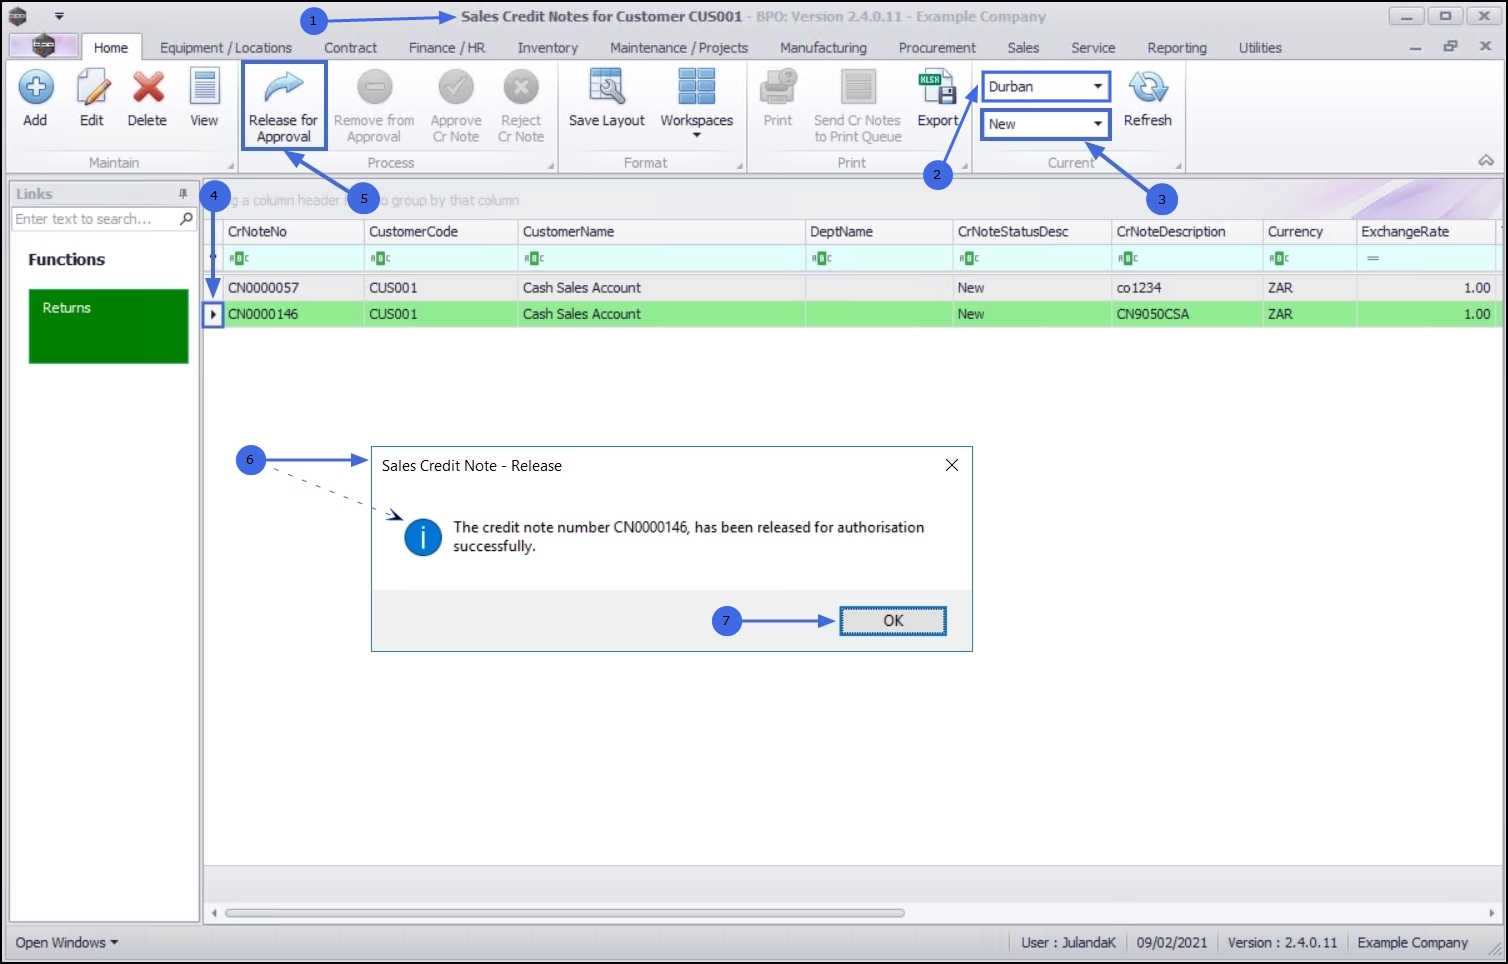
The Status for the Credit Note has changed to Released.
Place on Hold
- From the Sales Credit Notes for Customer [customer code] listing screen,
- Ensure that the correct Site has been selected.
- The example has Durban selected.
- Change the Status to Released to list all the Credit Notes that have been Approved. Only credit notes that have been Released can be placed on hold.
- Select the row of the Credit Note you wish to remove from approval.
- Click on Remove from Approval.
![]() Short cut key: Right click to display the All groups menu list. Click on Remove.
Short cut key: Right click to display the All groups menu list. Click on Remove.
- When you receive the Sales Credit Note - Hold message to confirm;
- The credit note number [credit note number], has been placed on hold successfully.
- Click on OK.
![]() For a detailed handling of this topic refer to Credit Notes - Place on Hold
For a detailed handling of this topic refer to Credit Notes - Place on Hold

The Credit Note Status has changed to New.
Approve Credit Note
- From the Sales Credit Notes for Customer [customer code] listing screen,
- Ensure that the correct Site has been selected.
- The example has Durban selected.
- Change the Status to Released.
Only credit notes that have been Released can be approved.
- Click on the row of the Credit Note you wish to approve.
- Click on Approve Cr Note.
![]() Short cut key: Right click to display the All groups menu list. Click on Approve.
Short cut key: Right click to display the All groups menu list. Click on Approve.
- When you receive the Input Validation message to confirm;
- Are you sure you want to Approve cr note no. [credit note number].
- Click on Yes.
![]() For a detailed handling of this topic refer to Credit Notes - Approve Credit Note
For a detailed handling of this topic refer to Credit Notes - Approve Credit Note
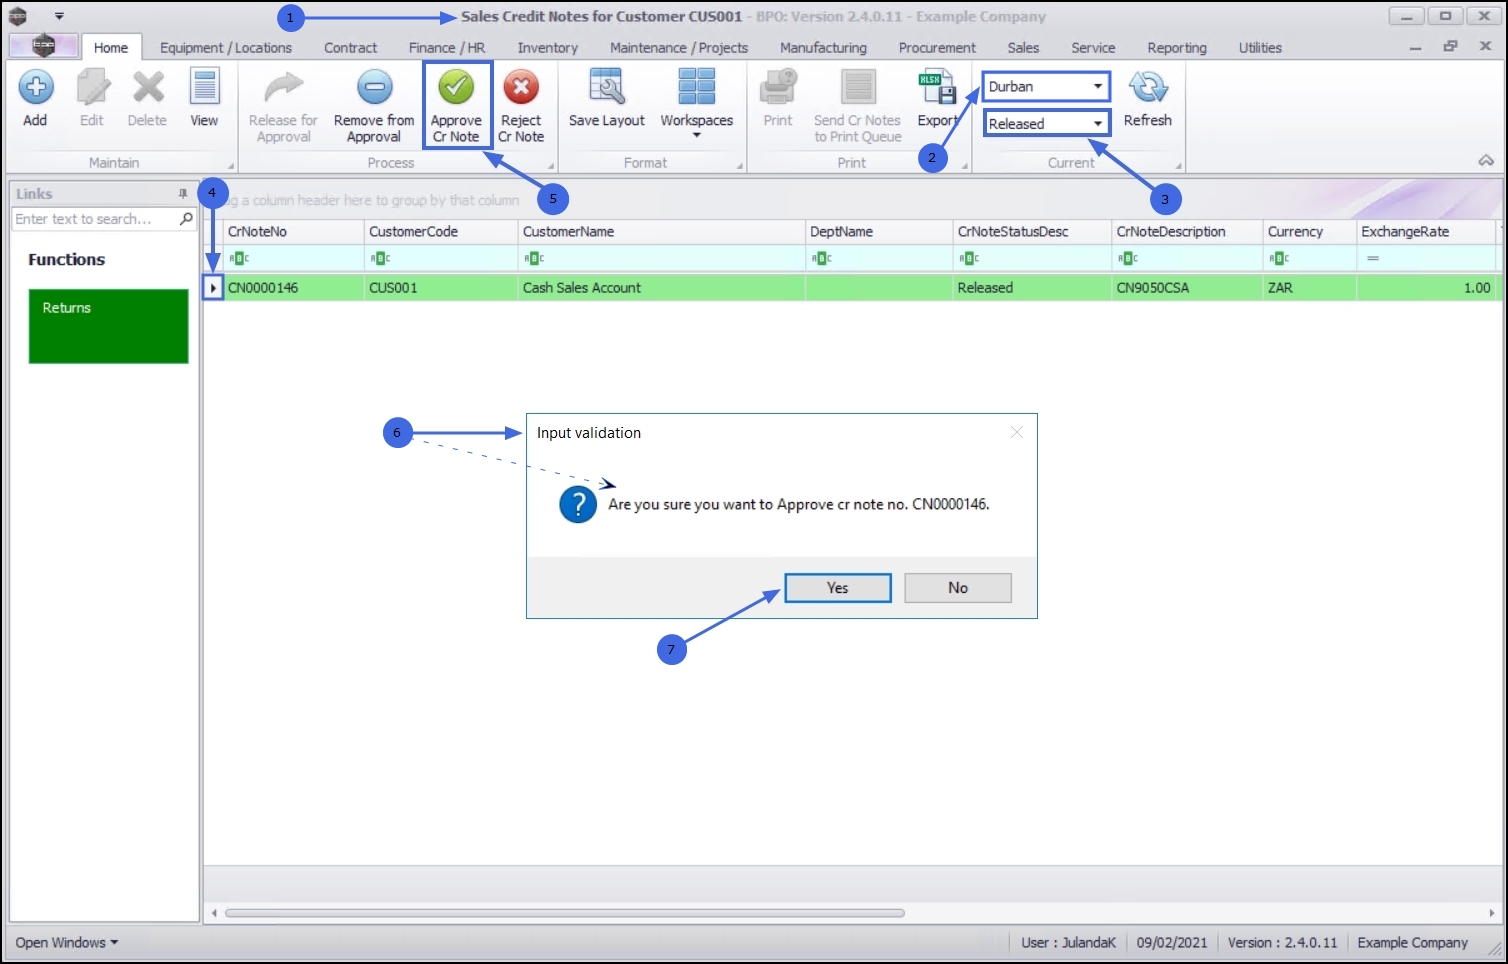
The credit note Status Description has been updated to Approved.
Reject Credit Note
- From the Sales Credit Notes for Customer [customer code] listing screen,
- Ensure that the correct Site has been selected.
- The example has Durban selected.
- Change the Status to Released. Only credit notes that have been Released can be rejected.
- Select the row of the Credit Note you wish to reject.
- Click on Reject Cr Note.
![]() Short cut key: Right click to display the All groups menu list. Click on Reject.
Short cut key: Right click to display the All groups menu list. Click on Reject.
- When you receive the Input Validation message to confirm;
- Are you sure you want to Reject cr note no. [CNcredit note number].
- Click on Yes.
![]() For a detailed handling of this topic refer to Reject Credit Note
For a detailed handling of this topic refer to Reject Credit Note

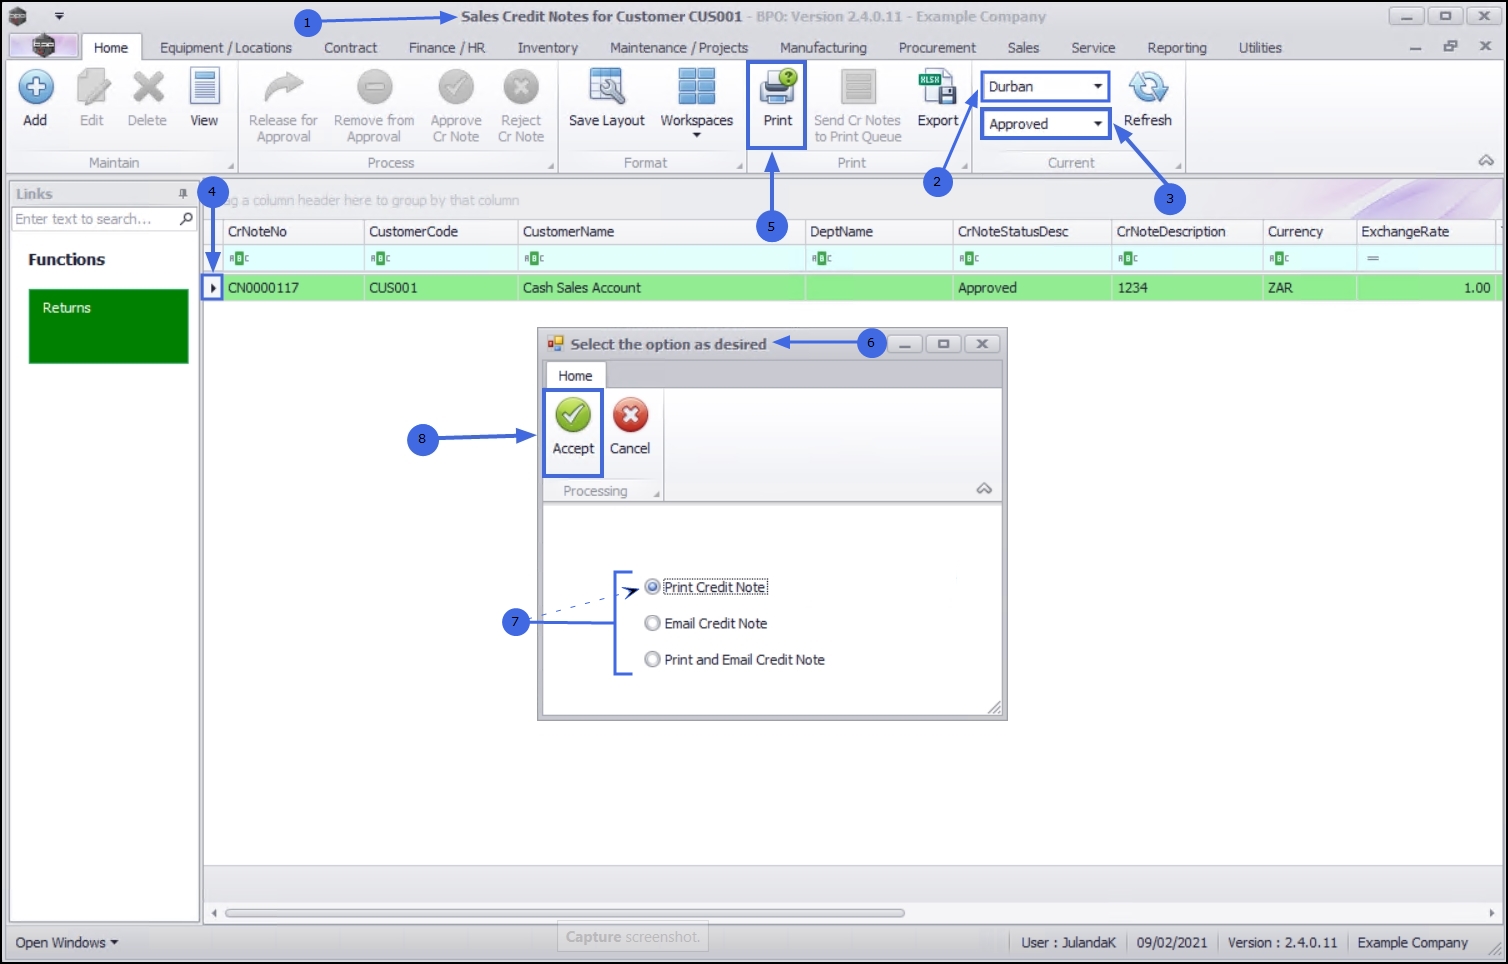
Print Credit Note
Credit notes that have been Approved and have been Printed will be available for printing.
- From the Sales Credit Notes for Customer [customer code] screen.
- Ensure that the correct Site has been selected.
- The example has Durban selected.
- Select the Status you required.
- The example has Approved selected.
- Select the row of the Credit Note you wish to print.
- Click on Print.
- The Select the option as desired screen will display.
- Select the print option you require.
 When selecting to Email Invoice, the invoice will be emailed via the BPO Email Service on the server (not from MS Outlook).
 - The example has Print Credit Note selected.
- Click on Accept.
- The Tax Credit Note will display in the Preview screen.
- From this screen you can make cosmetic changes to the document, as well as Save, Print, Add a Watermark, Export or Email the Invoice.
- Close this screen to return to the Sales Credit Notes for Customer screen.

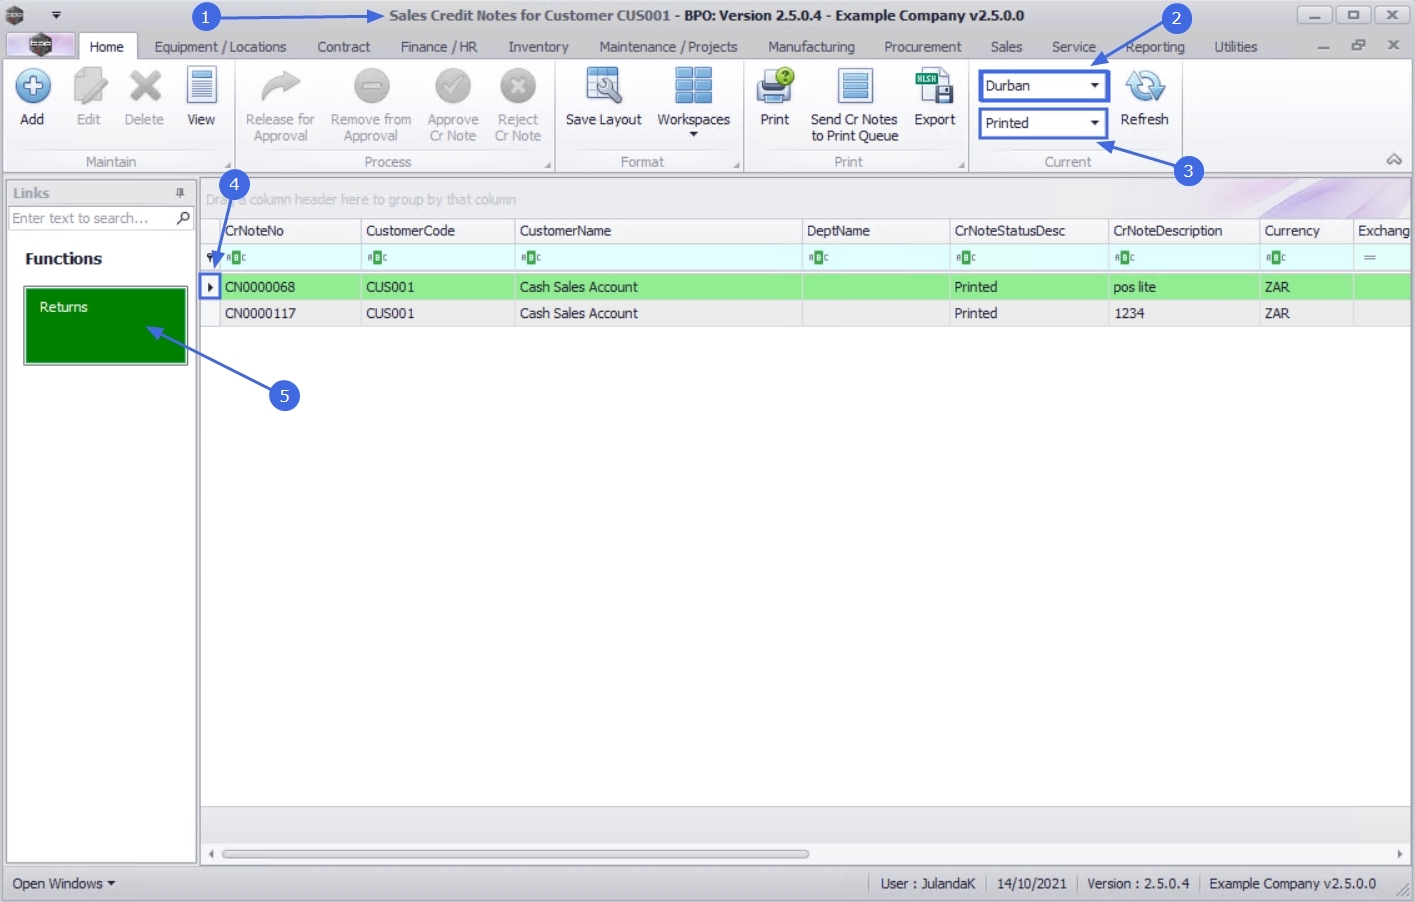
Send Credit Notes to Print Queue
You can send Credit Notes directly from the Print Queue from the Sales Credit Notes for Customer screen, instead of going to the Print Queue Reprint screen. This will enable you to forward a batch of credit notes to the customer.
- From the Sales Credit Notes for Customer [customer code] screen,
- Ensure that the correct Site has been selected.
- The example has Durban selected.
- Change the Status to Printed.
- Select the row of the credit note, or select a batch of credit notes, you wish to send to the Print Queue.
-
 Select a Range: Click in the
row of the
first credit note.
Hold down the
Shift key
on your keyboard and click in the
row
of the last credit note in your list.
Select a Range: Click in the
row of the
first credit note.
Hold down the
Shift key
on your keyboard and click in the
row
of the last credit note in your list.
-
Select alternate Invoices: Hold down the
Ctrl (Control) key on your keyboard and click in the
row of each Credit Note you want to include in the Print Queue.
- Click on Send Cr Notes to Print Queue.
- When you receive the Print Queue Processing message to confirm;
- The selected items have been sent to the print queue.
- Click on OK.

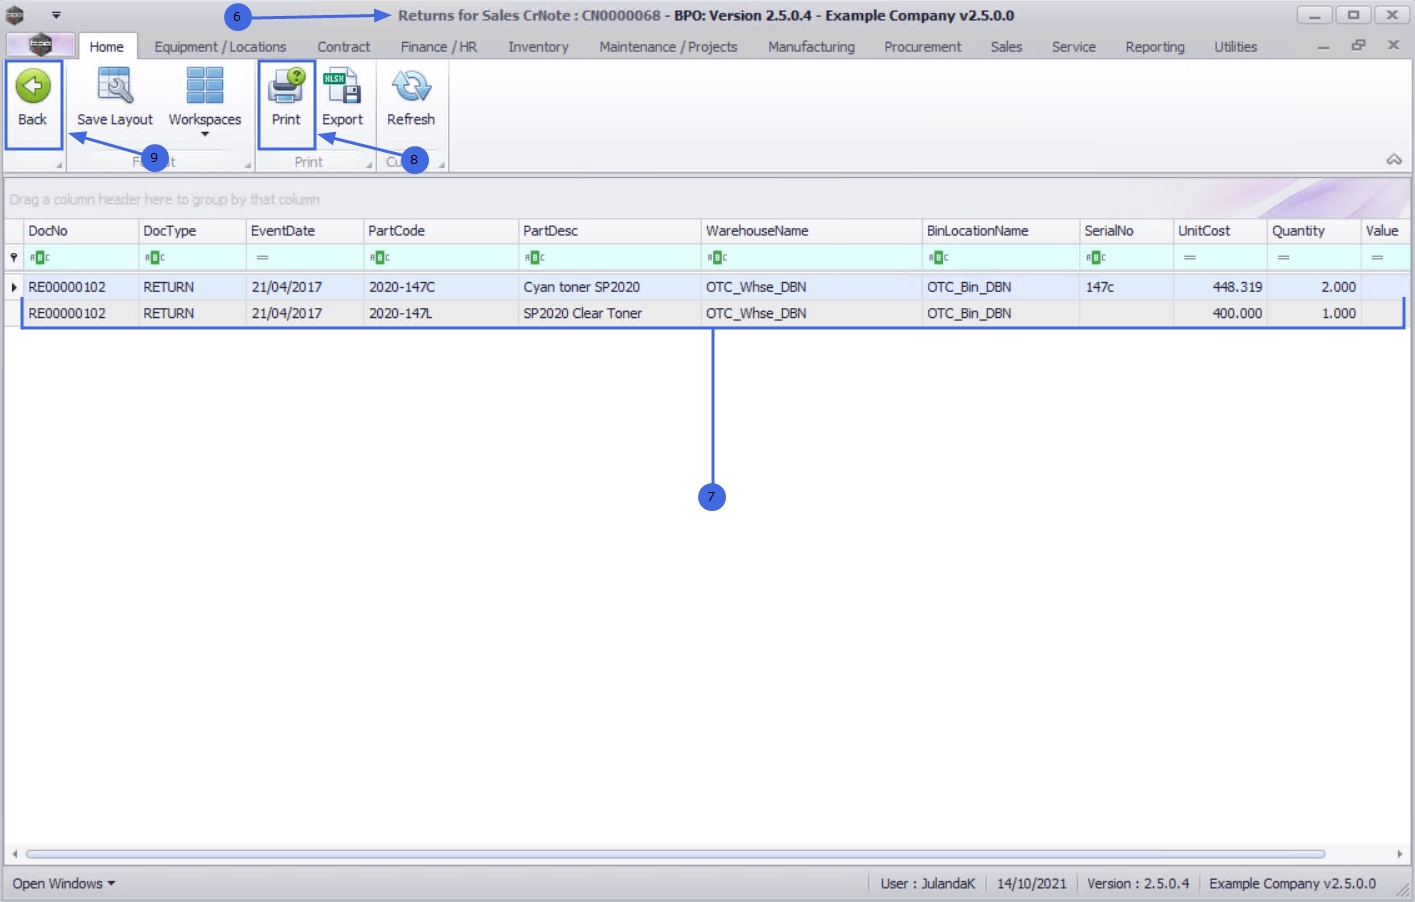
Credit Note Returns
- From the Sales Credit Notes for Customer screen you can view the Credit Note Returns for OTC and POS Invoices.
- When the Credit Note is issued from the Call Screen or the Project Screen then the Credit Note Returns needs to be viewed from the Credit Note Returns tab on the Call Screen or the Project Screen.
- Return requests can be raised for a Credit Note to Return Stock to Store for a Customer
- From the Sales Credit Notes for Customer [customer code] screen,
- Ensure that the correct Site has been selected.
- The example has Durban selected.
- Change the Status to Printed.
- Select the row of the credit note you wish to view the returns for.
- Click on the Returns tile.
- The Returns for Sales CrNote : CR[credit note number] screen will display.
- From this screen you can view any return items linked to the selected credit note.
- Click on Print to print the Parts Issue Note.
- Click on Back to return to the Sales Notes for Customer screen.
For a detailed handling of this topic refer to Credit Notes - Returns
MNU.061.036