We are currently updating our site; thank you for your patience.
Service
Work Orders - Sales Orders
The Orders tile direct you to a list of Sales Orders for a selected Customer.
This manual is a brief look at Sales Orders, accessed from the Customer Listing screen. For a detailed handling of the topic click on the link to redirect to the Sales Orders manual.
| Ribbon Access: Service > Work Orders |

- The Work Orders Listing screen will be displayed.
- Select the Site where the work order was issued.
- The example has Durban selected.
- Select the Status.
- The example has Open selected.
- Select the row of the work order you wish to convert to a sales order.
- Click on the Orders tile.

-
The Sales Orders for Work Order[work order number] screen will be displayed.
 The Site from the Customer Listing screen will not automatically pull through to the Sales Orders for Work Order screen.
 - Any Sales Orders that have already been added to the work order will display in the data grid.
Add Sales Order
- Click on Add.
![]() Short cut key: Right click to display the All groups menu list. Click on Add.
Short cut key: Right click to display the All groups menu list. Click on Add.

- The Add new Customer Order screen will be displayed.
- Complete the Sales Order Header and the Financial Header Information.
- Confirm the Billing and Shipping Addresses for the customer, if these fields were not auto populated when you entered the order header information.

Related References
- Click on the Related References tab to link the reference information for the customer Order.
Line Items and Comments
- Add Sales Order Items as required.
- Click in the Comments text box to type a comment related to the Order.
- Click on Save to save the customer Order.

- The Sales Orders for Customer listing screen will be updated with the new Order that you have created.
For a detailed handling of this topic refer to Orders - Add Sales Order

Edit Sales Order
![]() Sales Orders that have already been invoiced will not be available for editing.
Sales Orders that have already been invoiced will not be available for editing.
- From the Sales Orders for Customer [Customer Code] screen,
- Click in the row of the Sales Order you wish to edit.
- Click on Edit.
![]() Short cut key: Right click to display the All groups menu list. Click on Edit.
Short cut key: Right click to display the All groups menu list. Click on Edit.
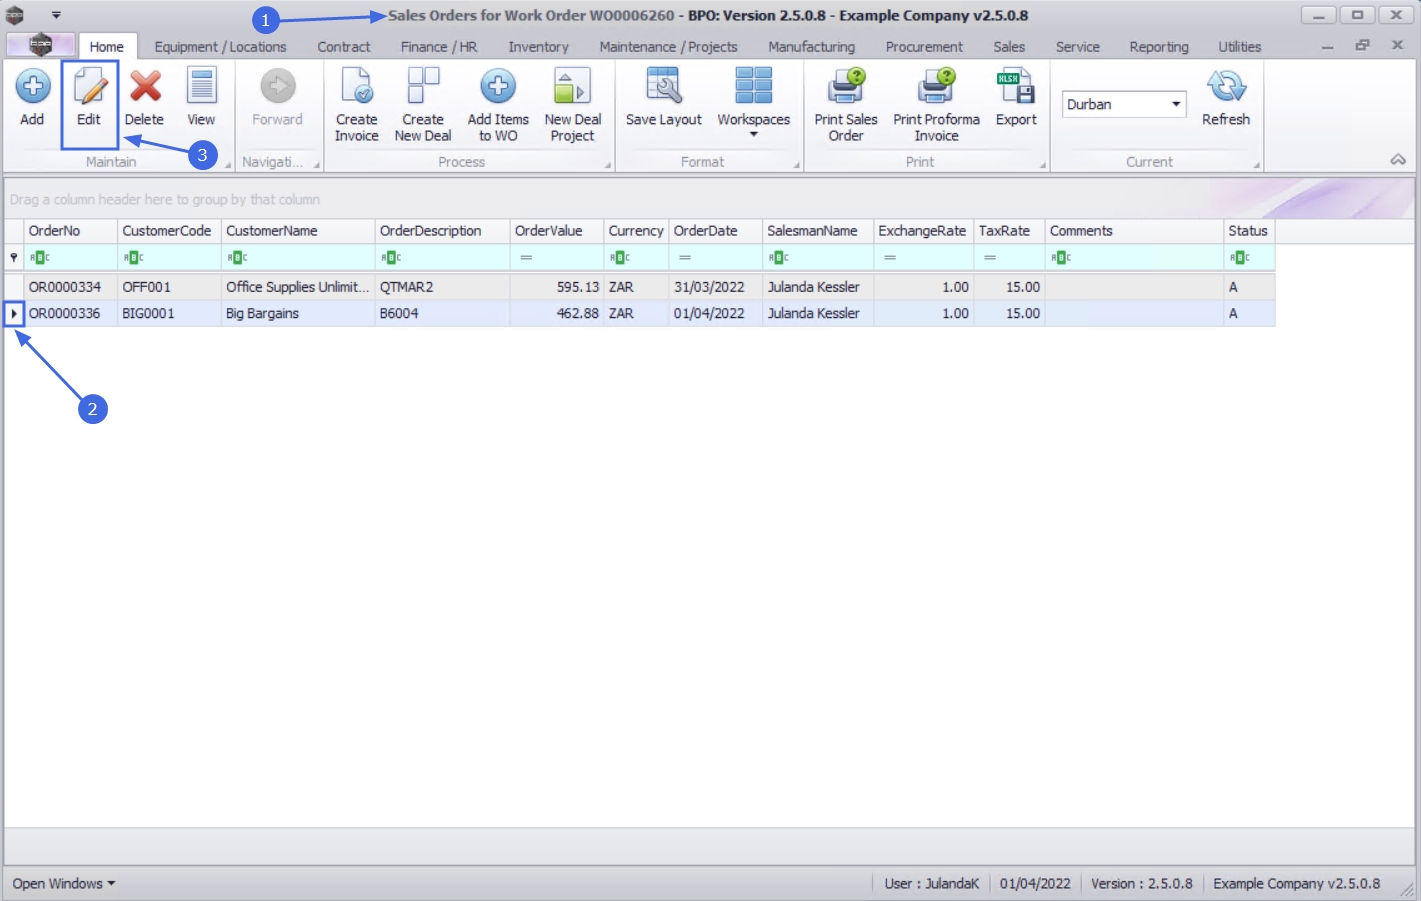
- The Edit Customer Order - [Order Number] listing screen will display.
- Make the required changes to the Heading Information, Addresses or Related References tabs.
- Make the necessary changes to the Order Item frame:
- To Add Sales Order Items, click in the Item Type column of the next available row.
- To Delete Item line entry, click on the row of the item you wish to remove, then click on Delete Item.
- Click on Save to save the changes to the Customer Order and return to the Sales Orders for Customer screen.
For a detailed handling of this topic refer to Orders - Edit Sales Order

Delete Sales Order
![]() Orders that have already been invoiced will not be available for deletion.
Orders that have already been invoiced will not be available for deletion.
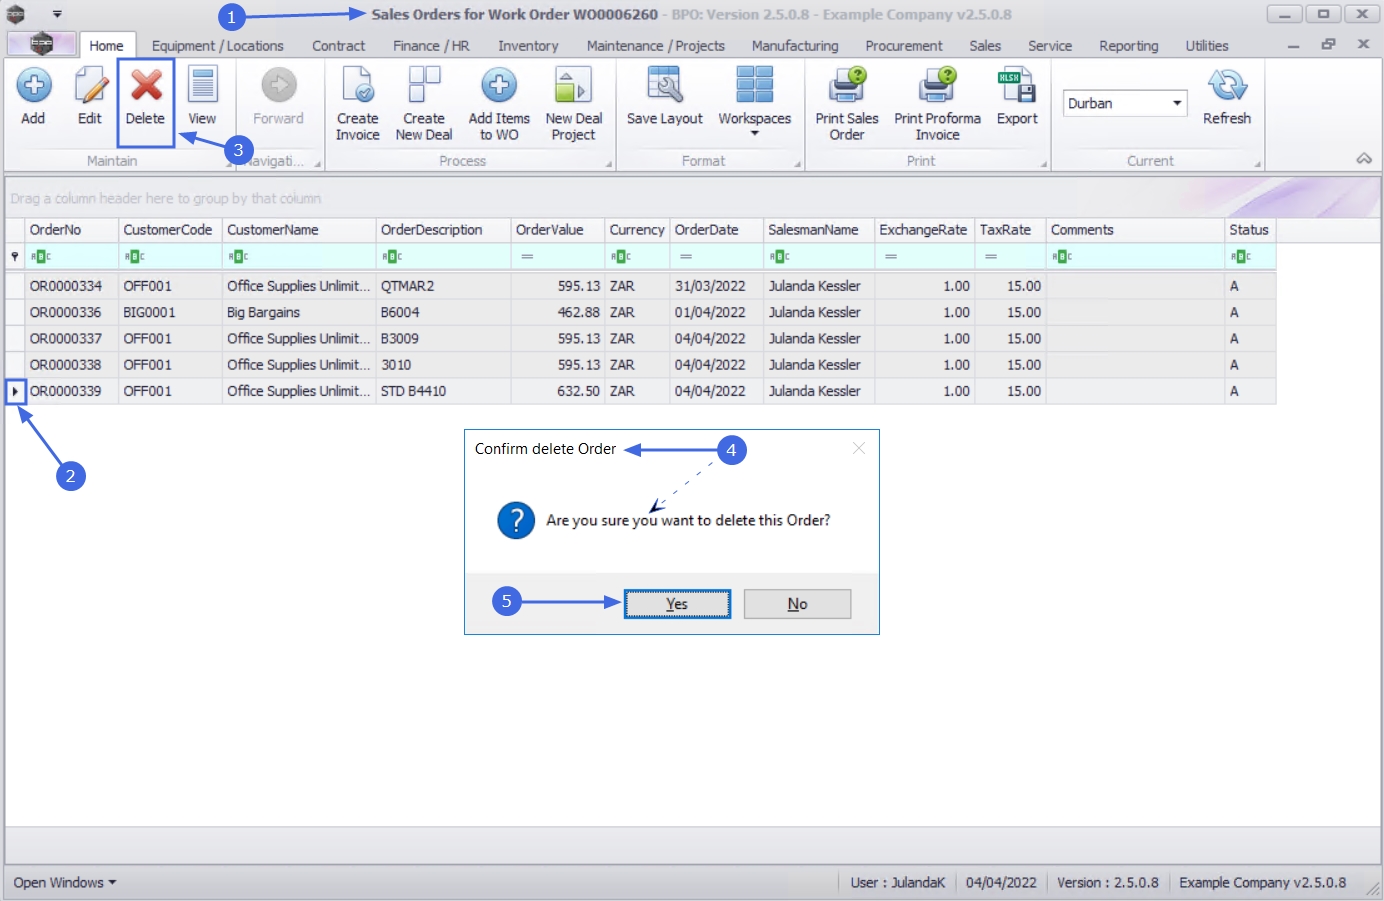
- From the Sales Orders for Work Order [work order number] screen,
- Click on to the row of the Sales Order you wish to remove.
- Click on Delete.
![]() Short cut key: Right click to display the All groups menu list. Click on Delete.
Short cut key: Right click to display the All groups menu list. Click on Delete.
- The Confirm delete Order message will display;
- Are you sure you want to delete this Order?
- Click on Yes.
The Sales Order will be removed from the Sales Orders for Customer listing screen.
![]() For a detailed handling of this topic refer to Orders - Delete Sales Order
For a detailed handling of this topic refer to Orders - Delete Sales Order
View Sales Order
An Order can be viewed in any status.
- From the Sales Orders for Work Order [work order number] screen,
- Click on the row of the Sales Order that you wish to view.
- Click on View.
![]() Short cut key:Right click to display the All groups menu list. Click on View.
Short cut key:Right click to display the All groups menu list. Click on View.

- The View Customer Order - [Order Number] screen will display. No changes can be made to the information on the Order as this is a view only screen.
- You can Print Sales Order / Print Proforma Invoice from this screen.
- Click Back to return to the Sales Orders for Work Order screen.

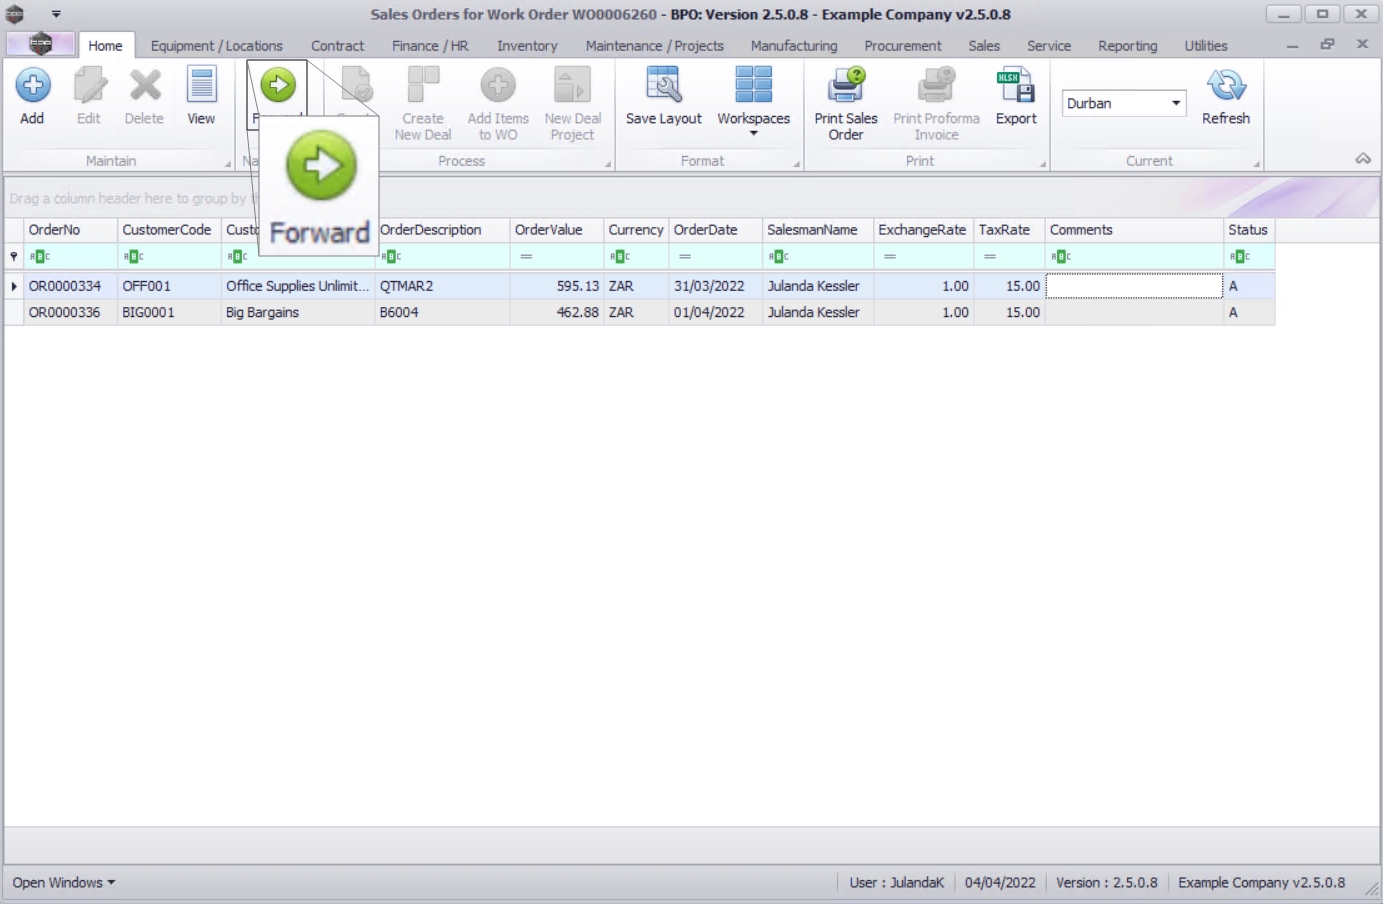
Navigation buttons
- The Forward navigation button allows for quick navigation to related documentation, by navigating to view the Sales Customer Invoice that has been created from the selected Sales Order.
- The Back navigation button will transport you back to the Work Order Listing screen.
Create Invoice
- From the Sales Orders for Work Order [work order number] screen,
- Select the row of the Sales Order you wish to create an invoice for.
- Click on Create Invoice.
![]() Short cut key: Right click to display the All groups menu list. Click on Invoice.
Short cut key: Right click to display the All groups menu list. Click on Invoice.

![]() You will receive three (3) Invoice Generation messages:
You will receive three (3) Invoice Generation messages:
- The first Invoice Generation message will confirm;
- Do you want to convert order no. [order number], for customer, [customer code], to an invoice?
- Click on Yes.

- The second Invoice Generation message will confirm;
- Do you wish to close the Order off? No further Invoices will be possible from this Order if it is closed.
- Click on Yes.

- When you receive the third Invoice Generation message to confirm;
- Do you wish to view the Invoice created, no [invoice number]?
- Click on Yes to view the Invoice.
- Click on No to return to the Sales Orders for Customer screen.

- The Edit Customer Invoice screen will display where you can view or make changes to the Invoice, if required.
- After making the necessary changes, click on Save.
![]() For a detailed handling of this topic refer to Orders - Convert to Sales Invoice
For a detailed handling of this topic refer to Orders - Convert to Sales Invoice

Create New Deal
- From the Sales Orders for Work Order [work order number] screen,
- Select the row of the Sales Order you wish to create a New Deal for.
- Click on Create New Deal.
![]() Short cut key: Right click to display the All groups menu list. Click on New Deal.
Short cut key: Right click to display the All groups menu list. Click on New Deal.

- The New Deal screen will be displayed.
- Complete the New Deal information as required.
- The Call Type field enables you to distinguish if this order is a New Deal Sale or New Deal Rental.
- When you have completed the new deal information, click on OK.
- When you receive the New Deal message to confirm that;
- The new deal call has been created, reference no. [reference number]
- Click on OK.

- You will return to the Sales Orders screen.
![]() For a detailed handling of this topic refer to Orders - Convert to New Deal Sale / Rental
For a detailed handling of this topic refer to Orders - Convert to New Deal Sale / Rental
Add Items to Work Order
The Add Items to WO function is only valid where the Customer Order has been linked to an existing Work Order.
- From the Sales Orders for Work Order [work order number] screen,
- Select the row of the Sales Order you wish to add items to.
- Click on Add Items to WO.
![]() Short cut key: Right click to display the All groups menu list. Click on Add Items.
Short cut key: Right click to display the All groups menu list. Click on Add Items.
- When you receive the Add Items to WO message to confirm;
- Are you sure you wish to add these order items to associated work order no [work order number]?
- Click on Yes.

- You will return to the Sales Orders for Work Order screen.
- The Work Order items will have been added to the Sales Order.
![]() For a detailed handling of this topic refer to Orders - Add Items to Work Order
For a detailed handling of this topic refer to Orders - Add Items to Work Order
New Deal Project
-
- The New Deal Project sales process will create a Project for work to be done and invoiced upon completion.
- Converting a Sales Order to a New Deal Project will create a new Project, and any parts and / or services listed on the Sales Order will be requested.
- This process begins from the Sales Orders for Customer Listing screen.
- You can also convert to a New Deal Project from the Sales Orders Listing screen.
- From the Sales Orders for Customer [Customer Code] screen,
- Click on the row of the Sales Order you wish to convert to a New Deal Project.
- Click on New Deal Project.
 Short cut key: Right click to display the All groups menu list. Click on New Deal Project.
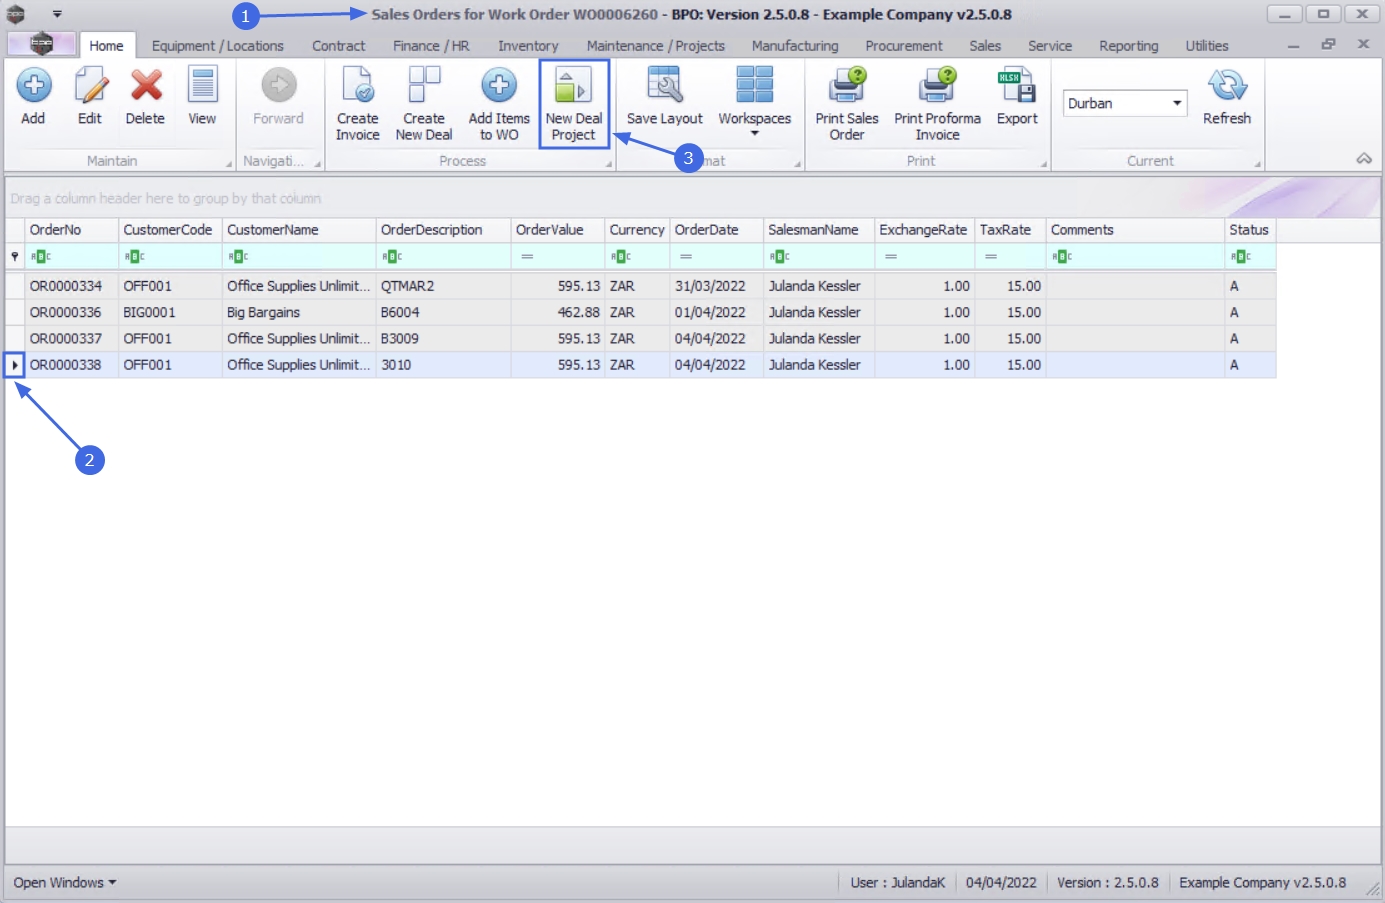
- The New Deal Project screen will be displayed.
- Complete the New Deal Project Details as required,
- Click on OK to save the new deal details.
- When you receive the New Deal message to confirm;
- The new deal project has been created, reference no. [reference number]
- Click on OK.

- You will return to the Sales Order screen.
For a detailed handling of this topic refer to Orders - Convert to New Deal Project
Print Sales Order / Print Proforma Invoice
- You will be able to Print a Sales Order and / or Print a Proforma Invoice from the;
- Sales Orders screen
- Add new Customer Order screen
- Edit Customer Order screen
- View Customer Order screen
- For this example, the proforma invoice will be printed from the View Customer Order - [Order Number] screen. The same procedure can be followed from any of the above mentioned screens.
- From the View Customer Order - [Order Number] screen,
- Click the print option that you require.
 Print Sales Order Print Proforma Invoice
 - The example has Print Proforma Invoice selected.

- The Select the option as desired message will display.
- Click on the radio button to select either Print Order, Email Order or Print and Email Order. When selecting to Email the Quote, the quote will be emailed via the BPO Email Service on the server and not from MS Outlook.
- The example has Print Order selected.
- Click on Accept to proceed.

- The Sales Order or the Proforma Invoice (this will depend on the print option you made earlier) will display in the Preview screen.
- You can make cosmetic changes to the document, as well as Save, Print, Export, Add a Watermark or Email the Sales Order or Proforma Invoice.
- Click on Close to return to the Sales Quotes for Customer screen.
![]() For a detailed handling of this topic refer to Orders - Print Sales Order or Orders - Print Proforma Invoice
For a detailed handling of this topic refer to Orders - Print Sales Order or Orders - Print Proforma Invoice

MNU.072.027