We are currently updating our site; thank you for your patience.
Service
Calls - Log a Call
Note that there are changes to the Call Centre screens due to the Call Centre Performance Enhancements rolled out in part of the
Extended Call Centre - Version Compatibility![]() . The functionality that is available to you may differ depending on the Call Centre mode configured and your user rights. For more information related to this, refer to the Call Centre Mode notes.
. The functionality that is available to you may differ depending on the Call Centre mode configured and your user rights. For more information related to this, refer to the Call Centre Mode notes.
Calls are primarily created when customers phone in for service related requirements.
-
The Call Listing screen is used to log billable and non-billable Service Calls against contract and non-contract items, whether these are Assets or Locations.
-
One or multiple Work Orders can exist within a call. Work Orders are likened to Job Cards or Work Instructions. Work In Progress transactions will be recorded against these work orders for the work that is required including Labour Time Booking, Parts, Expenses, Travel, Services and Sub Contract Work.
-
Generally either an Asset or Location must be selected when logging the Call, and a Work Order is auto created when saving the Call. But this is dependant on your Company's system configuration. Refer to Specialized Call Configuration for more details about processing outside the standard processing.
-
New Deal Sale and New Deal Rental processing will also process through the call centre screen to enforce the Work In Progress transactions for installation of Sale or Rental Items.
-
Calls are Assigned to employees (such as Technicians or Drivers) in order to perform the work required. An employee must be set as a Technician in order to be available for assignment. Refer to TechConnect for more information related to our mobile application that Technicians can use out in the field.
-
Once work has been completed Work In Progress transactions can then be Invoiced if required, dependant on the scenario.
![]() If the Company, Contact, or Address details for the customer have changed, then you can quickly update the details via the relevant Ellipse button in the call screen. Refer to Calls - Edit Buttons
If the Company, Contact, or Address details for the customer have changed, then you can quickly update the details via the relevant Ellipse button in the call screen. Refer to Calls - Edit Buttons
![]() You cannot log a call for a Customer on Hold. If you select a customer that is on hold, you will asked if you would like to log a Call Request instead.
You cannot log a call for a Customer on Hold. If you select a customer that is on hold, you will asked if you would like to log a Call Request instead.
![]() An optional telephone number can be added to the call, which will be for your reference, when logging or editing the call. Refer to Call Details
An optional telephone number can be added to the call, which will be for your reference, when logging or editing the call. Refer to Call Details
Call Logging - Detail Selection Methods
-
Call details can be selected based on what information is given when the client phones in.
-
For example, if a call is logged for a serialised item and the serial number is known, this can be selected first. Associated header information will auto populate, which makes the call logging process faster.
-
In this manual, we will first look at the standard call logging process, and then include a few tips for other call detail selection methods, such as first selecting the Serial Number or Location, Customer, Contact, or Telephone Number.
Log a Call
Ribbon Select Service > Calls

- The Call Listing screen will be displayed.

- The Calls are listed by Site and will display calls for the first Site listed.
- Click on the relevant Site for the calls you wish to view.

-
Click on the Add button.


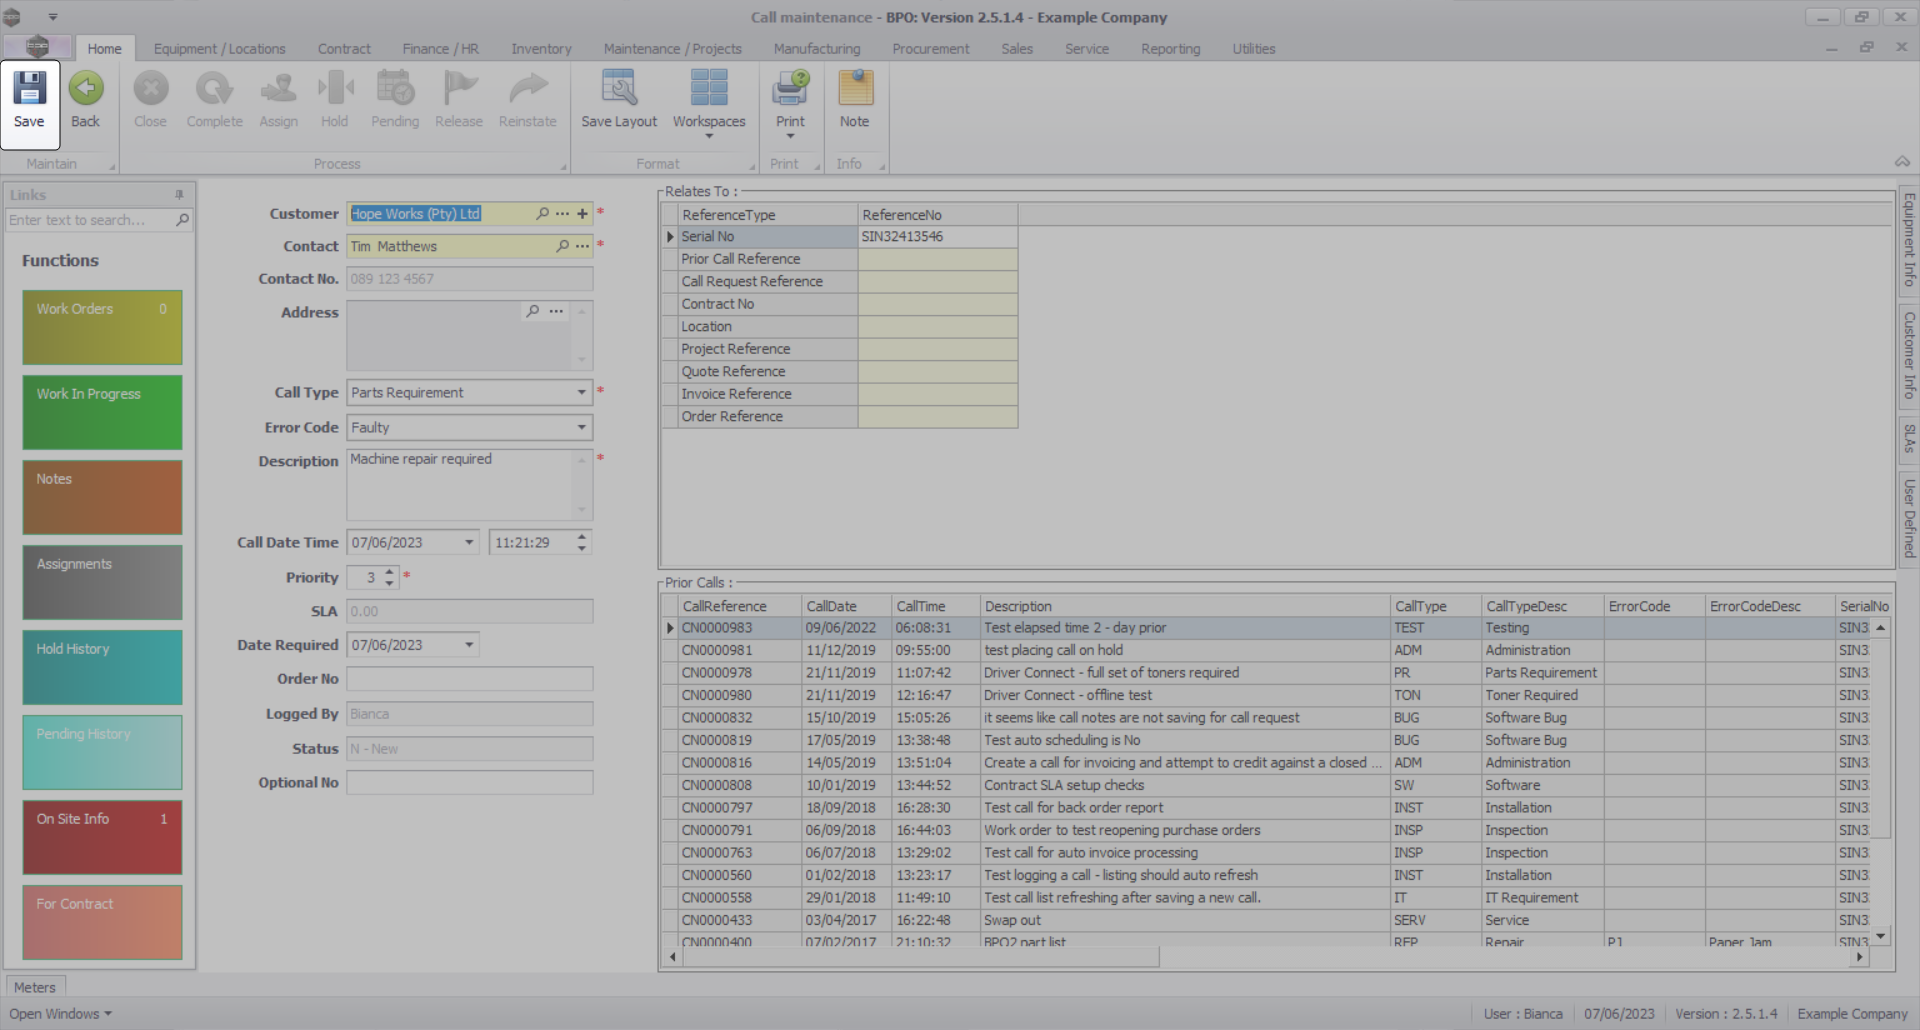
Call Details
- The yellow colouring of the field indicates that you can search for the customer, using one of two methods.
![]() Search Method 1:
Search Method 1:
- Type in a part of the Customer Name in the Customer field and press Enter.
- The example has "cafe" typed in the field. When pressing Enter, the system will locate all the Customers that has "cafe" as part of the name.
- If the system locates the Customer, then the screen will be populated with the customer information.
- If more than one Customer exists, then the Select a customer for this call screen will display a list of the Customer's that have "cafe" forming a part of the name.
- Skip to Select Customer below

![]() Search Method 2:
Search Method 2:
- Click on the search button in the customer field.
- The Select a customer for this call screen will display, listing all Active Customers.
- Click on the row of the customer you wish to log a call for.
- Click on OK.

- Click on the row of the customer you wish to log a call for.
- Click on OK.
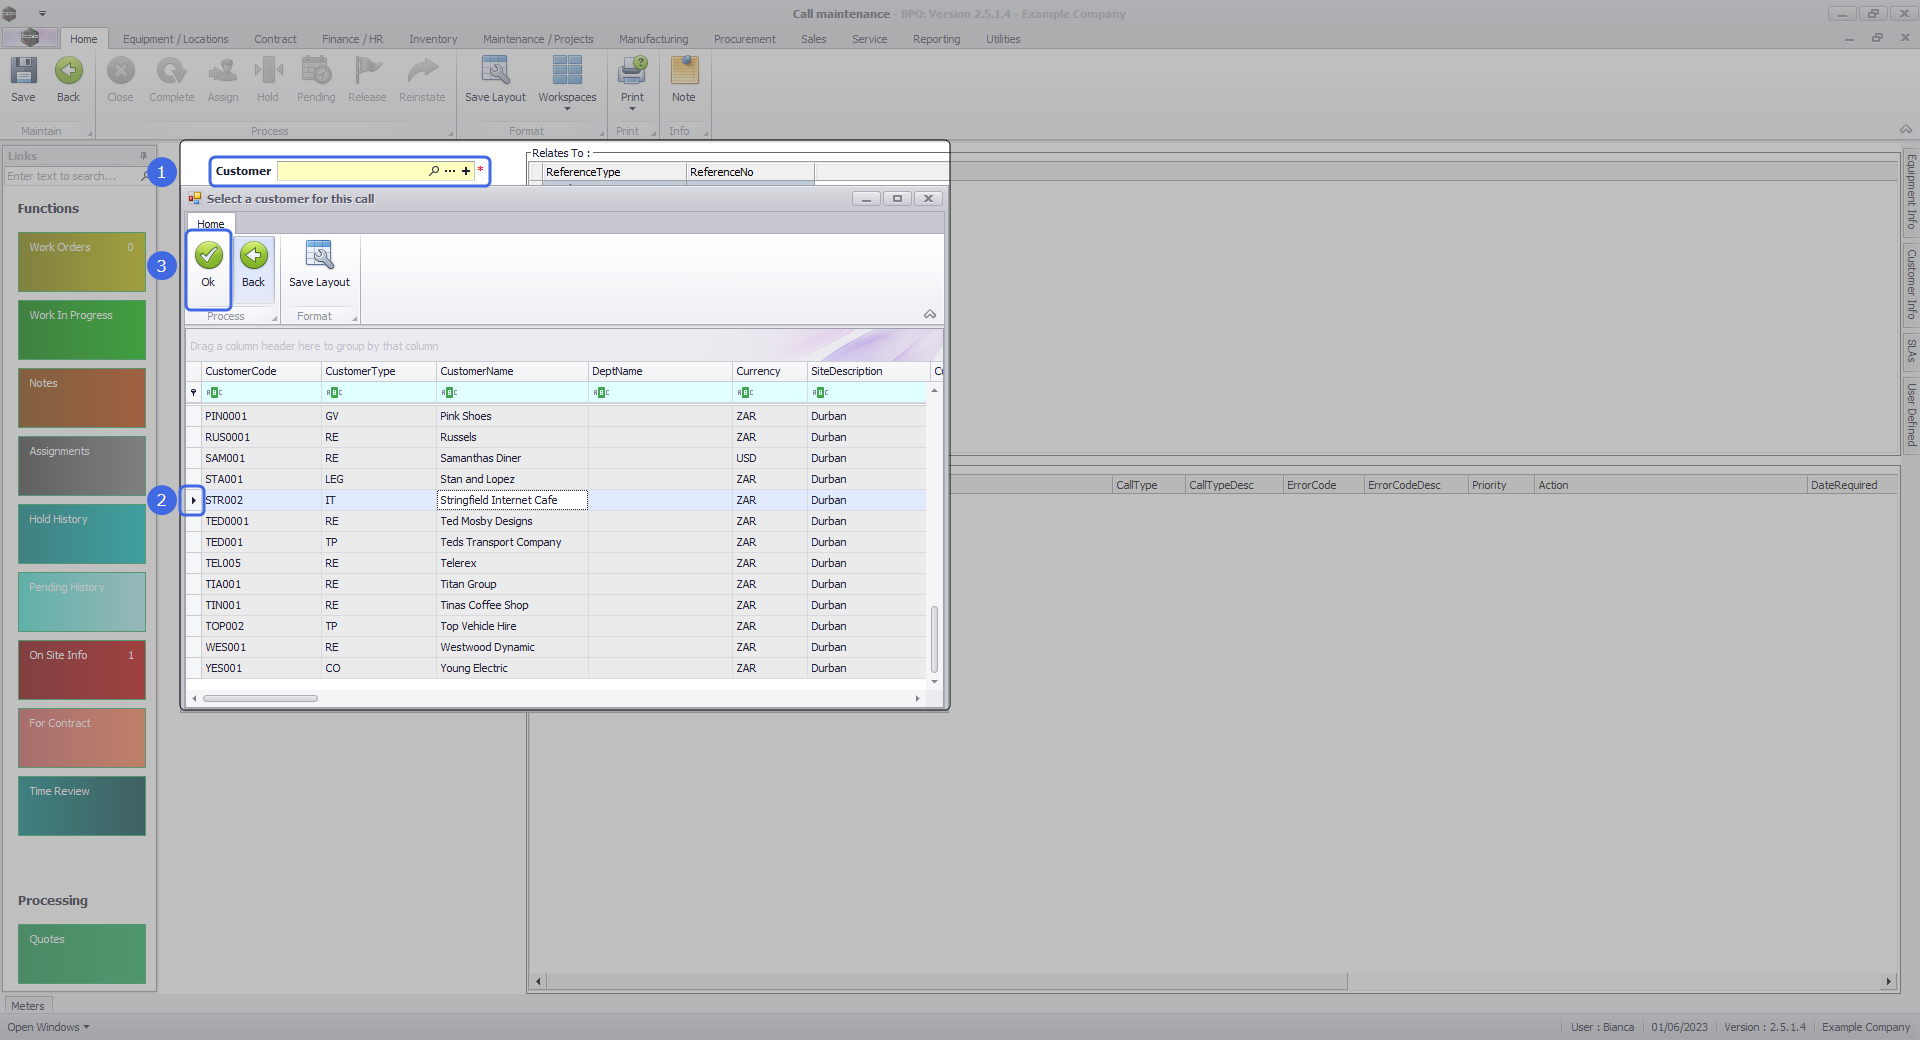
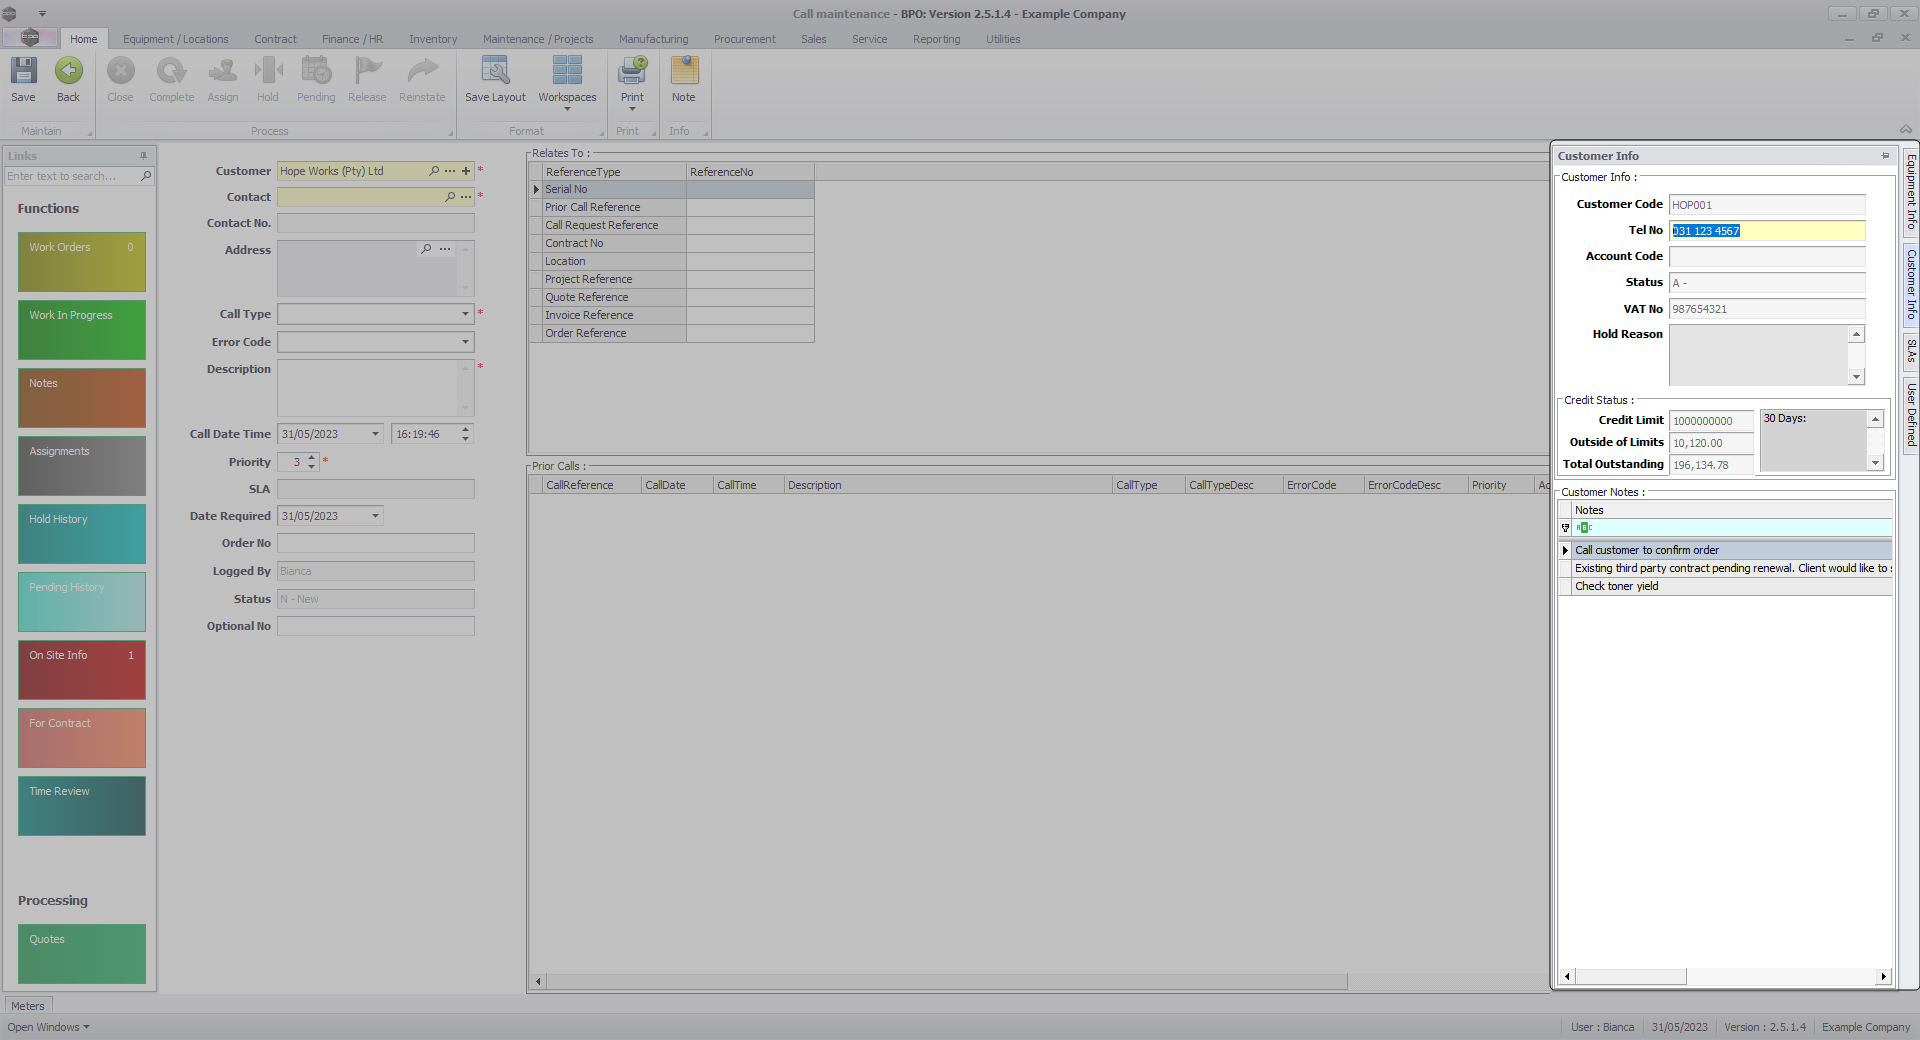
- The Customer Info docking panel will expand to display view only details for the selected customer. This is helpful for customer and credit status checks, as well as any prior call notes.
- When done, click anywhere outside this dock panel to hide it.
- The yellow colouring of the field indicates that you can search for the customer, using one of two methods.
![]() Search Method 1:
Search Method 1:
- Type in a part of the Contact Name in the Contact field and press Enter.
- The example has "Tim" typed in the field. When pressing Enter, the system will locate all the Contacts that has "Tim" as part of the name.
- If the system locates the Contact, then the field will be populated with the contact name.
- If more than one Contact exists, then the Select a contact for this call screen will display a list of the Contact's that have "Tim" forming a part of the name.
- Skip to Select Contact below.

![]() Search Method 2:
Search Method 2:
- Click on the search button in the contact field.
- The Select a contact for this call screen will display, listing all Active Contacts for the Customer previously selected.

- Click on the row of the contact you wish to link to the call.
- Click on OK.
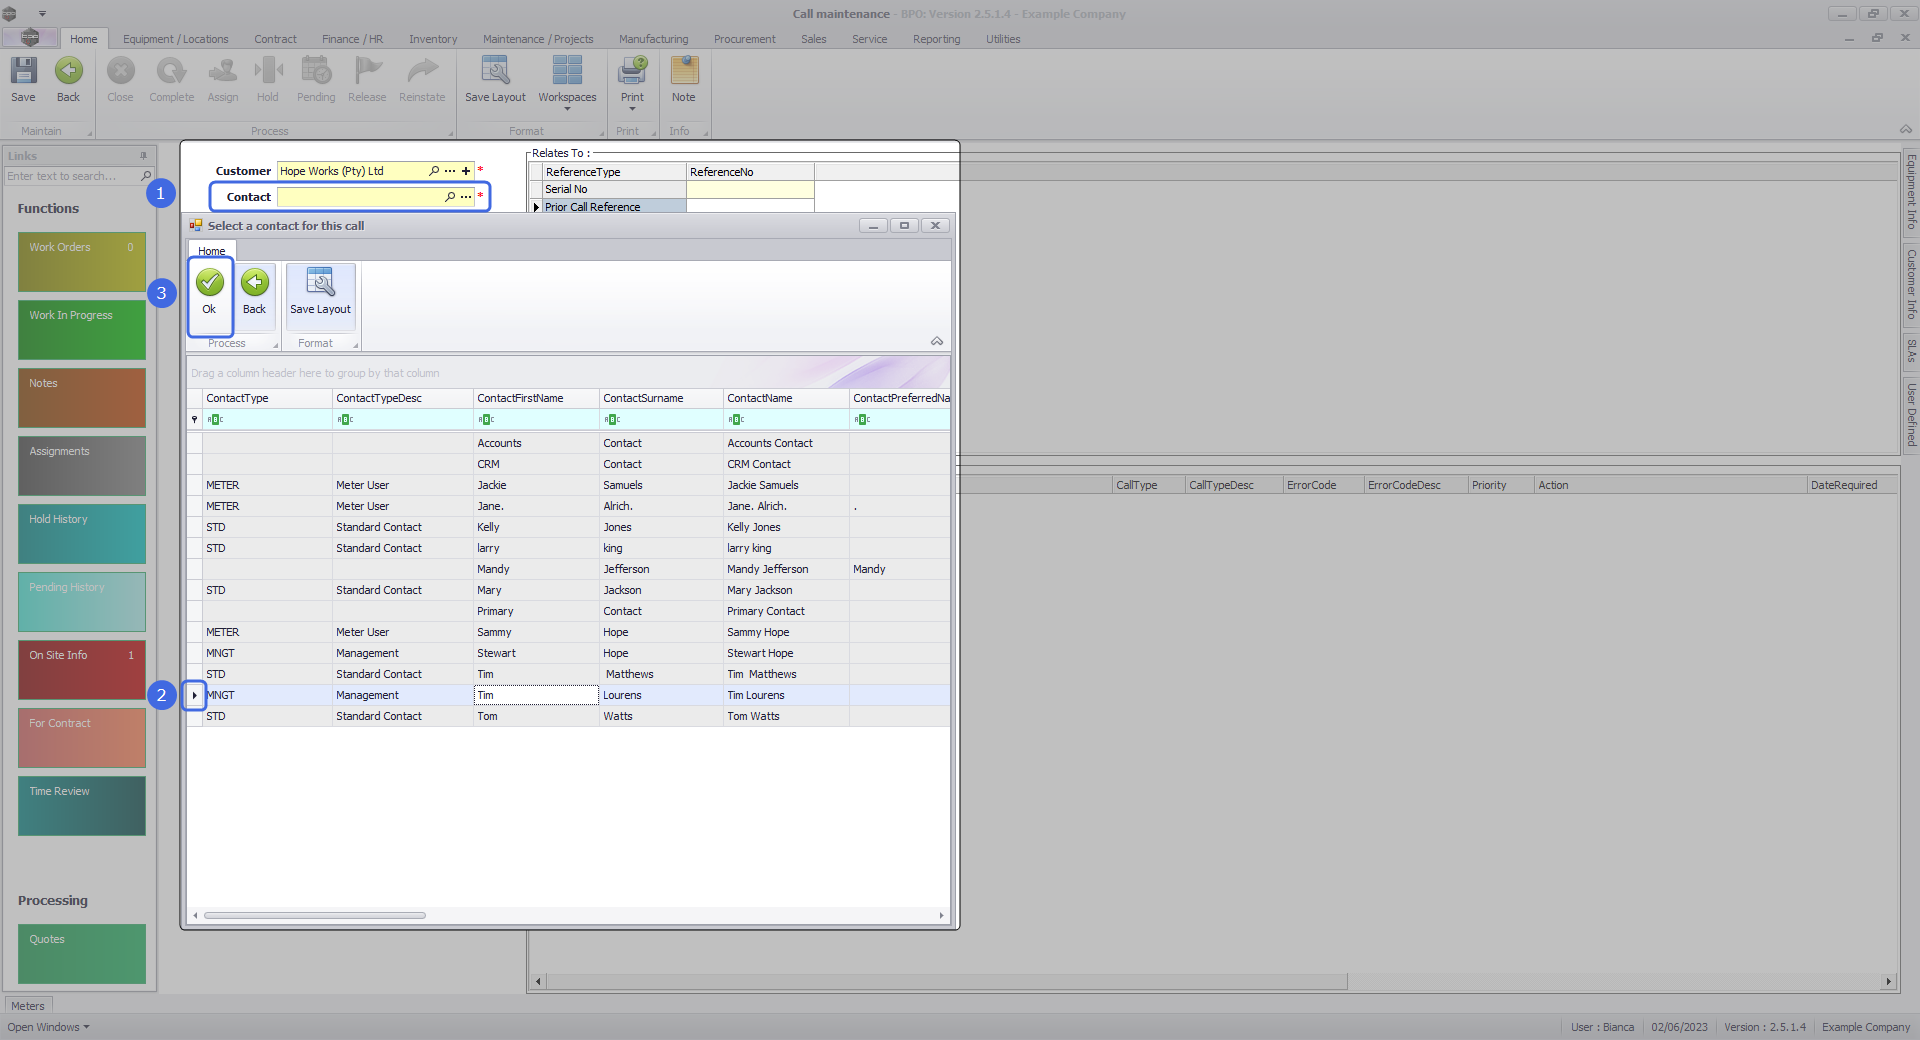
![]() If you have searched for the contact person, and they do not appear on the list, then you can add a new contact from the Call Maintenance screen. This contact should be added as a Standard Contact. Refer to Calls - Add New Contact.
If you have searched for the contact person, and they do not appear on the list, then you can add a new contact from the Call Maintenance screen. This contact should be added as a Standard Contact. Refer to Calls - Add New Contact.
- Contact No: When the contact is selected, this field is auto populated with the contact's telephone number if configured on the contact.
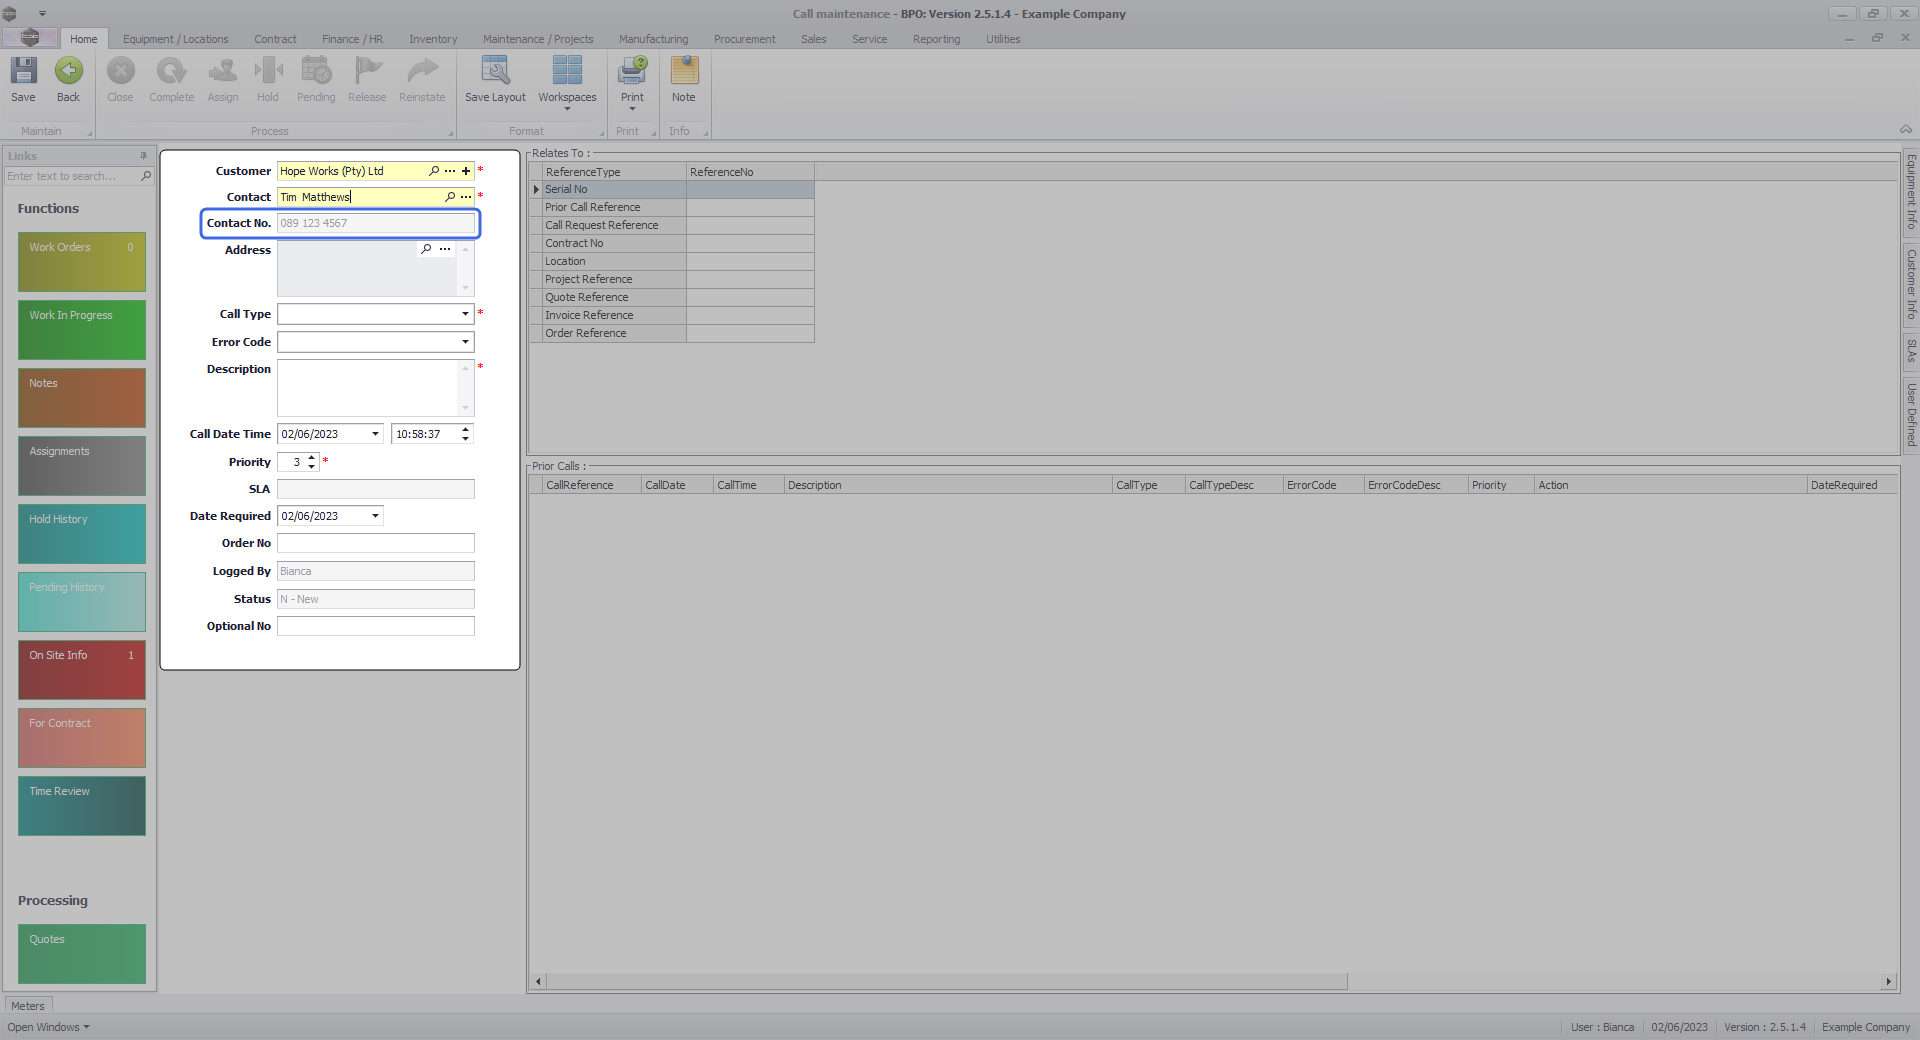
- Address: Search for and select the address.

- Call Type: Select the required call type from the drop down list. (Refer to Static Data - Call Types if the call type required has not yet been configured.)

- Error Code: Click on the down arrow to display the error code list.
- Select the error code type as quoted by the customer. This field is not a mandatory field and my not be set up, depending on system requirements. (Refer to Static Data - Call Error Codes for setting up error codes if not configured.)

- Description: Click in the text box to type in a description for the work required.
- Call Date Time: This field will display the current date and time by default, and should not be changed.
- Priority: Click in the field to type in or use the arrow indicators to select the call priority.
- SLA:
 This is the Service Level Agreement that you have signed with your customer. It is a contract of performance that you have agreed to. For example, if your customer calls with a requirement for a part or service request and your agreed response time to this customer (SLA) is 5 hours then you are required to have the part or technician on site within that time frame.
receive compensation of a pre-agreed type (usually also set up in the SLA). This field cannot be updated, as the service level agreement information will populate for the customer.
This is the Service Level Agreement that you have signed with your customer. It is a contract of performance that you have agreed to. For example, if your customer calls with a requirement for a part or service request and your agreed response time to this customer (SLA) is 5 hours then you are required to have the part or technician on site within that time frame.
receive compensation of a pre-agreed type (usually also set up in the SLA). This field cannot be updated, as the service level agreement information will populate for the customer. - Date Required: The date will default to the current date. Click to type in or use the down arrow to select an alternative date using the calendar function.
- Order No: Type in the Purchase Order number raised by the customer, if required.
 Note that this field could be mandatory based on the customer contract configuration i.e. if it is specified in the contract to include the Order Number then this will become a mandatory field for that particular customer.
- Logged By: This field will be populated with the name of the person currently logging the call.
- Status: The call status field will be set to N - New by default.
- Optional No: This field can be used for an additional reference number that the customer may wish to keep on record.

Related References
The Related To frame holds related references, such as the Serial Number or Location, originating Call Request Number, Contract Number, etc.

For Standard call log processing, we will select either a Serial Number or Location.
Serial Number
- Click in the Serial No. field to display the ellipsis button.
- Click on the ellipsis button and select the serial number you wish to log the call against.
- Click on OK.
![]() Note that as you have selected the customer first, the equipment list will be limited to the machines linked to the customer.
Note that as you have selected the customer first, the equipment list will be limited to the machines linked to the customer.

Meters
- If the asset has meters linked, then the Meters frame will automatically expand to display the Meter reading data grid.

- Type in the meter reading(s), if required.
- It is good practice to get the meter reading when logging a call, and is mandatory for requesting parts that are yield controlled.
- If this is a service related call, then you may only get the readings when the technician returns from the call, at which point you can edit and update the readings.
- You can also add a comment for each meter reading.
- When the meter reading has been updated, hide the frame by clicking outside the frame.
- Jump ahead to Contract Number.
Location
- Click in the Location field to display the ellipsis button.
- Click on the ellipsis button and select the Location you wish to log the call against.
- Click on OK.
![]() Note that as you have selected the customer first, the location list will be limited to the locations linked to the customer.
Note that as you have selected the customer first, the location list will be limited to the locations linked to the customer.

Contract Number
- If the Serial Number or Location you have selected is on contract, then the contract number field will auto populate with the contract number.

The Call maintain screen has a lot of helpful information that can be viewed when logging the call or after the call has been saved.
You can skip ahead to Adding the Call Note or Saving the Call.
Equipment Info
The Equipment Information dock panel will only contain information where a Serial Number is linked to the call, as this information is related to the associated part number.
-
Click on the Equipment Info tab.

-
The Equipment Info dock panel will open, displaying useful information related to the serial number and its part number:
-
Part No, Part Description, Model Number, Category, Duty Cycle and Life Cycle information related to the Part Number.
-
Warranties - will list any warranties assigned to the Serial Number.
-
Purchase Orders - ?
-

SLAs
If the Item is on contract any SLA Contract Inclusion Items will display in this list.
-
Click on the SLAs tab.

-
The SLAs dock panel will open displaying the SLA Items as well as the quantity included.
For Labour Time, you will be able to see how many hours are included versus how many hours have been used. If Time Review is used, you can also see time logged that has not yet been reviewed as under SLA.

-
Click on the expand data grid button to view the SLA Item Details
-
This will show you a record of the items logged under SLA

User Defined Fields
The inclusion of User Defined Fields is to provide more information within the Asset, Contract, Customer and Location modules so that associated work/processes can be carried out more efficiently. It will serve as connective tissue between contracts and call center functions to improve call center performance by having readily accessible information.
- Click on the User Defined dock panel tab to open the panel.

- Any custom fields configured and updated for the related Customer, Asset or Location and /or Contract linked to this call will display in the User Defined field panel.

Add Call Note
- A Call Note can be added directly from the Call Maintain screen by clicking on Note.

- The New Note frame will be displayed.
- Click in the text area to type the customer note and click on Close when done.
- The Note will be saved as a Call Note when the call is saved.

-
 Refer to Calls - Notes to view a list of all the notes created for the Call.
Save the Call
- When you are done, click on Save.
- You will return to the Call Listing screen where you can view the new call log.
- If the new call log is not immediately apparent in the Call Listing screen, then click on Refresh.

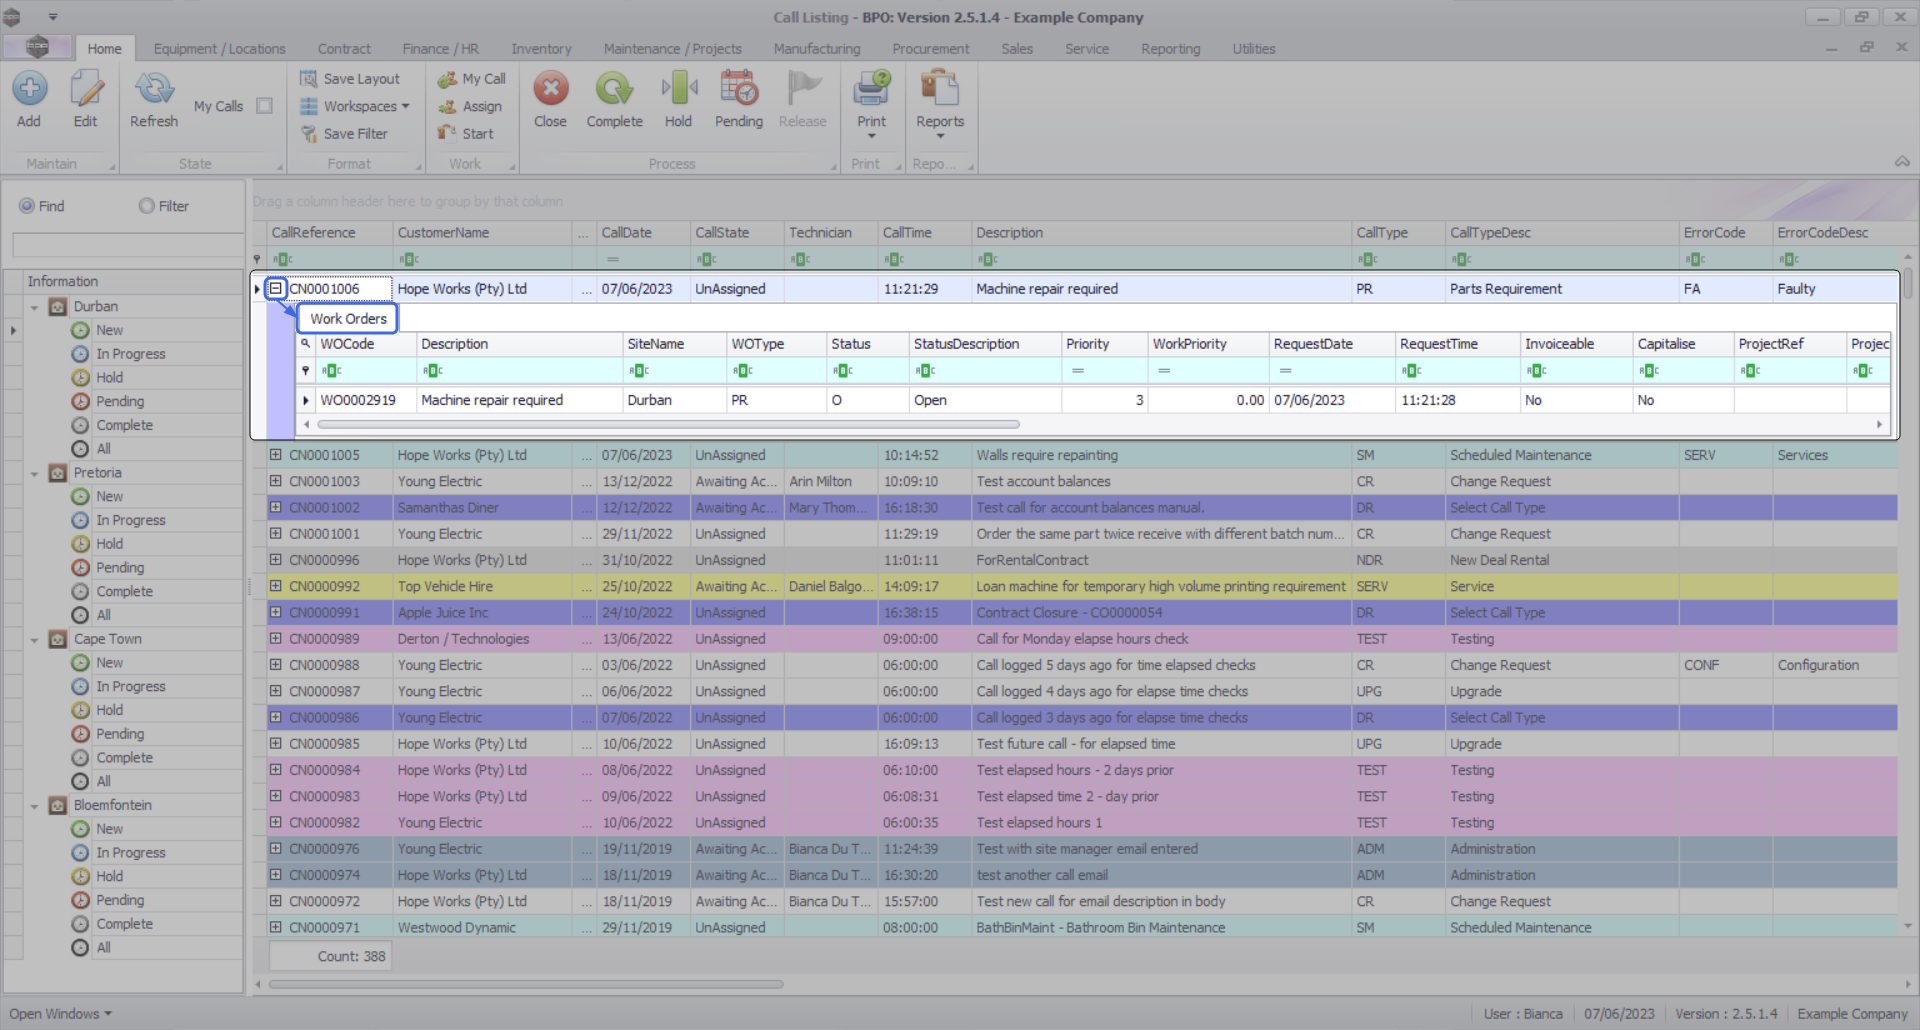
View Work Order Details
For standard call centre processing, the underlying Work Order is automatically created.
- From the Call Listing screen,
- Click on the expand button [+] in the row of the call log you wish to view the work order details for.
- The Work Order data grid will expand to display the generated work order number and all the information related to the call log.
You can also view the call work order(s) from the call maintain screen.
Additional Detail Selection Methods
As noted in the introduction text, using these detail selection methods can help speed up the call logging process.
Log Call from the Serial Number or Location
- In the Relates To frame, select either the Serial No. or the Location.
-
The associated Customer and Customer details will auto populate, and if the item selected is on Contract, the Contract Number will also auto populate.
Find Customer by Tel No
Alternatively, search for the customer by Telephone Number.
![]() Note that the telephone number saved on the customer record, and the number you are searching for should not have any spaces.
Note that the telephone number saved on the customer record, and the number you are searching for should not have any spaces.
- From the Call maintenance screen,
- Click on the Customer Info tab.

-
In the Tel No field, type in the telephone number and press enter on your keyboard.
-
If the number matches a telephone number on a single Customer, the customer details will populate.
-
If a few customers have the same telephone number, a lookup will list display that you can select from.
-

-
The associated Customer and Customer details will auto populate.
MNU.122.001