We are currently updating our site; thank you for your patience.
CRM Basics
Cold Call
- A Cold Call is a quick and easy way to raise a new Customer, Contact, Address, Case and Activity.
- A Cold Call can also be created for existing customers.
- A Cold Call for New or Existing Customers can be created from the Homepage or the Customer Homepage . Either of these processes will direct you to the Create Cold Call screen with the Customer frame clear of any details.
- A Create Cold Call for Customer Action button has been added to the Customer Dashboard Information frame. Navigating from this button will auto populate the selected Customer Details.
| Ribbon Access: Webpage > http://[servername]:[portno]/BPOCRM/User.aspx |
Access Cold Calls from Customer Dashboard
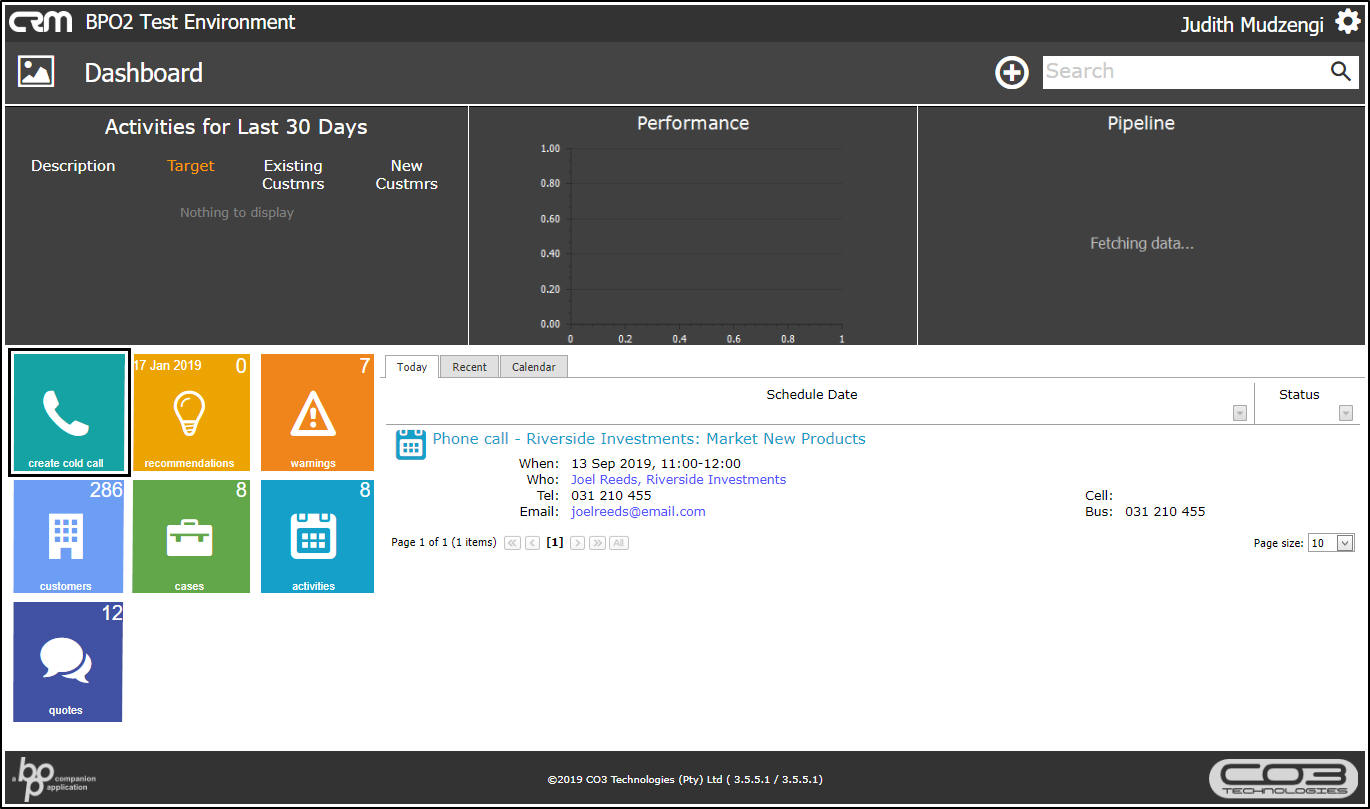
- Click on the Customers tile from the Dashboard .
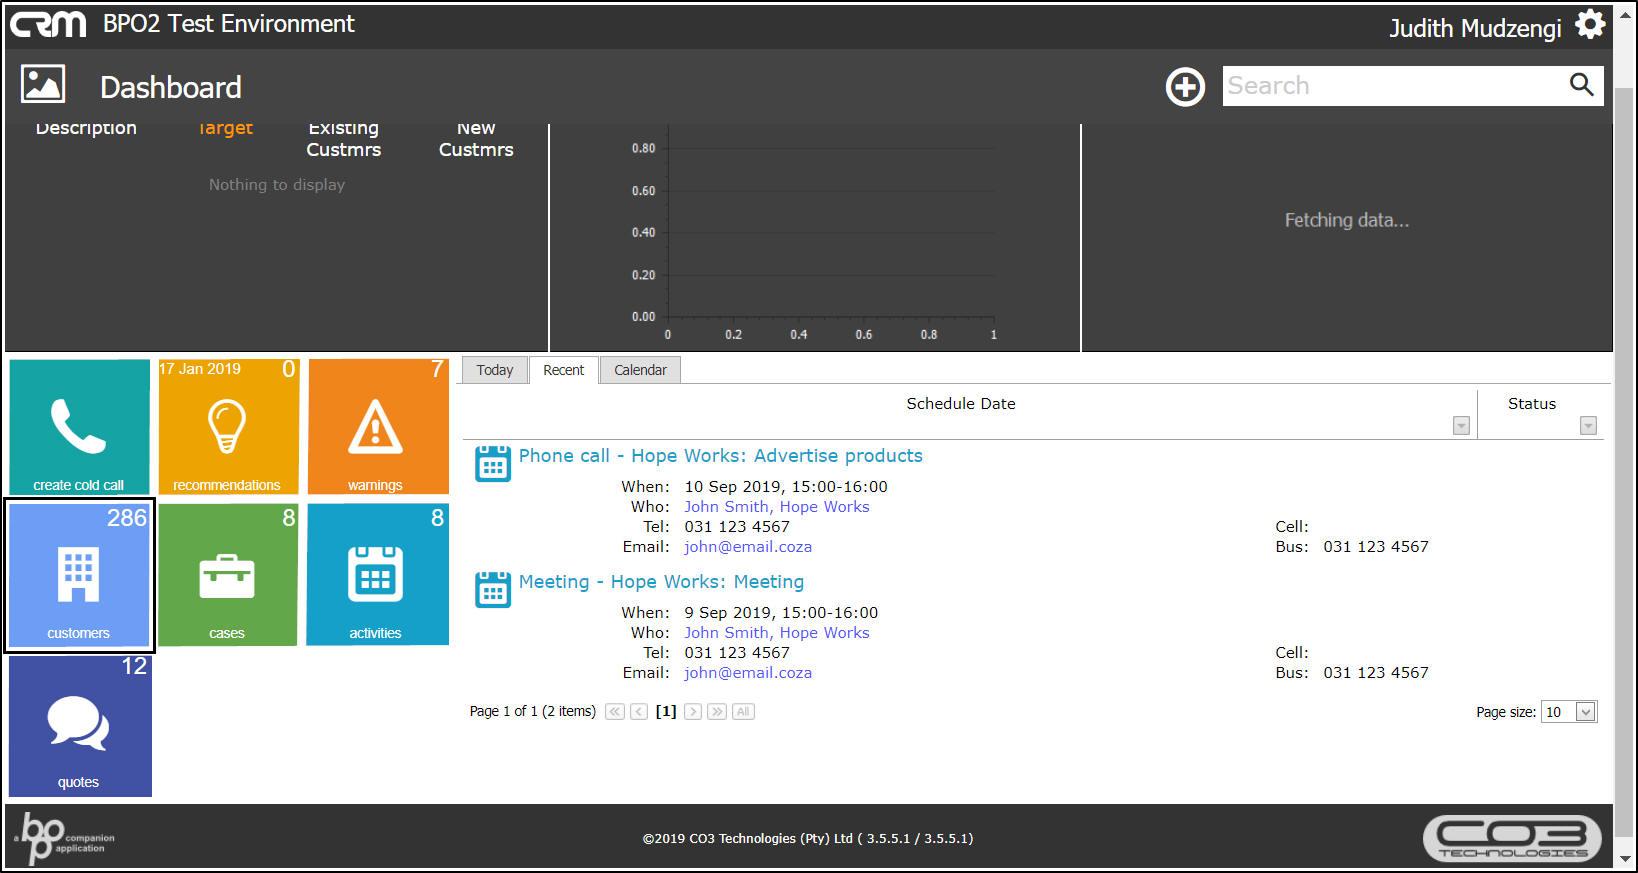
- The Customers screen will be displayed.
- A list of customers will be displayed.
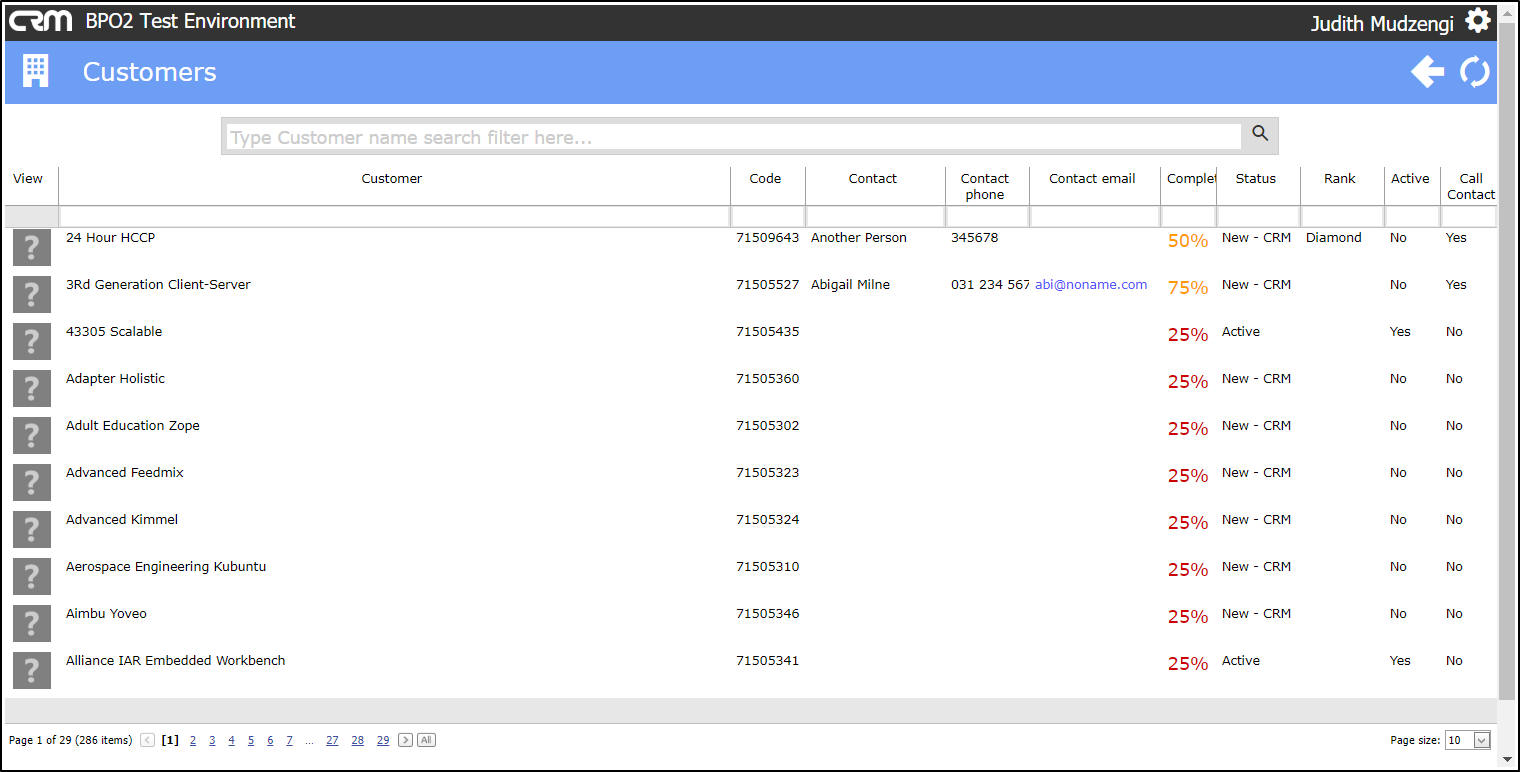
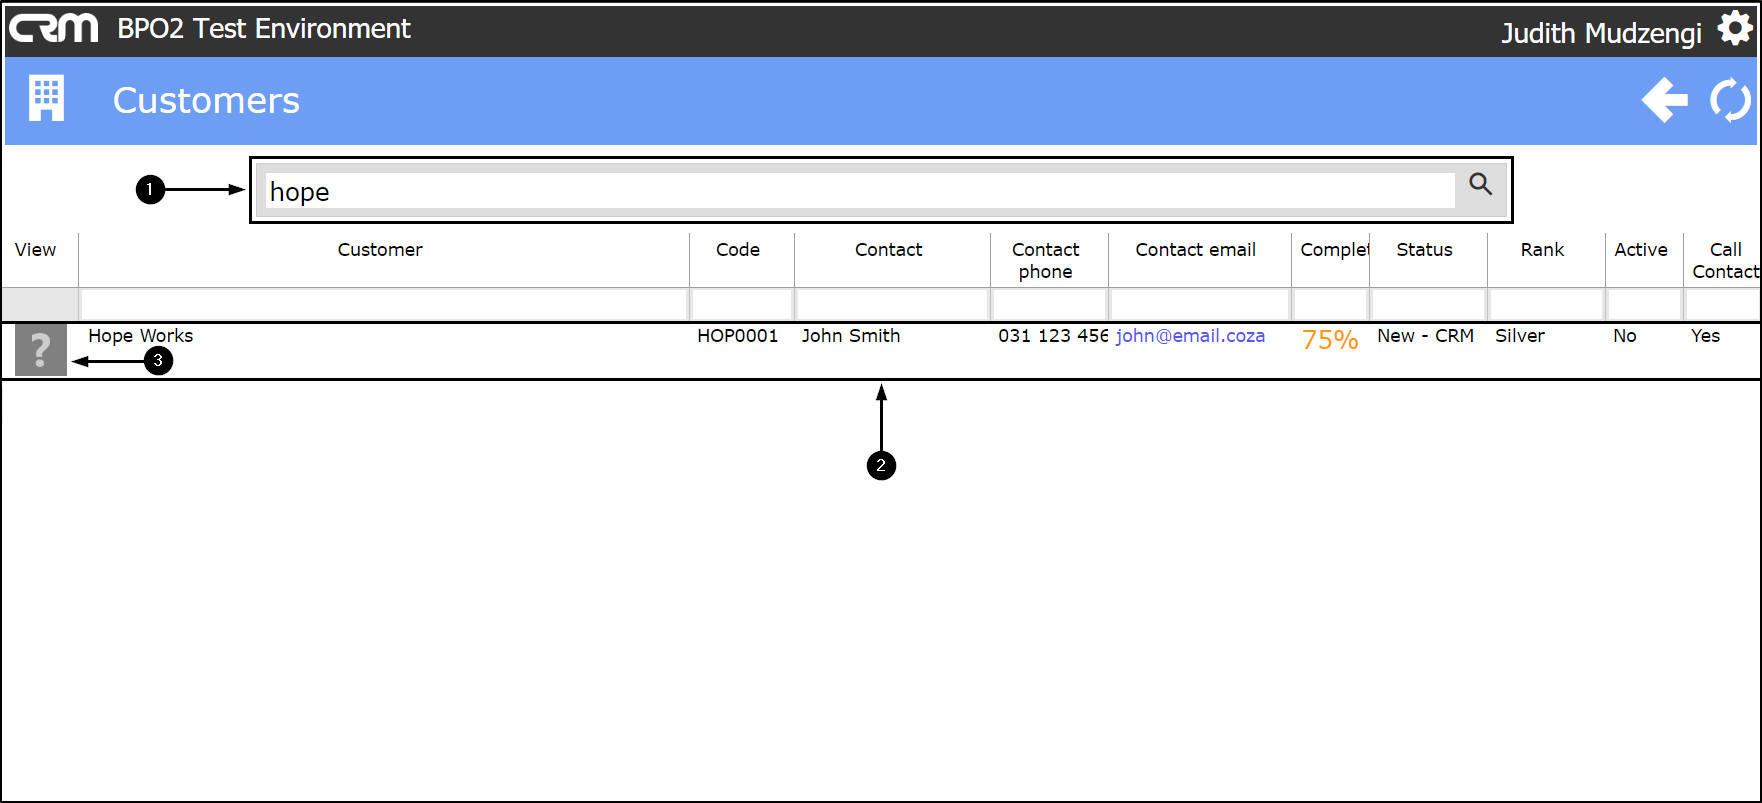
- Type in the customer name that you wish to create a cold call for in the Search bar.
- The system will filter for and display that customer in the list.
- Click on the Customer icon in the View column.
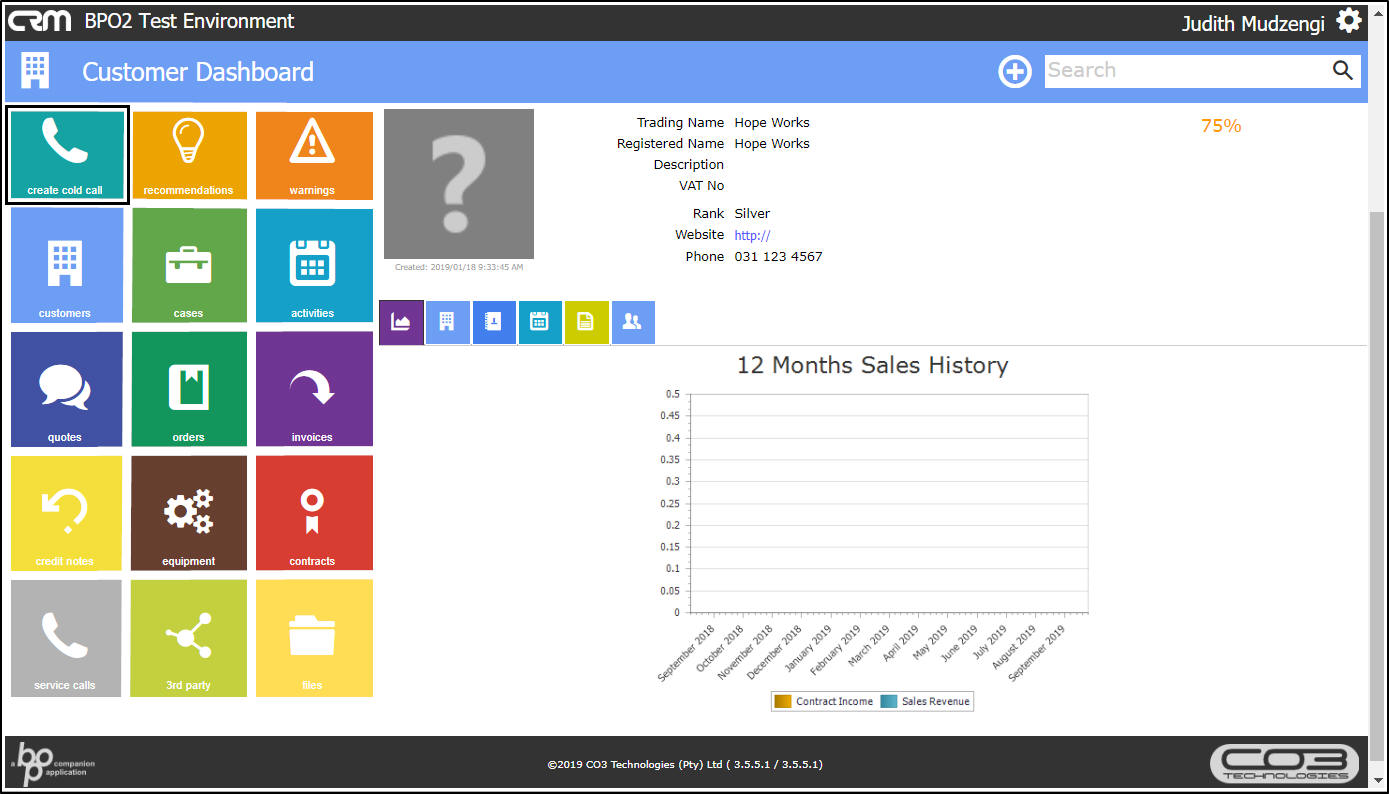
The Customer Dashboard screen will be displayed.
- Click on the Create Cold Call tile.
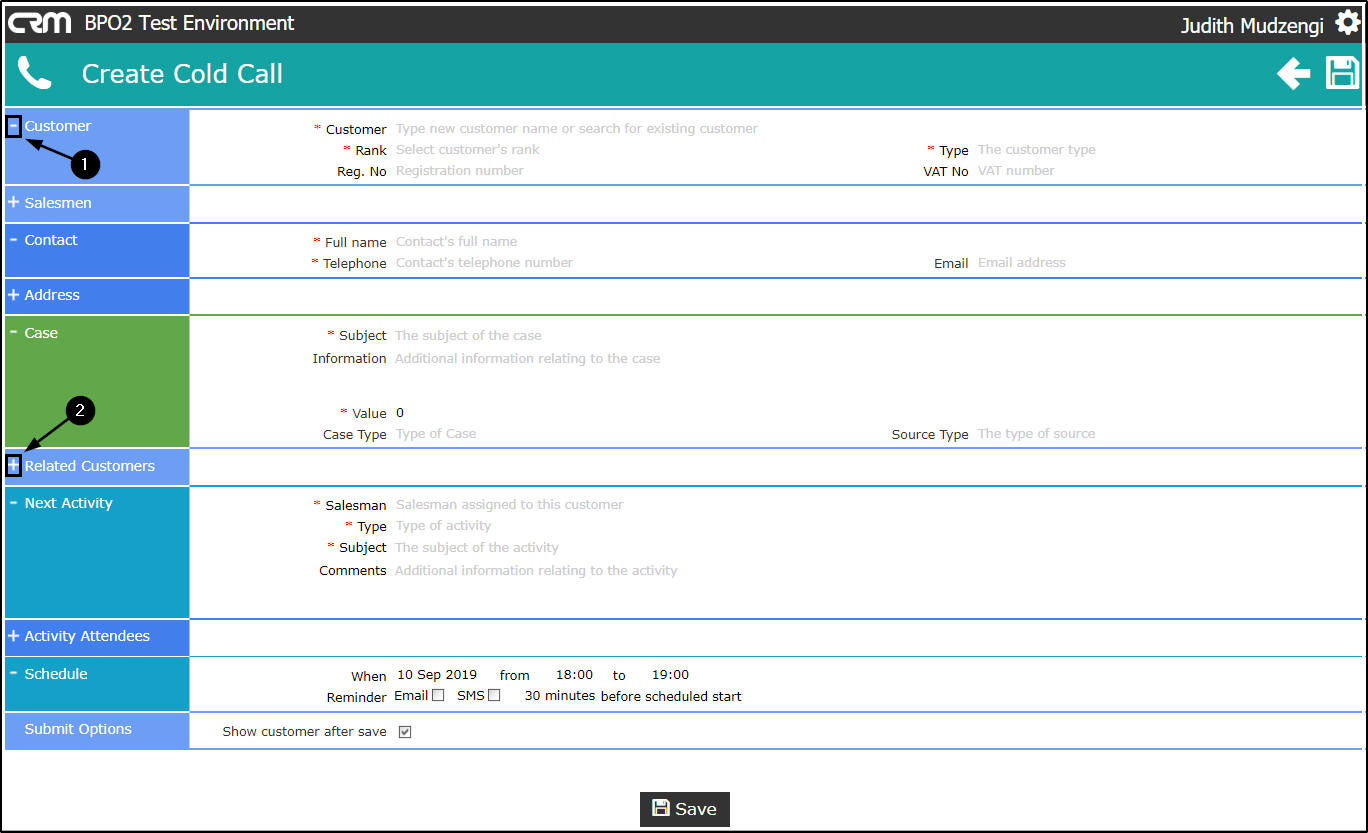
The Create Cold Call screen will be displayed.
- Click on the [ - ] sign to view more details.
- Click on the [ + ] sign to view less details.
Access Cold Calls from the Dashboard
- Click on the Create Cold Call in the Dashboard (Home page).
The Create Cold Call screen will be displayed.
- Click on the [ - ] sign to view more details.
- Click on the [ + ] sign to view less details.
Create Cold Call For New Customer
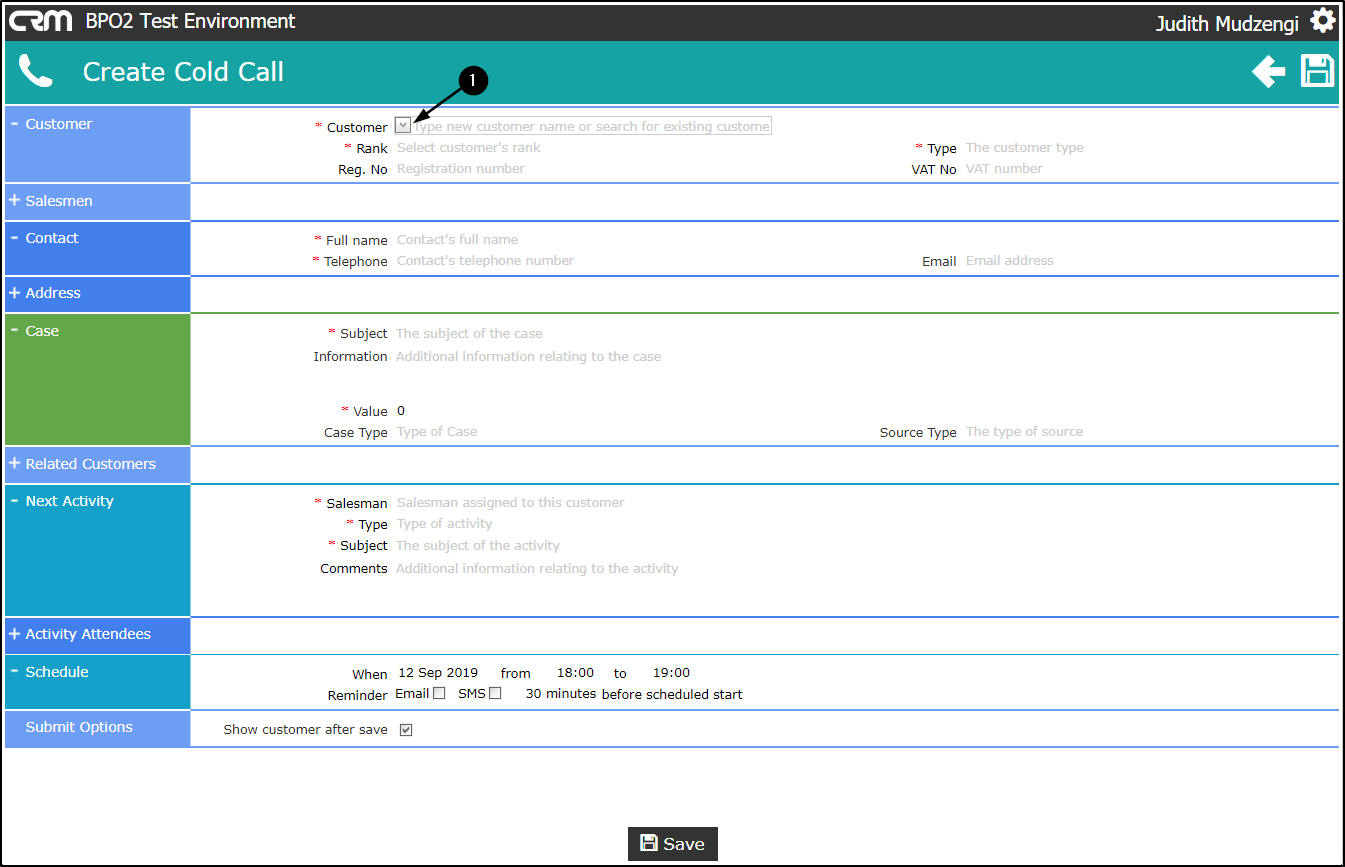
Customer F rame
- Customer:
- For a new customer, type in the Customer Name.
- As you type, companies with similar names will appear to help prevent duplicates.

- Rank: Click on the drop-down arrow and select the relevant rank.
- Reg No: Type in the company registration no, if applicable.
- Type: Click on the drop-down arrow and select the relevant type.
- VAT No: Type in the company VAT number, if applicable.
Salesmen Frame
- Select the checkboxes in front of the salesmen that will be linked to this customer. These marked salesmen will be available for selection if you are raising this cold call to assign to another salesman.
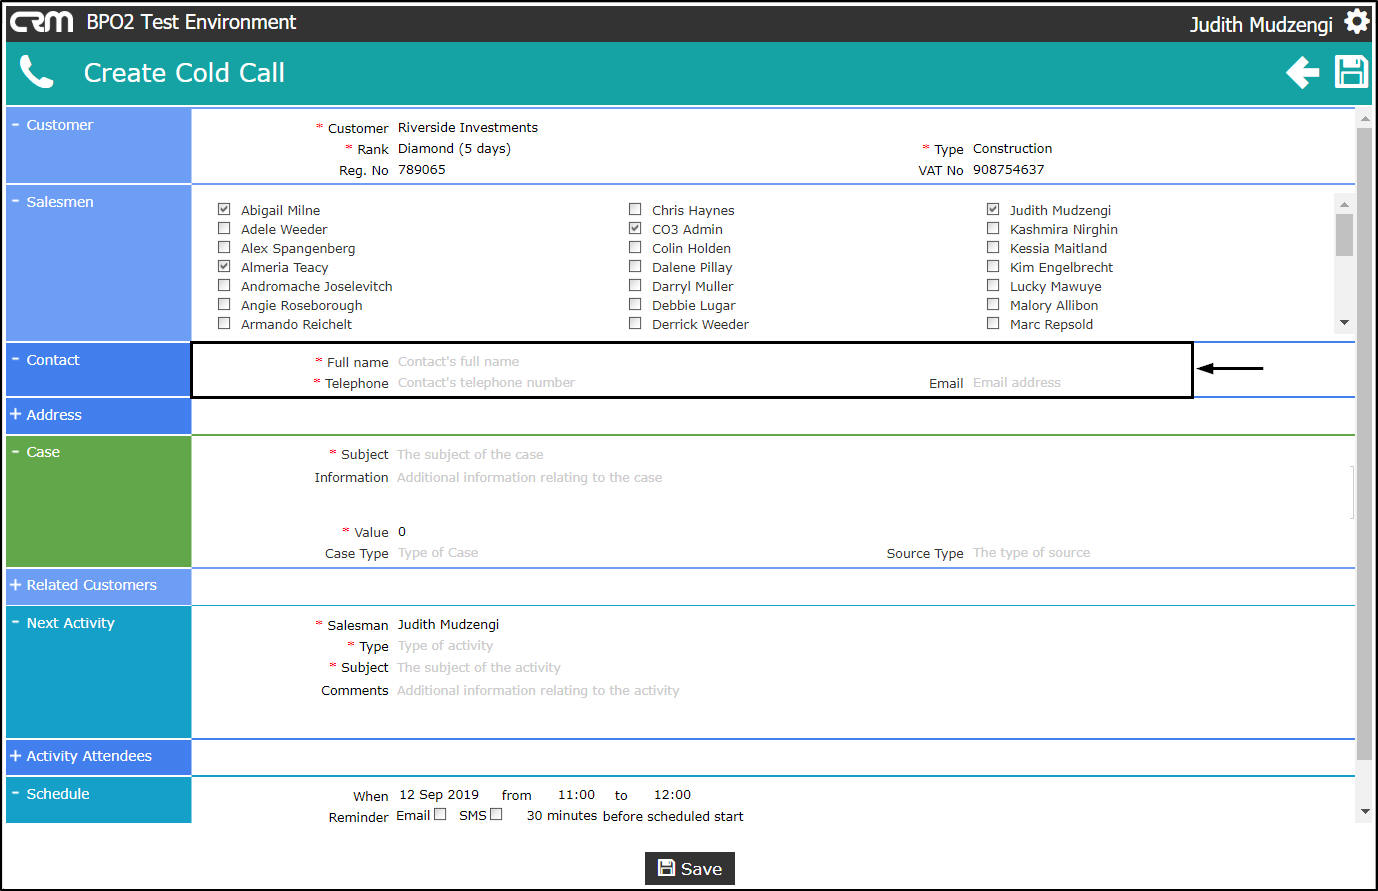
Contact Frame
- Full Name: Type in the full name of the customer contact.
- Telephone: Type in the telephone number of the customer contact.
- Email Address: Type in the email address of the customer contact.
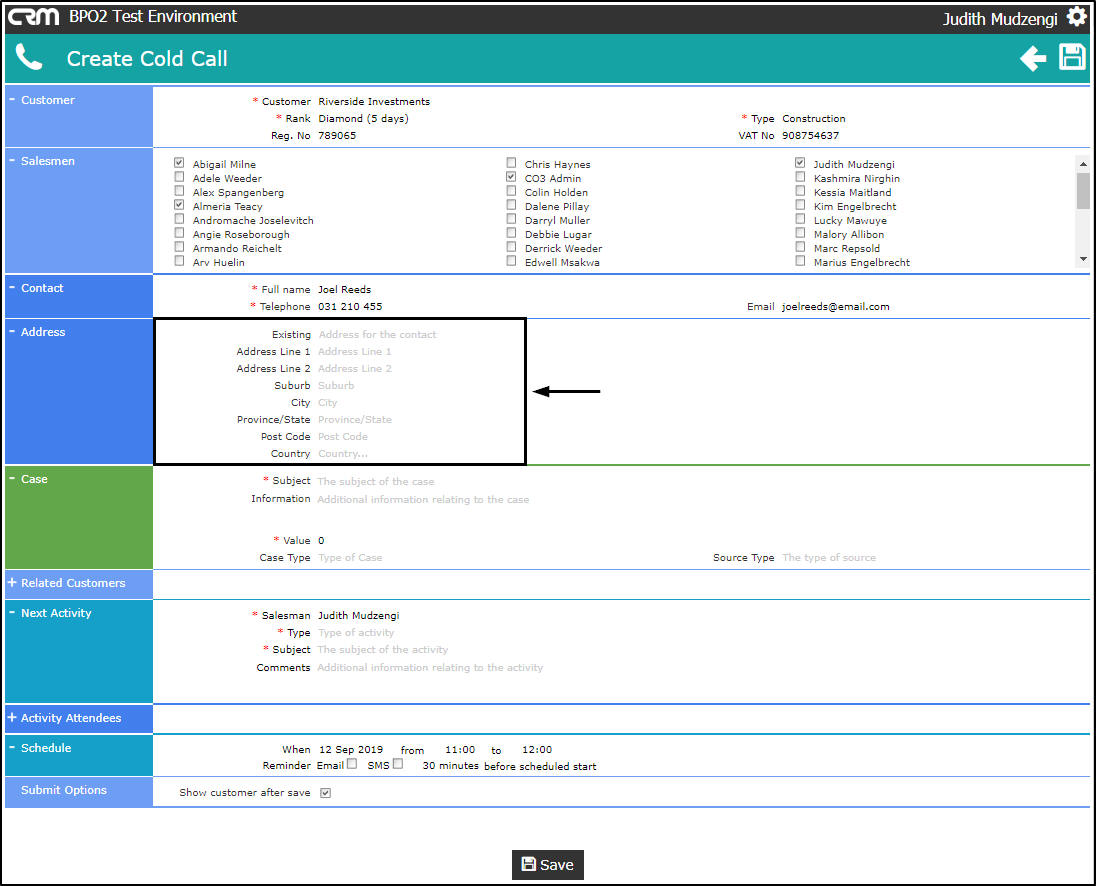
Address Frame
- Existing: Click on the drop-down arrow and select New .
- Address Line 1 and 2: Type in the relevant customer address details.
- Suburb: Type in the name of the suburb.
- City: Type in the city.
- Province / State: Type in the Province / State.
- Post Code: Type in the postal code.
- Country: Type in the country.
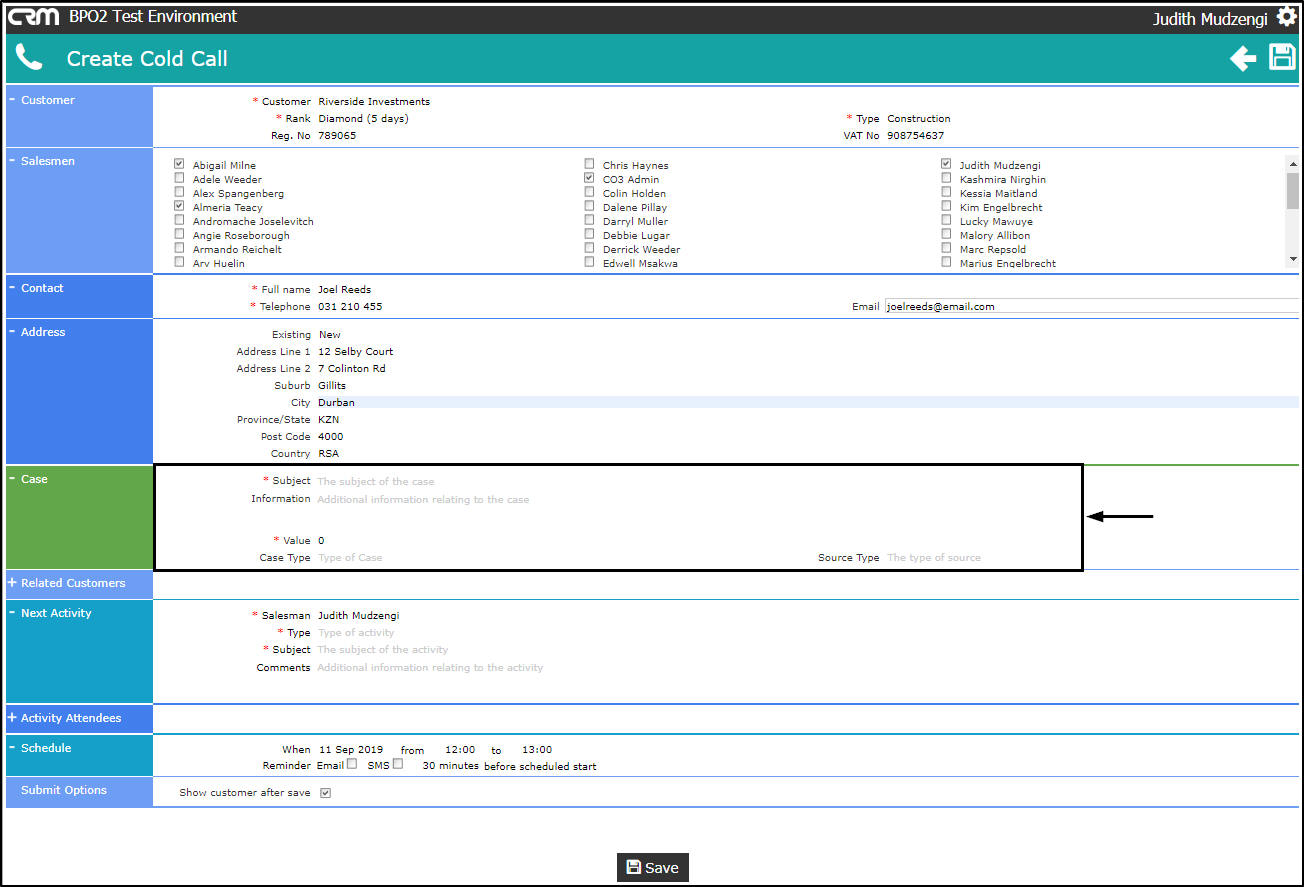
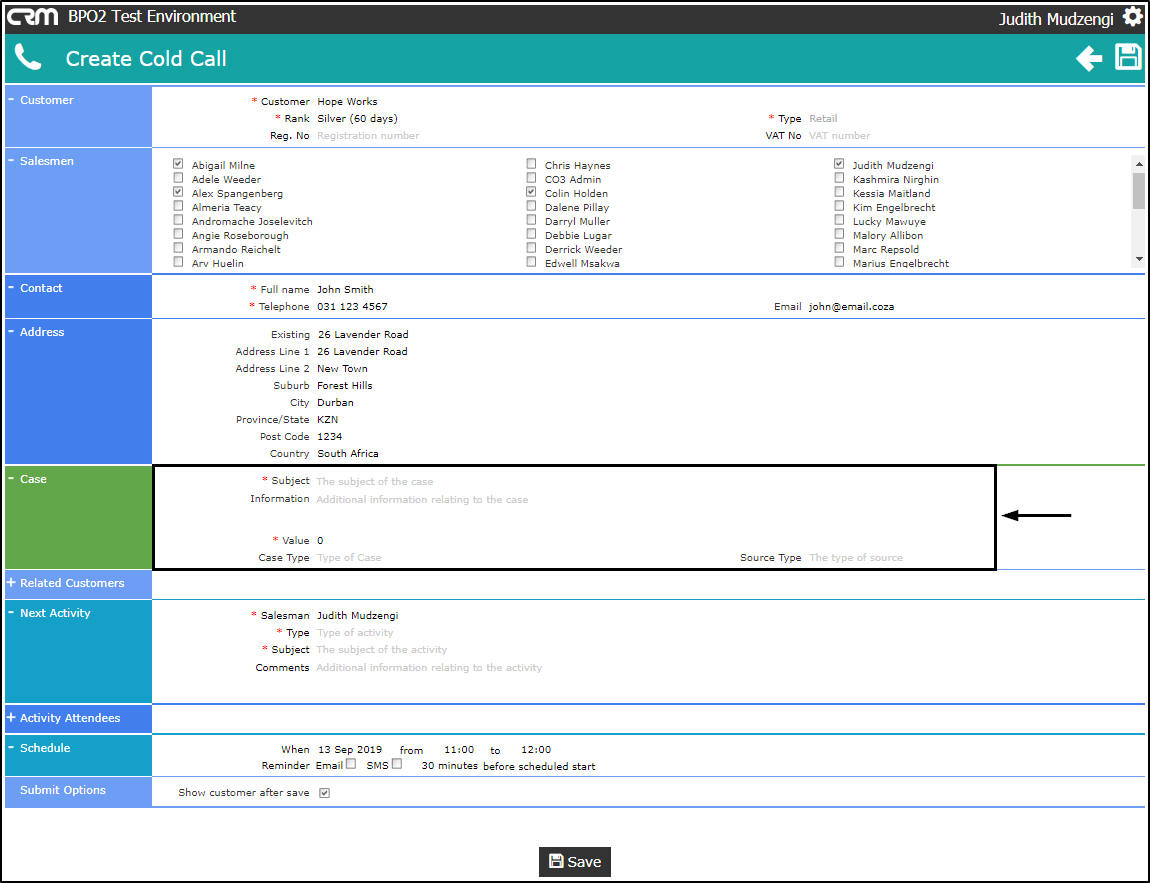
Case Frame
- Subject: Type in the subject of the case.
- Information: Type in additional information relating to the case if applicable.
- Value: Type in the estimated value of the case.
- Case Type: Click on the drop-down arrow and select from the list, the relevant case type.
- Source Type: (Where did you obtain this customer contact e.g. was this customer 'recommended' or 'referred'.) Click on the drop-down arrow and select from the list, the relevant source type.
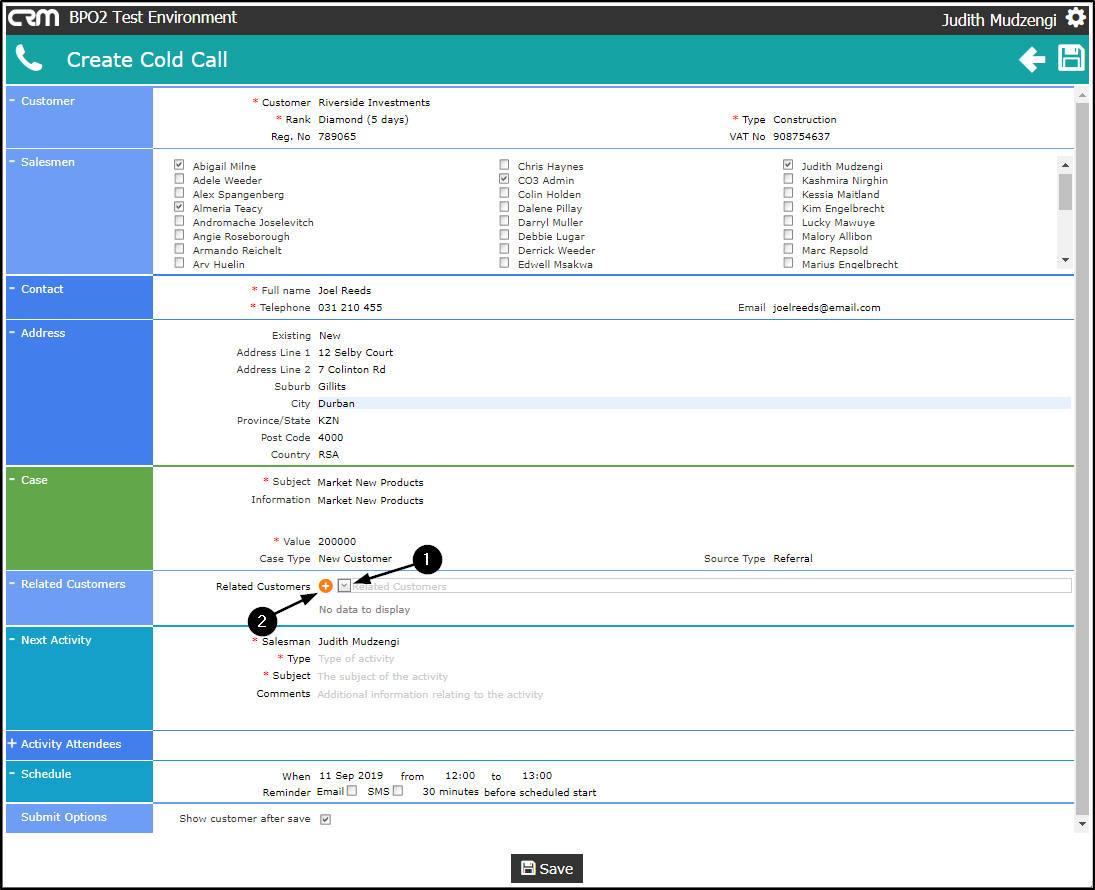
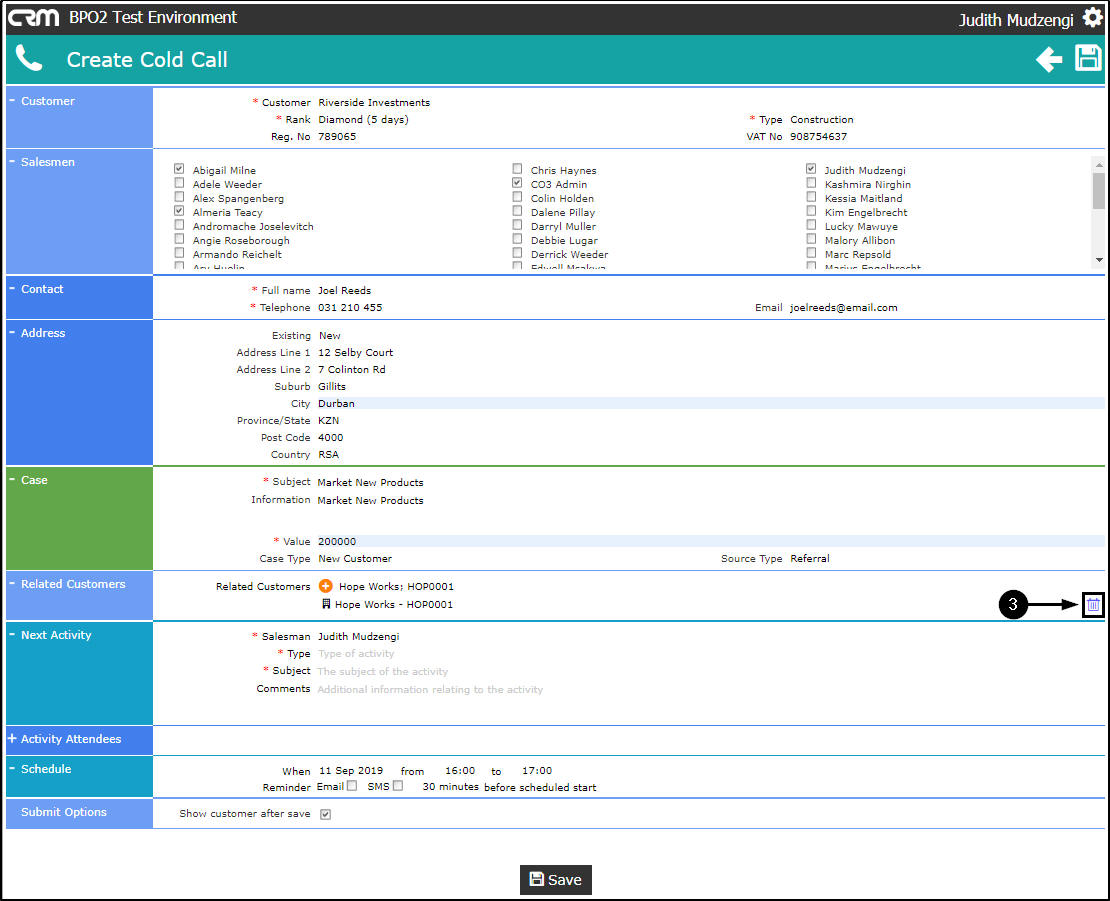
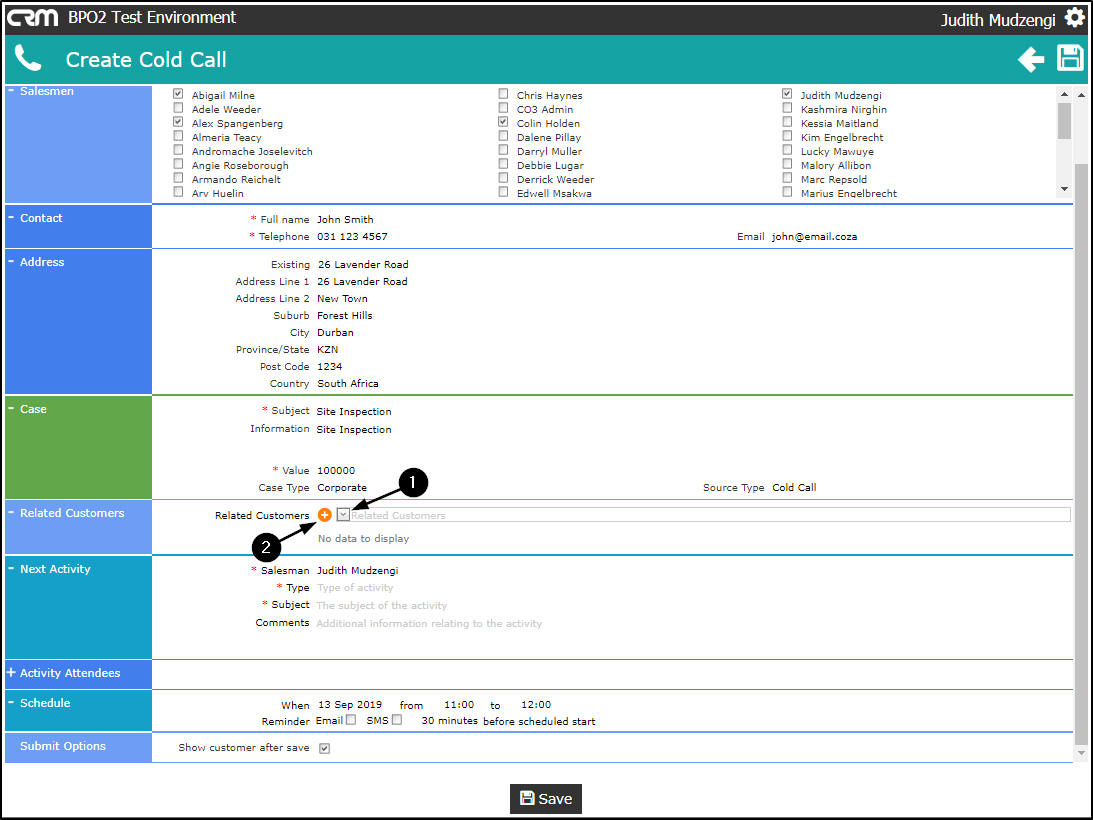
Related Customer Frame
-
You have the ability to link
Related Customers.
This enables you to invite contacts from various clients to an activity
- such as a meeting or training session.
-
If you do not need to link a
Related Customer
, you can move on to the
Activity frame
.
Add Related Customer
- Click on the drop-down arrow and select the relevant customer from the list.
- Click on the [ + ] button to save this customer to this frame.
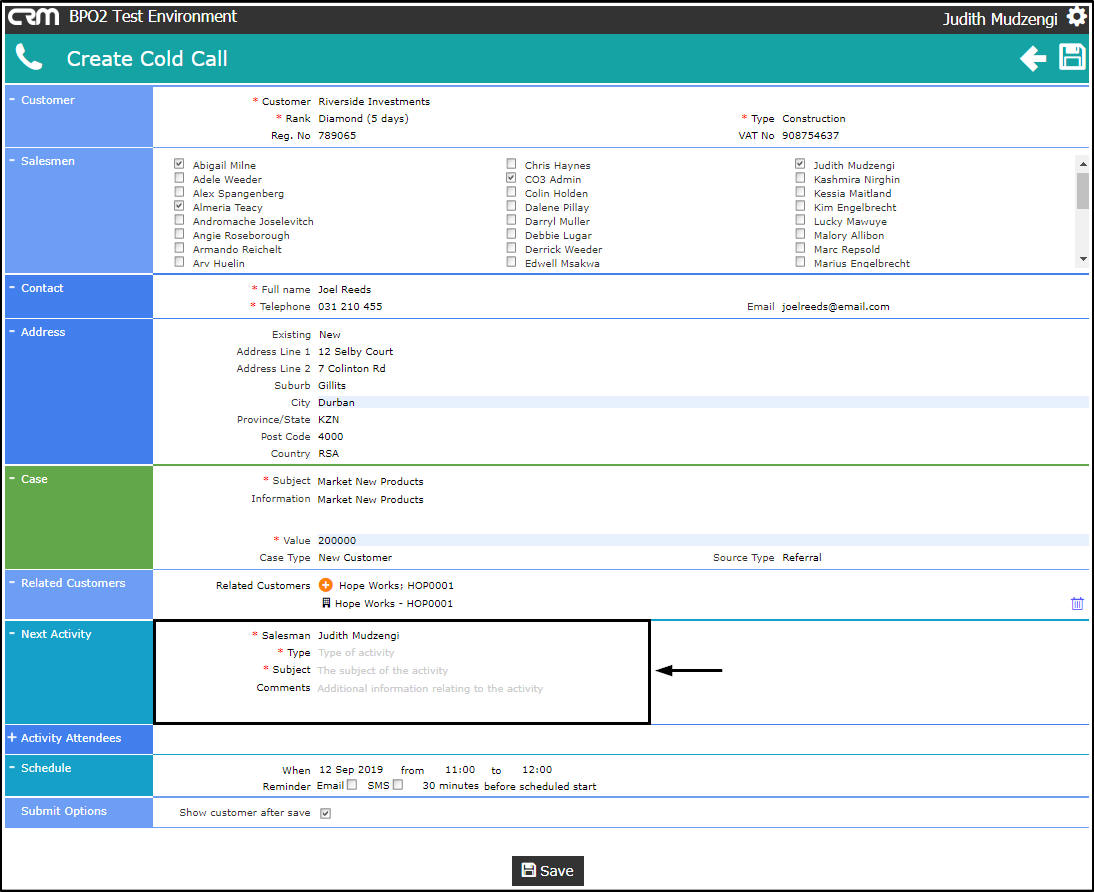
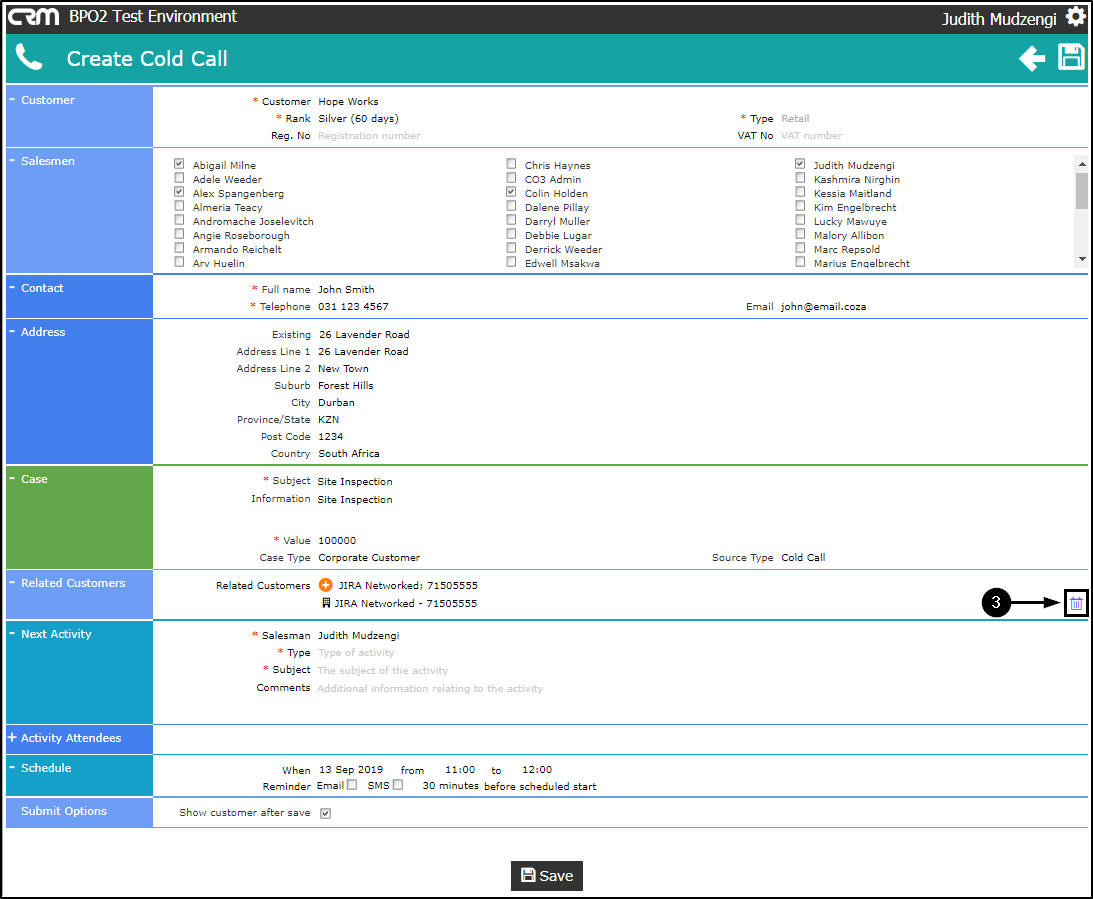
Delete Related Customer
- Click on the Delete icon if you wish to remove a linked related customer.
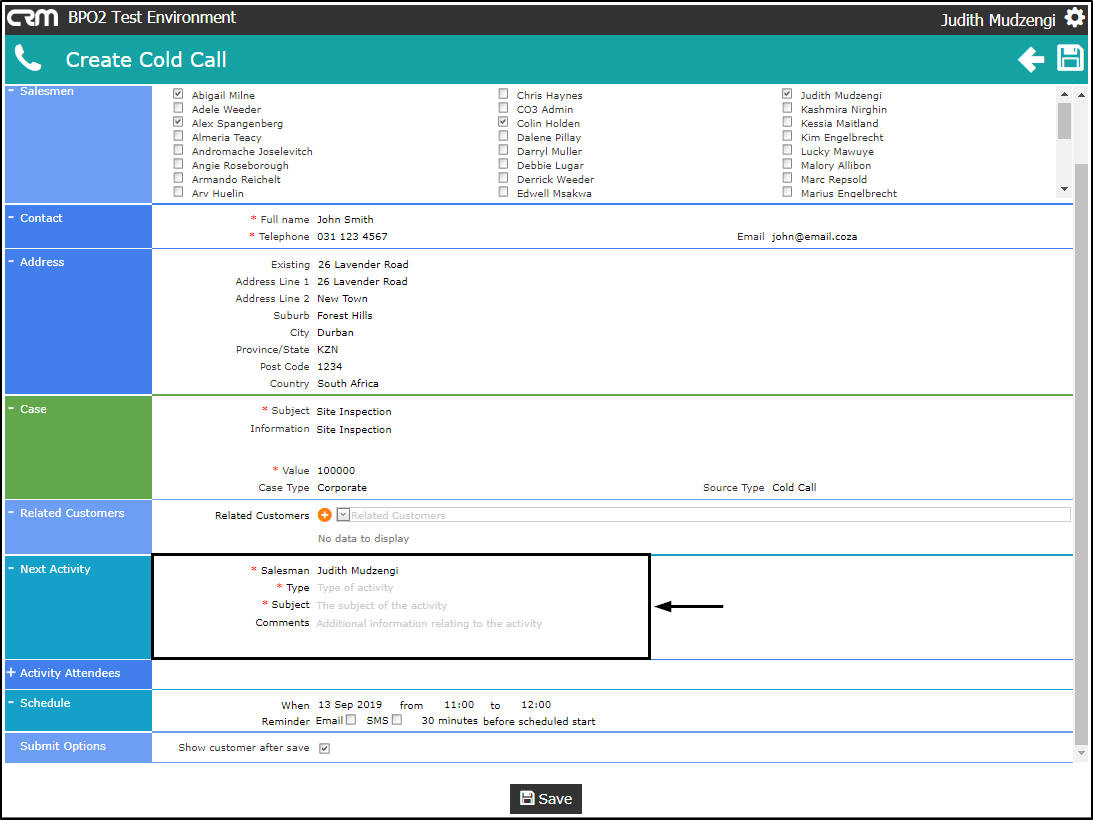
Next Activity Frame
- Salesman: The person currently logged on to the system will be selected by default. You can assign this Customer, Case and Activity to another salesman, if you are raising this cold call on their behalf.
- To assign this case to another salesman, click on the drop-down arrow and select the relevant salesman.
- Note: You will only be able to assign the case to one of the salesmen you selected in the Salesmen frame .
- Type: Select the type of Activity, e.g. 'Call'
- Subject: Type in the subject of the activity.
- Comments: This text box give you the opportunity to type in any additional information relating to the activity.
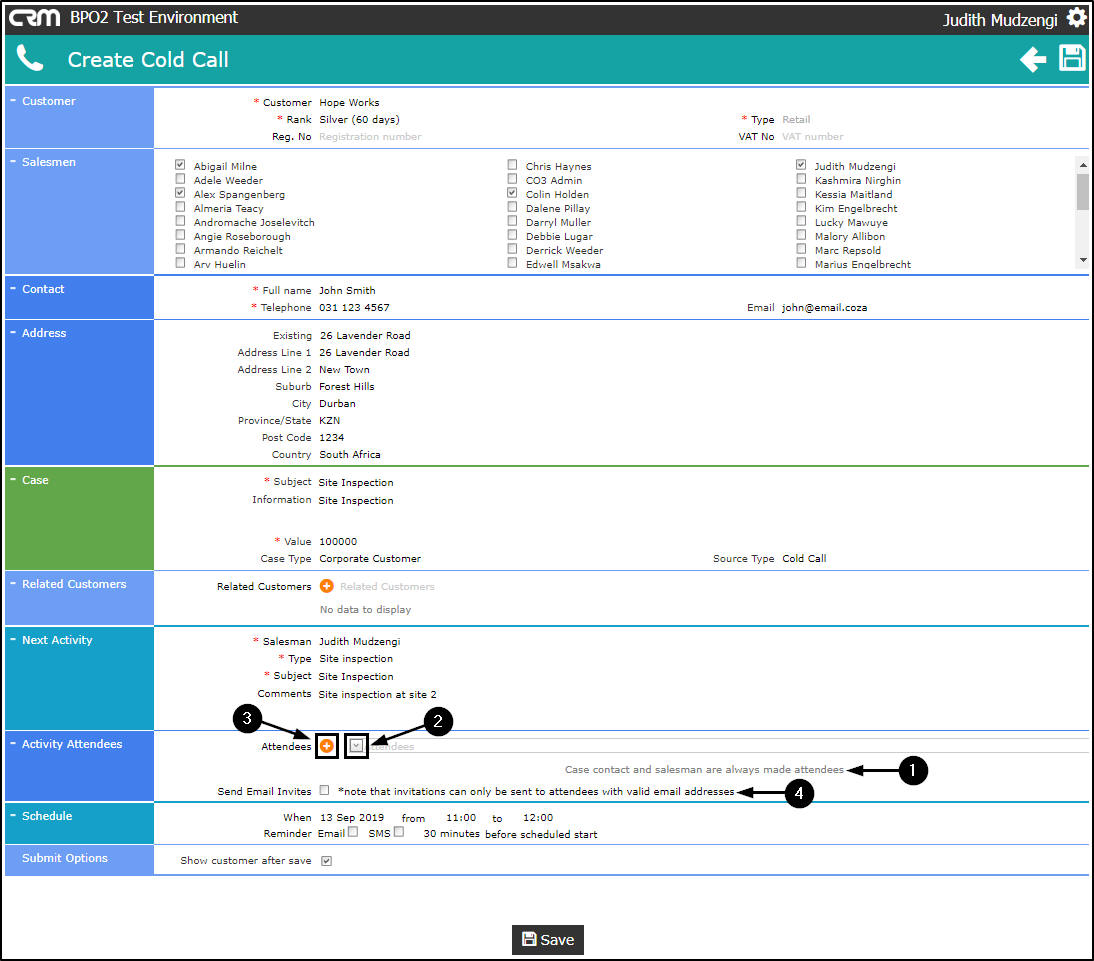
Activity Attendees Frame
-
It is only necessary to link Activity Attendees if you want to
send email invites to these people to join an activity - such as a meeting.
The attendees can accept or reject this request. If they accept,
this activity will display as an event on their calendar.
- The Salesman and Customer Contact will be linked as Activity Attendees by default (and cannot be removed).
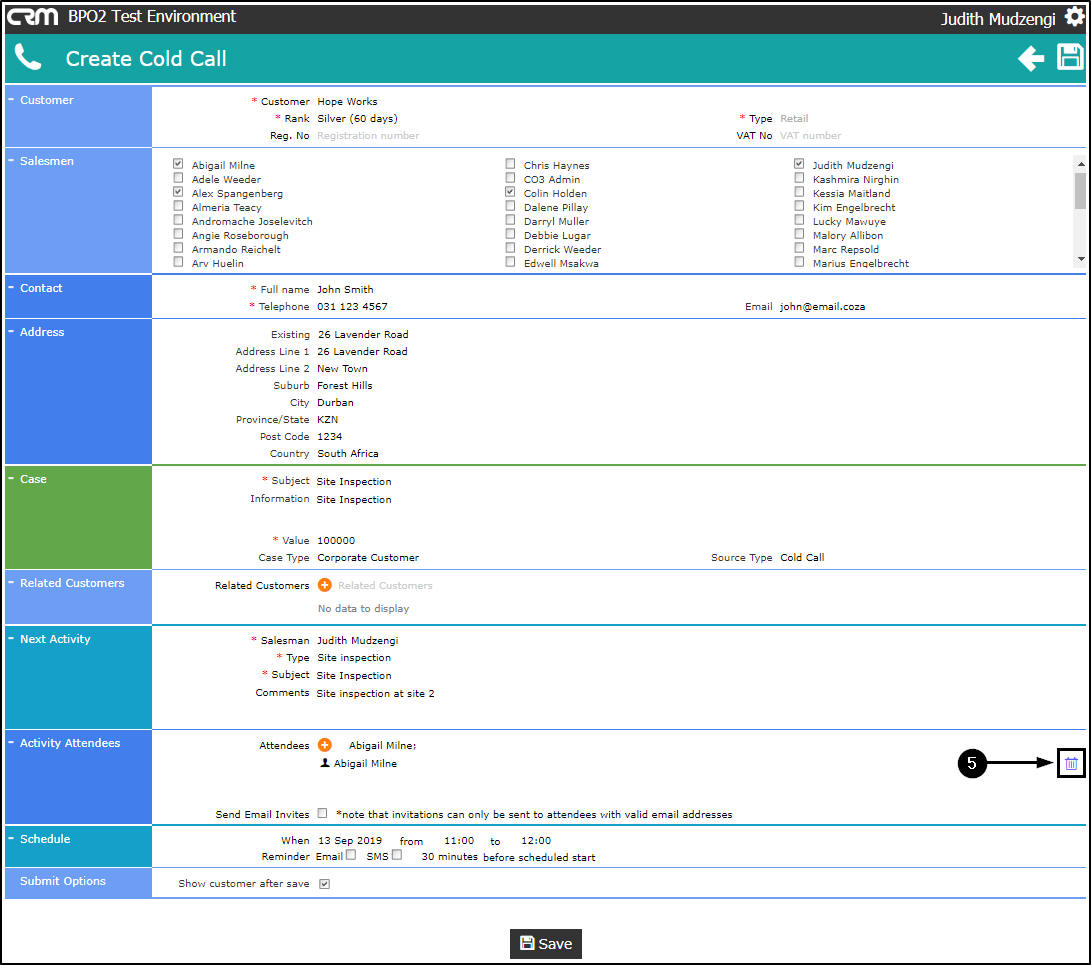
- You can also link other employees, case customer contacts and related customer contacts. To do so, click on the drop-down arrow and select the person from the list.
- Then click on the ' + ' button.
- Tick the Send Email Invites check box if you wish to send email invites to the attendees.
- Note: The Send Email Invites option may be selected by default ( depending on the BPOCRM configuration ).
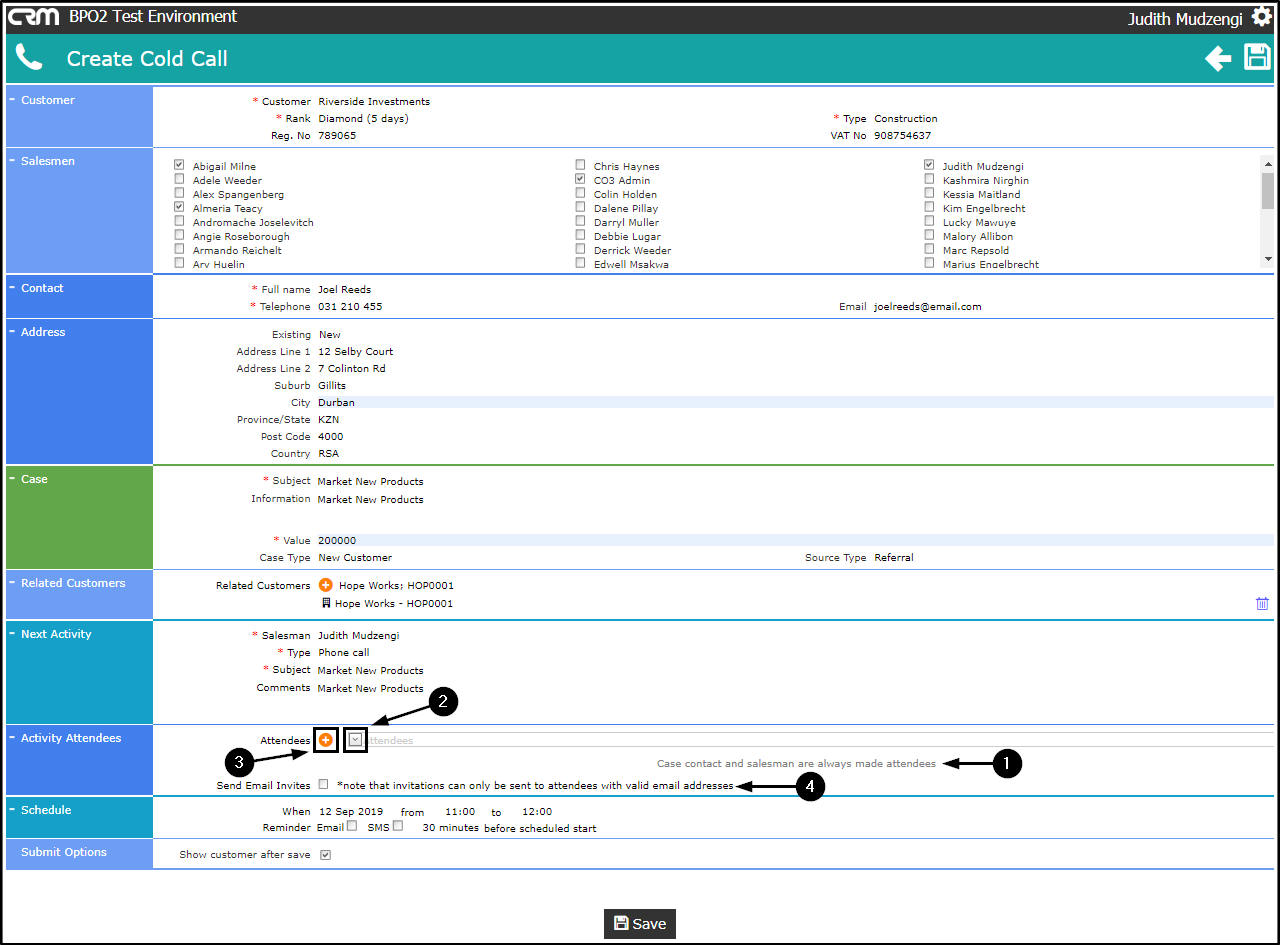
- Click on the Delete icon if you wish to remove an attendee.
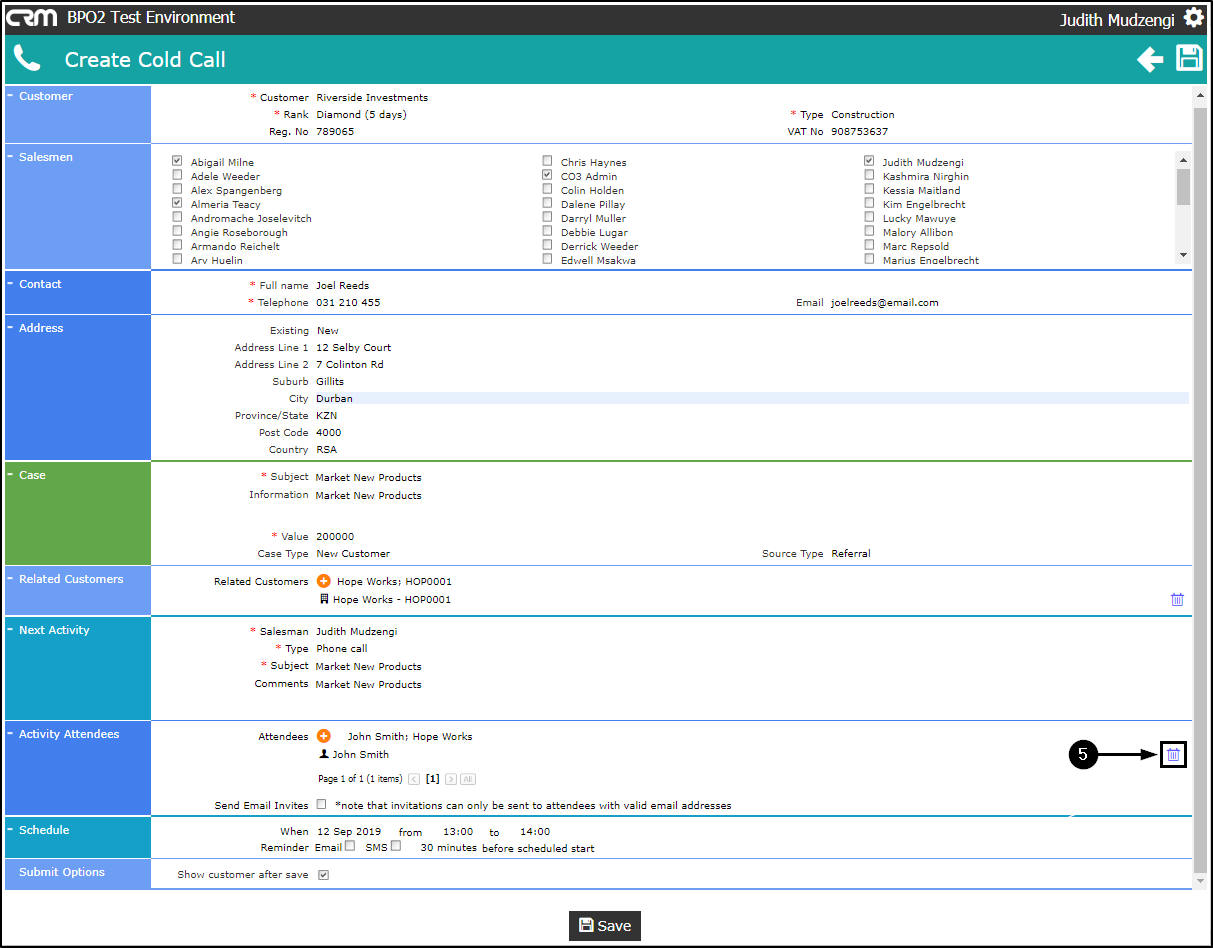
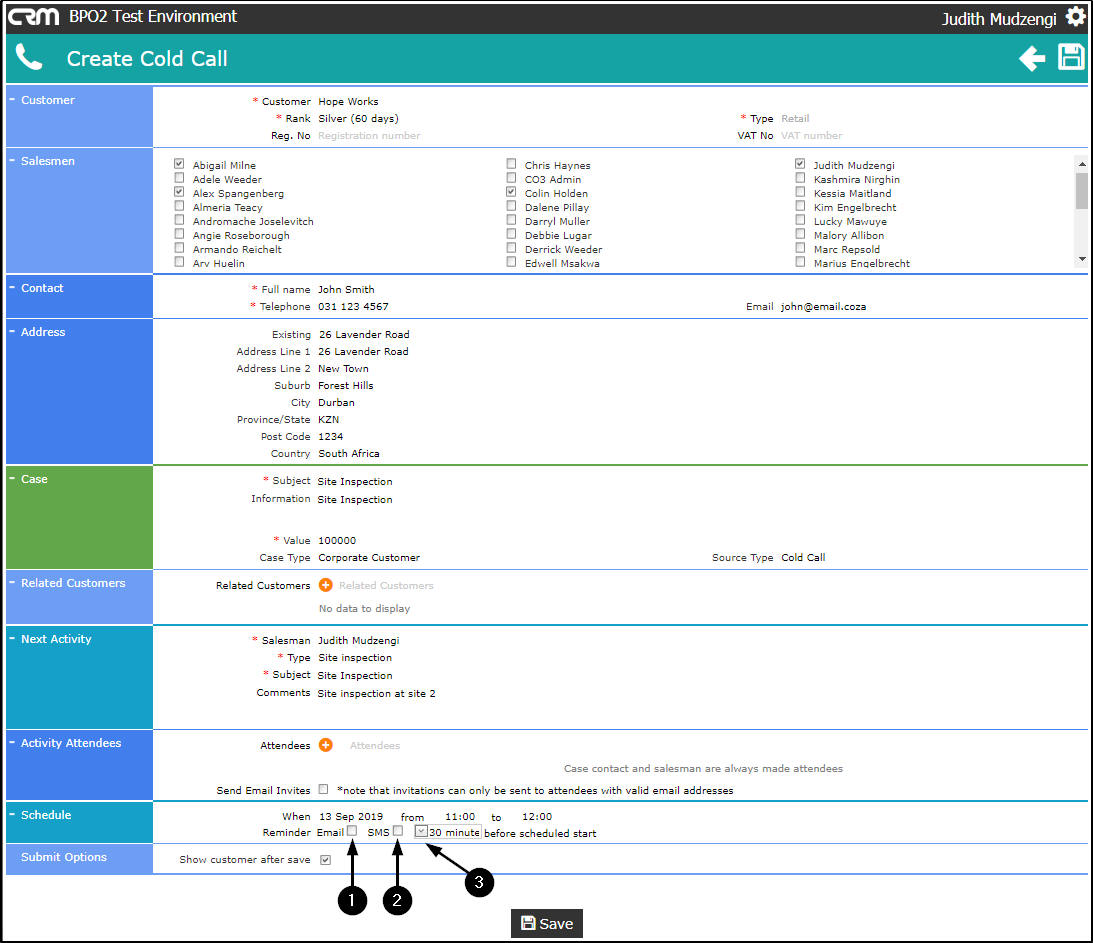
Schedule Section
- When: This field will be auto populated. Click on the drop-down arrow and select the relevant date.
- From: This field will be auto populated. Use the up and down arrows to select the relevant time.
- To: This field will be auto populated. Use the up and down arrows to select the relevant time.
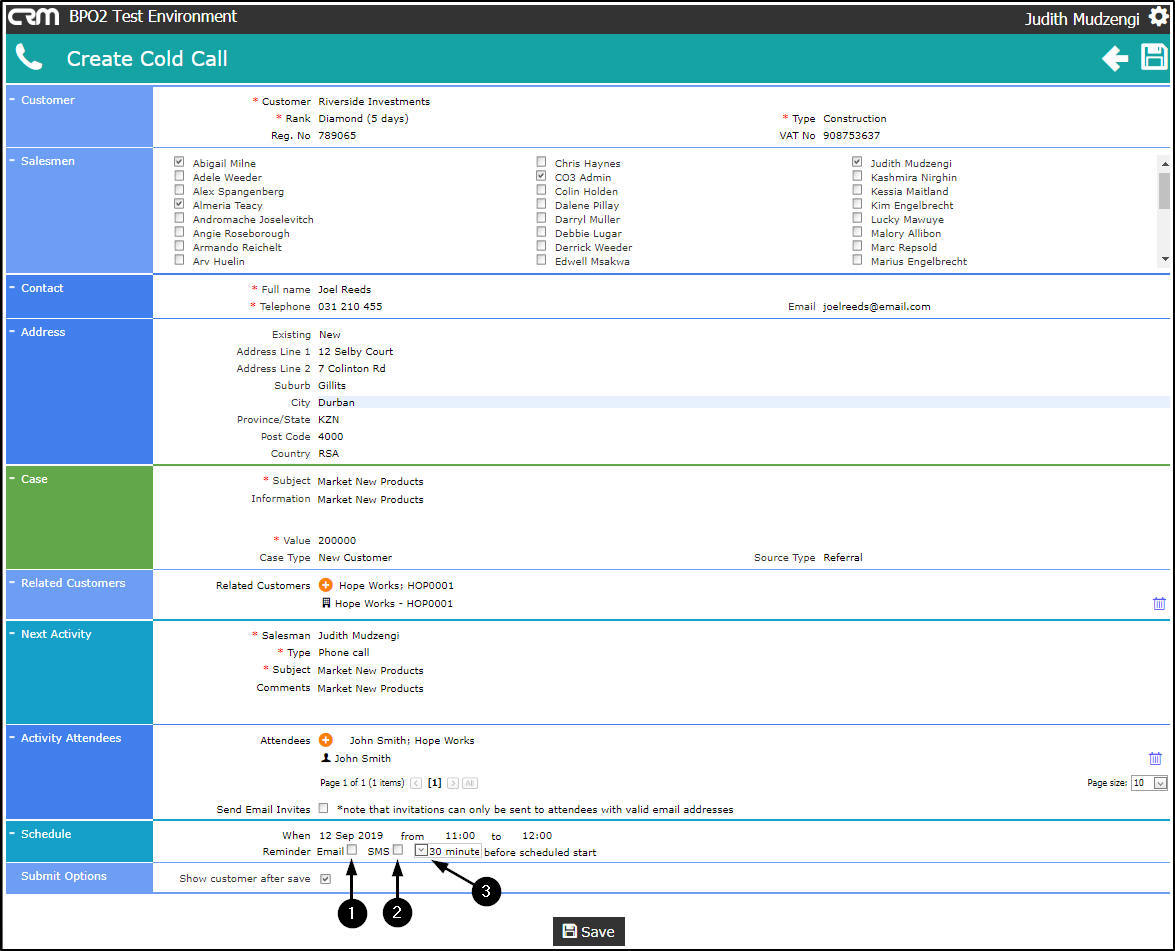
- Reminder: If you wish to send a reminder to your attendees,you can choose whether to send the reminder by Email or SMS .
- Tick the Email check box if you wish to send the reminder by email.
- Tick the SMS check box if you wish to send the reminder by SMS.
- ' Reminder Time ': You can also choose when to send the reminder by clicking on the drop-down arrow and selecting the appropriate time period.
- Note: Reminders will only work if your mobile number and email address have been configured in BPO .
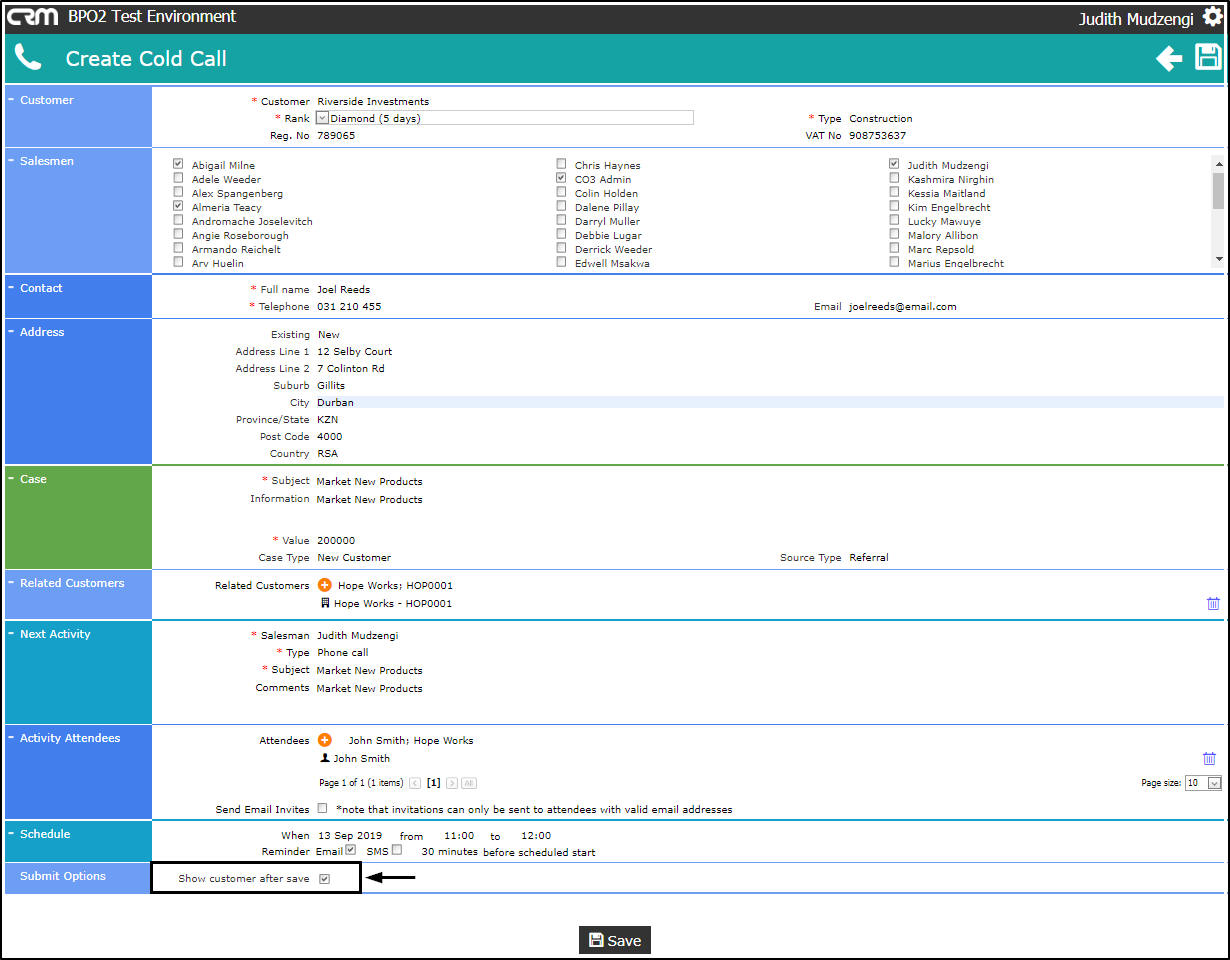
Submit Options Section
- Show customer after save: This will be selected by default. Unselect if you do not wish to see the customer after saving.
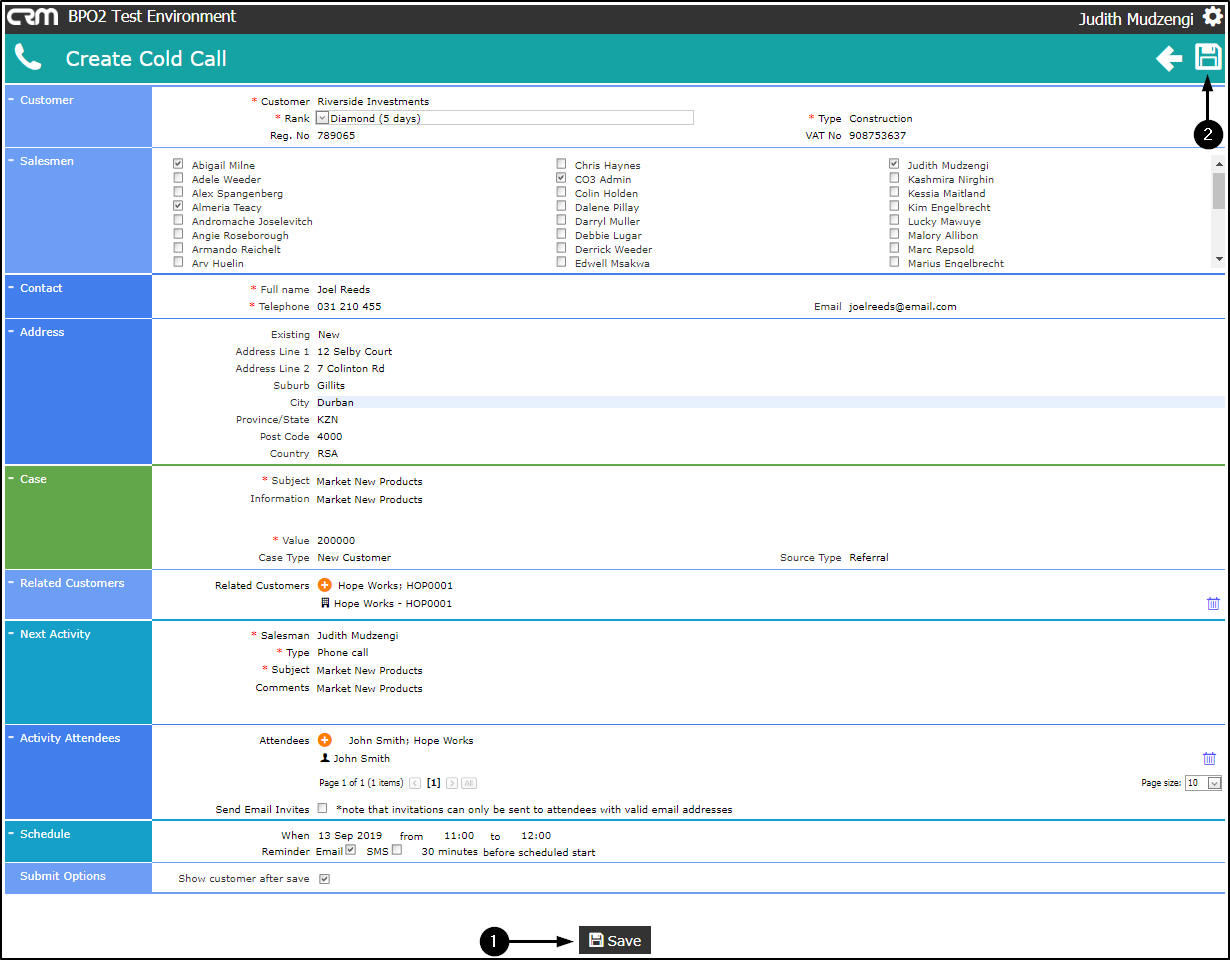
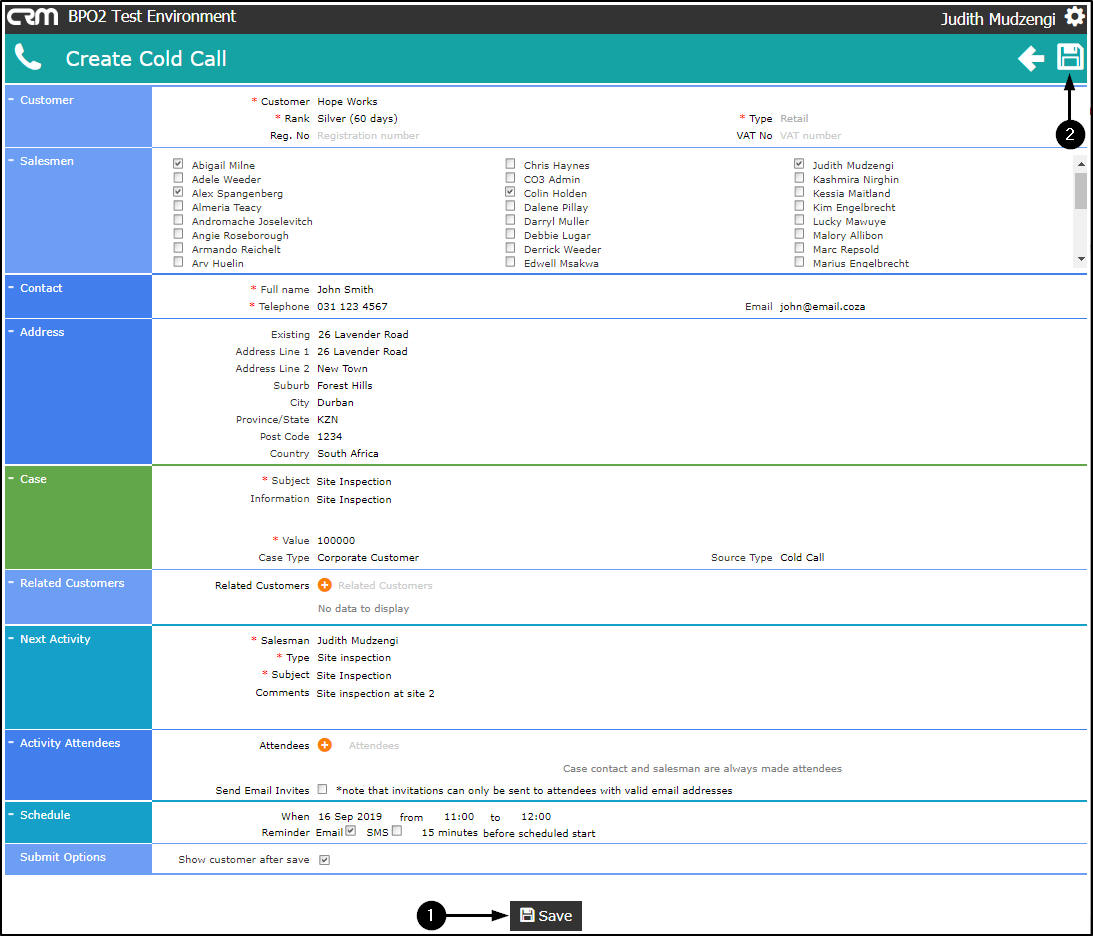
Save
- Click on either the
- Save button or
- Save icon.
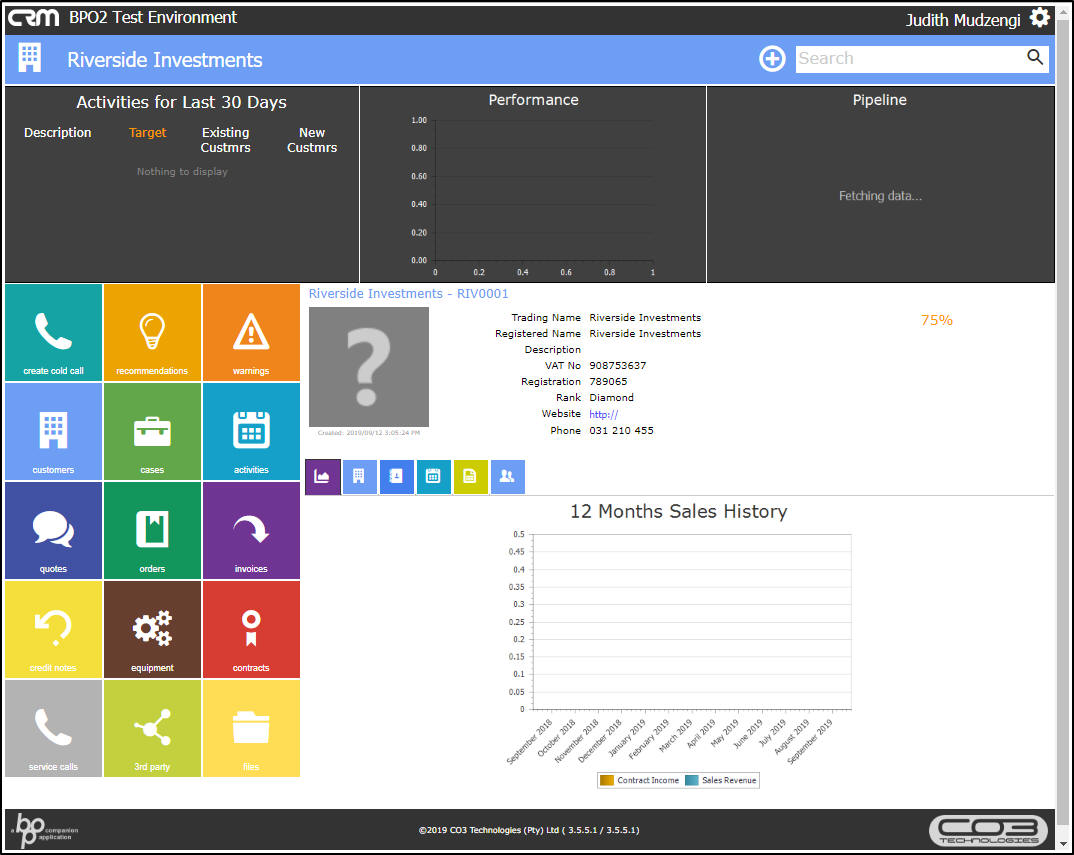
- The Customer Dashboard will be displayed.
- The newly added customer can be viewed in this screen.
Create Cold Call for Existing Customer
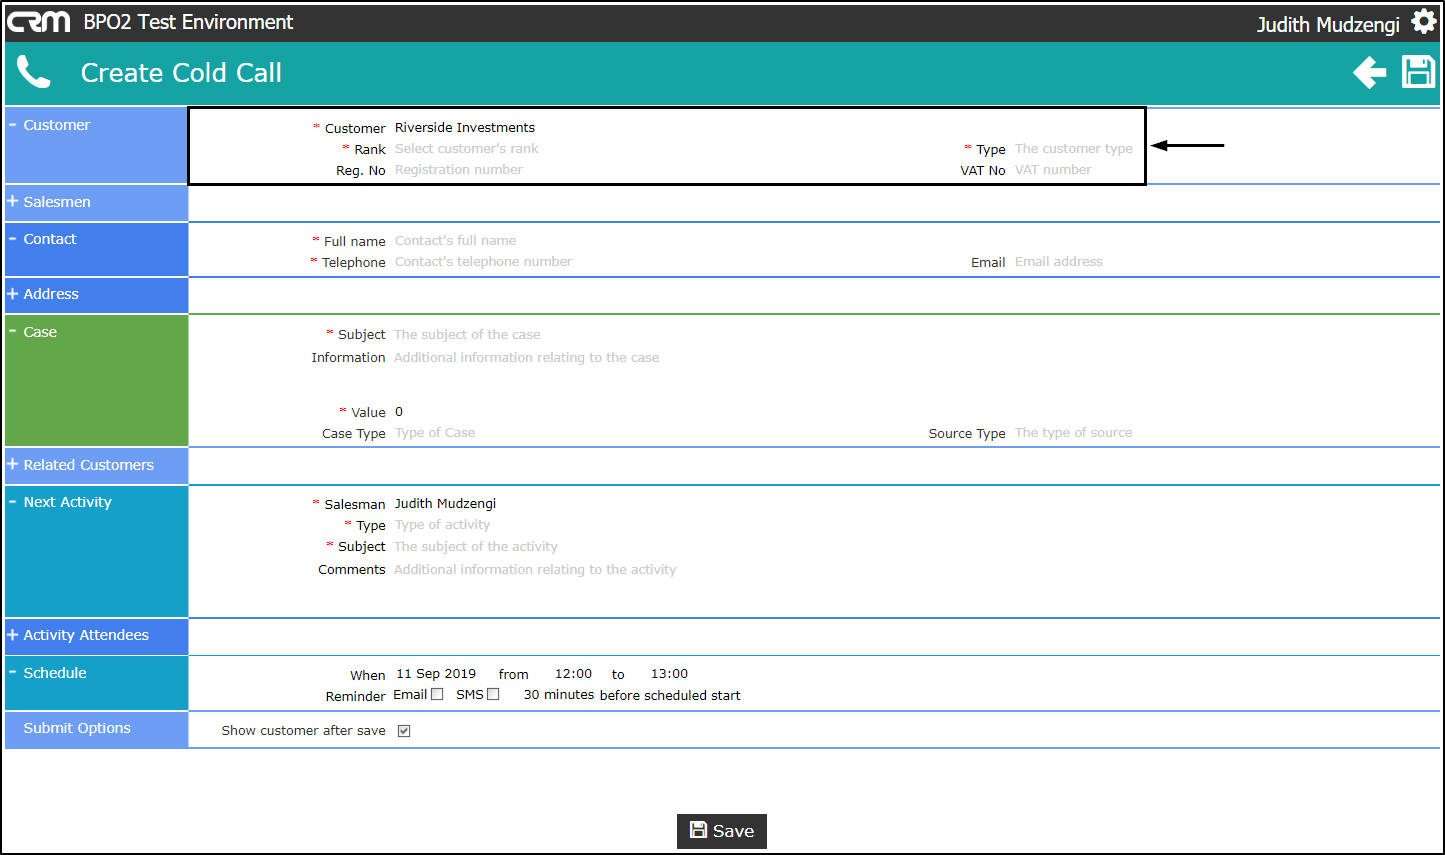
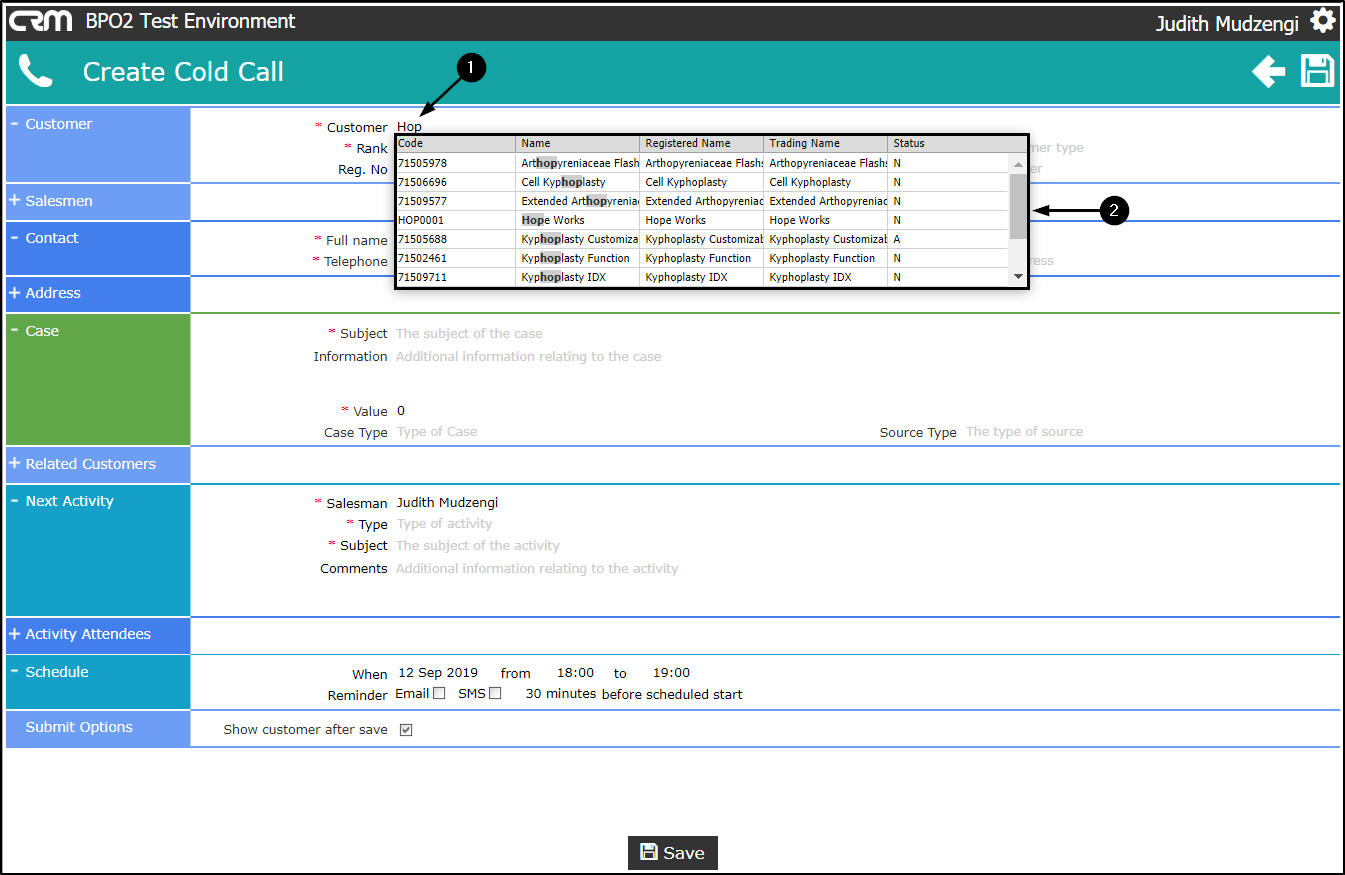
Customer Section
- Customer:
- For an existing customer, either click on the drop-down arrow and select the relevant customer or
- Customer:
- type in the Customer Name,
- a customers list will pop up. As you type,the amount of customers in the list this will reduce. Select the relevant customer.
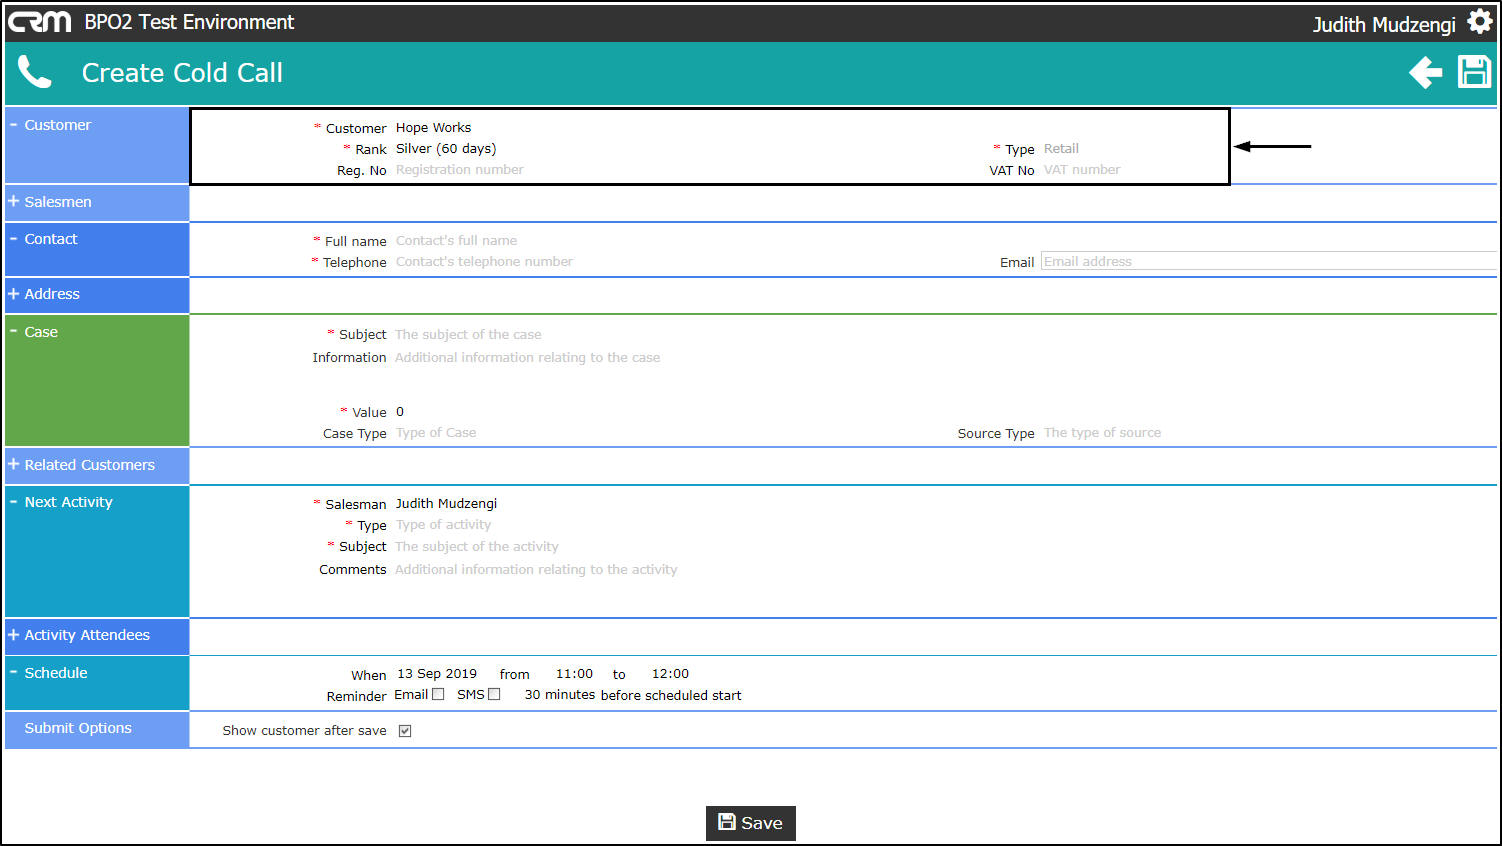
- Rank: This field will auto populated and cannot be edited.
- Reg No: This field will auto populated and cannot be edited.
- Type: This field will auto populated and cannot be edited.
- VAT No: This field will auto populated and cannot be edited.
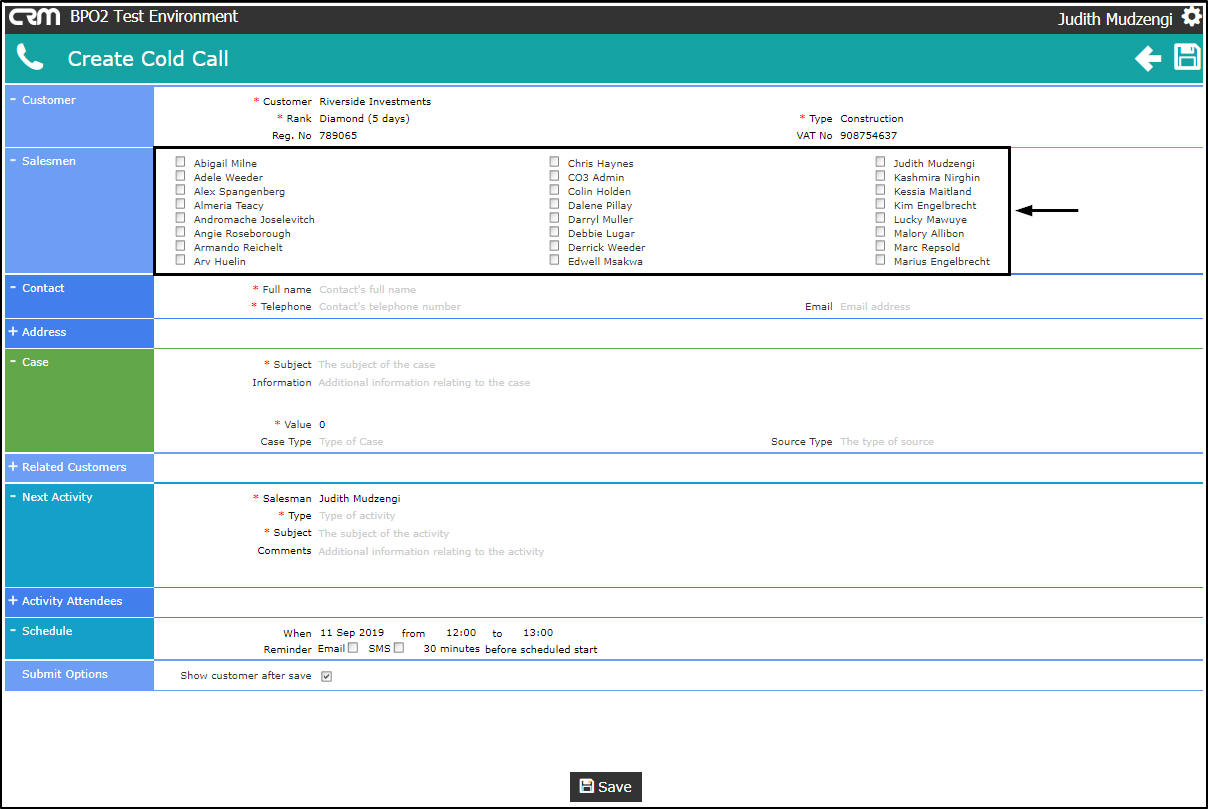
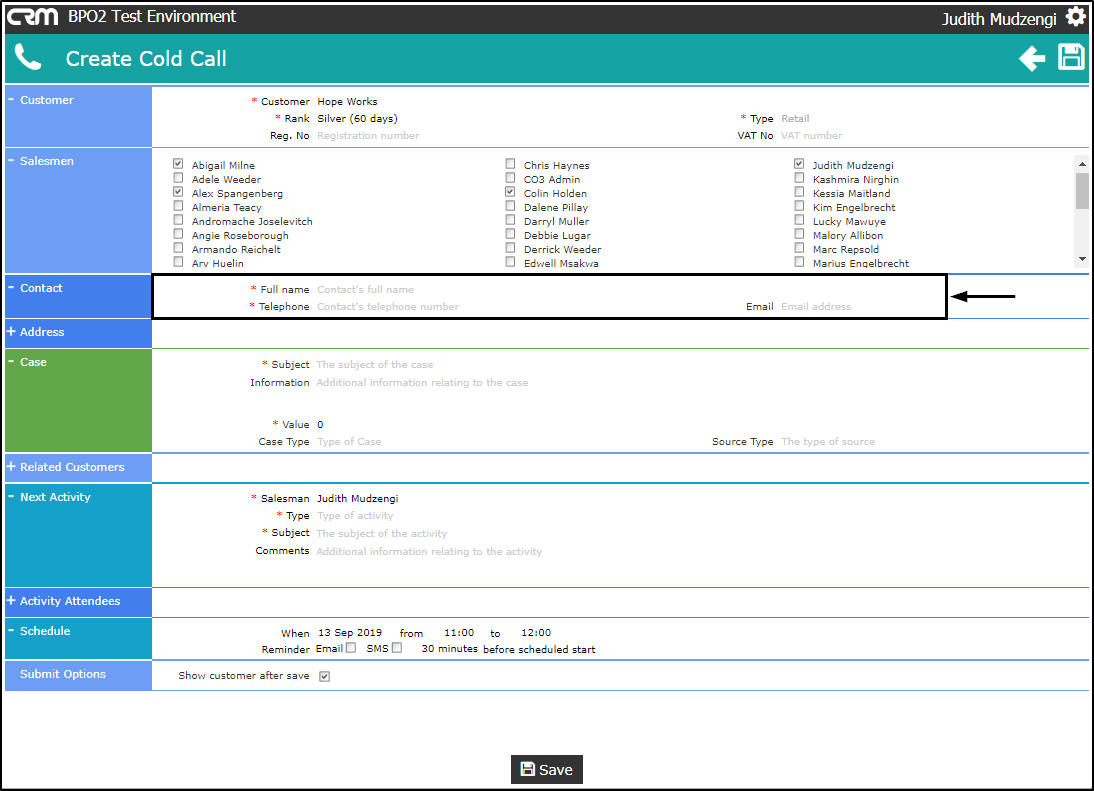
Sales Section
- Previously selected salesmen will already be marked. You can unselect a salesman if applicable.
- Mark additional salesmen that will be linked to this customer if required. These marked salesmen will be available for selection if you are raising this cold call to assign to another salesman.

Contact Section
- Full Name: Click on the drop-down arrow and select the customer contact.
- Telephone: This field will auto populate when the customer contact is selected but can be edited if required.
- Email Address: This field will auto populate when the customer contact is selected can be edited if required.
Address Section
- You can either select an existing customer address or add a new customer address.
- For the purpose of this manual, an existing customer address will be used.
- Existing: Click on the drop-down arrow and select an existing customer address.
- Address Line 1 and 2: These fields will auto populate but can be edited if applicable.
- Suburb: This field will auto populate but can be edited if applicable.
- City: This field will auto populate but can be edited if applicable.
- Province / State: This field will auto populate but can be edited if applicable.
- Post Code: This field will auto populate but can be edited if applicable.
- Country: This field will auto populate but can be edited if applicable.

Case Section
- Subject: Type in the subject of the case.
- Information: Type in additional information relating to the case if applicable.
- Value: Type in the estimated value of the case.
- Case Type: Click on the drop-down arrow and select the relevant case type.
- Source Type: Click on the drop-down arrow and select the relevant source type.
Related Customer Section
- You have the ability to link Related Customers . This enables you to invite contacts from various clients to an activity - such as a meeting or training session.
- If you don't need to link a Related Customer , you can move on to the Activity section .
- Related Customers:
- Click on the drop-down arrow and select the relevant customer from the list and
- click on the ' + ' button.
- Related Customers:
- Click on the Delete icon if you wish to remove a linked related customer.
Next Activity Section
- Salesmen: You will be selected by default. You can assign this Customer, Case and Activity to another salesman, if you are raising this on their behalf.
- To assign this case to another salesman, click on the drop-down arrow and select the relevant salesman.
- Note: You can only assign the case to the salesmen selected in the Salesmen section.
- Type: Select the type of Activity, e.g. 'Call'.
- Subject: Type in the subject of the activity.
- Comments: Type in additional information relating to the activity.
Activity Attendees Section
- It is only necessary to link Activity Attendees if you want to send email invites to these people to join an activity - such as a meeting. The attendees can accept or reject this request. If they accept, this activity will display as an event on their calendar.
- The Salesman and Customer Contact will be linked as Activity Attendees by default (and cannot be removed).
- You can also link other employees, case customer contacts and related customer contacts. To do so, click on the drop-down arrow and select the relevant person from the list.
- Then click on the ' + ' button.
- Tick the Send Email Invites check box if you wish to send email invites to the attendees.
- Note: The Send Email Invites option may be selected by default depending on the BPOCRM configuration .
- Click on the Delete icon if you wish to remove an attendee.
Schedule Section
- When: This field will be auto populated. Click on the drop-down arrow and select the relevant date.
- From: This field will be auto populated. Use the up and down arrows to select the relevant time.
- To: This field will be auto populated. Use the up and down arrows to select the relevant time.
- Reminder: If you wish to send a reminder to your attendees, you can choose whether to send the reminder by Email or SMS .
- Tick the Email check box if you wish to send the reminder by email.
- Tick the SMS check box if you wish to send the reminder by SMS.
- ' Reminder Time ': You can also choose when to send the reminder by clicking on the drop-down arrow and selecting the appropriate time period.
- Note: Reminders will only work if your mobile number and email address have been configured in BPO .
Submit Option Section
- Show customer after save: This will be selected by default. Unselect if you do not wish to see the customer after saving.

Save
- Click on either the
- Save button or
- Save icon.
- The Customer Dashboard will be displayed.
- The newly added customer can be viewed in this screen.

CRM.000.017