We are currently updating our site; thank you for your patience.
CRM Basics
Third Party
Third Party contains information relating to a customer's current (or expired) contract with a third party provider.
This is helpful for the various reasons including the following:
- To know when to contact your client as their third party contract ends / is due to end.
- To know what your client's current Item(s) and Item(s) Usage charges are, so that when you create a proposal or quote - you can ensure that it is competitive.
In CRM , you can access current Third Party information for a customer in 2 different pages:
- From the CRM Homepage. This will direct you to the Third Party for[Salesman's Name] Customers page:
- This will list all the salesman's customers that are linked to Third Party contracts.
- From the Customer Homepage. This will direct you to the Third Party for [Customer Name] page:
- This will list all the Third Party contracts linked to the selected customer.
To Add a new Third Party to a Customer, it is quickest to navigate from the Customers (listing) page.
In this manual we will cover the 1st process; accessing Third Party information from the CRM Homepage.
| Ribbon Access: Webpage > http://[servername]:[portno]/BPOCRM/User.aspx |
Third Party Homepage Tile
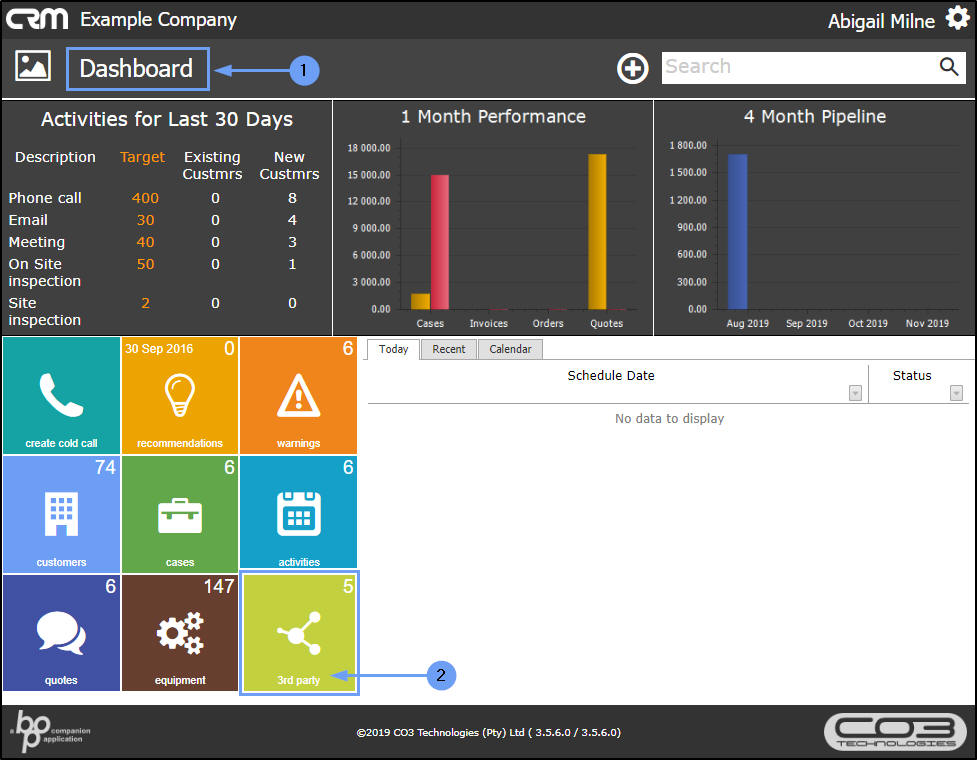
- In the CRM Homepage,
- Click on the 3rd Party tile.
- You will note a number in the top right corner of this tile - this indicates the total amount of Third Party Contracts linked to the salesman's customers.
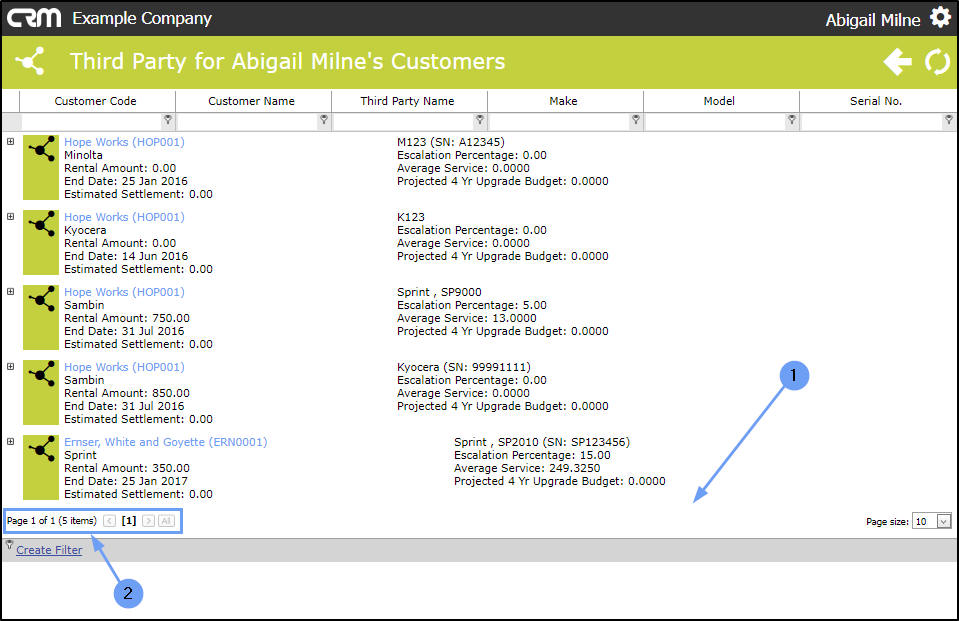
Third Party for [Salesman's Name] Page
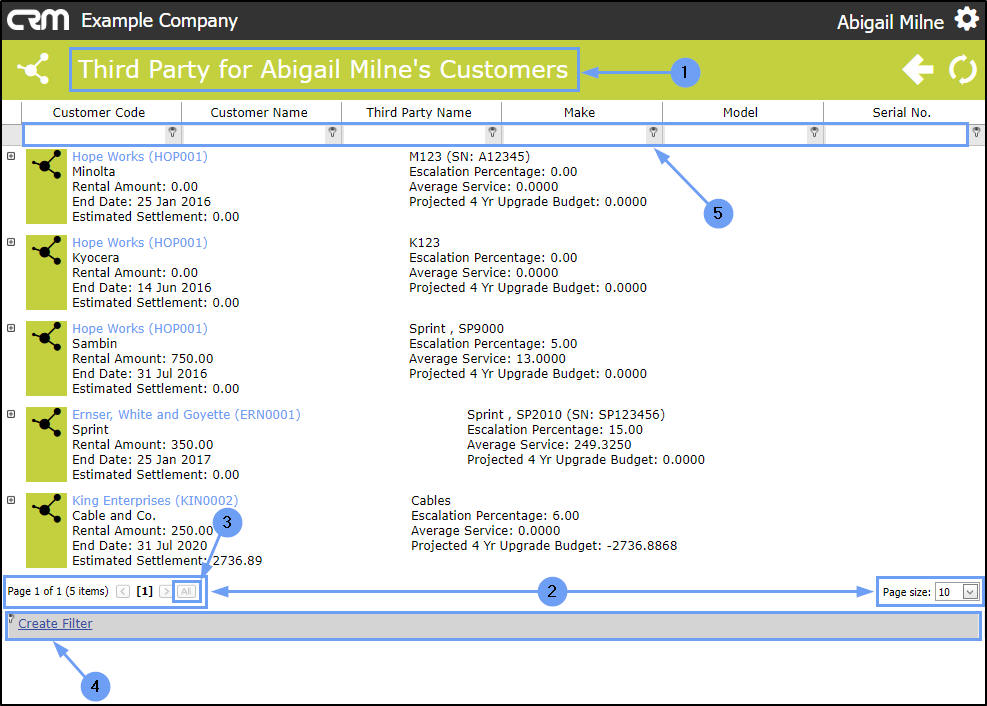
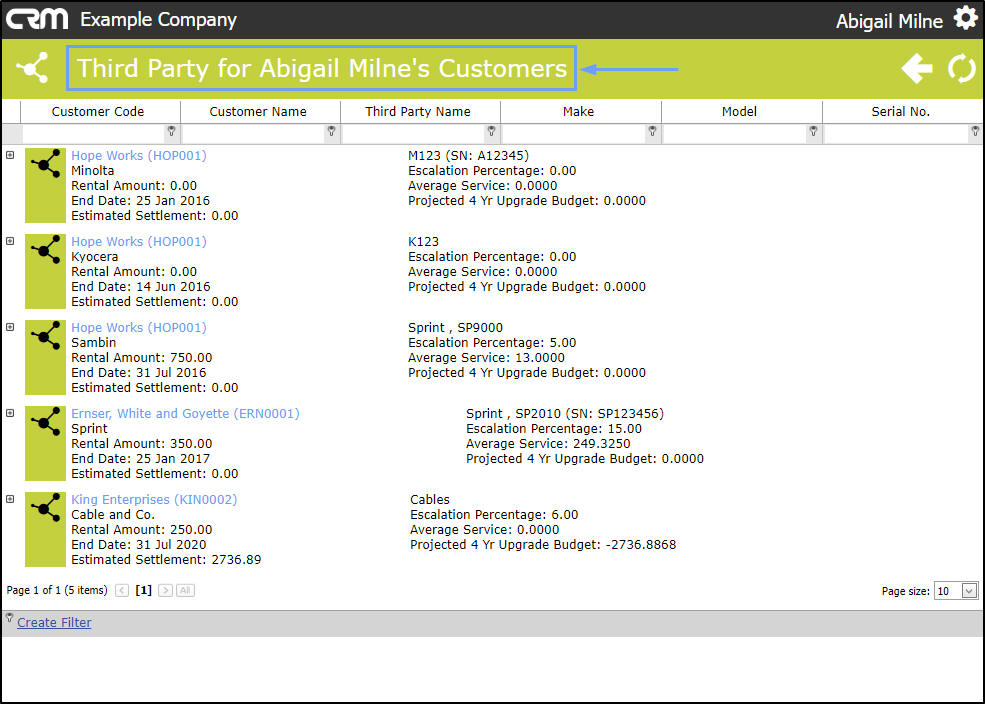
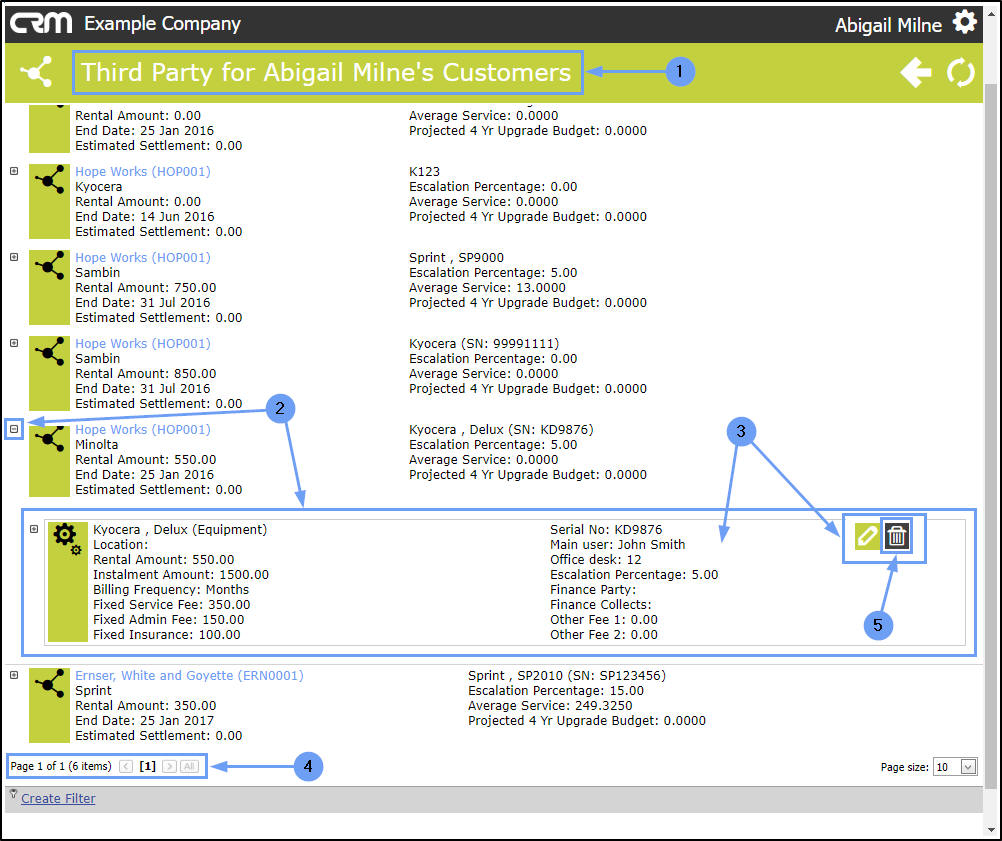
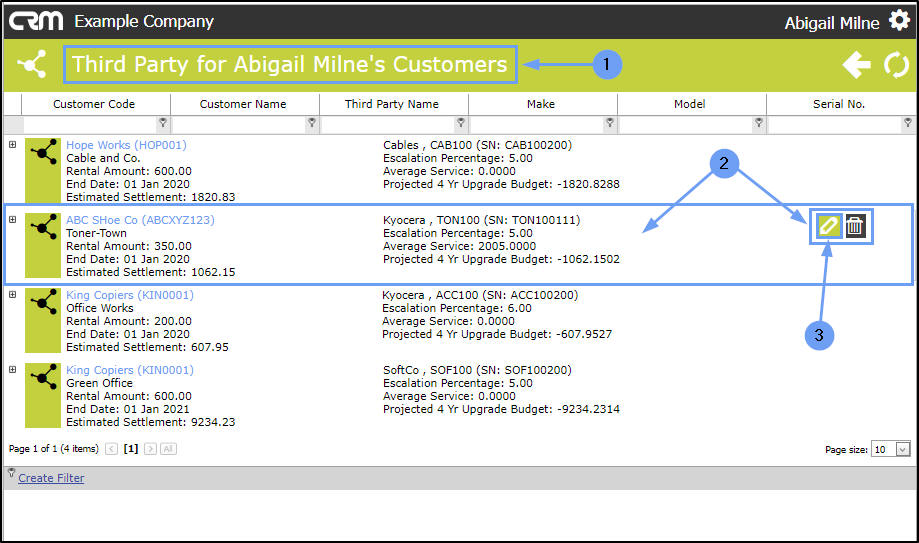
- The Third Party for [Salesman's Name] Customers page will open.
-
Here you can view a list of all the salesman's customers linked to third party contracts with a summary of each contract.
-
For more information on the features and functions in this page, click on the following links:
- The Page Reference and Page Size fields
- The All Button
- The Create Filter row
- The Filter Builder screen
- Clear the Filter (but keep the filter sequence reference)
- Clear the Filter Sequences
- The Filter Text Box
Quick View Third Party 'Main' Information Summary
- In the Third Party for[Salesman's Name]Customers page,
- You can view a summary of the Third Party main information.
Quick View Third Party 'Item' Information Summary
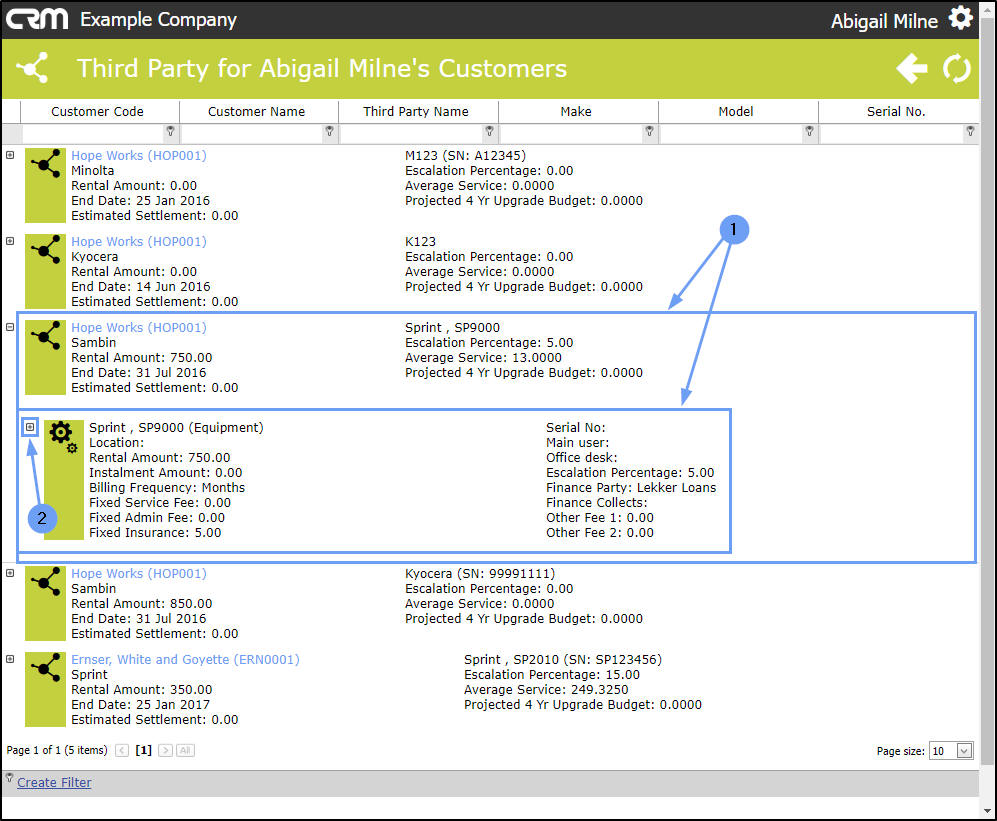
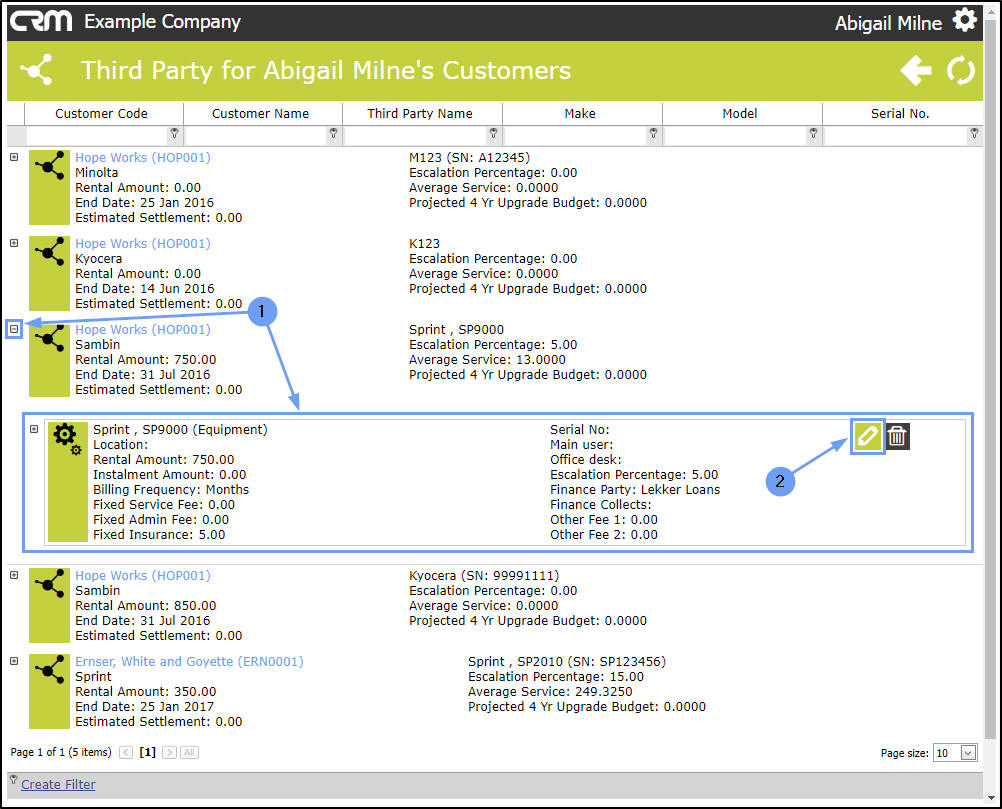
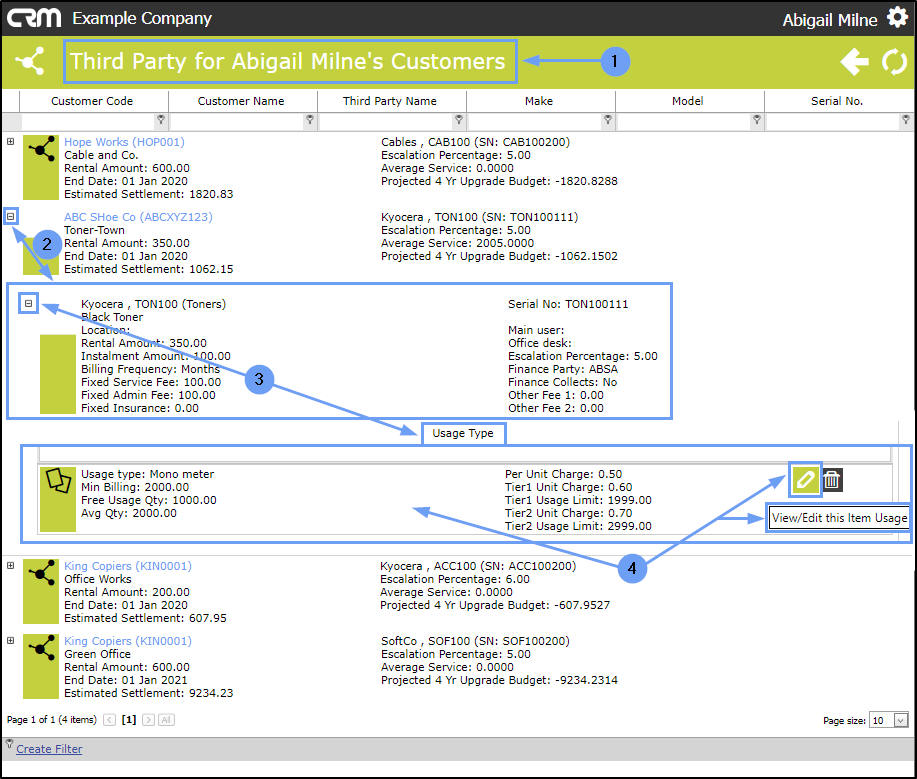
- Click on the expand icon in front of the Third Party that you wish to view the Item information of.

- The selected Third Party frame will expand to reveal a summary of the Third Party Item. This Item section allows you to save information regarding the equipment item itself.
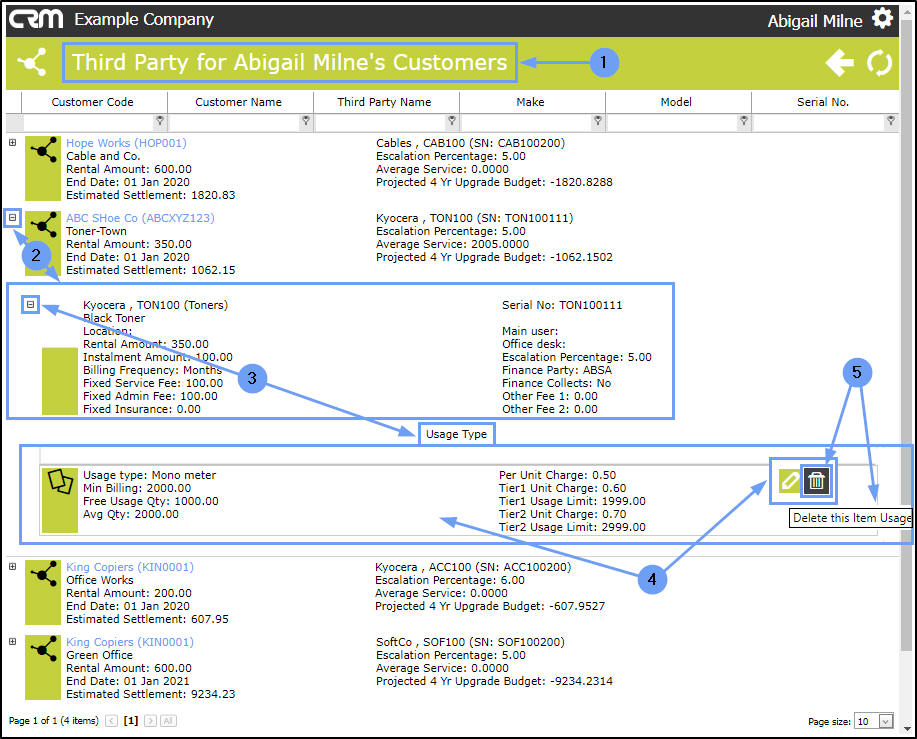
Quick View Third Party 'Item Usage Type' Information Summary
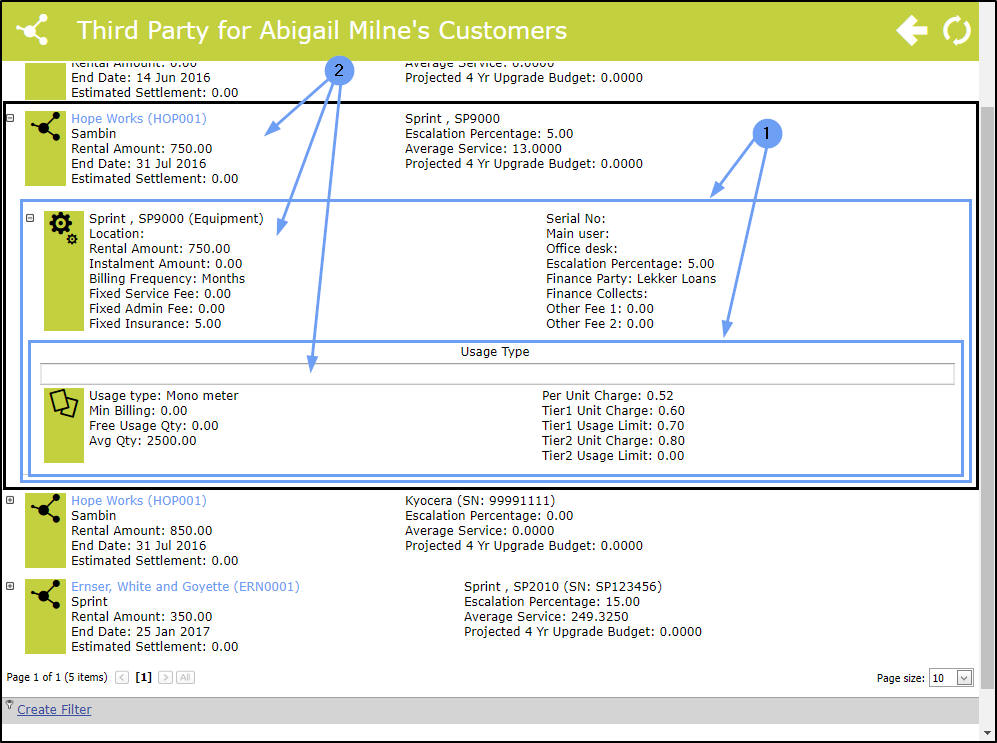
- Click on the expand icon in front of the Item frame.
- The Item frame will expand to reveal the Item Usage Type frame with a summary of the usage information.
- You can now view a summary of each tier of the Third Party:
- Contract summary
- Item Summary
- Item Usage Type summary
-
This frame allows you to add
details for the minimum and maximum billing and the cost per copy charges, if applicable.
View / Edit and Delete Action Buttons
- You can hover over any of these 3 frames to display the Action buttons:
- View/Edit
- Delete


View / Add / Edit Third Party 'Main' Information
- Hover over a Third Party Main Information summary to reveal the Action buttons:
- Click on the View / Edit this Third Party button.
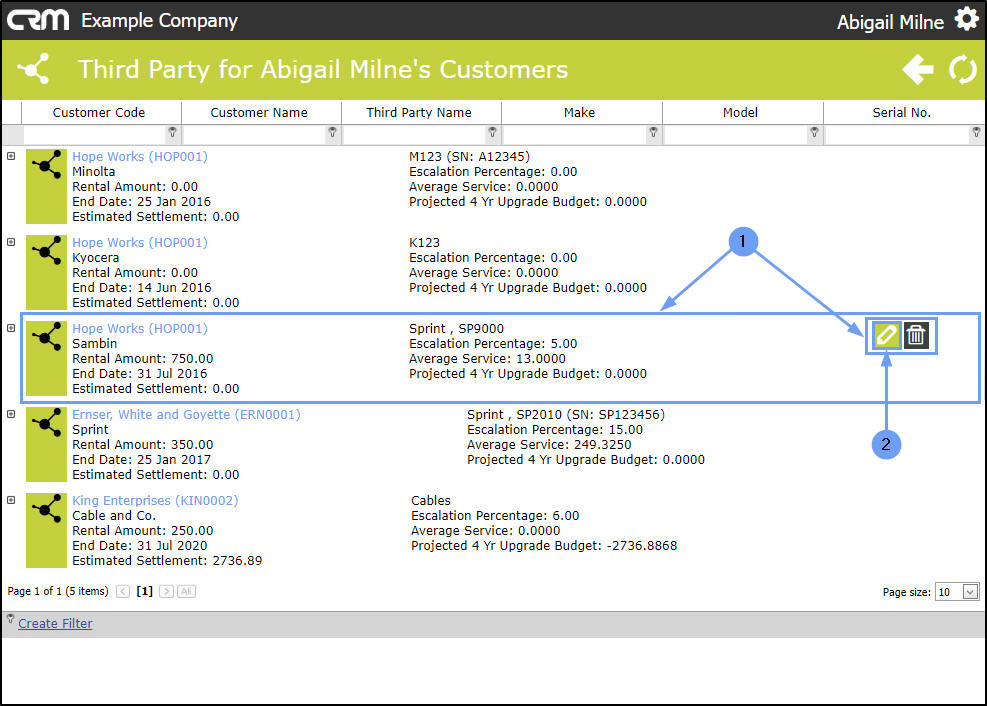
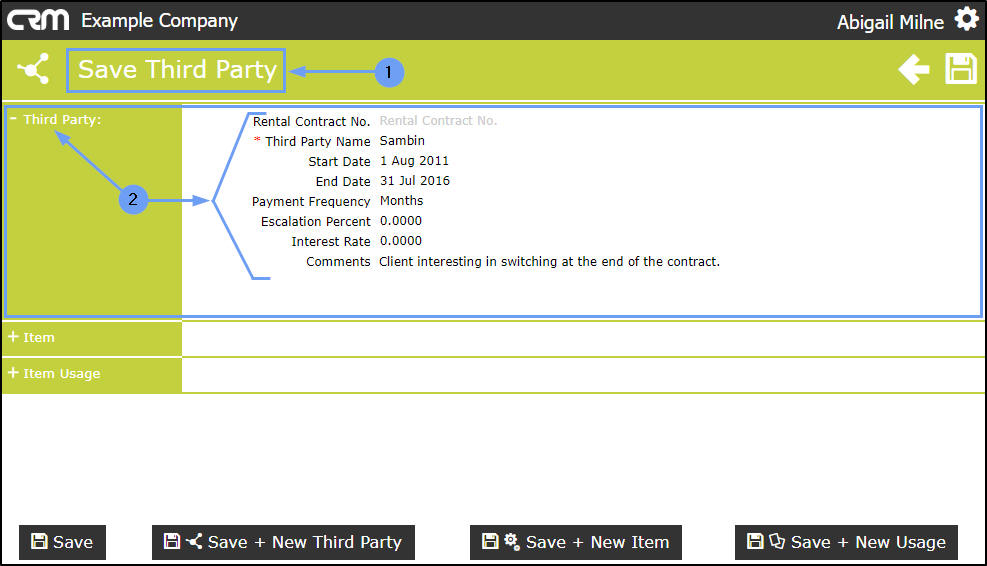
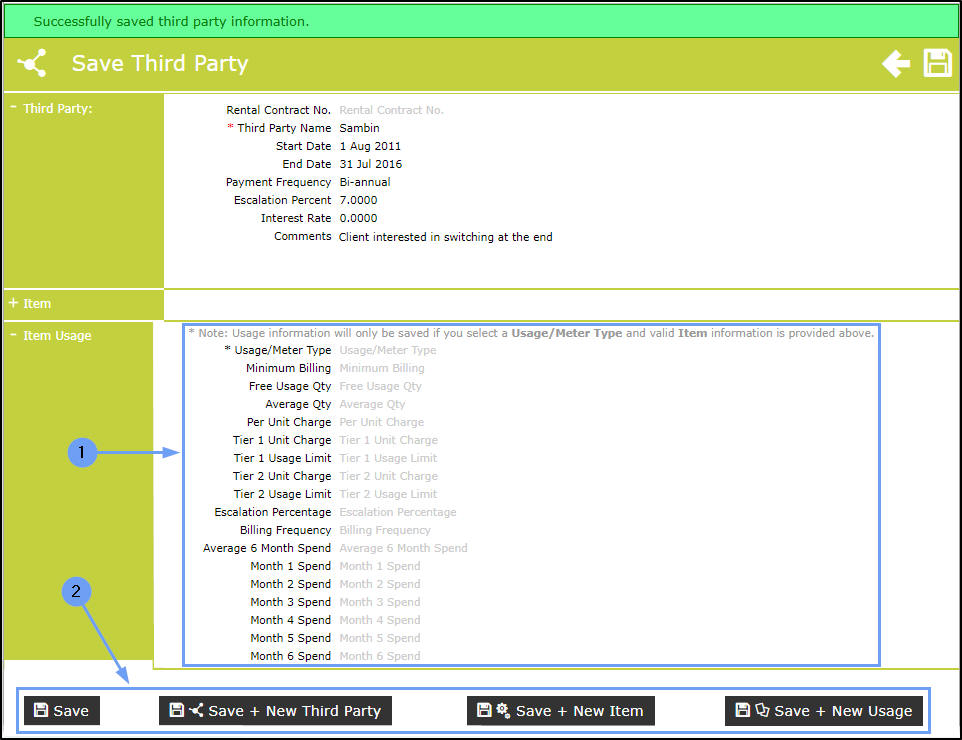
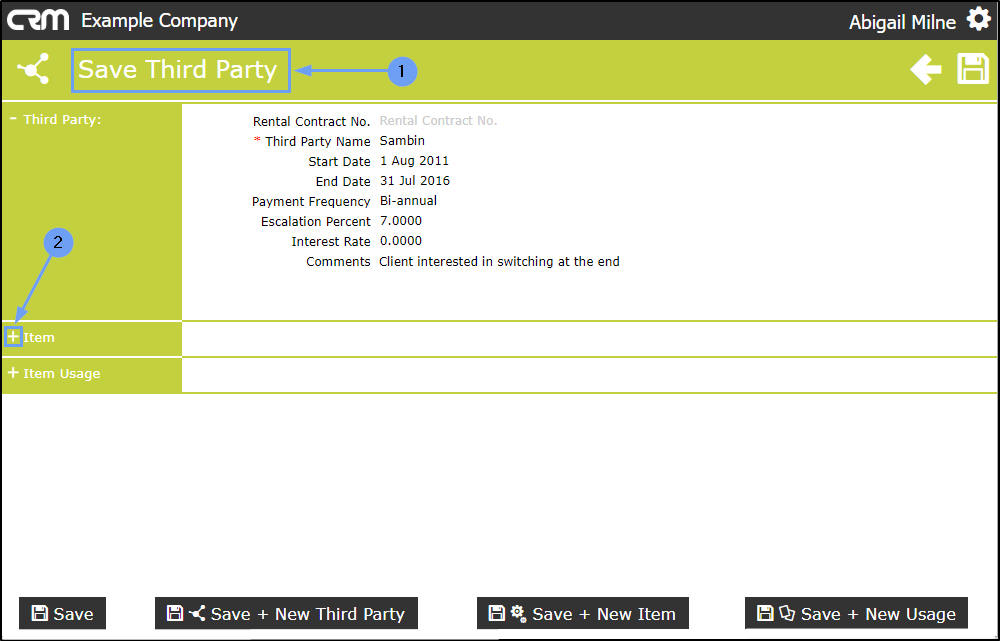
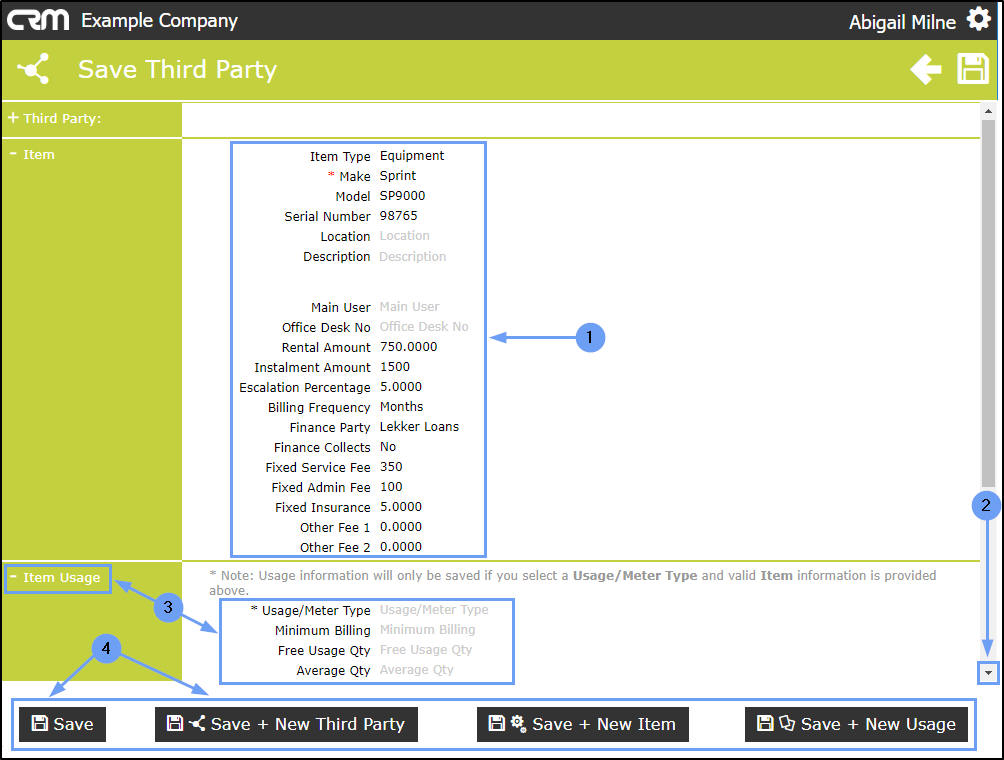
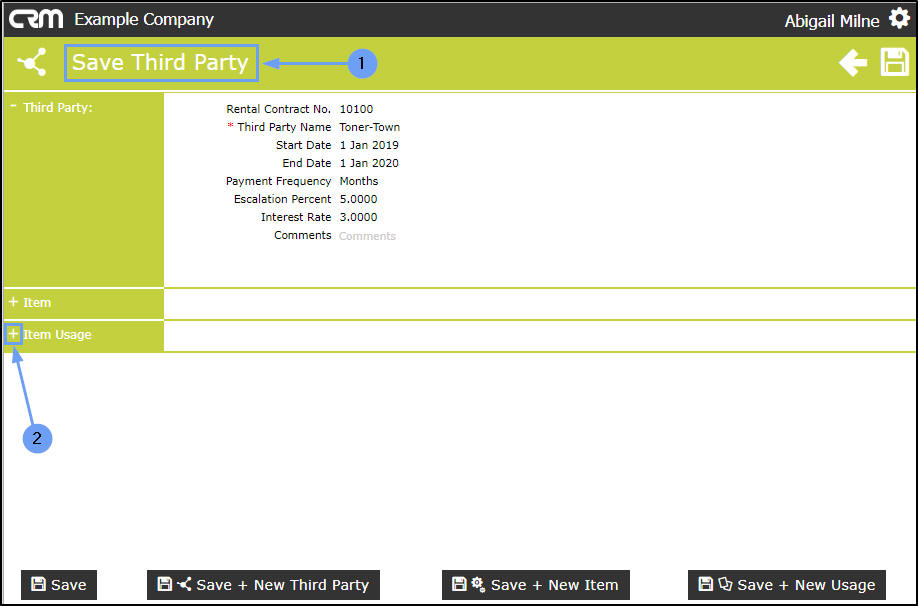
- The Save Third Party page will open.
- The Third Party section will be auto-expanded. This section is for entering the Main Information regarding the Third Party and the contract details. You can view, add and or edit the details as required:
- Rental Contract No: Type in the rental contract no.
- Third Party Name: Type in the Third Party name.
- Start Date: Click in this field and either type in the start date or click on the drop-down arrow and use the calendar function to select the date.
- End Date: Click in this field and either type in the end date or click on the drop-down arrow and use the calendar function to select the end date.
- Payment Frequency: Click in this field and select from the drop-down menu the payment frequency (e.g. monthly).
- Escalation Period: Click in this field and and either type in or use the directional arrows to select the escalation percentage.
- Interest Rate: Click in this field and and either type in or use the directional arrows to select the interest rate.
- Comments: Click in this field and and type in a comment relating to this Third Party contract, if required.
- Note:
You may not have all the Third Party information, but
CRM provides fields for all relevant contract information.
Fields with a red asterisk (*) are mandatory.
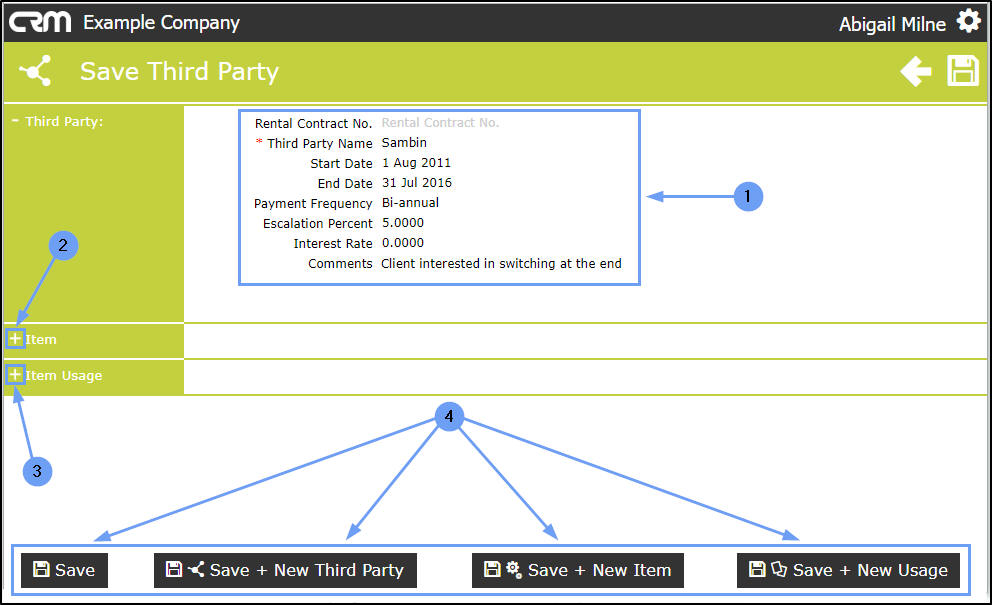
- When you have entered or edited the Third Party detail as required, you have several choices in this page:
- You can expand the Item section and view / edit / add any 'Item' Information, if applicable.
- You can expand the Item Usage section and view / edit / add any 'Item Usage' information, if applicable.
Save Options
- Or you can select one of the Save options,
- Save,
- Save + New Third Party,
- Save + New Item
- Save + New Usage
Save
- If you click on Save,
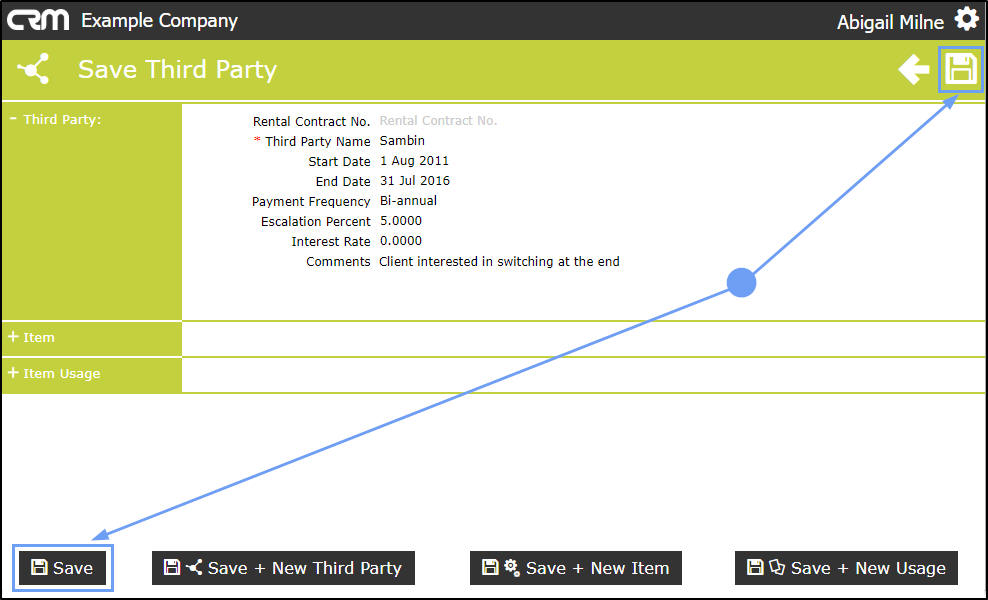
- The edited details will be saved and you will return to the Third Party for [Salesman's Name] Customers page.
Save + New Third Party
(save all details and add a new Third Party)- If you click on Save + New Third Party,
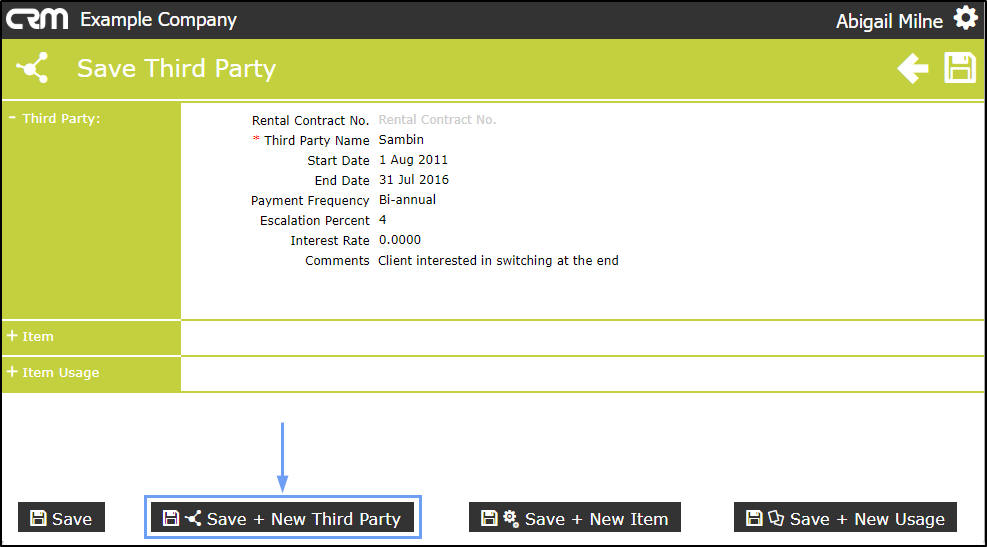
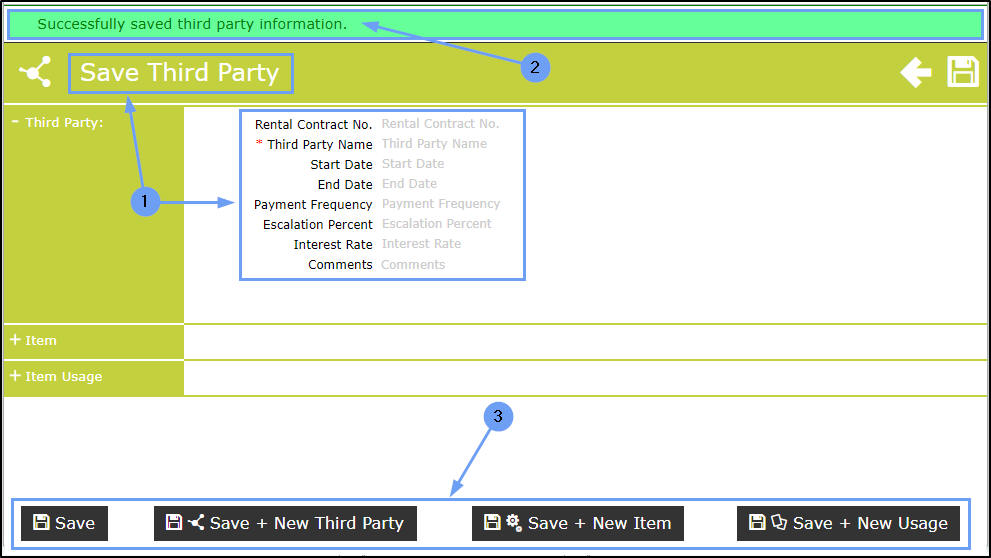
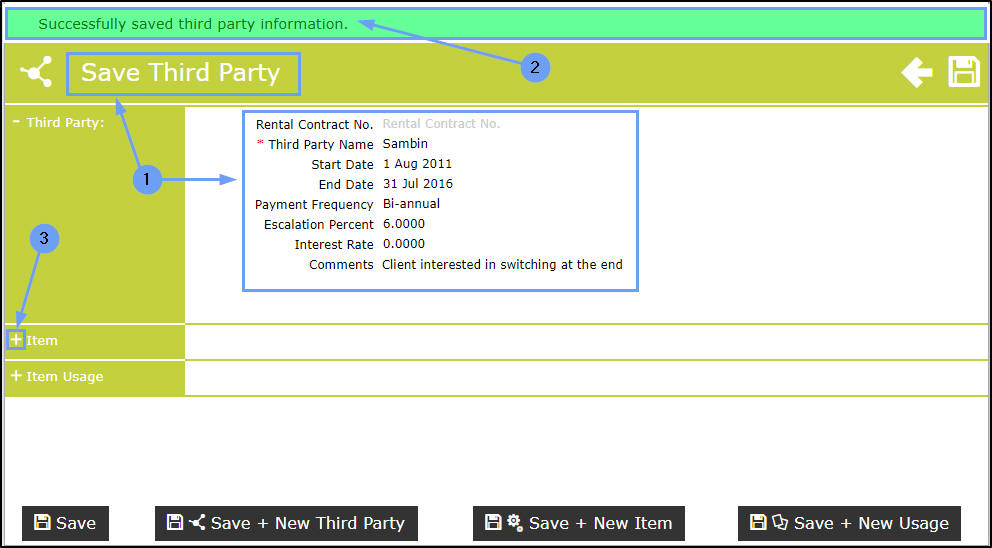
- The page will refresh and clear the Third Party section details, ready for you to add new Third Party details.
- A message bar will appear at the top of the page stating;
- Successfully saved third party information.
- Select the appropriate Save option to save your changes.
Save + New Item
(saves all details and adds a new equipment items for the same Third Party)
- If you click on Save + New Item,
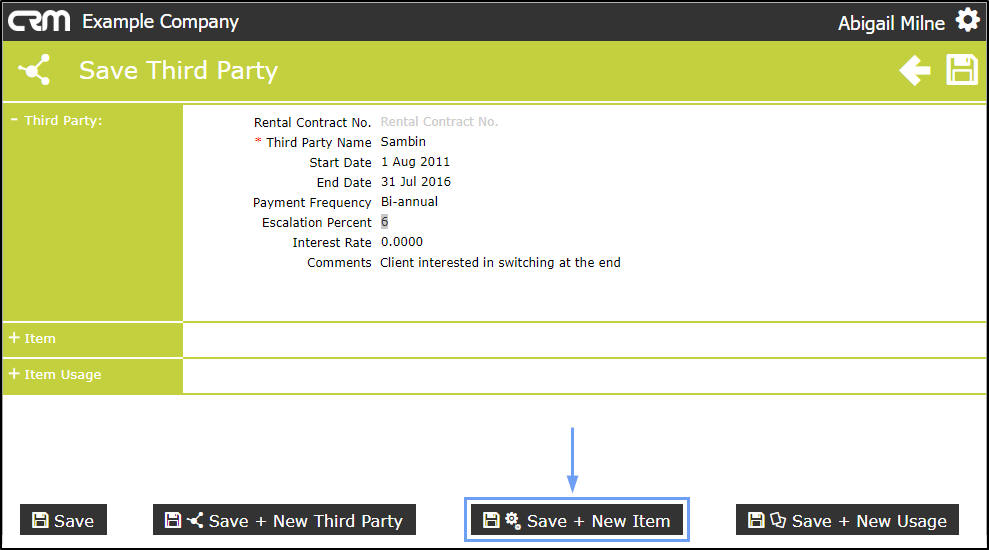
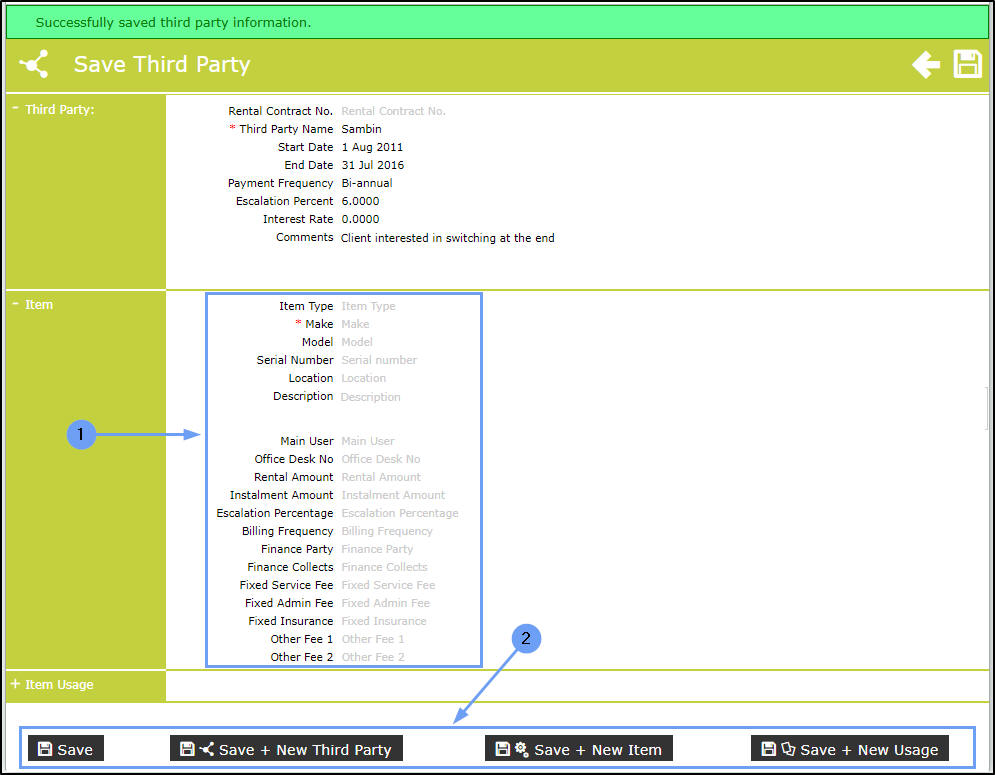
- The page will refresh but the Third Party details will remain in this page, ready for you to add a new item to this Third Party Item section.
- A message bar will appear at the top of the page stating;
- Successfully saved third party information.
- Click on the expand icon in front of Item.
- The Item section will expand and the details will have been cleared, ready for you to add new Item details.
- When you have added the new Item details, select the appropriate Save option to save your changes.
Save + New Usage
(saves all details and adds new usage for the same machine)
- If you click on Save + New Usage,
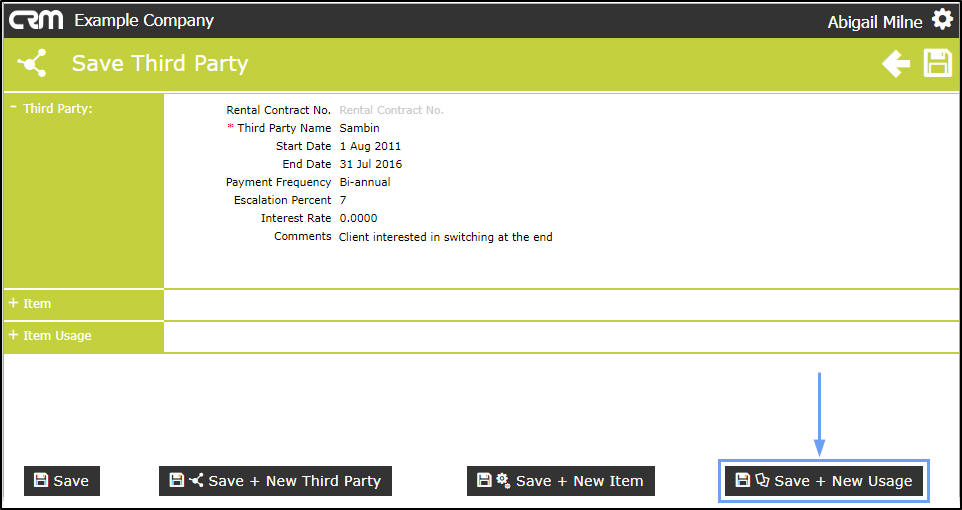
- The page will refresh but the Third Party details will remain in this page, ready for you to add a new item usage for this Third Party to the Item Usage section.
- A message bar will appear at the top of the page stating;
- Successfully saved third party information.
- Click on the expand icon in front of Item Usage.
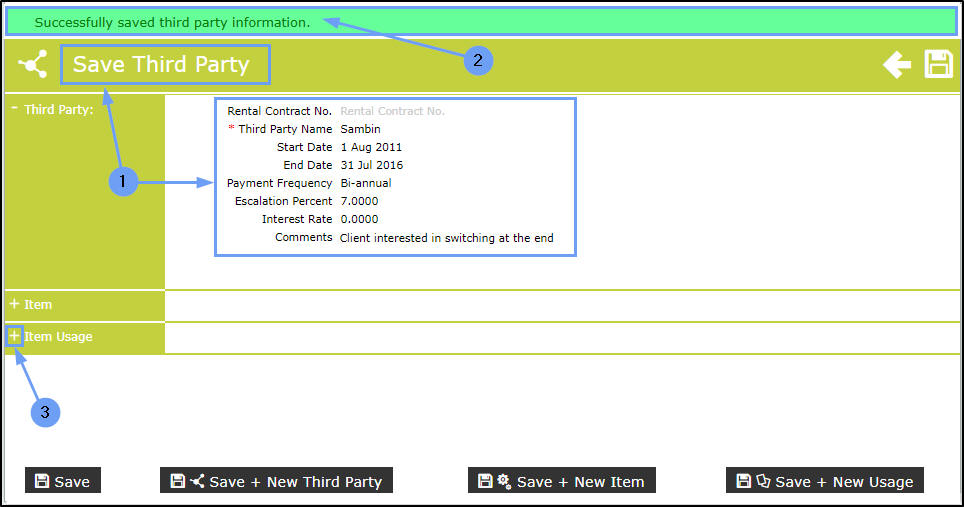
- The Item Usage section will expand and the details will have been cleared, ready for you to add new Item Usage details.
- When you have added the new Item Usage details, select the appropriate Save option to save your changes.
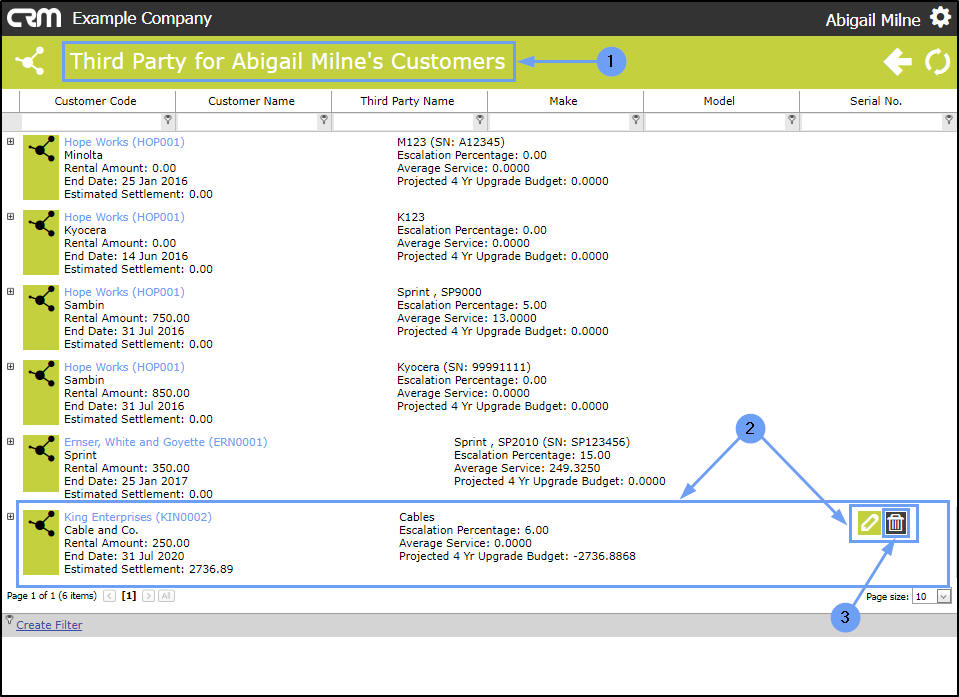
Delete Third Party 'Main' Information
- In the Third Party for [Salesman's Name] Customers page
- Hover over a selected Third Party summary to reveal the Action Item buttons:
- Click on the Delete this Third Party button.
- A message box will pop up asking;
- Are you sure you want to delete this? You cannot undo these changes.
- Click on Ok.

- The Third Party will be removed from the page.
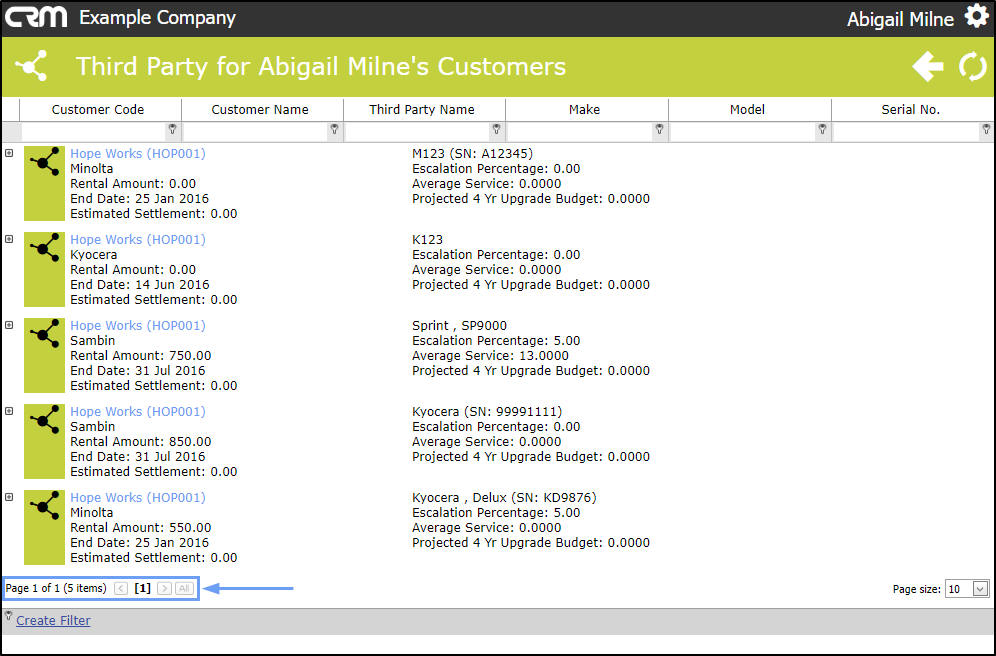
- The Page Reference field will adjust to account for the deleted Third Party.
View / Edit / Add Third Party 'Item' Information
This Item section allows you to save information regarding the equipment item itself.
These details are important to include, particularly the amounts (e.g. Instalment amount, Service and Admin fees etc.) as you will take all these figures into account (as well as the Item Usage figures) when creating your proposal or quote. The aim will be to create a better deal for this customer to win their custom.
-
Note:
If you need to add multiple equipment items, you can
select Save + New Item to add another equipment item.
You can navigate to the (edit) Item details frame in 2 ways:
-
Either
- In the Third Party for [Salesman's Name] Customers page
- Hover over a Third Party summary to reveal the Action Item buttons:
- Click on the View / Edit this Third Party button.
- The Save Third Party page will open.
- Click on the expand icon in front of Item.
-
Or
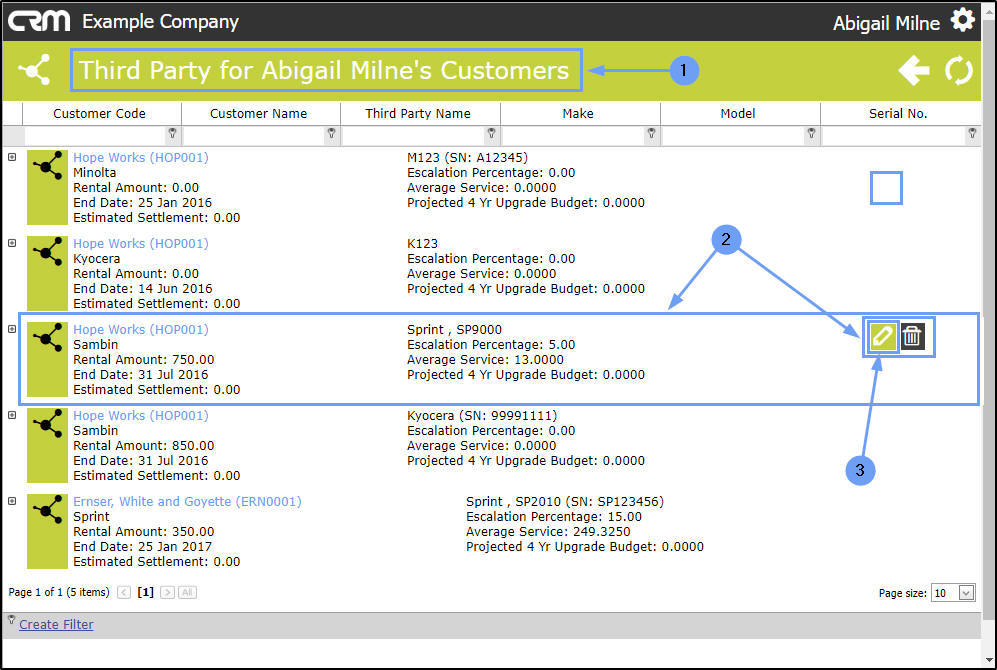
- In the Third Party for [Salesman's Name] Customers page
- Expand the selected Third Party summary to reveal the Item summary.
- Hover over the Item summary to reveal the Action buttons and click on the View / Edit this Third Party button.
- The Save Third Party page will open.
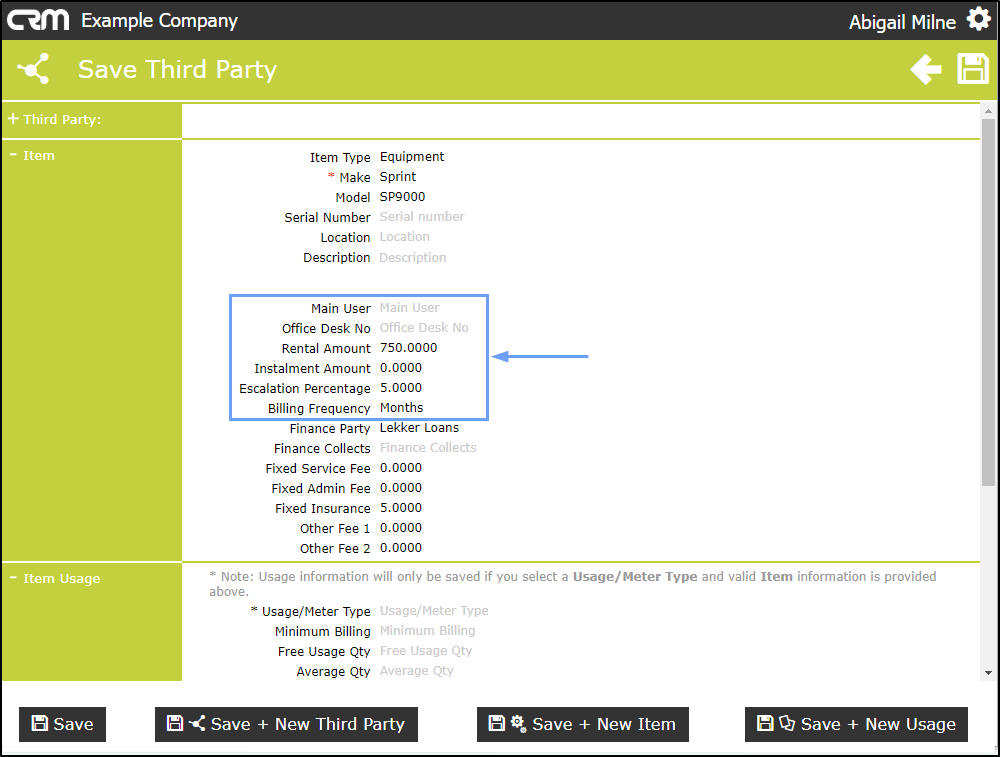
- The Item frame will be auto-expanded ready for you to make changes.
- Add or Edit the Item information as required:
- Item Type: Select from the drop-down menu the type e.g. Toners, Spares, Accessories.
- Make: Select from the drop-down menu the make e.g. Kyocera
- Model: Type in the Model No. of the item.
- Serial Number: Type in the Serial No. of the item.
- Location: Type in the location of the item.
- Description: Type in a brief description of the item.

- Main User: Type in the name of the user who mainly uses this item, if applicable.
- Office Desk No: Type in the office desk number of the user, if applicable.
- Rental Amount: Type in or use the directional arrows to select the rental amount.
- Instalment Amount : Type in or use the directional arrows to select the instalment amount that is being paid.
- Escalation Percentage: Type in or use the directional arrows to select the escalation percentage of this particular item.
- Billing Frequency: Select from the drop-down list the billing frequency e.g. months, quarterly.
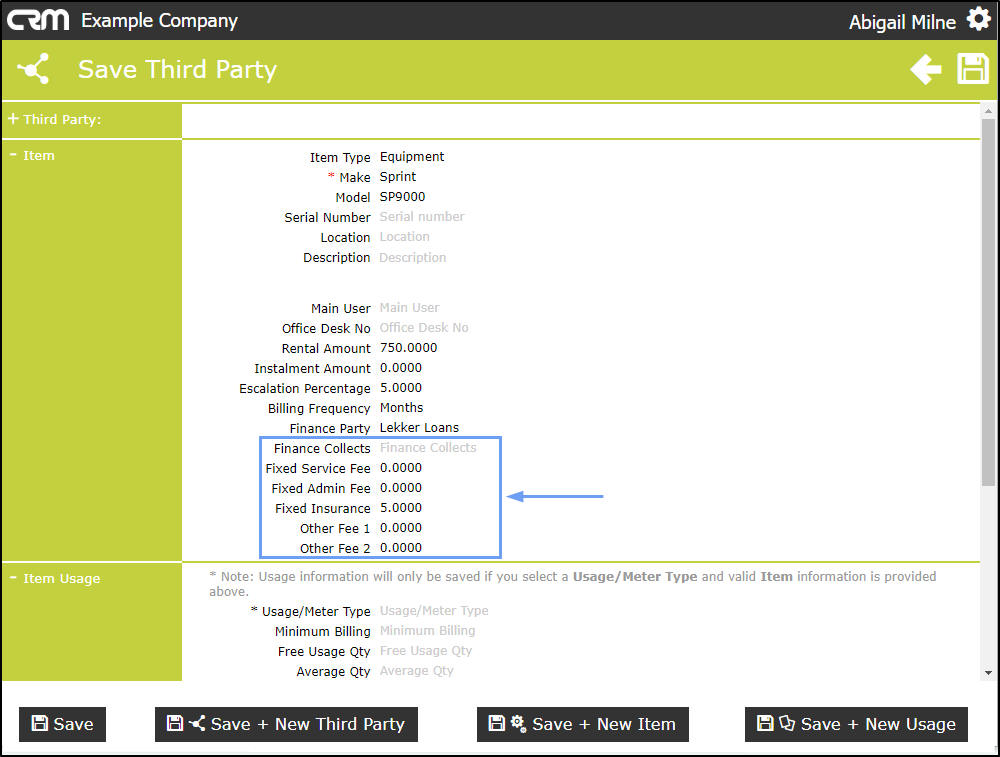
- Finance Party: Type in the Finance Party name.
- Finance Collects: Select Yes if the Finance Party collects the fee and No if not.
- Fixed Service Fee: If there is a fixed Service Fee, either type in or use the directional arrows to select this fee amount.
- Fixed Admin Fee : If there is a fixed Admin Fee, either type in or use the directional arrows to select this fee amount.
- Fixed Insurance: If there is a fixed Service Fee, either type in or use the directional arrows to select this fee amount.
- Other Fee 1 - 2 : Use these fields to add any additional fees (not listed here) that may be linked to this third party, if applicable.
- Once you have edited the Item details as required, you have several choices:
-
Either
- Scroll down the page to view all the Item Usage details.
- Add or Edit the Item Usage information as required.
-
Or
- Select one of the Save Options as explained above.
Delete Third Party 'Item' Information
- In the Third Party for [Salesman's Name] Customers page,
- Expand the selected Third Party summary to display the Item summary.
- Hover over this Item summary to reveal the Actions buttons.
- Note that the Page Reference field states that there are currently 6 items.
- Click on the Delete button.
- A message box will pop up asking;
- Are you sure you want to delete this item? You cannot undo these changes.
- Click on OK.
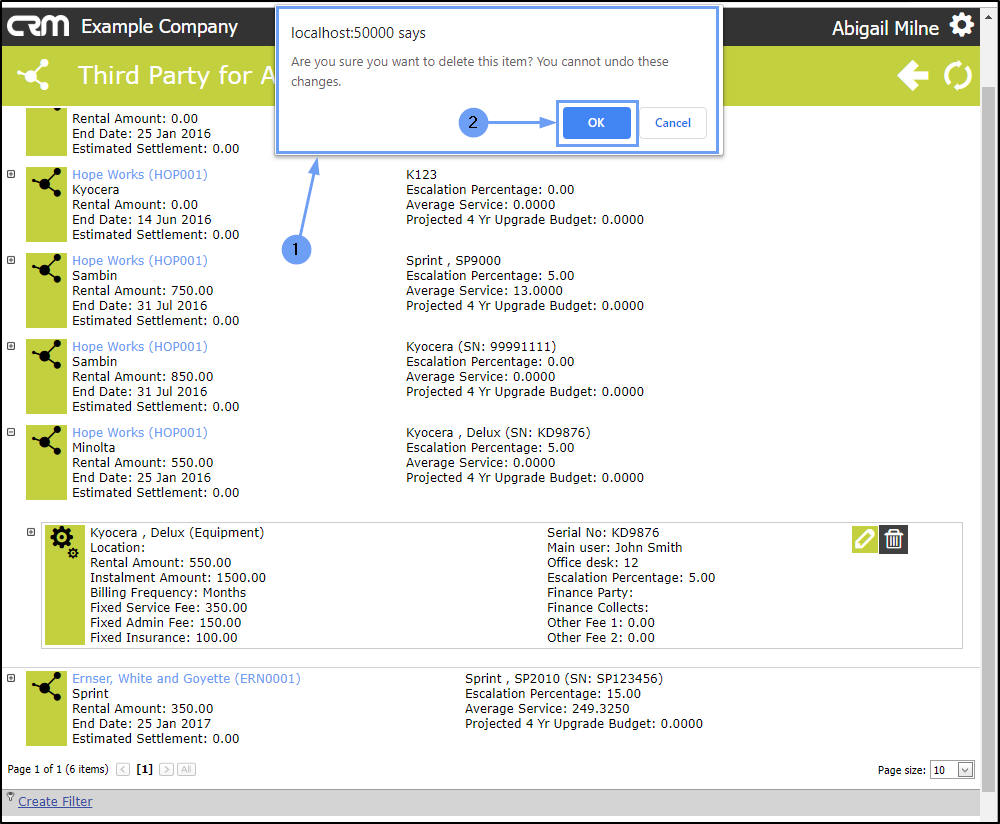
- The screen will refresh and the deleted item will be removed. The Page Reference field will adjust to reflect the reduced number of items.
View / Edit / Add Third Party ' Item Usage' Information
These details are important to include, if available as you will also take all these figures into account (as well as the Item figures) when creating your proposal or quote. The aim being to create a better deal for this customer to win their custom.
You can navigate to the Item Usage frame in 2 ways:
- Either
- In the Third Party for [Salesman's Name] Customers page
- Hover over a Third Party summary to reveal the Action Item buttons:
- Click on the View/Edit this Third Party button.
- The Save Third Party page will open.
- Click on the expand icon in front of Item Usage.
-
Or
- In the Third Party for [Salesman's Name] Customers page
- Expand the selected Third Party Main Information summary to reveal the Item summary.
- Expand this Item summary to reveal the Item Usage Type summary.
- Hover over the Item Usage Type summary to reveal the Action buttons and click on the View / Edit this Item Usage Action button.
- The Save Third party page will open.
- Both the Item frame and the
- Item Usage frame will be expanded ready for you to Add / Edit / Delete Item and Item Usage information.
- The reason that both frames are auto-expanded is explained in the Note found at the top of the Item Usage frame:
-
* Note: Usage information will only be saved if you select a Usage/Meter Type and valid Item information is provided above.
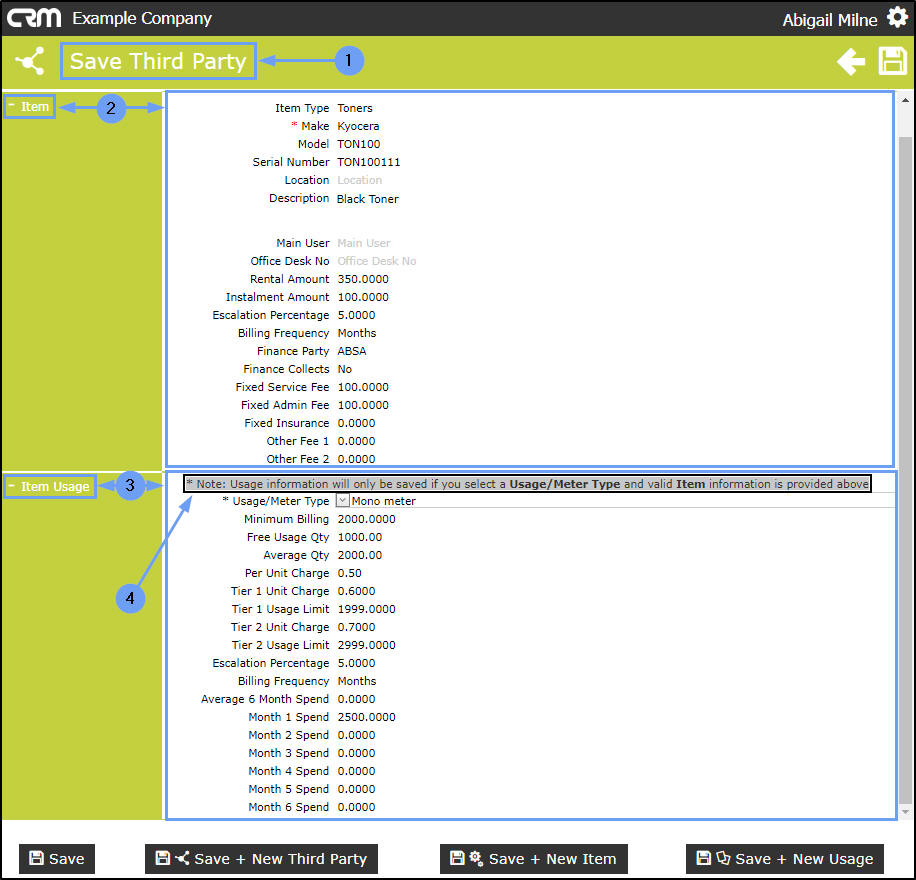
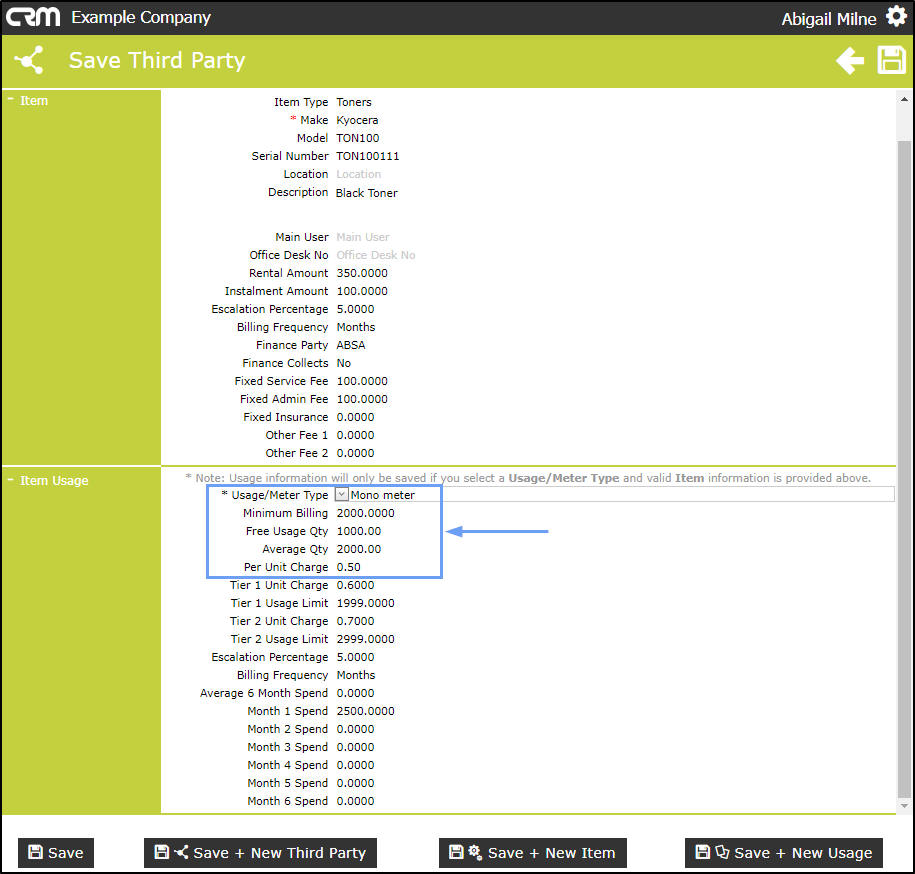
- Add or Edit the Item Usage information as required:
- Usage / Meter Type: Select from the drop-down menu the type e.g. Mono meter, Colour A3.
- Minimum Billing: Either type in or use the arrow indicators to select the minimum billing amount (in Rand value), if applicable
- Free Usage Qty: Either type in or use the arrow indicators to select the free usage quantity, if applicable.
- Average Qty: Either type in or use the arrow indicators to select the average usage quantity.
- Per Unit Charge: Either type in or use the arrow indicators to select the per unit charge.
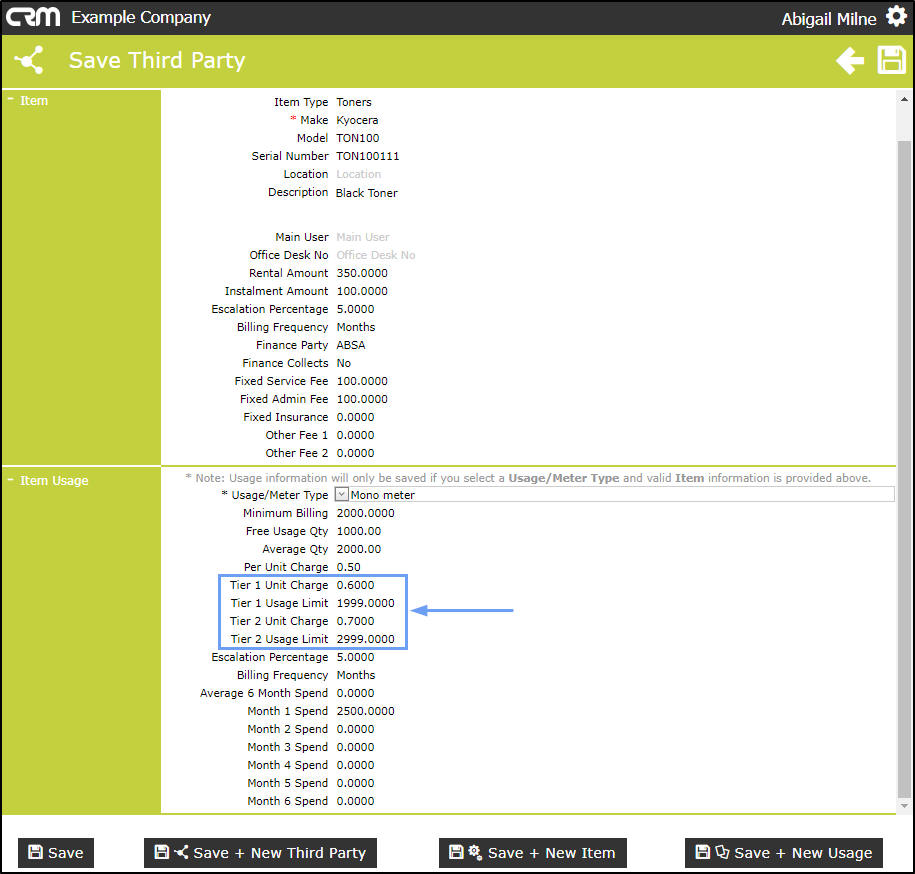
- Tier 1 Unit Charge:
- Tier 1 Usage Limit:
- Tier 2 Unit Charge:
- Tier 2 Usage Limit:
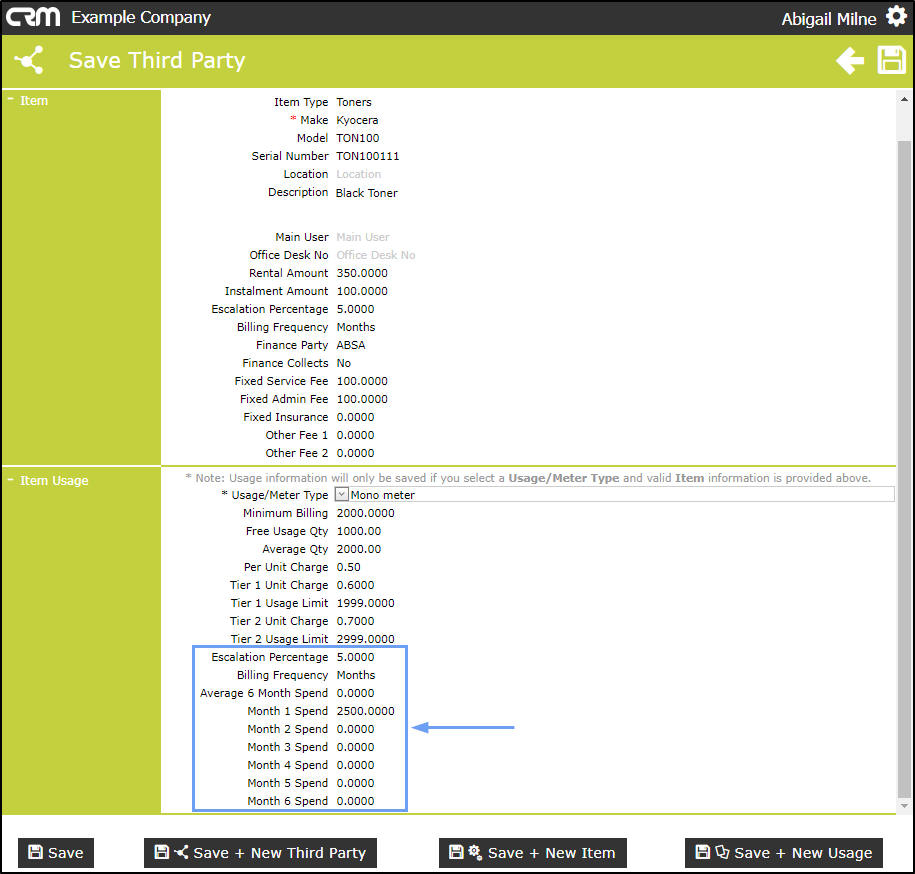
- Escalation Percentage:
- Billing Frequency:
- Average 6 Month Spend:
- Month 1 Spend to Month 6 Spend:
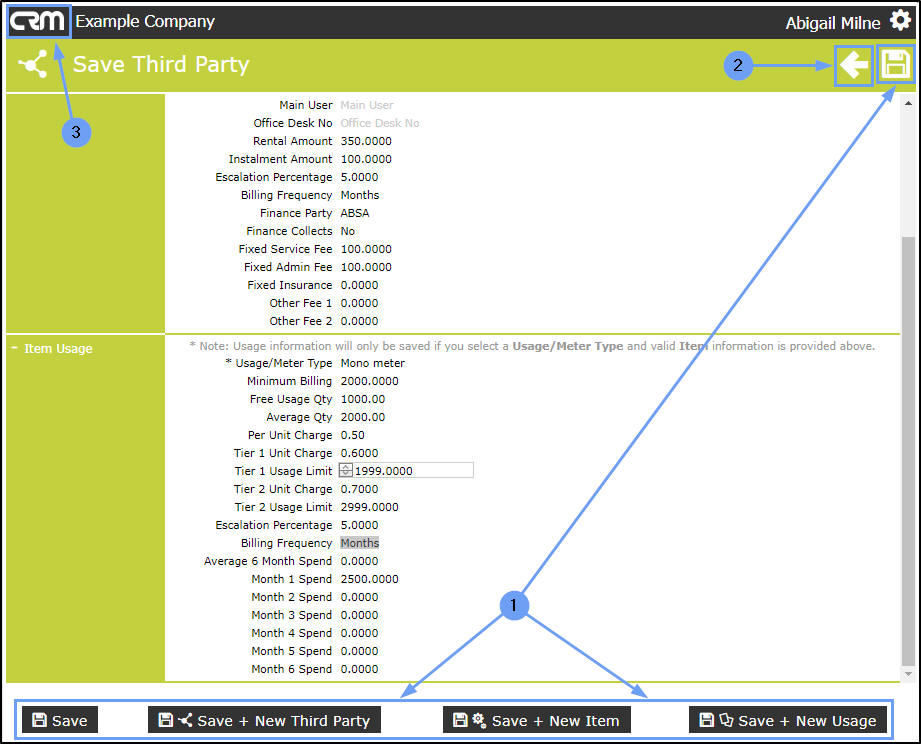
- When you have finished adding or editing the Item Usage information,
- Select one of the Save Options or
- Click on Back to return to the previous page (any changes made will not be saved)
- Click on the CRM logo to return to the Dashboard (Home page), (any changes made will not be saved).
-
Either,
-
or,
-
or,
- Note:
If you are adding equipment that has multiple meters - then select 'Save + New Usage' to add another meter.
Delete Third Party 'Item Usage' Information
- In the Third Party for [Salesman's Name] Customers page
- Expand the selected Third Party Main Information summary to reveal the Item summary.
- Expand this Item summary to reveal the Item Usage Type summary.
- Hover over the Item Usage Type summary to reveal the Action buttons.
- Click on the Delete this Item Usage Action button.
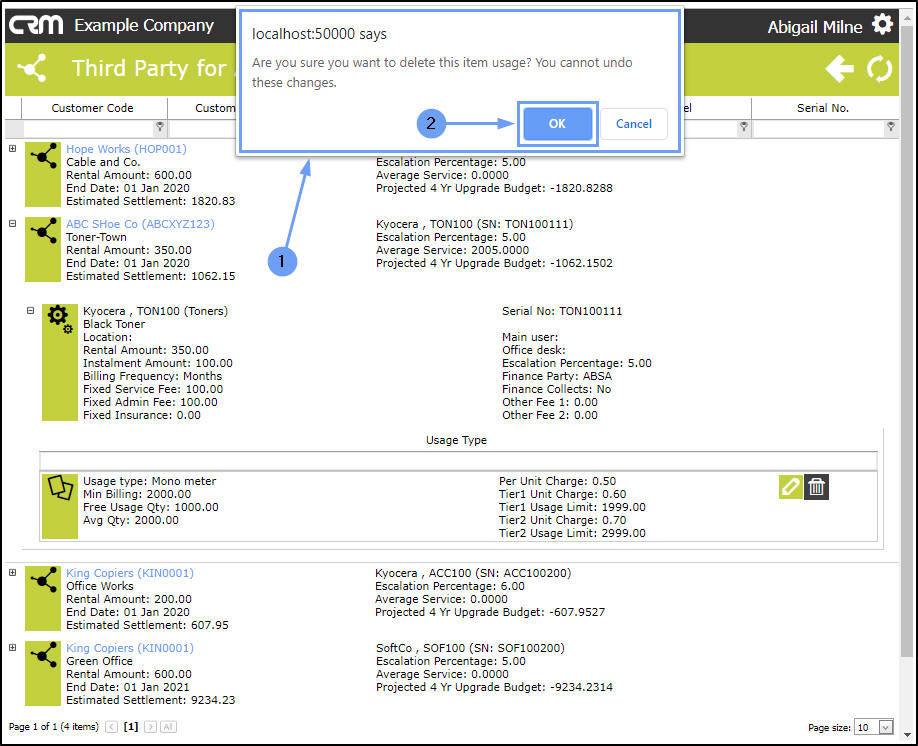
- A message box will pop up asking;
- Are you sure you want to delete this item usage? You cannot undo these changes.
- Click on OK.
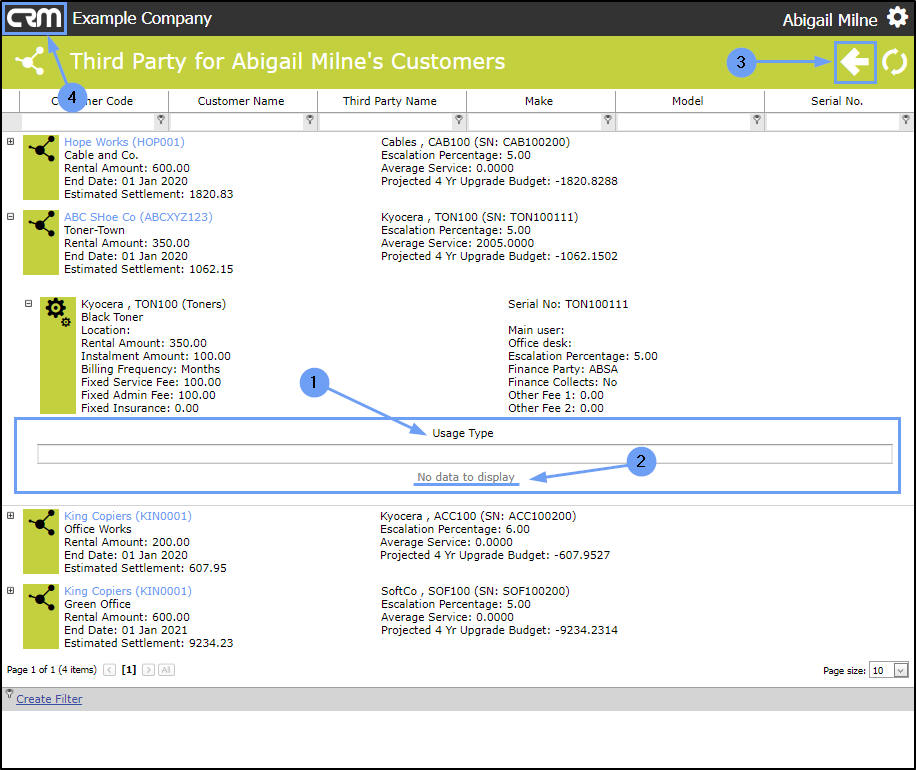
- The screen will refresh and the deleted item usage type information will be removed.
- The Usage Type frame will contain a No data to display message.
- Click on Back to return to the previous page or,
- Click on the CRM logo to return to the CRM Homepage.
CRM.000.025