Service
My Tickets
BPO_Ticketing is an application that gives the user the ability to both view and work on Calls and/or Projects where they are the owner (responsible person) for the Call or Project’s underlying work order. The user can also create ticket assignments to pass the work on to the next responsible person.
| Ribbon Access: Service > My Tickets |

The My Tickets screen will be displayed.
- A list of tickets specific to the user logged on to the system can be viewed.
- You can view all tickets that you have created and assigned to another person.
- You can also view all the tickets that other people have assigned to you.
- However, this list will only show these tickets if they are still in the New Status.

This screen also lists:
- the Call or Project Reference number.
- the Work Order Code and Description
- the work order Priority (1 = Most Important, 5 = Least Important)
- any Notes linked to the work order
- the Create Date of each work order
- whether the ticket has been Read: [Yes] or not: [No]

- the Customer Code and Customer Name number.
- the number of Days that the ticket has been Unattended
- the number of Days that the ticket has remained Open
- the Elapsed Hours.

Important Notes
Ownership
For a ticket to be displayed in this list, the user should take ownership of the call in BPO by:
-
Either
- Unread tickets: these tickets have not been opened for viewing - the text will be in bold and the Read column will state No.
- Open/Read tickets : As soon as a ticket is opened for viewing – the text will no longer be in bold and the Read column will state Yes.
Ticket Colour
- Red : Ticket has been assigned to you and is for your attention.
- Blue : Ticket that you have assigned to another employee

View a Ticket
- Select a ticket.
- The colour of the ticket will change to a grey.
-
Either
- Right click on the selected row to display a Process menu.
- Click on Edit - Edit Ticket.

-
Or
- double click on the ticket row.
-
Or
- Ensure that the correct row is selected.
- Click on Edit.
- In this image, DCN0000085 has been selected.

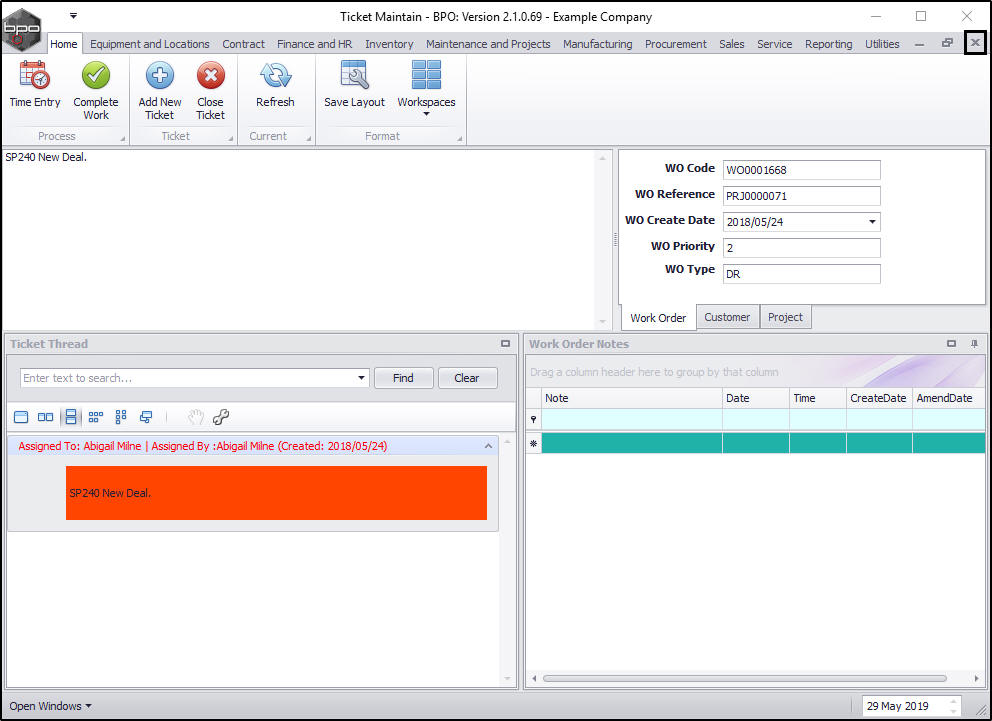
The Ticket Maintain screen will be displayed.
- The Work Order Description can be viewed in the top left frame of this screen.
- The Work Order Details (Code, Reference, Create Date, Priority and Type) can be viewed in the top right frame of this screen.

- Click on the Customer tab.
- If this work order is linked to a customer, the Customer Details (Name, Contact, Contact No, Contact Email) can be viewed.

- Click on the Project (or Call ) tab.
- If this work order is linked to a Project (as in this example) or a Call , the Project (or Call) Details (Reference No, Description) can be viewed here.

The Ticket Thread Frame
- Use the Search field to search for any ticket in the ticket thread.
- Type in the text box and click on Find.
- To clear the search, click on Clear.
- The Customization toolbar contains icons which will adjust the view layout of the ticket thread For example, you can view the thread in One row, Multiple Columns or Carousel Mode.
- If you hover any icon, the icon description will pop up.

- All tickets linked to the selected work order are displayed in this frame.
- The tickets are in inverse chronological order. The most recently created ticket will be at the top of the list.

- Assignment Details: In this frame, you can see the assignor, assignee and the date the ticket was created.
- Comments : You can also view the ticket comments relating to the work order.

The Work Order Notes Frame
- Here you can view the work order notes with the date and time they were created.

Assign a Ticket
- Select the ticket that you wish to assign to another person.
- Click on Edit
- In this image, DCN0000029 is selected.

- The Ticket Maintain screen will be displayed.
- Click on Add New Ticket.

- The Add New Ticket pop up screen will appear.
- Assigned by: This will auto-populate with the name of the user currently logged onto the system.
- Assigned To: Click on the drop-down arrow and select from the list, the person you wish to assign the ticket to.
- Note: Type in notes or instructions you wish to relay to the person you are assigning the ticket to.
- Click on Save.

-
The
Add New Ticket
screen and
Ticket Maintain
screen will close and you will return to the
My Tickets screen.
- The ticket that you assigned will no longer be displayed in the list.
- A new ticket has been created and displayed with status N - New.

Add Work Order Notes
- Select the ticket you wish to add work order notes to.
- Click on Edit.
- In this image, DCN0000040 was selected.

The Ticket Maintain screen will be displayed.
- Type in a relevant note in the Note column.
- All the other fields in this frame will auto populate.
- Click on Enter on the keyboard, type in the next note if required. You can add multiple notes.
- When you are done typing in the notes, click on Close to exit the screen.

Time Booking
- The system will log your time as you work based on you Starting and Ending work.
- Select the ticket you want to book time for.
- Click on Edit
- In this image, DWO0000266 was selected.

The Ticket Maintain screen will be displayed.
- Click on Time Entry.

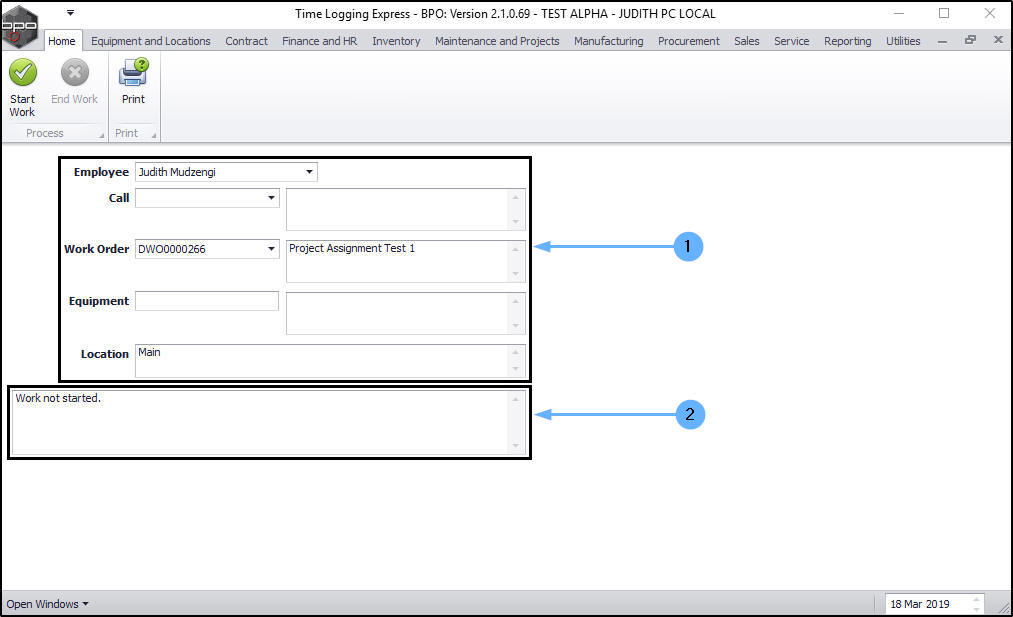
The Time Logging Express screen will be displayed.
- Employee : This will auto populate with the person currently logged on to the system.
- Call : This will auto populate with the call number and description if the work order is linked to a call.
- Work Order : This will auto populate with the work order number and description.
- Equipment : This will auto populate with the serial number and descriptionif a machine is linked to the work order.
- Location : This will auto populate with the locationif a functional location is linked to the work order.
- Status: The final field in this frame will contain a brief description of the status of the work e.g. 'Work not started'.
Start Work
- Click on Start Work.

- The Time Logging Express screen will close and you will return to the Ticket Maintain screen.
- A Call Processing message box will pop up informing you that;
- Call No: [ ] has been released.
- Click on Ok.

- The Call Processing message will close.
- Exit the Ticket Maintain screen.

Important Note: You cannot start work on a new ticket before ending work on the previous ticket.
- Although details of the current ticket will be displayed in the Time Logging Express screen, the Start Work button will be Inactive (grey).
- The work status of the previous ticket will be displayed.
- Take note of the work order number, close this screen and follow the process to end work on the previous ticket.

End Work
If you need to stop the current work, use this End Work option. This will book your time for the current work. Remember to type in a note regarding what work was done during this time.
If the work is done, then use the Complete Work process.
- Click on End Work.

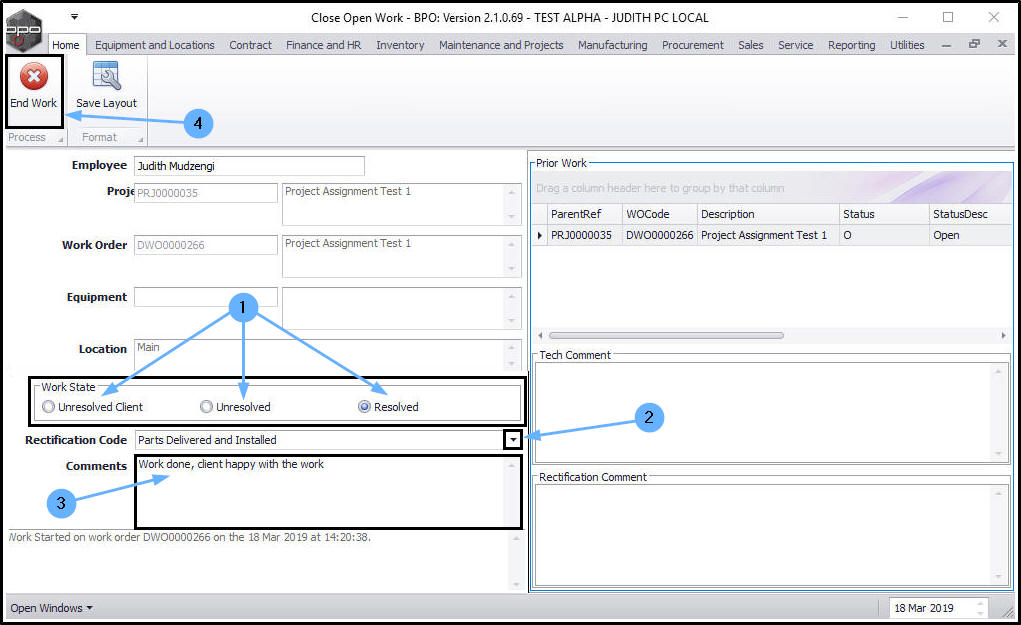
The Close Open Work screen will be displayed.
Ticket Details:
- Employee : This will auto populated with the person logged on to the system.
- Call or Project : This will auto populate with the Call or Project number and description if the work order is linked to a Call or Project.
- Work Order : This will auto populate with the work order number and description.
- Equipment : This will auto populate with the serial number and description if a machine is linked to the work order.
- Location : This will auto populate with the location if a functional location is linked to the work order.

Prior Work
- This section shows you prior work done and the comments logged against this work.

Work State and Resolution Actions
- Select one of the 3 listed Work States.
- Unresolved (Client) - once processed, this call will move to on Hold.
- Unresolved - once processed, this call will move to Pending.
- Resolved - once processed, this call will move to Complete.
- Click on the down arrow in the Rectification Code field and select from the drop-down menu, the appropriate Rectification Code, e.g. 'Replaced Components', 'Parts Delivered and Installed', 'Fixed Machine' etc.
- Type in a relevant Comment(s).
- Click on End Work.
You now need to decide whether to end the work without assigning any work to the next person or whether to end the work and assign it to the next person.
End Work Without Assigning to the Next Person
- A Work Process message will be displayed asking you;
- Do you wish to assign this to the next person?
- Click on No.

- The Close Open Work Screen will close.
- The Time Logging Express Screen will be displayed.
- Note 1: In this example, the End Work button is now inactive (greyed out). However, sometimes the Start Work button will be greyed out while the End Work button is not.
- Note 2: In this example, the work status description notes that work was ended. However, sometimes the work status message will display as Work started on work order [ ] on the [ ] - even if work has been ended.

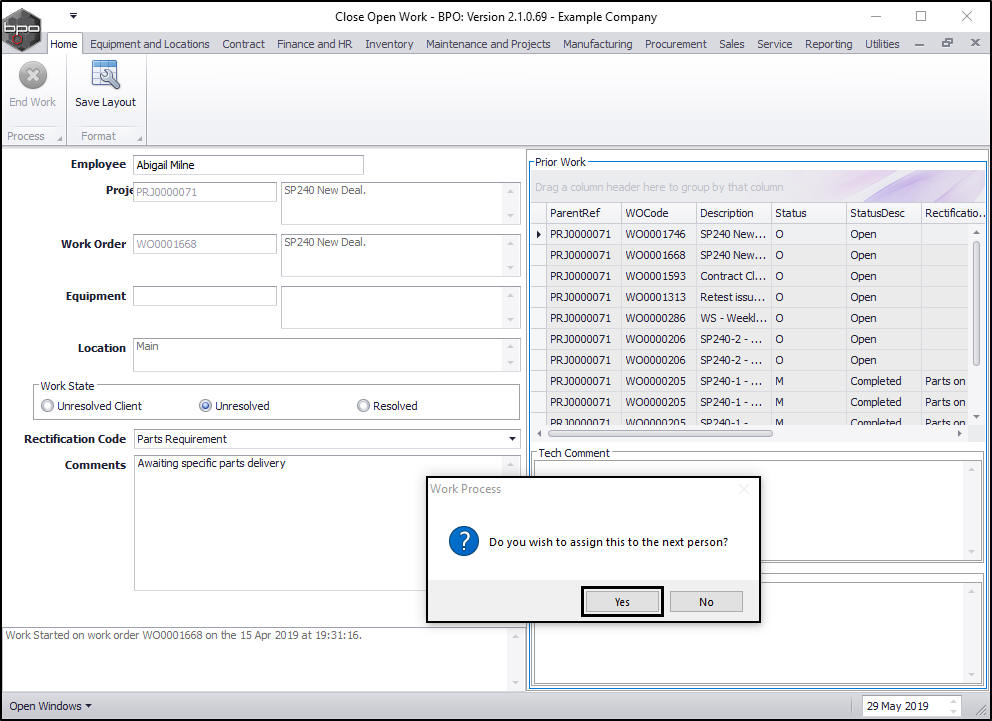
End Work and Assign to the Next Person
In the Close Open Work screen.
- A Work Process message will be displayed;
- Do you wish to assign this to the next person?
- Click on Yes.
The Project (or Call) Assignment screen will be displayed.
- Assigned To: Click on the drop-down arrow in this field.

- The Name menu will be displayed.
- Select from this list, the person you wish to assign this to.

- Detail: This will auto populate but you can edit the text, if required.
- Assignment Date: This will auto populate with the current date and time.
- Date: You can either type in or click on the drop-down arrow and use the calendar function to select an alternative date, if required.
- Time: You can either type in or use the directional arrows to select an alternative time, if required.
- Assigned By: This will auto populate with the person currently logged on to the system but you can click on the drop-down arrow and select an alternative person, if required.
- Functional Location or Equipment: This will populate depending on whether the call, project or work order selected, is linked to a location or a machine.
- Item and Location: This will populate depending on whether the call, project or work order selected, is linked to a location or a machine.

You now need to decide whether to create a new work order or whether to select an existing open work order.
Create New Work Order
- Tick the Create new Work Order check box to create a new work order that you will assign to the selected person.
- Click on Save.

-
You will return to the Time Logging Express screen.
- The Start Work button will be greyed out while the End Work button is not.
- The work status message may display as Work started on work order [ ] on the [ ], even if work was ended.
- Exit the screen.

You will return to the Ticket Maintain screen.
- Exit this screen.
You will return to the My Tickets screen.
- Here you can view the new work order.

Select Existing Open Work Order
-
Instead of creating a new work order for the person you wished to assign the work order to, you could select an existing open work order to assign.
- Note: You cannot choose a work order that was previously assigned to someone.
- In the Close Open Work screen, select Yes in the Work Process message box.

The Project or Call Assignment screen will be displayed.
- Click on the check box in front of the open work order that you wish to assign on to the assignee.
- Click on Save.

The Project or Call Assignment screen will close and you will return to the Time Logging Express screen.
- You will note that the Start Work button is 'inactive' (greyed out) but the End Work button is 'active'.
- The Work Status text box may display "Work started....."
- Exit the screen.

You will return to the Ticket Maintain screen.
- Exit this screen.

You will return to the My Tickets screen.
- Her you can view the open work order that has been assigned on.

View Updated Ticket Thread
- Select the ticket that you have just re-assigned.
- Click on Edit .

The Ticket Maintain screen will be displayed.
- In the Ticket Thread frame, you can see that there are now 2 tickets in the thread, the one assigned to yourself and the one you have assigned on to another person.
- Exit the screen.

Print Work Order Report
- Select the ticket you wish to print a work order report for.
- Click on Edit.
- In this image, DWO0000067 was selected.
- Note:
You can do this process once you have
started or
ended
work without first exiting the Time Logging Express screen first.

- The Ticket Maintain screen will be displayed.
- Click on Time Entry.

- The Time Logging Express screen will be displayed.
- Click on Print.

- A Report Generation message will be displayed asking you;
- Do you want to print the WO Report for WO [ ]?
- Click on Yes.

- The Work Order Report will be displayed.
- You can save, print or email this report.
- Click on Close to exit this screen.

Complete Work
- You can use this functionality once your work has been completed, or if you can no longer continue with the work if, for example, you are waiting for a Parts Requirement or you are awaiting client confirmation.
- Select the ticket you want to complete work for.
- Click on Edit.
- In this image, DWO0000260 was selected.

- The Ticket Maintain screen will be displayed.
- Click on Complete Work.

- The Complete Work screen will be displayed.
- Employee: This will auto populate with the name of the employee currently logged onto the system.
- Call/Project: This will auto populate with the call/project number if the work order is linked to a project or call.
- Work Order: This will auto populate with the work order number.
- Resolution Actions: Select one of the 3 resolution actions
- Resolved - once processed, this call will move to Complete.
- Unresolved - once processed, this call will move to Pending.
- Unresolved (Client) - once processed, this call will move to On Hold.
- Reason Code: Click on the down arrow and select the reason code.
- Notes: Type in the relevant notes.
- Click on Save.

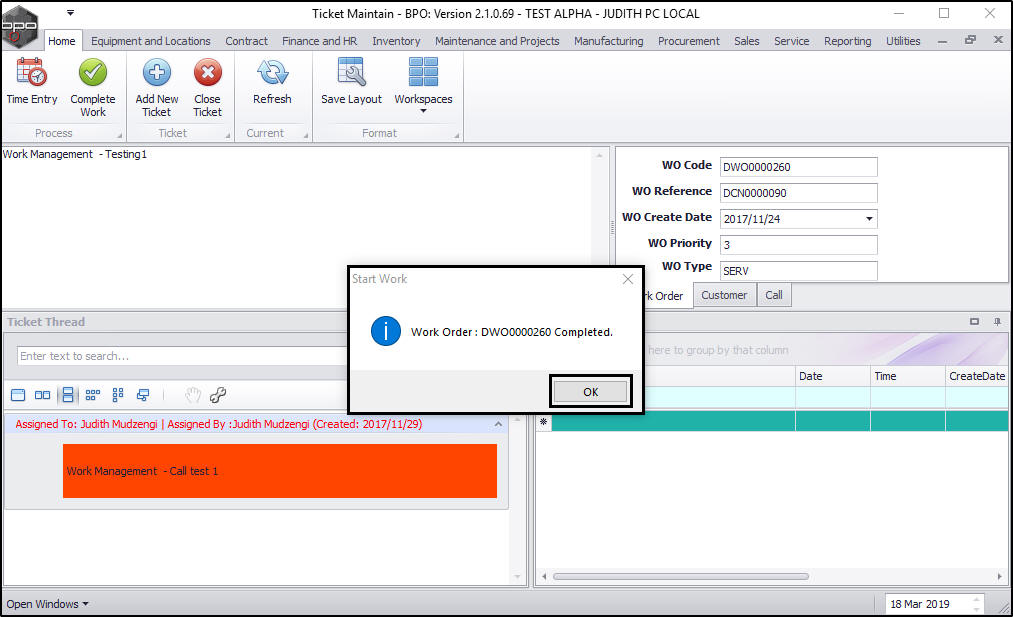
- A Start Work message will be displayed telling you;
- Work Order: [ ] Completed.
- Click on Ok.
- The Start Work message will be closed.
- Click on Close to exit this screen.

Close ticket
- Once all work has been done and completed, a ticket thread can be closed.
- Select the ticket you want to complete work for.
- Click on Edit.
- In this image, DWO0000240 was selected.

- The Ticket Maintain screen will be displayed.
- Click on Close Ticket.

- The Ticket Thread message will be displayed telling you;
- Ticket Thread closed.
- Click on Ok.

- The Ticket Thread message will closed.
- To exit this screen, click on Close.

CAP.001.002