Service
Calls - Work Orders
A work order, or job card is an order for work to be performed for a Company or a Customer. All transactions concerning this work, such as part issues, labour time, etc. are logged against the work order.
When work is required for a Customer, a Call is raised. The system will generate a work order in the background. Transactions are logged on the call, but stored against the work order. More than one work order can be linked to a call, for example, when different tasks needs to be performed to complete one call.
When work is required for a Company, such as Building Maintenance or a Machine Repair, then a work order needs to be raised manually.
- If the work is for Building Maintenance, or Training, then the work order must be linked to a functional location, which must be set up before hand.
- If the work required is for an asset, e.g. repair a machine in store to be sold refurbished, then the machine is linked to the call.
| Ribbon Access: Service > Calls |
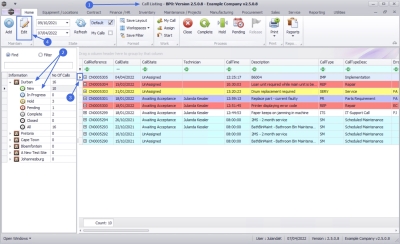
- The Call Listing screen will be displayed.
- Select the
Site and
Status.
- The example has Durban as site and the New status selected.
- Click on the row of the call you wish to issue a work order for.
- Click on Edit.
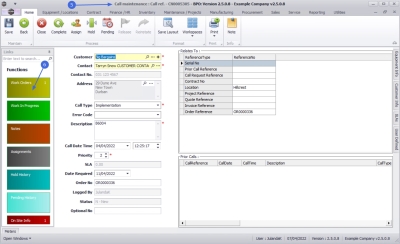
- The Call maintenance : Call ref - [call reference number] screen will display.
- Click on the Work Orders tile.
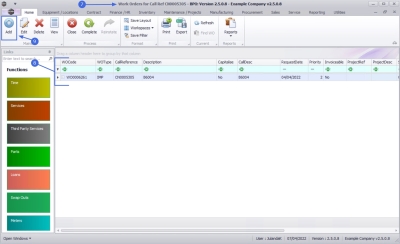
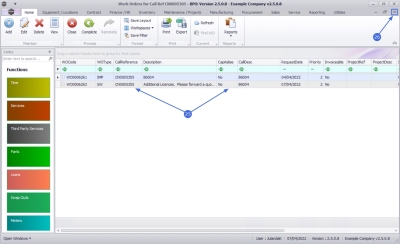
- The Work Orders for Call Ref [call reference number] screen will display.
- Any work orders that have been issued against the call will display in the data grid.
Add Work Order
- Click on Add.
![]() Short cut key: Right click to display the All groups menu list. Click on Add.
Short cut key: Right click to display the All groups menu list. Click on Add.
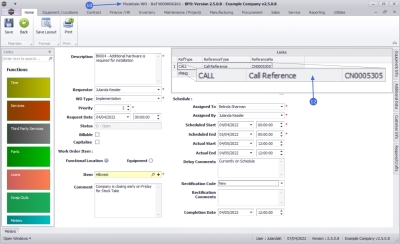
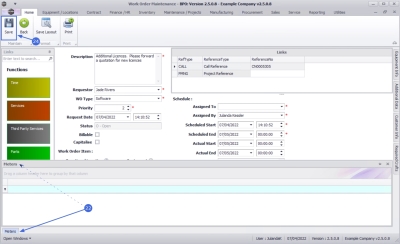
- The Work Order Maintenance screen will be displayed.
- Complete the Work Order details for the call.
- In the Links frame note that the Call Reference has automatically been linked to the call reference you have selected.
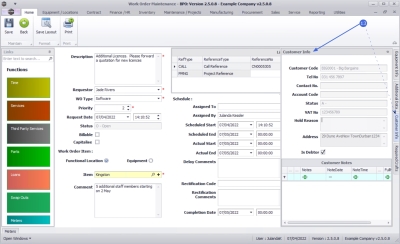
Customer Info tab
- Click on the Customer Info tab to expand the Customer Info docking panel.
- From here you can view additional information for the customer linked to this work order as well as the Customer Notes, if any has been created.
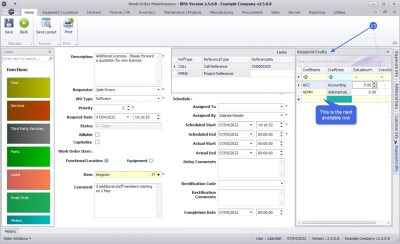
Required Crafts tab
- Click on the Required Crafts tab to expand the Required Crafts docking panel.
- Crafts that have already been identified for the work order will be listed.
-
 Right click on the next active row in the Craft Name field to add any additional craft(s) needed for carrying out this Work Order.
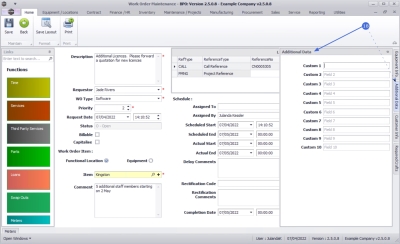
Additional Data tab
- Click on the Additional Data tab to expand the Additional Data docking panel.
- You can view and rename the Custom fields 1 - 10, that can be utilised for additional information required for this Work Order that is not covered on the Work Order screen. Rename the field labels to suit your company requirements.
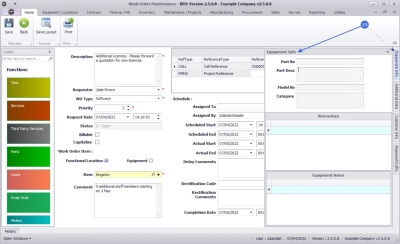
Equipment Info tab
- Click on the Equipment Info tab to expand the Equipment Info docking panel.
- When addressing the [+] icon in the Item field, this panel can be viewed for additional information about the selected equipment item, including any warranties and/or equipment notes if applicable.
Meters tab
- Click on the Meters tab to expand the Meters docking panel.
- You will be able to view the meter history information for the Item referencing on the Work Order, if applicable.
![]() For a detailed handling of this topic refer to Work Orders - Add a Work Order
For a detailed handling of this topic refer to Work Orders - Add a Work Order
Save Work Order
- When you have finished adding details to the screen, click on Save.
- You will return to the Work Orders for Call Ref screen where you can view the linked work order
- Close the screen to return to the Call maintenance screen.
Edit Work Order
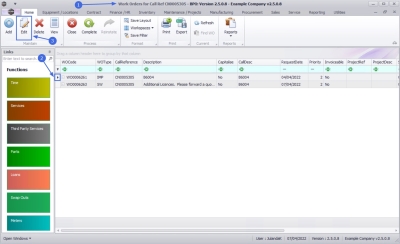
- From the Work Orders for Call Ref [call reference number] screen,
- Click on the row of the work order you wish to edit.
- Click on Edit.
![]() Short cut key: Right click to display the All groups menu list. Click on Edit.
Short cut key: Right click to display the All groups menu list. Click on Edit.
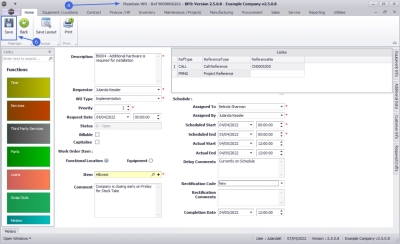
- The Maintain WO - Ref [work order number] screen will be displayed.
- You can make the changes to the Work Order information screen, Required Crafts tab or Additional Data tab as required.
![]() For a detailed handling of this topic refer to Work Orders - Add a Work Order
For a detailed handling of this topic refer to Work Orders - Add a Work Order
- When you have made the necessary changes, click on Save.
Delete Work Order
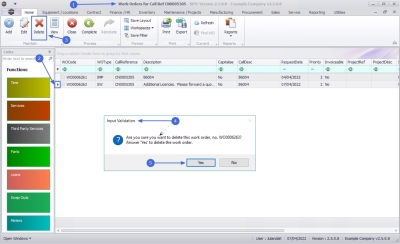
- From the Work Orders for Call Ref [call reference number] screen,
- Click on the row of the work order you wish to remove.
- Click on Delete.
![]() Short cut key: Right click to display the All groups menu list. Click on Delete.
Short cut key: Right click to display the All groups menu list. Click on Delete.
- When you receive the Input Validation message to confirm;
- Are you sure you want to delete this work order, no. [work order number]? Answer 'Yes' to delete the work order.
- Click on Yes.
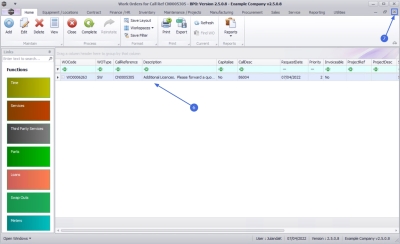
- The work order has been removed from the Work Orders for Call Ref screen.
- Click on the Close button to return to the Call maintenance screen.
View Work Order
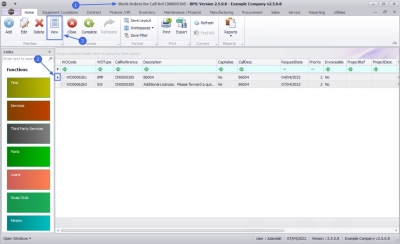
- From the Work Orders for Call Ref [call ref number] screen,
- Click on the row of the work order you wish to view.
- Click on View.
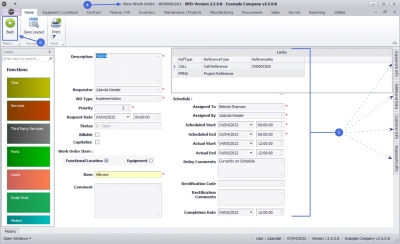
- The
View Work Order - [work order number] screen will be displayed.
 Note that only the Back button is available on this screen as this screen is view only.
 - From here you can view the Work Order details, Customer Info, the Required Crafts, Additional Data or the Equipment Info for the work order.
- Click on Back to return to the Work Order, or
- Click on Print to Print the Work Order.
Close Work Order
- All work order transactions must be completed, for instance issuing parts, invoicing etc., before a work order can be closed. The system will prevent you from closing the work order if a transaction still needs to be processed on the work order.
- You must have successfully completed the work order, before it can be closed.
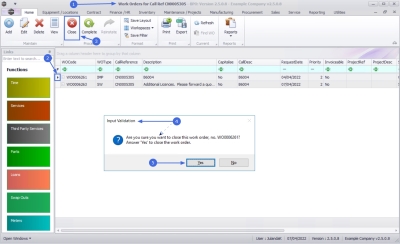
- From the Work Orders for Call Ref [call ref number] screen will be displayed.
-
Click on the
row of the work order that needs to be closed.
 Note that you will only be able to close a work order that has been completed.
 - Click on Close.
![]() Short cut key: Right click to display the All groups menu list. Click on Close.
Short cut key: Right click to display the All groups menu list. Click on Close.
- When you receive the Input Validation message to confirm;
- Are you sure you want to close this work order, no. [work order number]? Answer 'Yes' to close the work order.
- Click on Yes.
![]() For a detailed handling of this topic refer to Work Orders - Close Work Order
For a detailed handling of this topic refer to Work Orders - Close Work Order
Scroll to view the Status for the Work Order in the Status column.
The Status has changed to C - Closed.
Complete Work Order
Work orders linked to a project should be completed when the work required has been done.
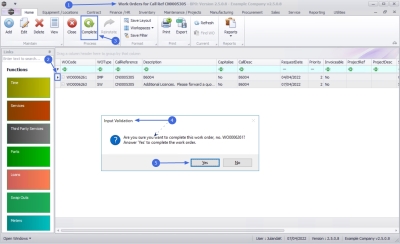
- The Work Orders for Call Ref [call reference number] screen will be displayed.
- Click on the row of the Work Order you wish to complete.
- Click on Complete.
![]() Short cut key: Right click to display the All groups menu list. Click on Complete.
Short cut key: Right click to display the All groups menu list. Click on Complete.
- When you receive the Input Validation to confirm;
- Are you sure you want to complete this work order, no. [work order number]? Answer 'Yes' to complete the work order.
- Click on Yes.
![]() For a detailed handling of this topic refer to Work Orders - Complete a Work Order
For a detailed handling of this topic refer to Work Orders - Complete a Work Order
Reinstate Work Order
- If you need to process or change something on a closed work order, you will need to reinstate the work order, add or edit the details as required, then close it again when done.
-
Some of the reasons for reinstating a work order are:
- To credit a cancelled order.
- To credit incorrect stock and re-invoice correct stock.
- To credit over supply.
- To credit and re-invoice correct selling price.
- Only closed work orders can be reinstated.
- From the Work Orders for Project Ref [project ref number] screen will be displayed.
-
Click on the row of the closed work order that needs to be reinstated.
 Note the status for the work order as C - Closed.
- Click on Reinstate.
![]() Short cut key: Right click to display the All groups menu list. Click on Reinstate.
Short cut key: Right click to display the All groups menu list. Click on Reinstate.
- When you receive the Input Validation message to confirm;
- Are you sure you want to re-instate this work order, no. [work order number]? Answer 'Yes' to re-instate the work order.
- Click on Yes.
![]()
Print Work Order
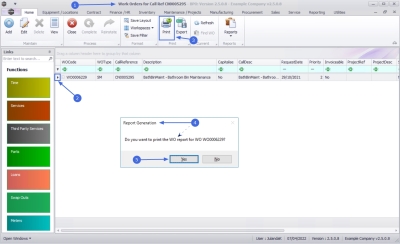
- From the Work Orders for Call Ref [call reference] screen,
- Click on the row of the work order you wish to print the work order report for.
- Click on Print.
- When you receive the Report Generation message to confirm,
- Do you want to print the WO report for [work order number]?
- Click on Yes.
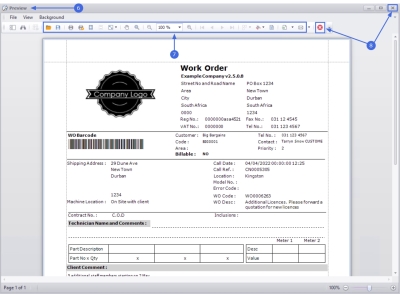
- The Work Order will display in the Reports Preview screen.
- From here you can make cosmetic changes to the Work Order, as well as Save, Zoom, Add a Watermark, Export or Email.
- Close the Report Preview screen when done.
Function Tiles
|
|
The Times tile will direct you to the Time booking for Work Order screen where you can Add, Edit and Delete Labour Time for a Work Order linked to a Project. Refer to Work Orders - Time Booking |

|
The Services tile will direct you to the Internal services for WO Code screen where you can Add, Edit and Remove an Internal Service from the Work Order. Refer to Work Orders - Internal Services |

|
The Third Party Services tile will direct you to the Service Request for WO Code screen where you can Add, Edit, Delete, issue a Requisition and do Billing for the Work Order. Refer to Work Orders - Third Party Service Request |

|
The Parts tile will direct you to the Service Request for WO Code screen where you can, Add, Edit, Remove an Internal Service to a Work Order, as well as view Requisitions, Issues and Transfers, maintain Notes, Change the Warehouse, Remap a Part or Create a Part on the Work Order. Refer to Work Orders - Part Requests |

|
The Loans tile will direct you to the Loan Requests for WO Code screen where you can Add, Edit, Delete and view Returns on a loan request linked to the Work Order. Refer to Work Orders - Loans |

|
The Swap Outs tile will direct you to the Swap Outs for WO Code screen where you can Add swap outs on a Work Order. Refer to Work Orders - Swap Outs |

|
The Meters tile will direct you to the Meters for WO Code screen where you can view the list of meter readings against the work order. Refer to Work Orders - Meters |

|
The Equipment tile will direct you to the Expense Claims for WO Code screen where you can Add, Edit and Delete and expense claim from the Work Order. Refer to Work Orders - Expenses |

|
The Travel tile will direct you to the Travel Claims for WO Code screen where you can Add, Edit and Delete a travel claim from the Work Order. Refer to Work Orders - Travel |

|
The Documents tile will direct you to the Documents for Work Order screen where you can Add, Edit, Delete and View a digital documents linked to a work order. Refer to Work Orders - Documents |

|
The functions tile will direct you to the Issued Warranties for WO Code screen where you can, Add, Edit and Delete a warranty linked to a work order. Work Orders - Warranties Issued |

|
The functions tile will direct you to the Instructions for WO Code screen where you can Add, Edit, Delete and Complete an instruction for a Work Order. Refer to Work Orders - Task Instructions |

|
The functions tile will direct you to the Images for WO Code screen where you can view and Print the images linked to the Work Order. Refer to Work Orders - Images |

|
The functions tile will direct you to the Work in Progress for WO Code screen where you canReturn, Invoice WO and Invoice Call(s) linked to the Work Order. Refer to Work Orders - Work in Progress (WIP) |

|
The functions tile will direct you to the Maintenance Methodology for location screen where you can Add, Edit and Delete a maintenance methodology from a Work Order. Refer to Work Orders - Maintenance |

|
The functions tile will direct you to the Time Not Billed for Work Order Code screen where you can Invoice WO, Invoice Project, Flag Reviewed and set SLA Time linked to the Work Order. Refer to Work Orders - Time Review |
Processing Tiles

|
The Quotes functions tile will direct you to the Sales Quotes for Work Order screen where you can Add, Edit, Delete, View, Accept, Reject, Covert and Clone a Quote linked to a Work Order. Refer to Work Orders - Sales Quotes |

|
The Orders functions tile will direct you to the Sales Orders for Work Order screen where you can Add, Edit, Delete, View, Create Invoice, Create New Deal, Add Items to WO, New Deal Project, Print Sales Order and Print a Proforma Invoice. Work Orders - Orders |

|
The Invoices functions tile will direct you to the Sales Invoices for Work Order screen where you can Add, Edit, add a Comment and Reference, Print and Send Invoices to Print Queue. Refer to Work Orders - Invoices |

|
The Credit Notes functions tile will direct you to the Sales Credit Notes for Work Order screen where you can Add, Edit, Delete, View, Release for Approval, Remove from Approval, Approve Cr Note and Send Cr Notes to Print Queue. Refer to Work Orders - Credit Notes |
MNU.122.033

