Service
Calls - Start Work
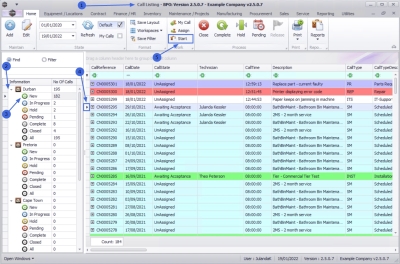
You can begin the Start Work process from the Call Listing screen in BPO. From here you can Start and End work on the Calls you are working on.
You or the Call Centre, can start work on behalf of a Technician, but the Technician will need to end work for themselves.
A Call must be in the New status to enable Start Work. It will then move to the In Progress status where you can continue the process until End Work.
![]() If a technician is using
Tech Connect,
then he can
Start Work
on the Call from his device.
If a technician is using
Tech Connect,
then he can
Start Work
on the Call from his device.
| Ribbon Access: Service > Calls |
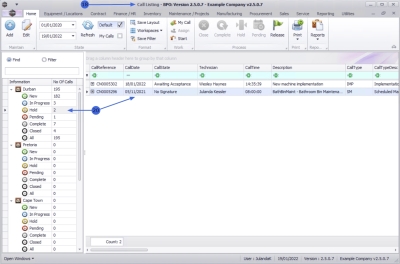
- The Call Listing screen will be displayed.
- Select the Site the call has been logged for.
- The example Durban is selected.
- Ensure that the status has been set to New.
-
Click on the row of the Call you wish to start work on.
 This can be an Unassigned call or a call where you have been assigned the Technician.
- Click on Start.
Start Work Details
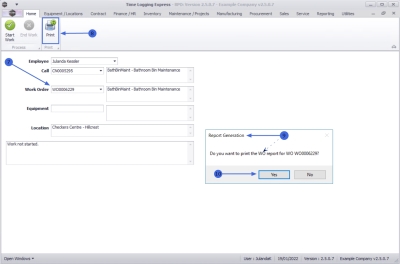
- Employee: The employee field will populated with the person currently logged onto the system. Click on the down arrow to select an alternative employee, if required.
- Call: The call number and description of the selected call will populate this field. Click on the down arrow to select an alternative call number from the call list, if required.
- Work Order: If only one Work Order is linked to this call, then this field will populate with the work order number and description.
- If more than one Work Order has been linked to the call, click on the down arrow to select the required Work Order.
- Equipment: Once the Work Order has been selected, the equipment field will populate with the serial number and description of the machine linked to the work order, if applicable.
- Location:
If a
functional location
has been linked to the work order, then this field will populate with the location.
 Note that the Work Order will be linked to either a machine or a location.
- Status: The final unlabelled text box will contain a description of the current status of the work e.g. "Work not started".
Print Work Order Report
- Once the Work Order has been selected, you can Print the Work Order Report.
- Click on Print.
- When you receive the Report Generation message to confirm;
- Do you want to print the WO report for WO[number]?
- Click on Yes.
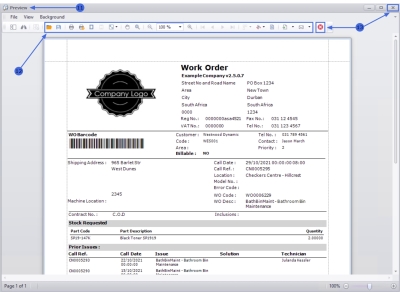
- The Work Order will display in the Reports Preview screen.
- From the preview screen you can make cosmetic changes to the document as well as Save, Zoom, Add a Watermark, Export or Email the report.
- Click on Close to return to the Time Logging Express screen.
Start Work
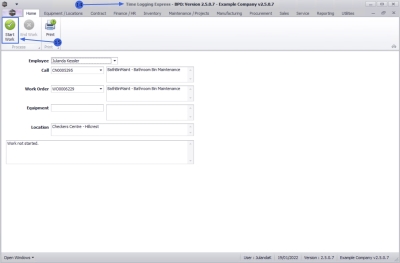
- From the Time Logging Express screen,
- Click on Start Work.
- You will return to the Call Listing screen.
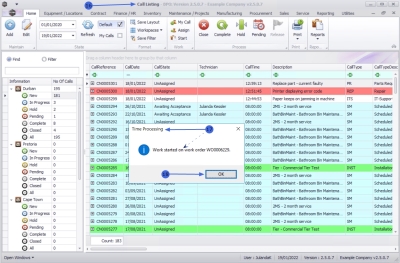
- When you receive the Time Processing message to confirm that;
- Work started on work order WO[number].
- Click on OK.
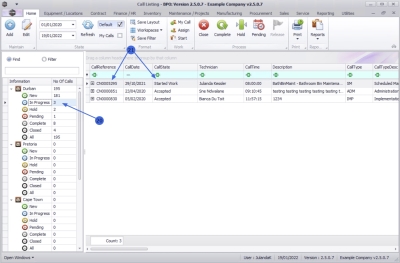
- The Call has been removed from the Call Listing screen where the status is New.
- Click on the In Progress status to view the call.
- Note the Call State for the call has change to Started Work.
End Work
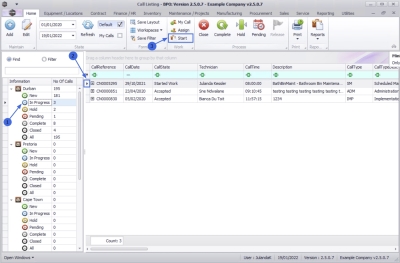
- To end work on a call, ensure that the Status has been set to In Progress.
- Click on the row of the call you wish to end.
- Click on Start.
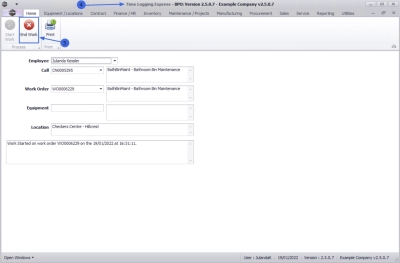
- The Time Logging Express screen will display.
- Click on End Work.
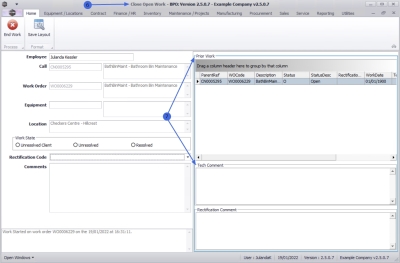
- The Close Open Work frame will display.
-
Any previous work will be noted in the
Prior Work andTech Comment
frames.
- Click on a row in the Prior Work frame. The corresponding observation from the Technician responsible for the work, will reflect in the Tech Comment frame, if a comment was recorded.
- The corresponding rectification observation from the Technician responsible for the previous call, will reflect in the Rectification Comment frame, if a comment was recorded.
- Use the scroll bar to scroll across the Prior Work frame to view more information related to previous calls, such as the previous work date(s), the previous Technician responsible for the work order, etc.
Open Work details
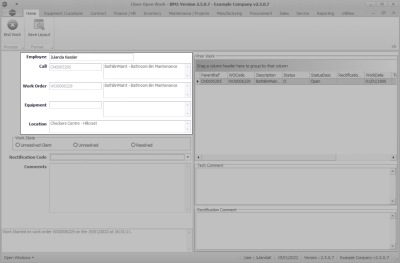
![]() Note that this information cannot be edited in this screen.
Note that this information cannot be edited in this screen.
- Employee: The employee field will auto populate with the person selected on the Time Logging Express screen.
- Call: The call field will display the Call number and description.
- Work Order: This field will display the selected Work Order number and description.
- Equipment: The equipment field will display the serial number and description, if a machine was linked to the work order.
- Location: The functional location will populate this field, if a location was linked to the work order.
Work State
It is important to select the correct Work State as each selection will place the call in a different status:
- Unresolved Client - This will place the call on Hold in the Call Centre (Refer to Calls - Place on Hold
- Unresolved (Company) - This will place the call in Pending in the Call Centre (Refer to Calls - Move to Pending Status
- Resolved - This will place the call in the Complete status in the Call Centre (Refer to Calls - Complete a Call
Resolved
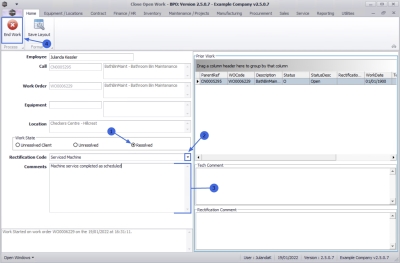
- Click on the Resolved radio button.
- Rectification Code: Click on the down arrow to select the appropriate rectification
Reason Code
and
Description
from the options list.
 The
Hold reason codes are set up in Static Data in the Configurator.
- Comments: Click in the text box to type in a comment related to the call rectification.
- Click on End Work.
Unresolved / Unresolved Client
The procedure for an Unresolved or Unresolved Client Call is very similar. For the purpose of the example, the Unresolved Client option will be followed.
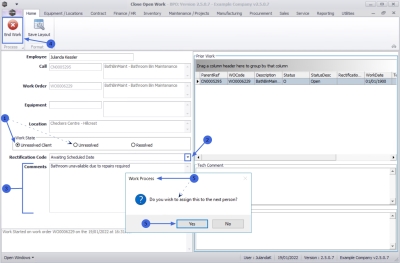
- Click on the Unresolved or
Unresolved Client radio button.
- In the example the Unresolved Client radio button was selected.
- Rectification Code: Click on the down arrow to select the appropriate rectification
Reason Code
and
Description
from the options list.
 The
Hold reason codes are set up in Static Data in the Configurator.
- Comments: Click in the text box to type in a comment as to the reason for call being unresolved.
- Click on End Work.
- When you receive the Work Process message requesting;
- Do you wish to assign this to the next person?
-
Click on
Yes to assign the call to the next person, or
- select No to leave the call open as Unassigned.
Assign Call
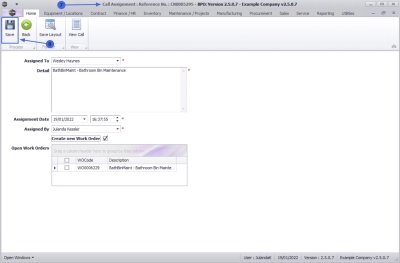
- The Call Assignment : Reference No: CN[number] screen will be displayed.
- Assigned To: Click on the down arrow to select the person you wish to assign the work order to.
 Note that you can assign the work order to yourself, if required.
 - Detail: The information linked to the work order will display in this field. Add or edit the information as required.
- Assignment Date: and Time: This will auto populate with the current date and time.
- Date: Type in or click on the down arrow to use the calendar function to select an alternative date, if required.
- Time: Type in or use the arrow indicators to select an alternative time, if required.
- Assigned By: The name of the person currently logged on to the system will display in this field. Click on the down arrow to select an alternative person, if required.
- Create new Work Order: Click on the check box to create a new work order to be linked to the call.
- Open Work Orders: All the open work orders for the call will be displayed in the open work orders frame. Click to select the relevant work order if you wish to assign the work to an existing work order.
- Click on Save.
Unfulfilled Part Requests
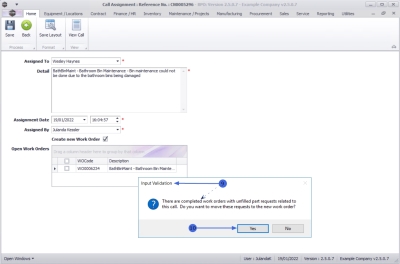
- When assigning a work order, and unfilled part requests related to the call exists, then you will receive an Input Validation message to confirm;
- There are completed work orders with unfilled part requests related to this call. Do you want to move these requests to the new work order?
- Select Yes to move the part requests to the new work order, or
- select No to complete the unfilled part requests. Refer to Work Orders - Part Requests
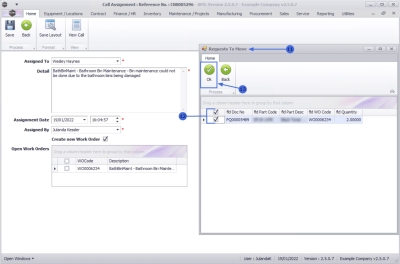
- The Requests To Move screen will display with a list of all the unfilled Part Requests.
- Click to select the part requests you wish to move to the new work order.
- Click on OK.
Call Processing
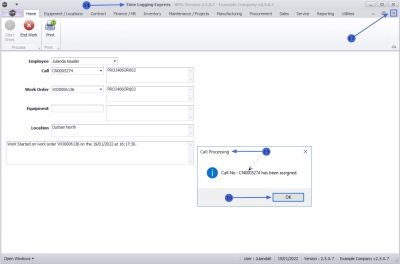
- You will return to the Time Logging Express screen.
- When your receive the Call Processing message to confirm that;
- Call No: CN[number] has been assigned.
- Click on OK.
- Close the screen.
- You will return to the Call Listing screen.
- The Call will no longer be in the In Progress status.
- For an Unresolved Client, the call can be viewed in the Hold status, and the Unresolved call can be viewed in the Pending status.
MNU.122.035

