We are currently updating our site; thank you for your patience.
Inventory
Raise a Revaluation Request
Stock revaluation enables you to adjust the cost of stock items to reflect a changes in the standard cost of an item without changing the stock quantity.
These changes in value may be due to many different factors including, for example:
- Changes in procurement
- Changes in manufacturing
- Exchange rate movements
![]() A Revaluation Request could also be auto created by the Receiving Goods with Landed Cost Revaluation process.
A Revaluation Request could also be auto created by the Receiving Goods with Landed Cost Revaluation process.
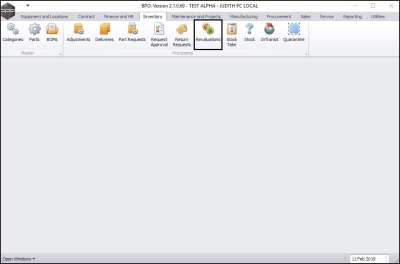
| Ribbon Access: Inventory > Revaluations |
The Revaluation Request Listing screen will be displayed.
- Select the Site.
- In this image, Durban has been selected.
- Select the Status.
- In this image, New has been selected.
- Note: You can add a stock revaluation request in any status but for you to view the newly created stock revaluation request, you have to be in status New.
Create/Add Revaluation Request
- Click on Add.
-
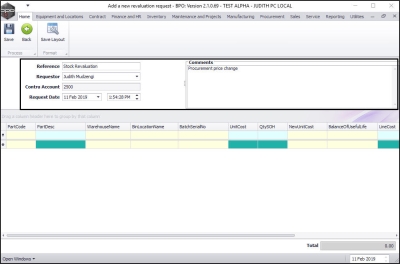
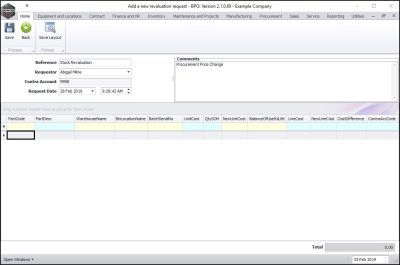
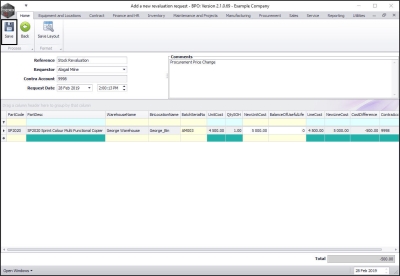
The Add a new revaluation request screen will be displayed.
Revaluation Request Details and Comments
- Reference: Type in the reference for this revaluation.
- Requestor: This will auto populate with the name of the user currently logged on to the system. You can click on the drop-down arrow and select from the list an alternative requestor, if required.
- Contra Account:
 The revaluation suspense account used to contra the stock account for the underlying financial transactions posted by the REVI and REVD drivers.
This is the revaluation suspense general ledger account code which will auto populate based on what has been set up in the
company configuration.
- Request Date and Time:
This will auto populate with the current date and time.
- Date: You can either type in or click on the drop-down arrow and use the calendar function to select an alternative date, if required.
- Time: You can either type in or use the directional arrows to select an alternative time, if required.
- Comments: Type in a comment relating to this revaluation.
Revaluation Request Parts/Items Details
Add a New Item-Method 1
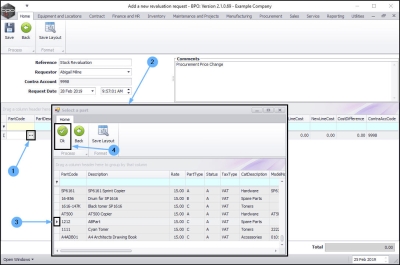
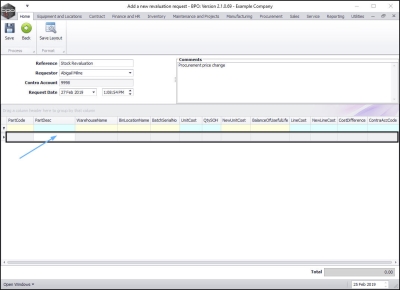
- In the Parts data grid, click on the blank text box beneath the Part Code column header (not the filter row).
- An ellipsis button will appear, click on this button.
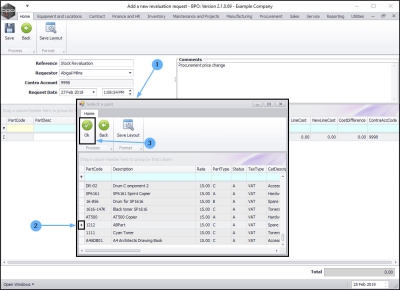
- The Select a part screen will be displayed.
- Click on the row selector in front of the part code that you wish to revalue.
- Click on Ok.
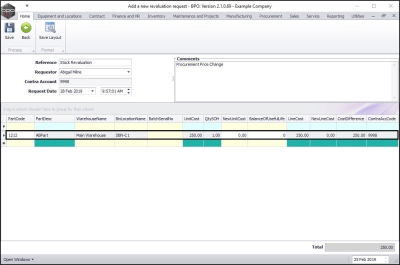
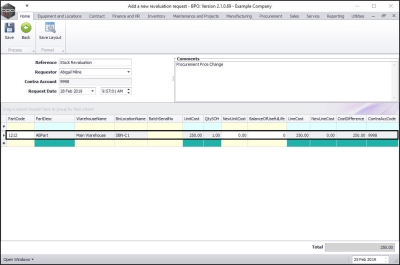
- The Parts data grid will populate with the selected part code details.
Add a New Item-Method 2
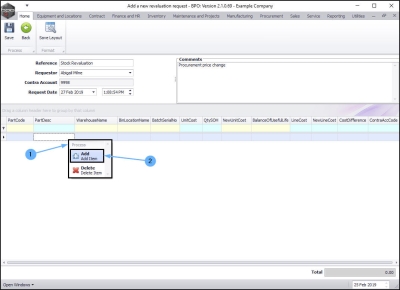
- In the Parts data grid, right click anywhere in a blank row (not the filter row).
- A Process pop up menu will be displayed.
- Click on Add - Add Item.
- A Select a part screen will pop up.
- Click on the row selector in front of the part you wish to revalue.
- Click on OK.
- The Parts data grid will populate with the selected part details.
Add a C-Class Part Not Linked to Batch Tracking
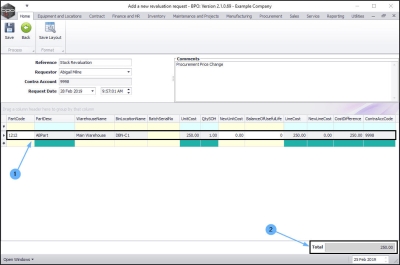
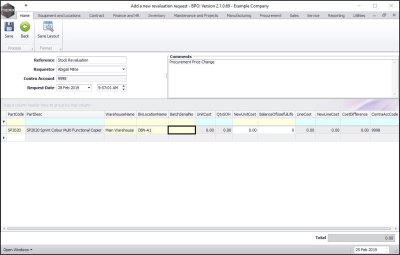
- In both of these method, the C-Class part that was selected did not have Batch Tracking linked. The Batch Serial No field in the Parts data grid will therefore be blank .
- Part Desc: This will populate with the selected part code.
- Part Desc: This will populate with the part description.
- Warehouse Name: This will populate with the default stock warehouse name. This can be changed as explained further in this manual.
- Bin Location Name: This will populate with the default stock bin. This can be changed as explained further in this manual.
- Batch Serial No: This will be blank as this part is not linked to batch tracking.
- Unit Cost: This will populate with the average unit cost of the part as currently set on the system.
- Qty SOH: This will populate with the quantity stock on hand of this part as recorded on the system.
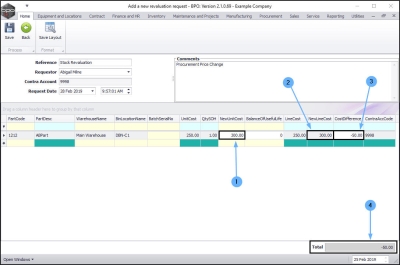
- New Unit Cost: You will either type in or use directional arrows to select the new unit cost (according to the revaluation) in this field.
- Balance of Useful Life:
As this is a C-Class part - this field is not relevant and should be left as 0.
- (If this was an A or B-Class part - you would type in the remaining useful life of the item in months. This will be used in asset depreciation calculations when the item is converted to an asset. If asset depreciation is not used leave as 0.
- Line Cost: This will populate with the Unit Cost of the selected part multiplied by the Qty Stock on Hand.
- New Line Cost: This will populate with the New Unit Cost of the selected part multiplied by the Qty Stock on Hand and will auto populate once the New Unit Cost has been typed in.
- Cost Difference: The system will calculate the sum of the Unit Cost minus the New Unit Cost and populate this field accordingly.
- Contra Account Code: This will populate with the general ledger account code set up in the company configuration.
- The Total field displays the total difference between the existing cost and the new cost.
- Once the New Unit Cost has been entered, the system will calculate
- the New Line Cost and the
- Cost Difference, which will affect the
- Total amount.
Add a C-Class Part Linked to Batch Tracking
Use either Method 1 or Method 2 above to select a C-Class part.
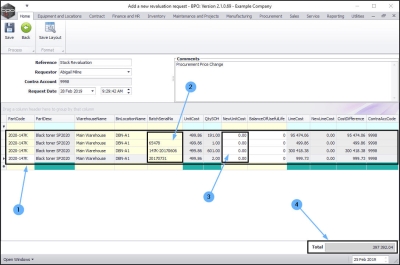
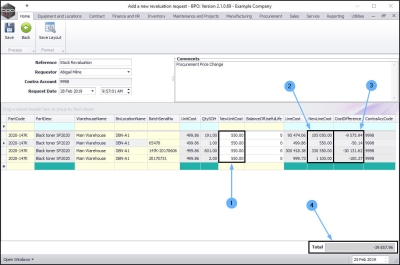
- The Parts data grid will populate with the selected part code .
- All the selected part batches in the stock warehouse will be listed, each batch will be on a separate line.
- You will only need to type in a New Unit Cost for one batch, as you type in the new cost, the system will auto populate the remaining batches with the same amount.
- The Total field will display...
- Once the New Unit Cost(s) has been entered, the system will calculate
- the New Line Cost for each batch line and the
- Cost Difference for each batch line, which will affect the
- Total amount.
Add an A or B-Class Part/Item
Use either Method 1 or Method 2 above to select an A or B-Class part.
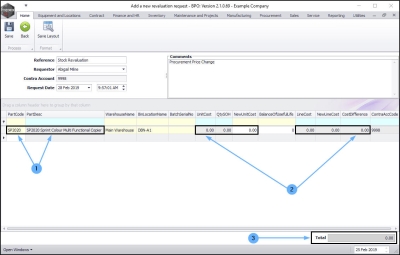
- The Part Code and Part Description fields will populate with the selected part.
- However, unlike with C-Class parts/items, the:
- Unit Cost
- Qty SOH
- New Unit Cost
- Line Cost
- New Line Cost
- Cost Difference
-
fields will not be populated, as with an A or B-Class part/item you need to select a
Serial No.
first.
- With no figures in the Parts data grid, the Total field will be populated with nil.
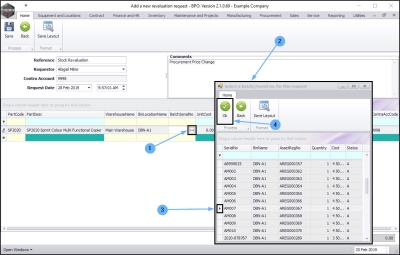
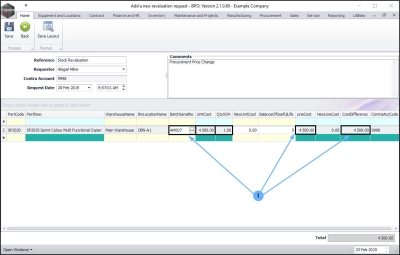
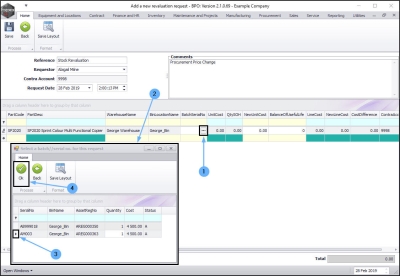
- Click in the Batch Serial No field.
- An ellipsis button will be revealed, click on this button.
- A Select a batch//serial no. or this request screen will pop up.
- Click on the row selector in front of the A or B-Class serial no. that you wish to revalue.
- Click on OK.
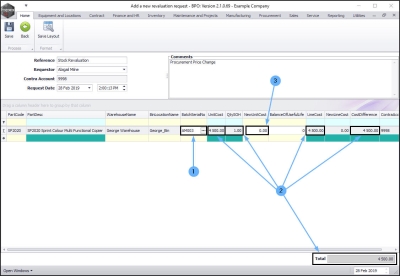
- Batch Serial No: This will be populate with the selected part serial number.
- Unit Cost: This will auto populate with the actual value of the selected item.
- Qty SOH: This will always populate with 1 for A or B-Class items because each serial number is unique.
- Line Cost: This will auto populate with the same value as the Unit Cost as only 1 A or B-Class item can be listed per line.
- Cost Difference: The system will calculate the sum of the Unit Cost minus the New Unit Cost and populate this field accordingly.
Change the Warehouse
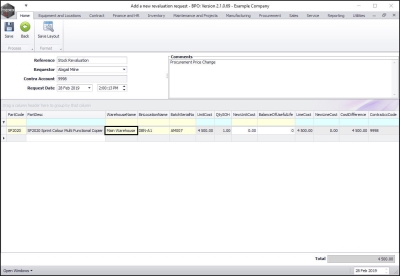
The Warehouse Name and Bin Name fields auto populate as a part/item is selected with the default stock warehouse and bin as set up on the system. You may want to change the warehouse and/or bin for a part/item if, for example, the incorrect warehouse was either auto populated or selected at the start of the process.
For this process, the warehouse of the A Class part/item selected above will be changed.
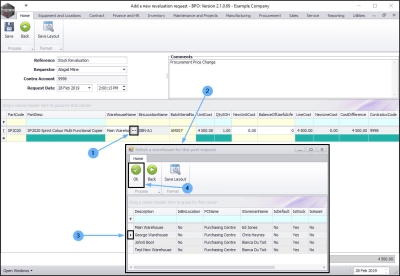
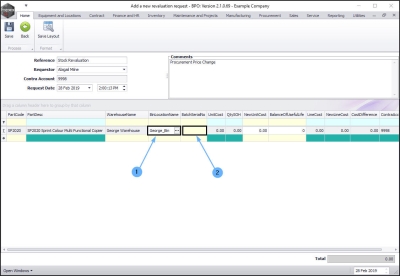
- Click in the Warehouse Name text box.
- An ellipsis button will appear, click on this button.
- The Select a warehouse for this part request screen will pop up.
- Click on the row selector in front of the alternative warehouse.
- Click on Ok.
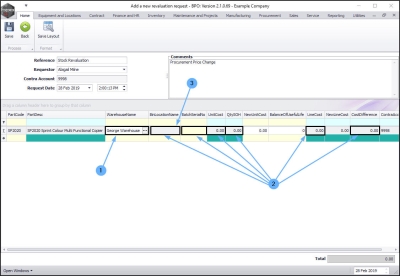
- The Warehouse Name field will populate with the selected warehouse name.
- You will note that the Bin Location Name , Batch Serial No , Unit Cost , Qty SOH , Line Cost and Cost Difference fields have cleared.
Change the Bin Location
- Click in the Bin Location Name field.
- An ellipsis button will appear, click on this button.
- The Select a bin for this part request screen will pop up.
- Click on the row selector in front of the alternative bin.
- Click on Ok.
- The Bin Location Name field will populate with the selected bin name.
Change the Batch/Serial No.
- Click in the Batch Serial No field.
- An ellipsis button will appear, click on this button.
- The Select a batch//serial no. for this request screen will pop up.
- Click on the row selector in front of the serial no. you wish to revalue.
- Click on Ok.
- The Batch Serial No field will populate with the selected serial no.
- You will note that the Unit Cost , Qty SOH , Line Cost , Cost Difference and Total fields have now populated with the figures linked to the new serial no.
Select New Unit Cost (Revaluation)
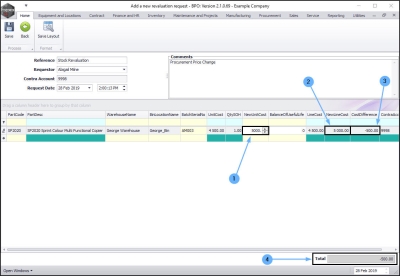
- Click in the New Unit Cost field.
- Type in or use the directional arrows to select the New Unit Cost. As the new amount is entered, the
- New Line Cost and
- Cost Difference figures will adjust resulting in a change in the
- Total amount.
Save New Revaluation Request
- When you have finished adding/editing the details in this screen, click on Save.
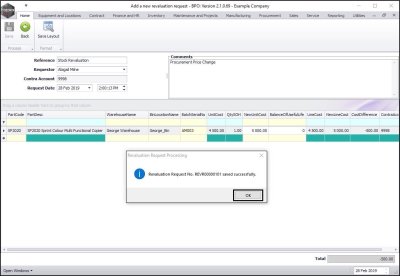
- The Revaluation Request Processing message will be displayed informing you that;
- Revaluation Request No. [ ] saved successfully.
- Click on OK.
Print Revaluation Request
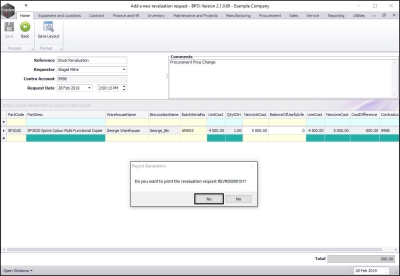
- The Report Generation message will be displayed asking you;
- Do you want to print revaluation request [ ]?
-
Click on Yes if you want to print the revaluation request and on No if you do not want to print the revaluation request.
- For the purpose of this manual, Yes is selected.
The revaluation request report will be displayed.
- Here you can see the Unit Cost , New Cost (Revaluation), Cost Difference and resulting Total amount has been recorded.
- From this screen, you can view , email , export or print the report.
- Close the screen when you are done.
You will return to the Revaluation Request Listing screen.
- This screen will open in the New status.
- Here you can view the newly added revaluation request will be displayed in the data grid.
- Close the screen when you are done.
MNU.148.001
