We are currently updating our site; thank you for your patience.
Sales
Credit Notes - Issue a Credit Note
A Sales Credit Note is the reversal, in part or in full, of a Sales Invoice and should therefore be linked to that invoice.
"Unlinked" Sales Credit Notes should only be created in special circumstances such as crediting an invoice that was created prior the use of BPO, where only the balance against the debtor was brought in.
When linked Credit Notes are raised, remember the following:
- Partial credit notes can be raised.
- Select whether or not to return the stock to store, and whether replacement is required.
- If you select to return to store, you must complete a return request in order to move your stock back to the warehouse.
- When a Credit Note is raised to adjust incorrect pricing on an invoice, then there is no need to return the stock to store.
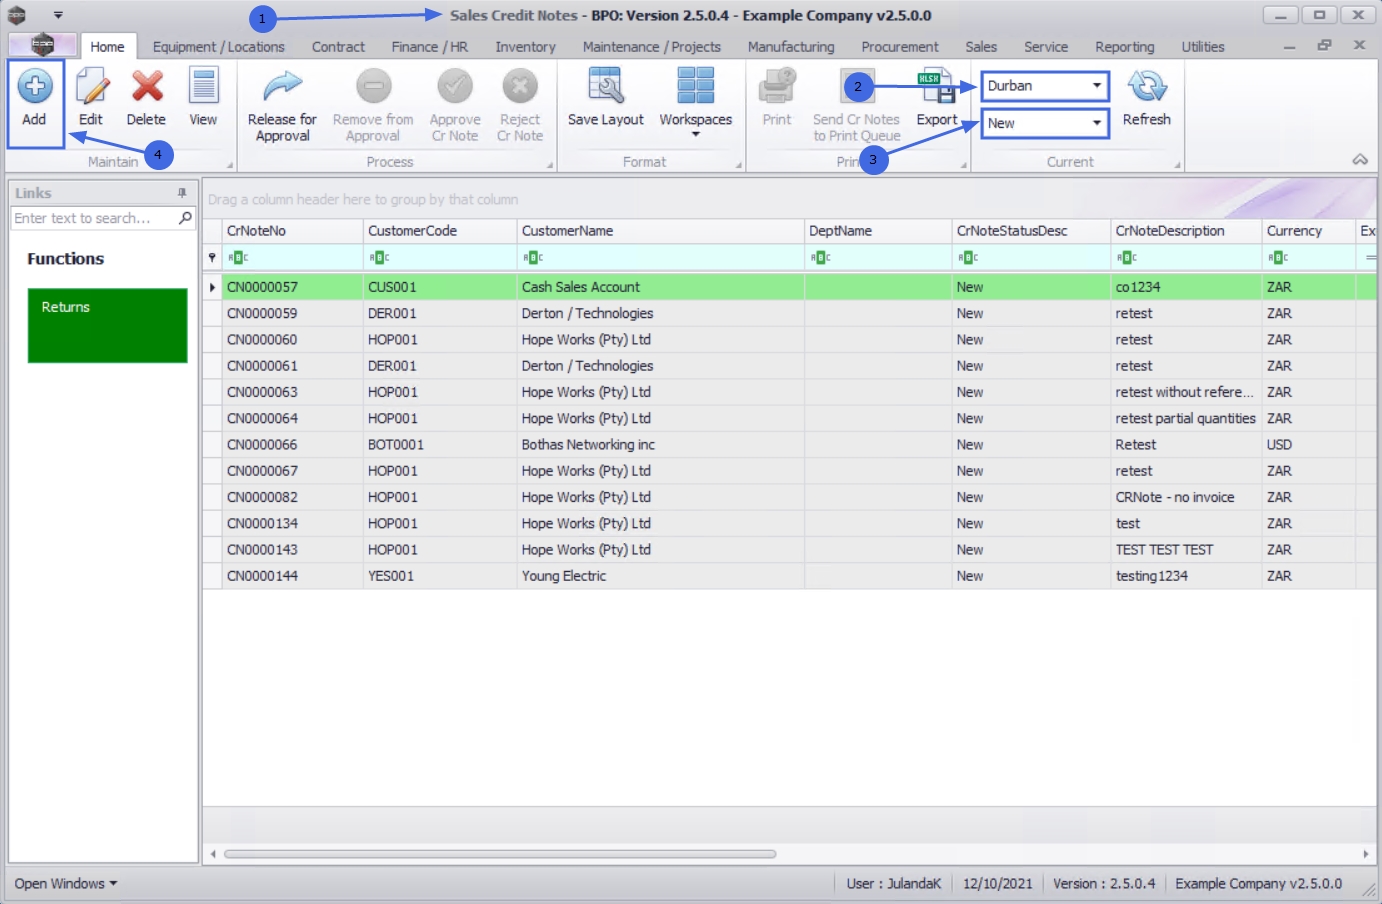
| Ribbon Access: Sales > Credit Notes |

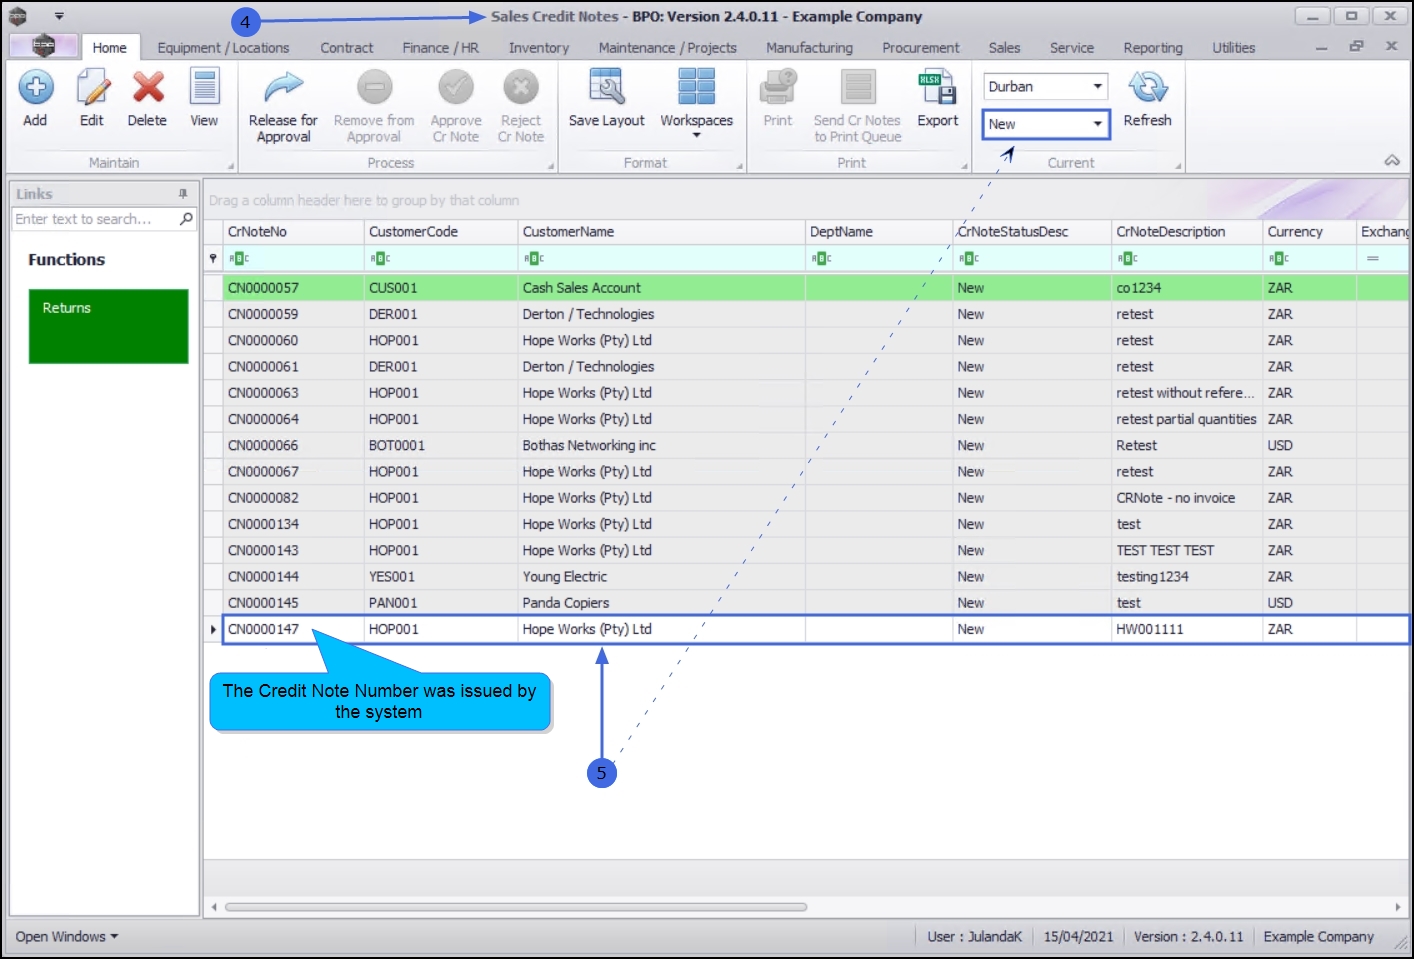
- The Sales Credit Notes listing screen will be displayed.
- Select the Site where the credit note needs to be created.
- The example has Durban selected.
-
You can create a Credit Note in any Status, but it will display in the New status list after it has been saved.
- The example has New selected.
- Click on Add.
![]() Short cut key: Right click to display the All groups menu list. Click on Add.
Short cut key: Right click to display the All groups menu list. Click on Add.
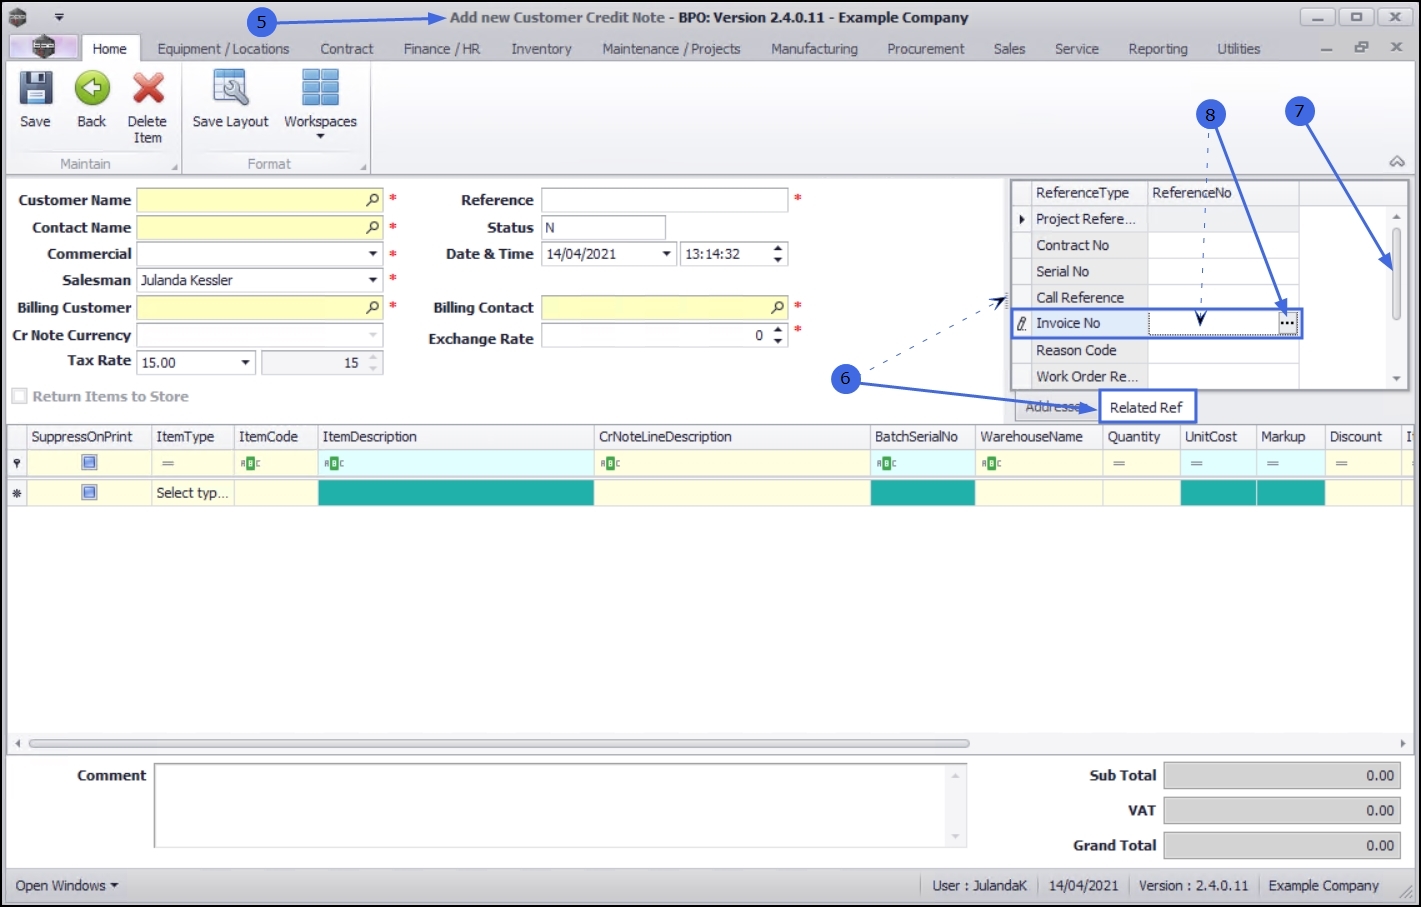
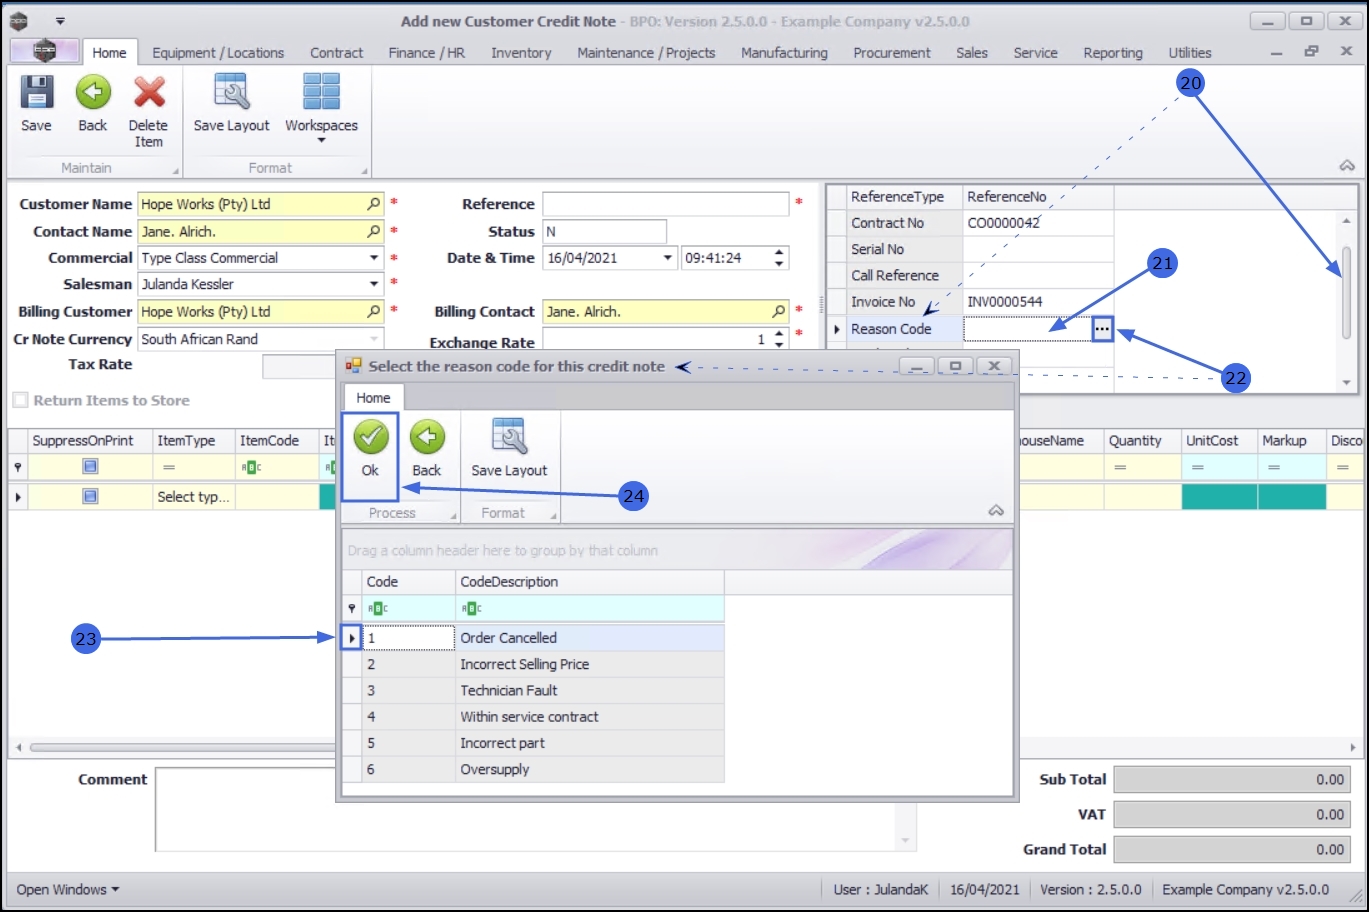
Related References tab
- Click on the Related Ref tab to display the Related References panel.
- Scroll down until you can view the Invoice No reference type.
- Click in the Reference No text box to display the ellipsis button.
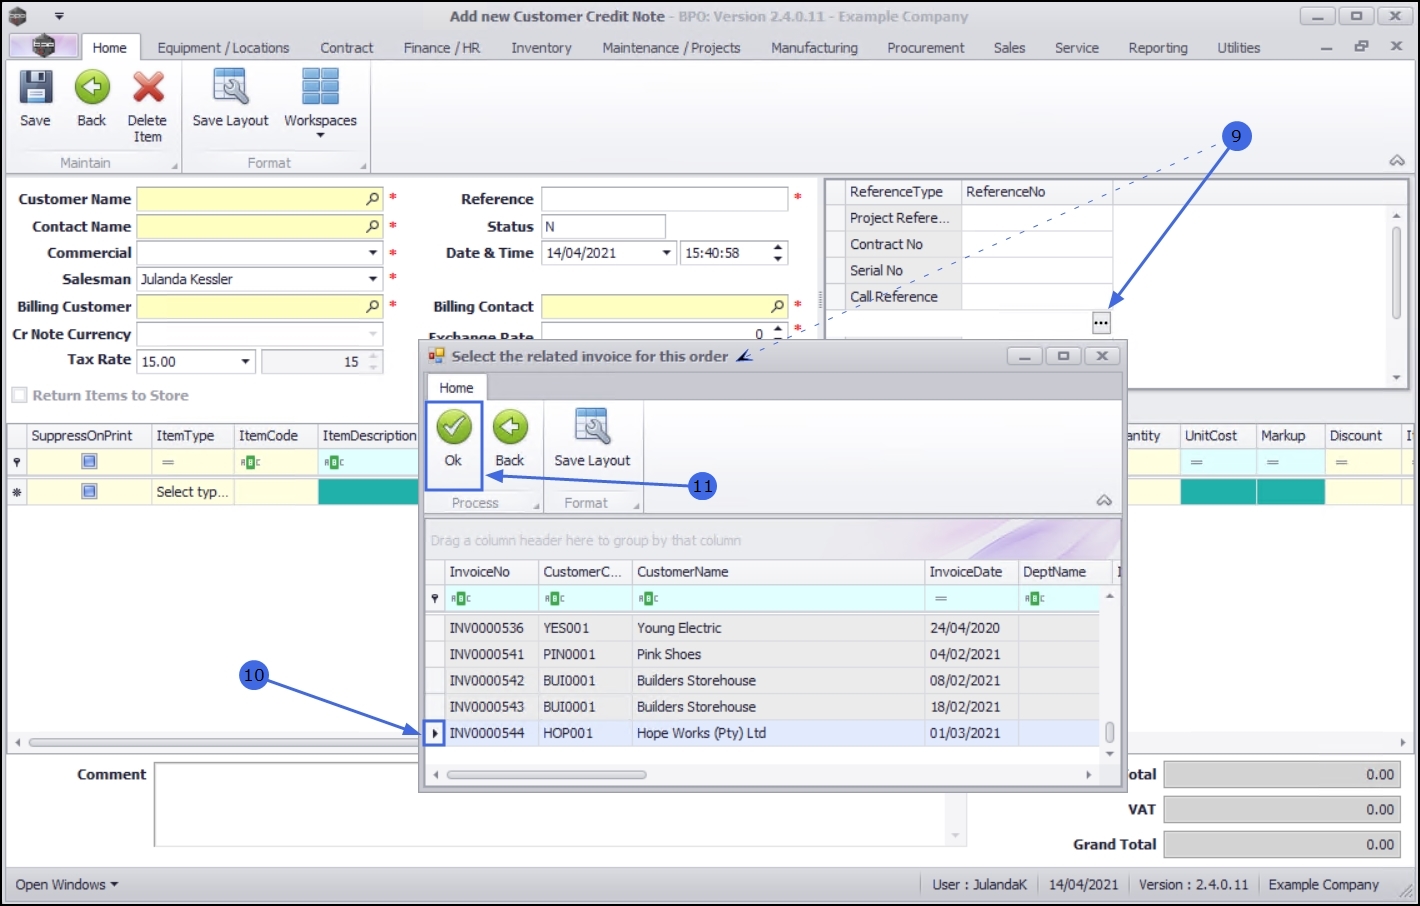
Link an Invoice
- Click on the ellipsis button to display the Select the related invoice for this order screen.
- Click on the row of the invoice you wish to link to this credit note.
- Click on OK.
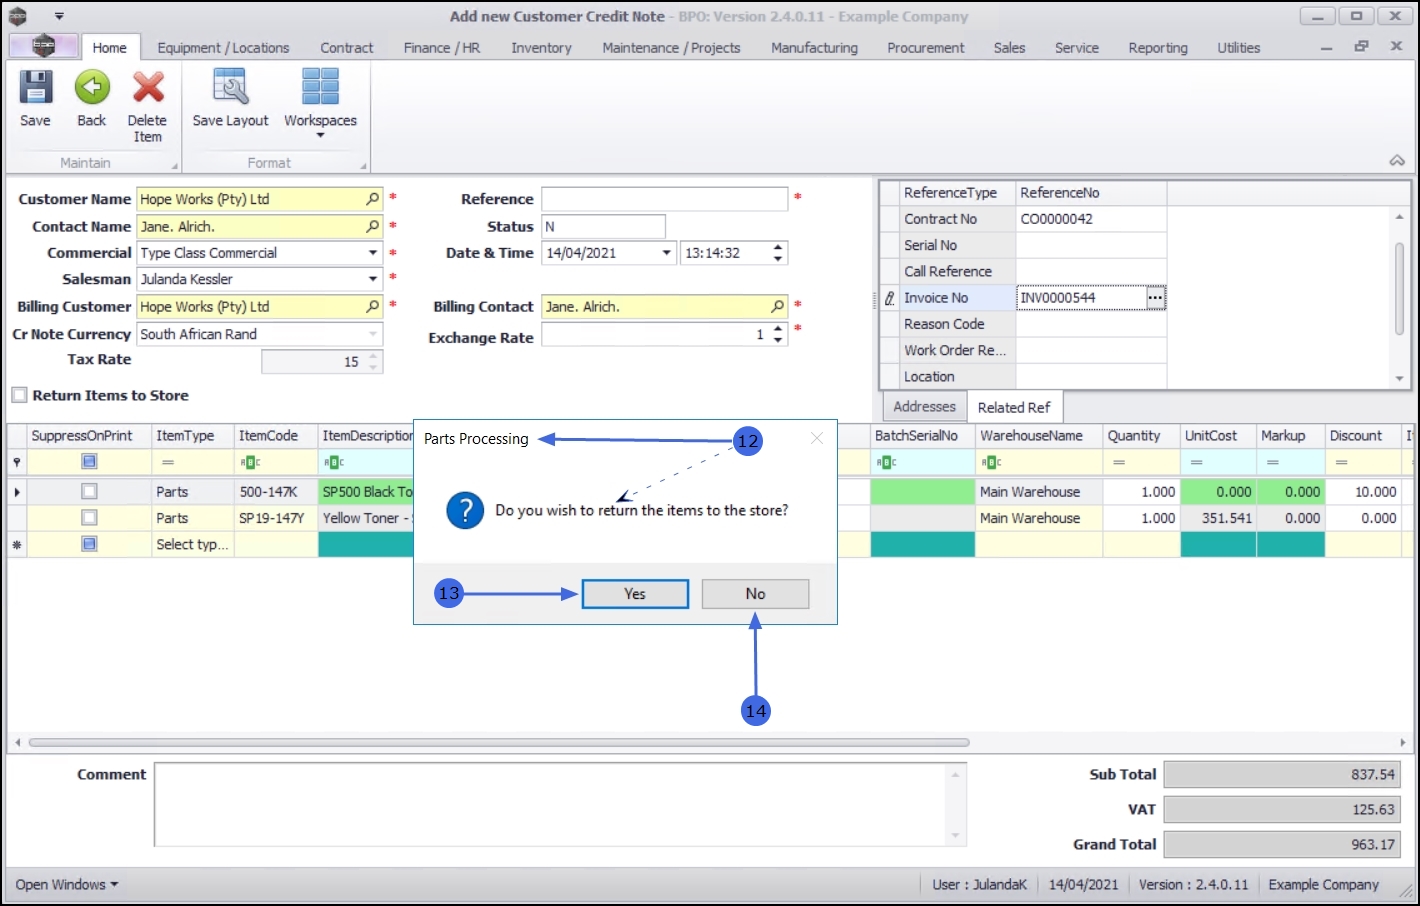
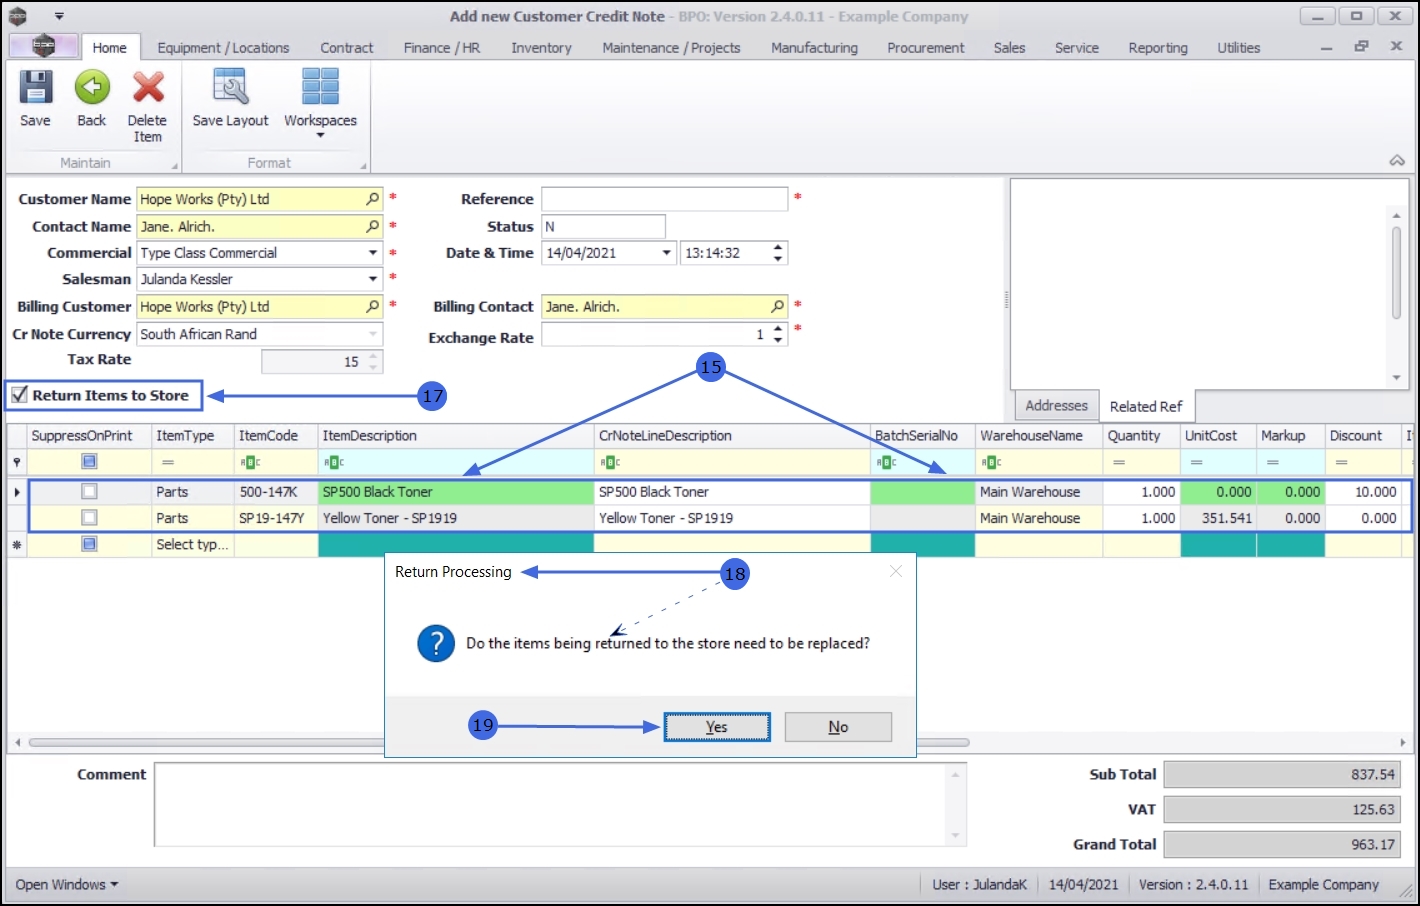
- When you receive the Parts Processing message to confirm;
- Do you wish to return the items to the store?
-
Select Yes
if:
- You are crediting a cancelled order, an over-supply or an incorrect part.
- This will raise a return request to return the items to store.
- Select No if:
-
You are crediting the selling price or to re-invoice the correct selling price.
 The option you choose will be applied to all items with Item Type - Parts.
Items Data Grid
- The Items data grid will be populated with the selected invoice details.
- You may now proceed to Delete Line Item(s) or Add Additional Line Item(s) to the document.
- If you have selected to return items to store, then the Return Items to Store check box will be marked.
- - If you selected the incorrect option on the Return Item message box, then you can always change the selection by marking / un-marking the Return Items to Store check box.
- - The option you choose will be applied on all items with Item Type - Parts. (We will be explaining how to return individual items further down the manual.)
- If you have selected to Return the Items to Store, then the Return Processing message will prompt:
- Do the items being returned to the store need to be replaced?
 For POS or OTC Credit Notes, you will always select NO. If a replacement is required, a new POS Invoice must be raised. The Item / Part can be viewed from the Credit Note Returns Tab.
 - Click on Yes.
Add Reason Code
- On the Related References panel, scroll down until you can view the Reason Code reference type.
- Click in the Reference No text box in the Reason Code row to display the ellipsis button.
- Click on the ellipsis button to display the
Select the reason for this credit note screen.
- - If the codes have not yet been configured, or the code you need to use has not yet been set up, then it needs to be added in Sales Credit Note Reason.
- - You can also do a partial credit note.
- Click on the row of the reason for this credit note.
- Click on OK.
- The Reason Code will be recorded in the Related References panel.
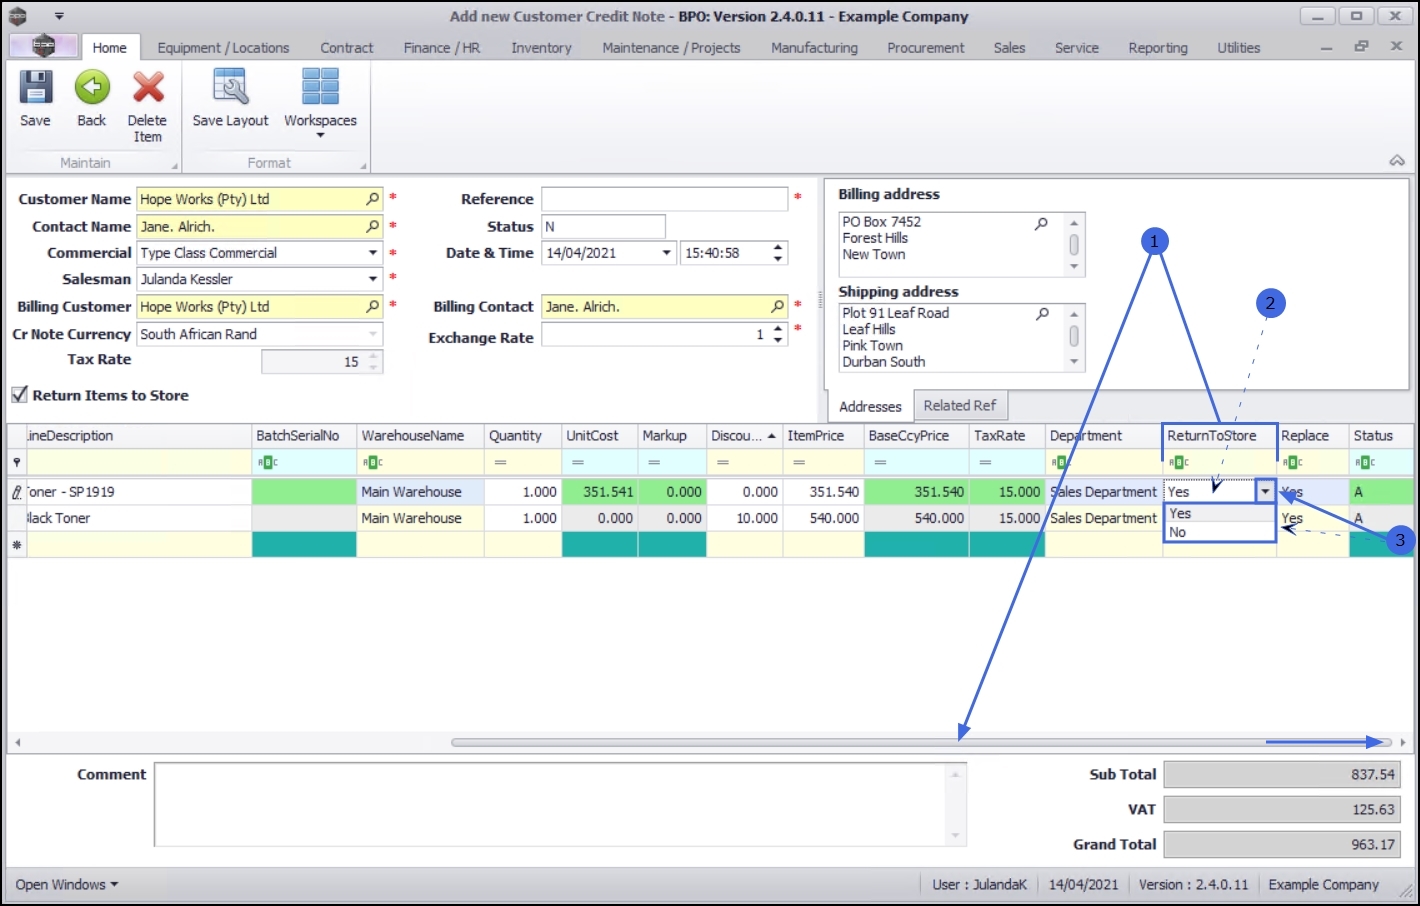
Return an individual item
From the Item Data Grid, you have an option to choose whether to return an individual item to store and to replace it or not. The choice you make will only apply to the selected item.
- Use the scroll bar at the bottom of the screen to scroll until the Return To Store column is visible on the screen.
- Click in the Return To Store column on the text box of the item that needs to be returned to store.
- Click on the down arrow to select the relevant option from the drop-down menu.
Replace an item
After choosing to return an item to store, you can choose whether to replace the item or not. The choice you make will apply to the selected item only.
- Use the scroll bar at the bottom of the screen to scroll until the Return To Store column is visible on the screen.
- Click in the Replace column in the text box of the item that needs to be replaced.
- Click on the down arrow to select the relevant option from the drop-down menu.
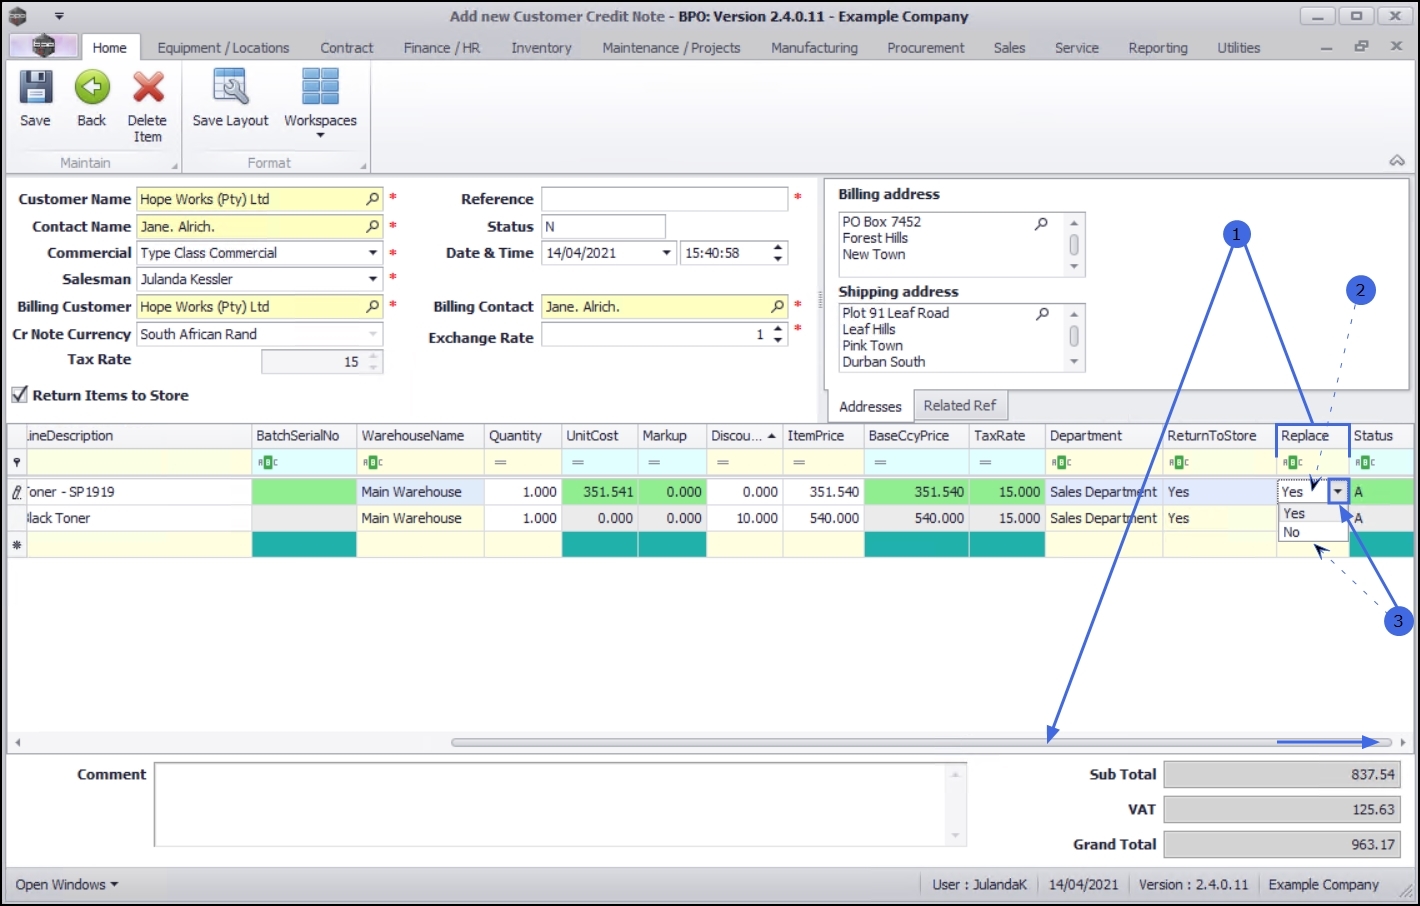
- Each line item will show whether;
- a return request will be raised to stores for return of the part and / or
- whether a replacement part is required.
Suppress On Print
- You have an option to suppress items on print by clicking on the Suppress On Print check box.
-
Only click on this check box in the row of the items that you do not want visible on the printed credit note
The Sub/Grand Total will not be affected, but the selling prices that are visible will not match up with the credit note total.
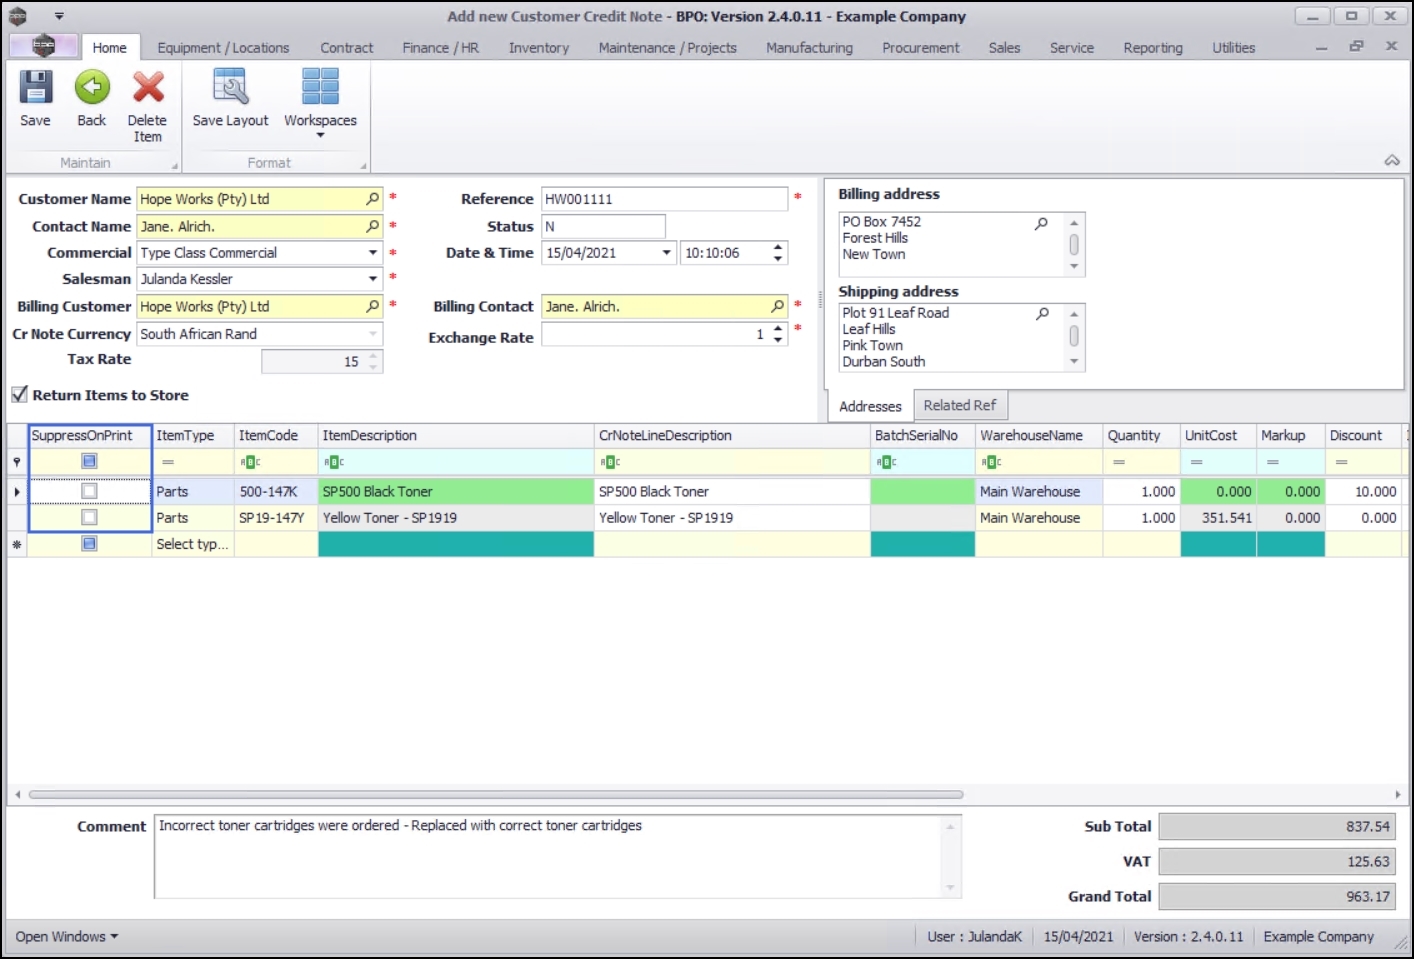
Add Reference and Comment
- Click on the Reference number text box to type a reference number for the Credit Note. The reference number is a compulsory field and you will not be able to save the Credit Note without a reference number.
- Click in the Comments text box to type a comment relating to the reason for the Credit Note. The comment will display on the Credit Note.
Save Credit Note
- When you have completed all the required information for the Credit Note, click on Save.

- You will return to the Sales Credit Notes listing screen.
- The screen will be updated with the new Credit Note you have created in the New status list.
![]() The Credit Note Number has automatically been issued by the system.
The Credit Note Number has automatically been issued by the system.
MNU.064.001