We are currently updating our site; thank you for your patience.
SConnect
Issuing Stock
- Using a Handheld Scanner running on Windows CE5 and SConnect, you can scan stock you need to issue to a Work Order (whether for a Call, Project or stand alone Work Order) or OTC Invoice.
- Ensure the barcode is linked to the part code.
- Once items have been scanned, and the Stock Issue is saved from the Handheld Scanner, the Issue is processed in BPO as it would via the Part Request screen.
- You will need to Print the Issue and Delivery Note from BPO using the Document Search screen, (Document Type: PSIN - Part Issue). You can refer to the Recent Issue Notes on the Handheld Scanner for the Stock Issue Number.
View Part Requests to Action
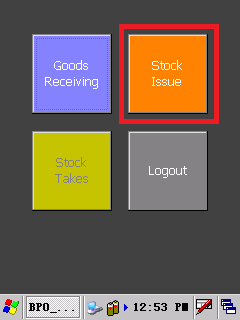
- Select 'Stock Issue'
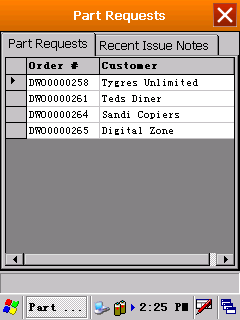
- The 'Part Requests' screen will open, displaying 2 tabs.
- 'Part Requests' tab: displays all Part Requests against which a Stock Issue needs to be done, with the Work Order Code / Invoice Number and Customer. (Note that if the work order is not linked to a customer, this field will be blank).
- Select the Part Request where stock needs to be issued.
Scan Serialised Items
(A Class and B Class Items)
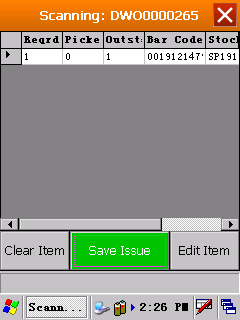
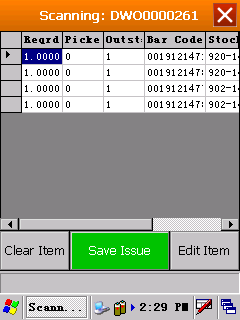
- You will see the following fields:
- Reqrd: Quantity to be Issued
- Picked: Quantity Scanned
- Outstanding: Quantity remaining to scan
- Bar Code: Inventory Barcode
- Stock: Part Number
- Serial: Serial Number scanned (if A-class part)
- Remember that A-Class Items will display 1 line per serial number to be issued (if you need to issue 5 x SP1912 machines - you will see 5 rows because you need 5 serial numbers).
- Scan the barcode for the part.
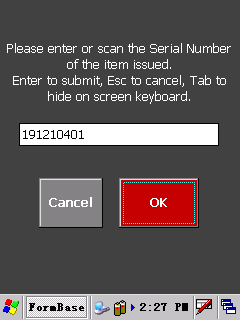
- A screen will come up where you need to input the serial number.
- You can either scan the serial number or type it in.
- Use 'Enter' on the keypad or 'Ok' on screen to submit the serial number to the Part Request you are scanning.
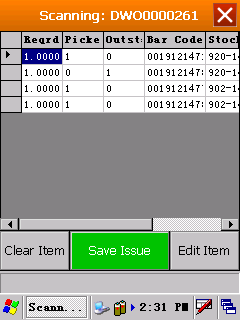
- You will see the 'Picked' quantity is now set to 1, 'Outstanding' quantity is set to 0, and the Serial Number field is populated with the serial number.
- Continue scanning the barcode and the serial number for each A-Class item you need to issue.
- The same applies for C-Class items, except you will be updating quantities issued.
- If you did not receive all the Serialised Items, those lines will remain 'un-picked'. Once saved, these will remain the part request list, and can be issued later.
- When you are done, select 'Save Issue'

Extra
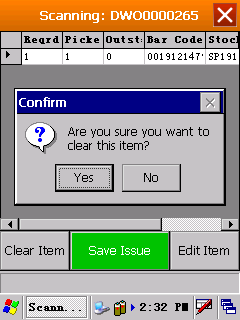
- If you have scanned an item in error: you can
- 'Clear the Item' - this resets to selected line so that you can scan again.
- 'Edit the Item' - this lets you change the serial number (for A-class), or quantity (for C-class).

Scan Non-Serialised
(C Class Items)
- You will see the following fields:
- Reqrd: Quantity to be Issued
- Picked: Quantity Scanned
- Outstanding: Quantity remaining to scan
- Bar Code: Inventory Barcode
- Stock: Part Number
- Serial: Serial Number scanned (if A-class part)
- Scan the barcode for the part.
- A screen will come up where you need to check the quantity to issue.
- By default, the Required quantity will pull through. If you are issuing less stock, change the quantity.
- Select 'Ok'

- You will see the 'Picked' quantity is now updated to the quantity scanned.
- Continue scanning the barcode and entering the quantity for each C-Class item you need to issue.
- You can partially issue C-Class Items. In this example you will notice the Picked and Outstanding quantity columns displaying what has been scanned and what is still outstanding. (Any items not issued will remain on the part request list, and can be issued later).
- When you are done, select 'Save Issue'
Extra
- If you have scanned an item in error: you can
- 'Clear the Item' - this resets to selected line so that you can scan again.
- 'Edit the Item' - this lets you change the serial number (for A-class), or quantity (for C-class).
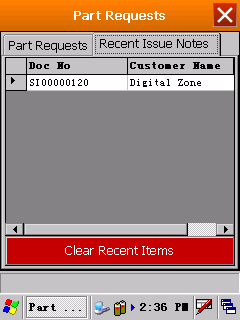
View Recently Scanned Issues
- Select the 'Recent Issue Notes' tab to view all recent Issues.
- This is helpful when you want to go back to BPO to print the Part Issue Note and Delivery Note.
MNU.154.003