Service
Scheduling
A Work Scheduling screen has been added within the BPO_V2 application interface. It is designed for and can only be used by companies using TechConnect (the Auto Accept Call Assignment configuration flag must be set to 'No'), who needs to schedule Installations in advance.
![]() Note
that this function should not be used for every day service calls.
Note
that this function should not be used for every day service calls.
| Ribbon Access: Service > Scheduling |

- The Work Scheduling screen will be displayed.
Schedule Unassigned Work Orders
- Select the Technician you wish to assign a Work Order to from the Technicians grid.
- On the Calendar grid, navigate to the date and time you wish to schedule the work for.
- Select the work order code you wish to assign from the Unscheduled Work grid and drag and drop the work order to the Technicians calendar.
- When you receive the Input Validation message to confirm;
- Are you sure you want to schedule this work? Answer 'Yes' to schedule.
- Click on Yes to schedule the work, or
- Click on No, to ignore the request.

Assignment Time
The duration of the assignment, when first placed on the calendar, will default to what is configured for the Work Order Schedule > Required Craft Estimated Hours.
- If no Estimated Hours have been configured on the work order, the default length will be set to a 2 hour block.
Adjust Assignment Time
- To change the duration of the assignment, drag the assignment to fit the time required.
- When you receive the Input Validation message to confirm
- Are you sure you want to change the end time of this work? Answer 'Yes' to change the scheduled time.
-
Click on Yes to change the end time, or
- Click on No to ignore the request and leave the end time at the original setting.
 Note
that an assignment cannot be changed if it has already been accepted by the Technician. The white bar on the left of the assignment will change to red when accepted.
Note
that an assignment cannot be changed if it has already been accepted by the Technician. The white bar on the left of the assignment will change to red when accepted.
- Click on No to ignore the request and leave the end time at the original setting.

Reschedule Assignment
- To reschedule a work assignment, drag and drop the assignment to the required date and time slot on the technician's calendar.
- When you receive the Input Validation message to confirm;
- Are you sure you want to reschedule this work? Answer 'Yes' to reschedule.
-
Click on Yes, if you are certain about your selection, or
- Click on No to ignore the request and leave the work assignment as originally scheduled. Note
that an assignment cannot be changed if it has already been accepted by the Technician. The white bar on the left of the assignment will change to red when accepted.
- Click on No to ignore the request and leave the work assignment as originally scheduled.

Assign to Another Technician
- To move an assignment to a different Technician, ensure that both Technicians have been selected in the Technician grid to view both calendars.
- Drag and drop the assignment to the required date and time slot for the alternative technician.

- As you drop the assignment on the new slot,
- you will receive the Input Validation message box to confirm;
- Are you sure you want to reschedule this work? Answer 'Yes' to change the reschedule.
-
Click on Yes.
Note
that an assignment cannot be changed if it has already been accepted by the Technician. The white bar on the left of the assignment will change to red when accepted.

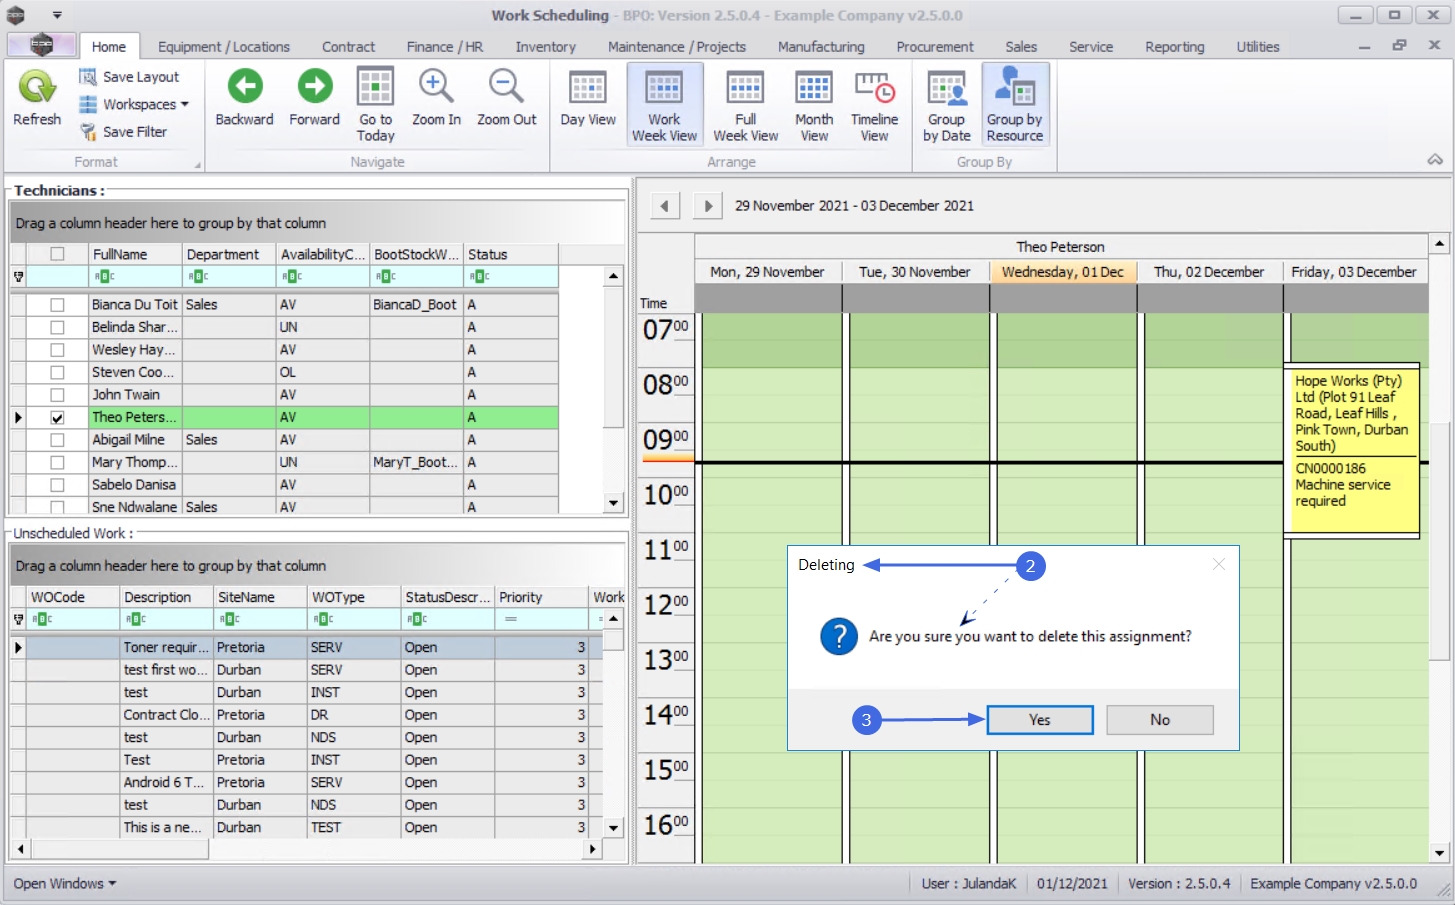
Remove/Delete an Assignment
-
 Right click on the assignment you wish to remove and then select Delete.

- When you receive the Deleting message to confirm;
- Are you sure you want to delete this assignment?
-
Click on Yes to remove the assignment.
Note
that an assignment cannot be changed or deleted if it has already been accepted by the Technician. The white bar on the left of the assignment will change to red when accepted.
Accept an Assignment
-
When the Technician
Accepts the call or project on
TechConnect, the white line on the left of the assignment
with turn red to indicate that no changes can be made to the assignment.
- The Technician will need to continue work on the call or project, until he has End Work.
- When work has been completed - the assignment will be removed from the Calendar.
- If for some reason, the assignment was accepted, but the Technician is unable to do the work, then he should Reject the Call from TechConnect. The assignment can then be assigned to another Technician.
![]() Note
that if a Technician has already Started Work on TechConnect, then the call cannot be rejected. The Technician will need to End Work once done, or End Work as Unresolved.
Note
that if a Technician has already Started Work on TechConnect, then the call cannot be rejected. The Technician will need to End Work once done, or End Work as Unresolved.

View Call Assignment
From the Work Scheduling screen;
- Hover the mouse over the scheduled assignment to view the Start and End times, the Location and any Reminders for the assignment, or

- To view or edit the assignment, double click on the scheduled assignment.
- The Call Assignment: Reference No: [call ref number] screen will be displayed.
- When you are done working on the screen, click on Save to update the changes or
- Click on Back to return to the Work Scheduling screen.

MNU.070.001