We are currently updating our site; thank you for your patience.
CRM Basics
Add / Edit an Activity
When creating a new activity from the Dashboard (Home page), you will also be creating a new Case for the Customer.
A Case can be seen as an umbrella over all the underlying activities that work towards achieving a contract with that customer.
If a Case and an Activity already exists for a customer, then you need to:
- View the current Activity
- Process the 'Next Action'
- Which will complete the current Activity and then
- Create a new Activity
-
There cannot be more that 1 open Activity at a time, per Case.
| Access: Webpage - http://[servername]:[portno]/BPOCRM/User.aspx |
Create New Activity
In the CRM Homepage,
- Click on the Add new items... icon
- Click on the Activity tile.
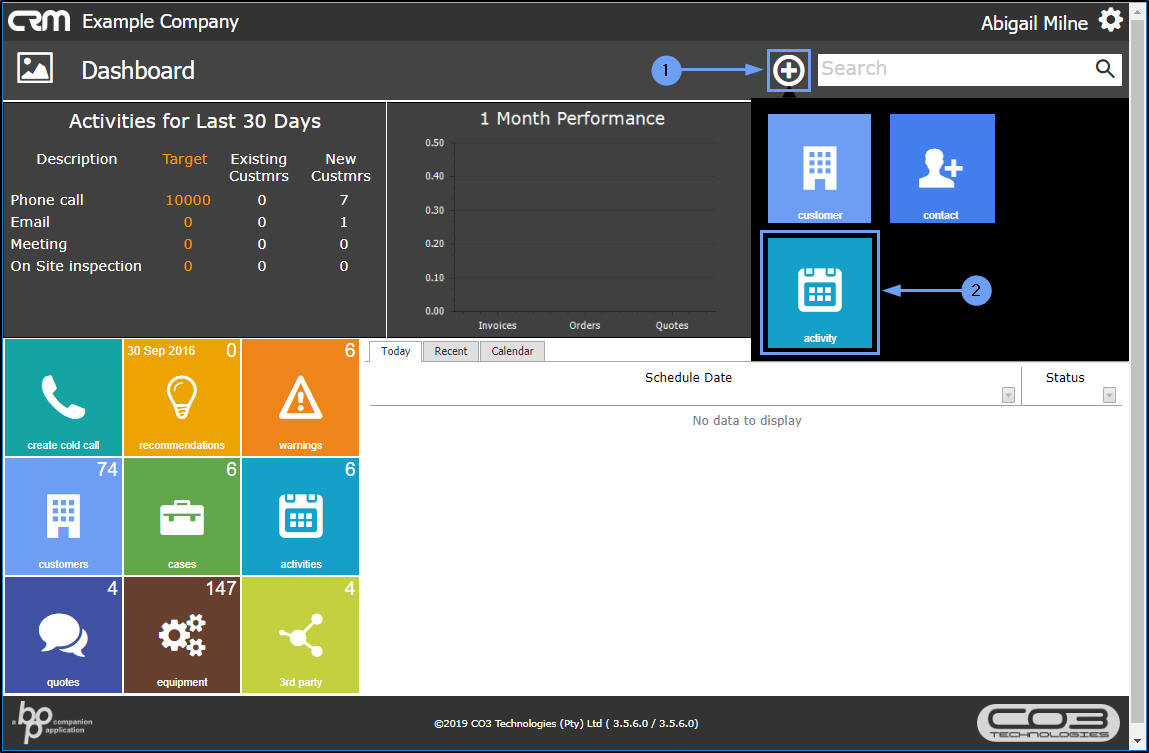
- The Save Activity screen will be displayed.
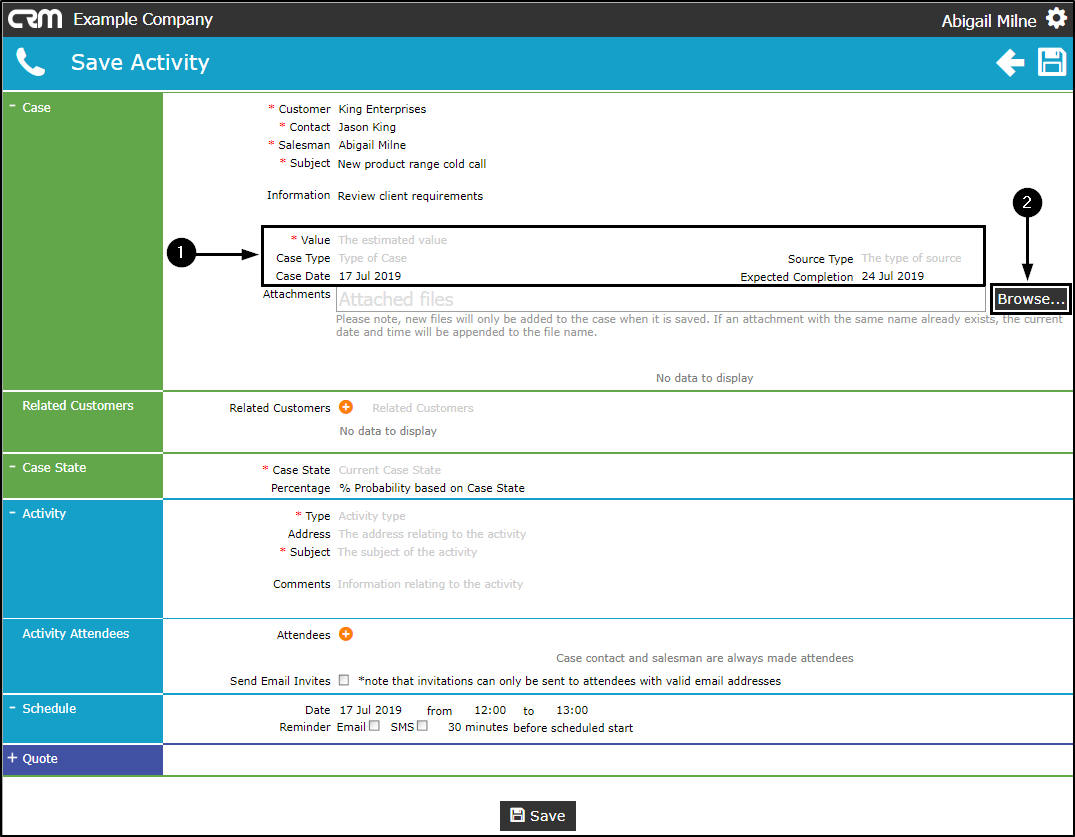
Case Details
- Add details to the following fields:
- Customer: Click in this field to display a list of all the customers on the system. Select the relevant customer.
- Contact: Click in this field to display a list of all the contacts linked to the customer specified above. Select the applicable contact.
- Salesman: This will auto populate with the person currently logged on to the system
- Subject: Type in the subject of this case (e.g. New product range cold call ).
- Information: Type in any additional information pertinent to this case (e.g. Review client requirements ).
- Note: Although this is not a mandatory field, it is an important one. A salesman may not always remember extra details specific to a customer. Here you can include any extra pertinent information that may help build good customer relationship which will help the salesman achieve / win this case.

- Value: Type in the estimated value of this case.
- Case Type: Click in this field to display a list of all the Case Types set up on the system (e.g. Machine Sales or New Deal). Select the relevant Case Type.
- Case Date: This will auto populate with the current date.
- Either type in, or click on the drop-down arrow that appears and use the calendar function to select the date of this case
- Source Type: Click in this field to display a list of all the source types set up on the system (e.g. Referral, Google Ads - how you heard about this customer). Select the applicable source type.
- Expected Completion: This will auto populate with the date 7 days after the auto populated case date.
- Either type in, or click on the drop-down arrow that appears and use the calendar function to select the expected completion date of this case.
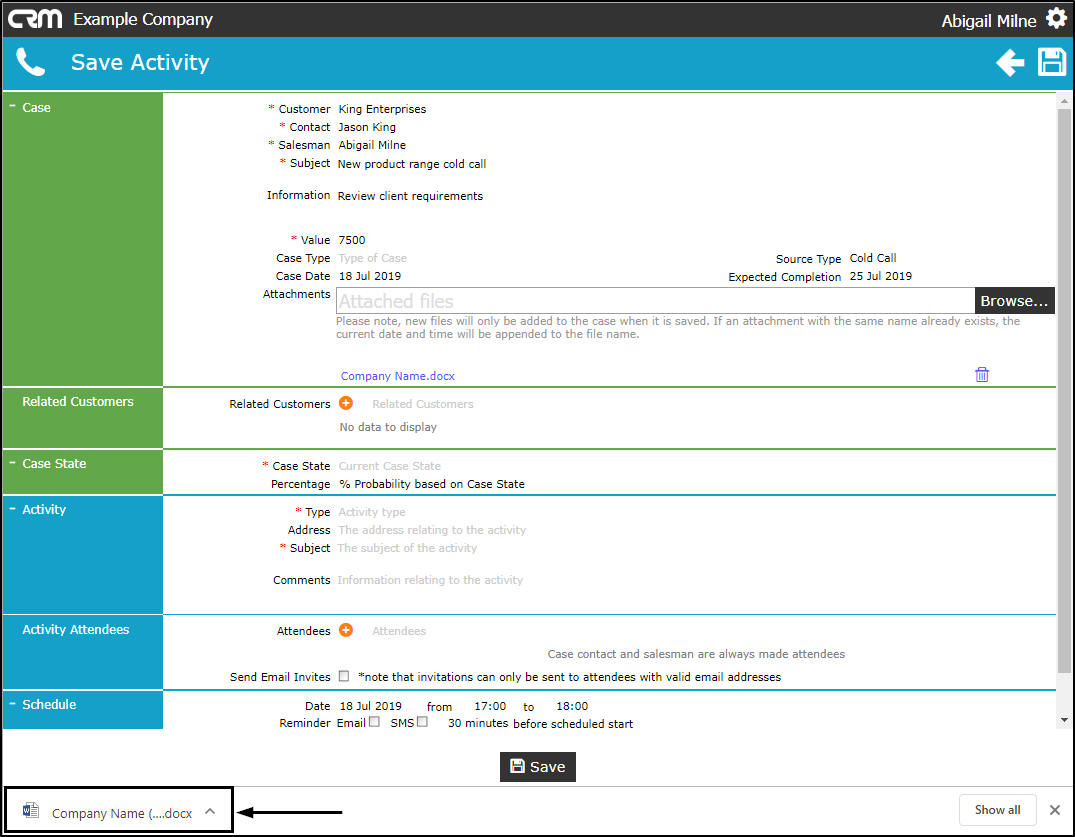
Attachments
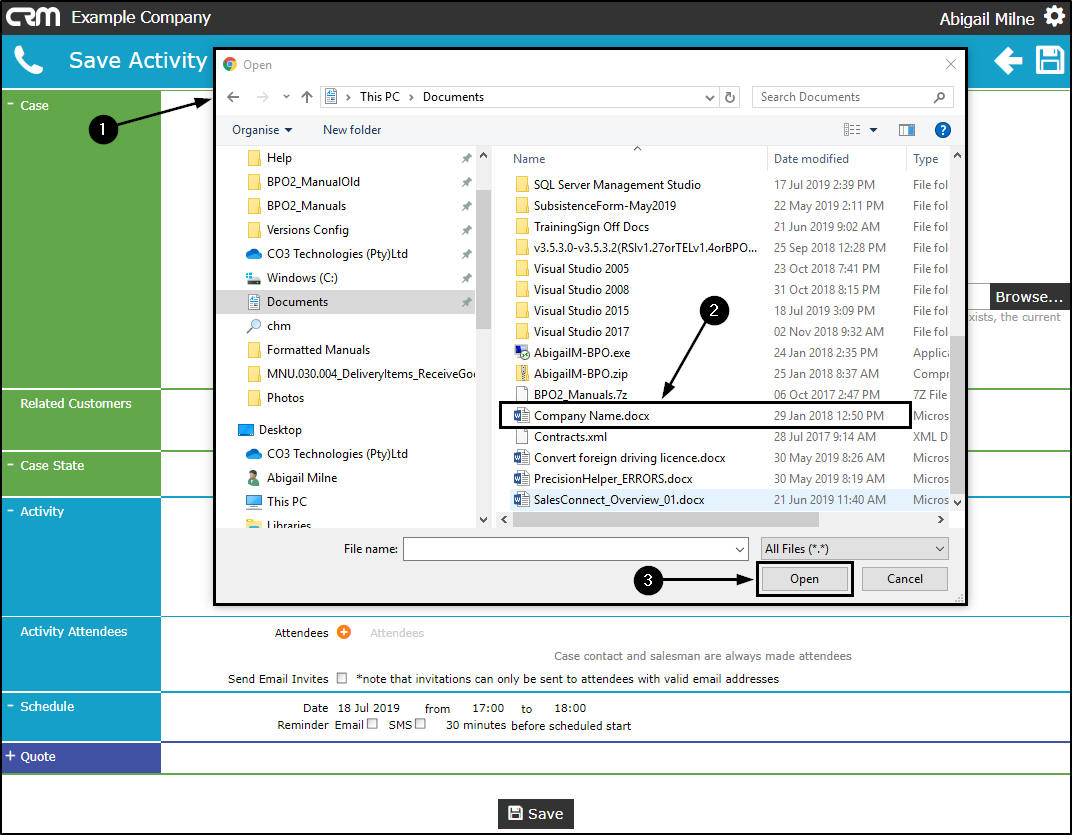
- Click on the Browse... button.
- The Open file screen will pop up.
- Search for and select the file you wish to link.
- Click on Open.
- The link for the selected document is now attached in the Case frame
- You can now view a Bin icon. This can be used this to Delete the attachment from this frame, if required.
View Attachment
- Click on the link.
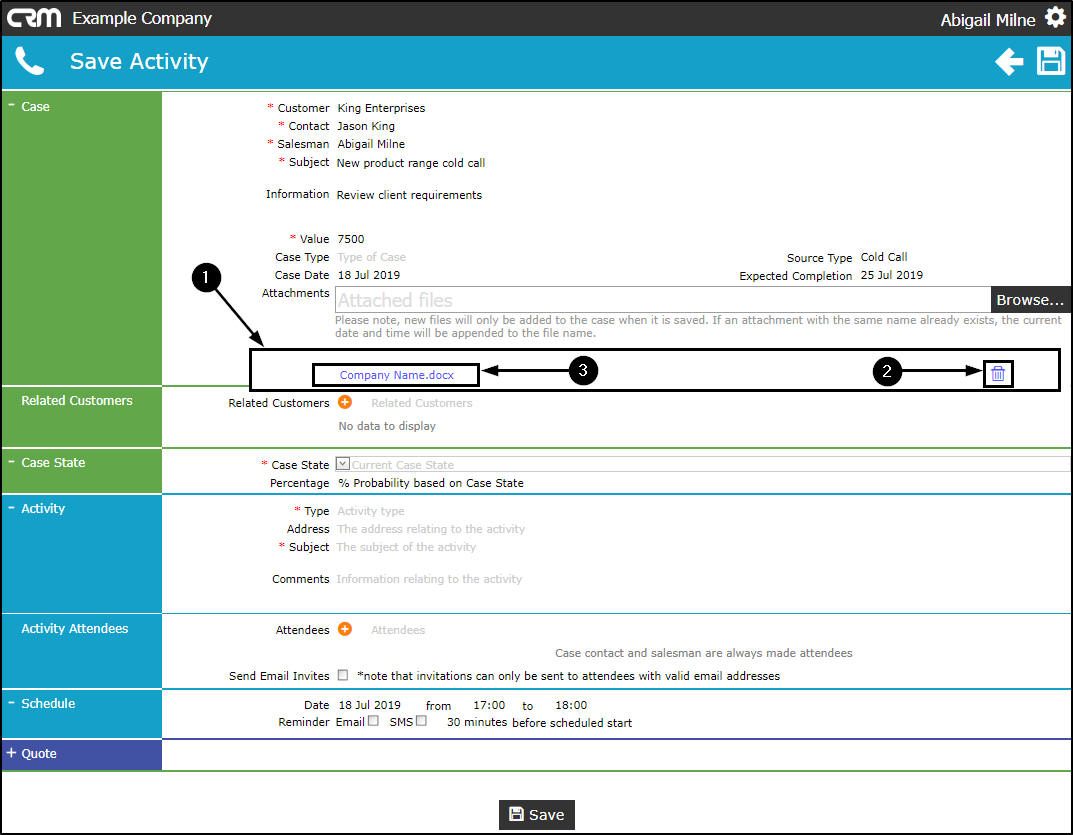
- A tab will open at the foot of the screen, click on this tab.
- The attachment will open for viewing. Exit the screen to return to the Save Activity screen.

- An Attachments information message informs you;
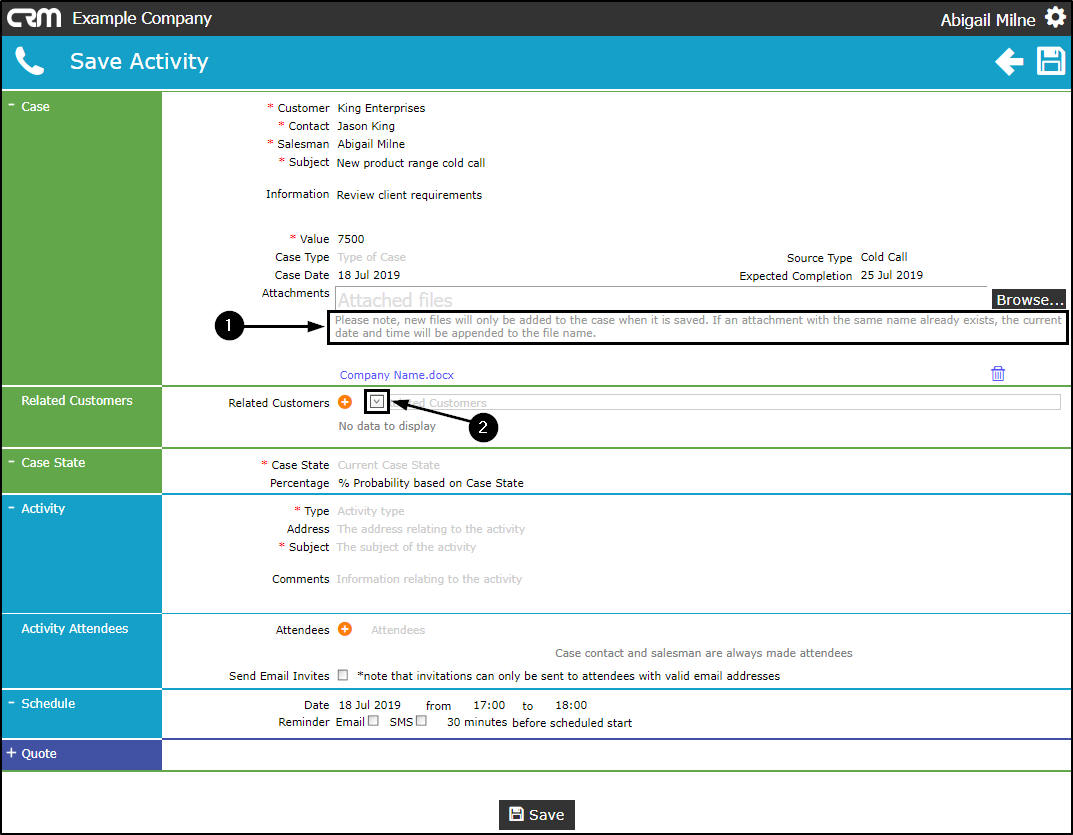
- Please note, new files will only be added to the case when it is saved. If an attachment with the same name already exists, the current date and time will be appended to the file name.
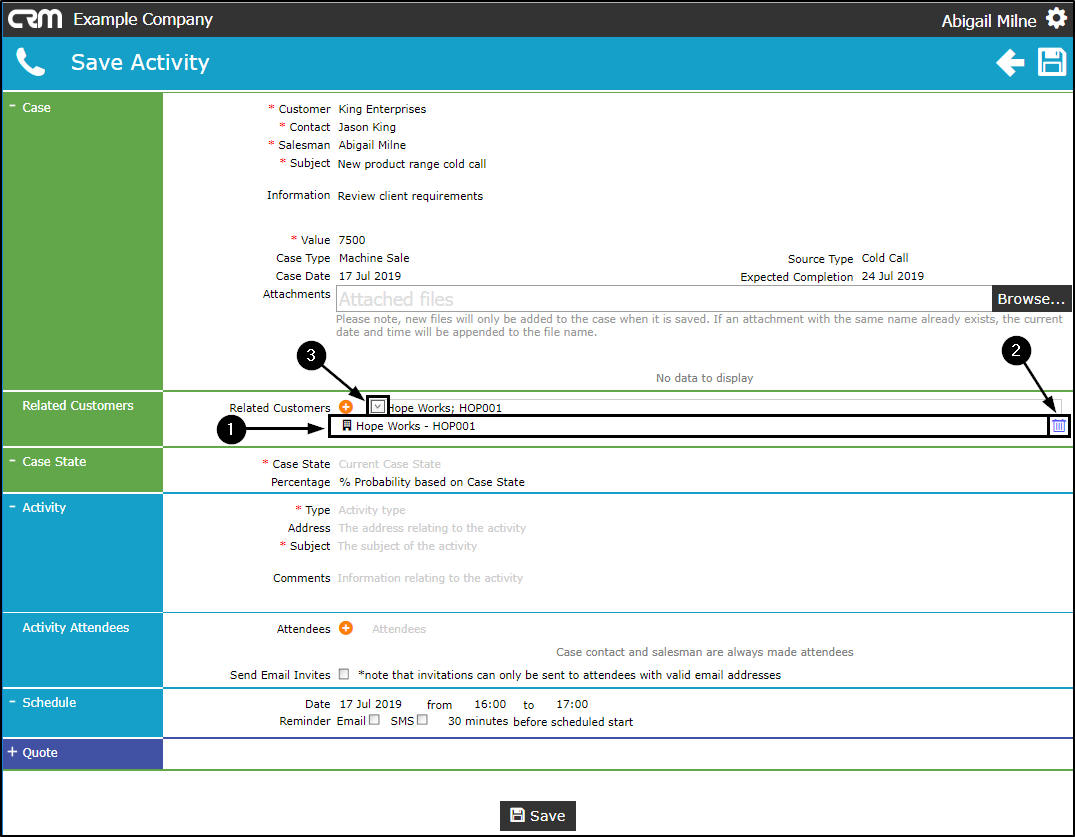
Related Customers
You can link a Related Customer, in order to invite contacts from various clients to an Activity - such as a meeting or training session.
- Hover over the Related Customers field to reveal a drop-down arrow, click on this arrow.
- A list of customers already set up on the system will be displayed.
- Select the applicable related customer.
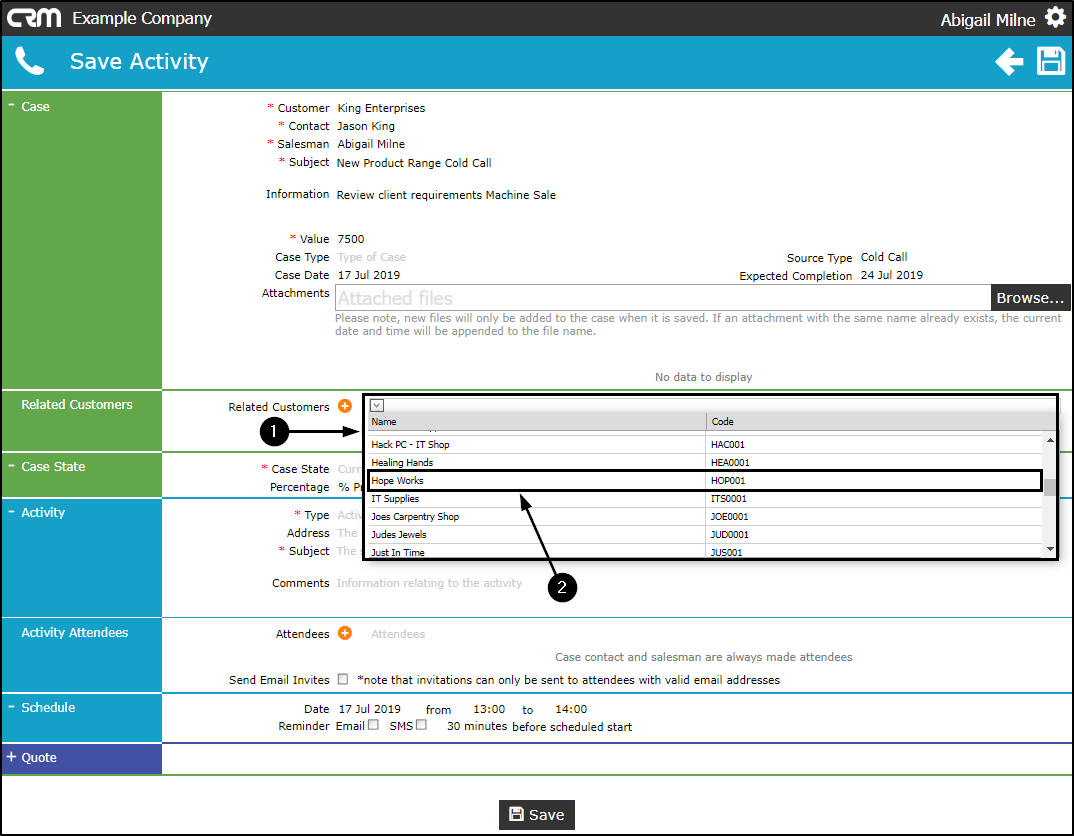
- The selected Customer Name and Code will populate the field.
- Click on the plus[+] button.
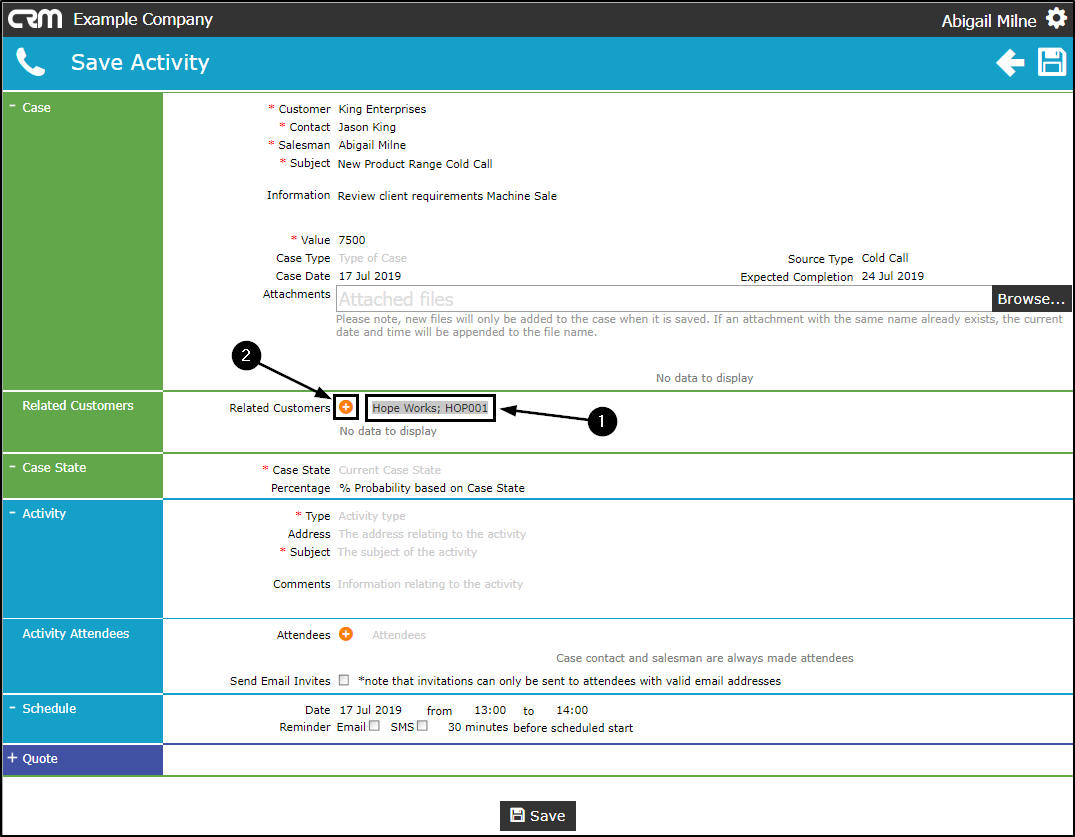
- The selected customer name will now appear in the data grid below this field.
- You can now view a Bin icon - you can use this to delete the customer from this data grid, if required.
Link Additional Related Customer(s)
- Hover over the Related Customers field again to reveal the drop-down arrow, click on this arrow.
- The list of customers will be displayed.
- Select the additional related customer.
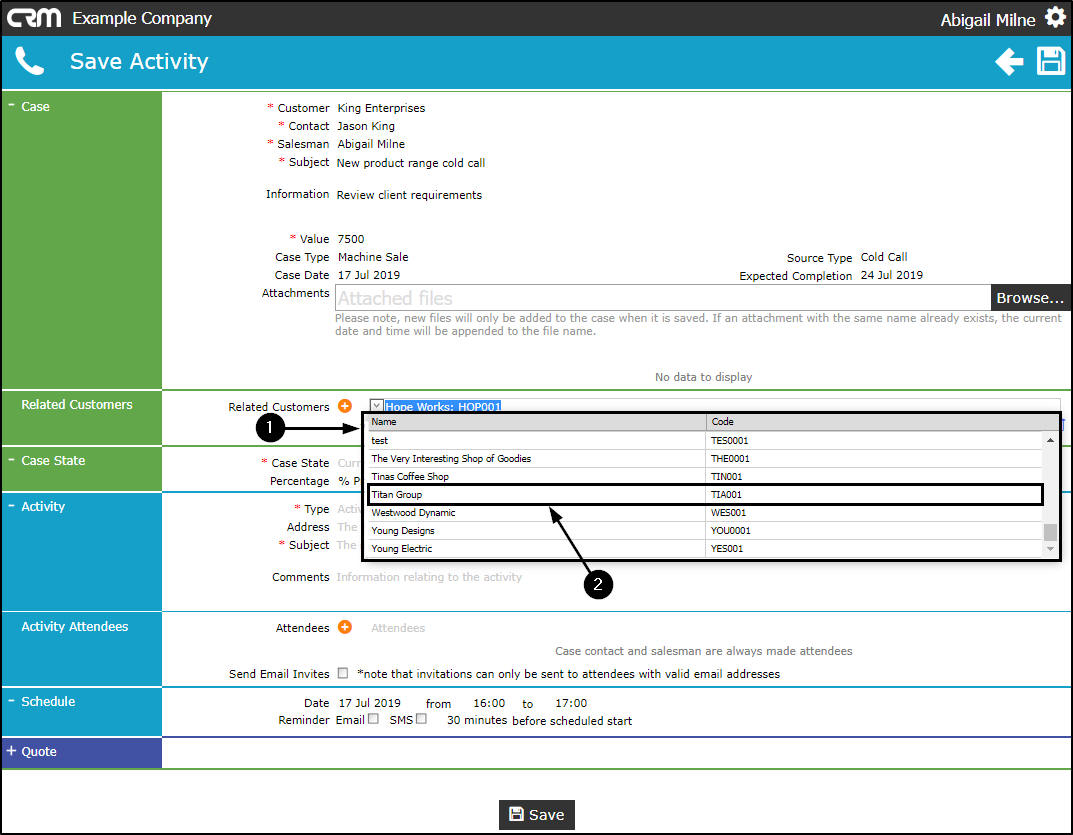
- The selected additional Customer Name and Code will populate the Related Customers field.
- Click on the plus [+] button.

- The additional customer name will now populate the data grid.
- Note the additional bin - to enable you to remove this additional customer, if required.
You can continue to add customers in this way until you have all the related customers listed in the data grid.
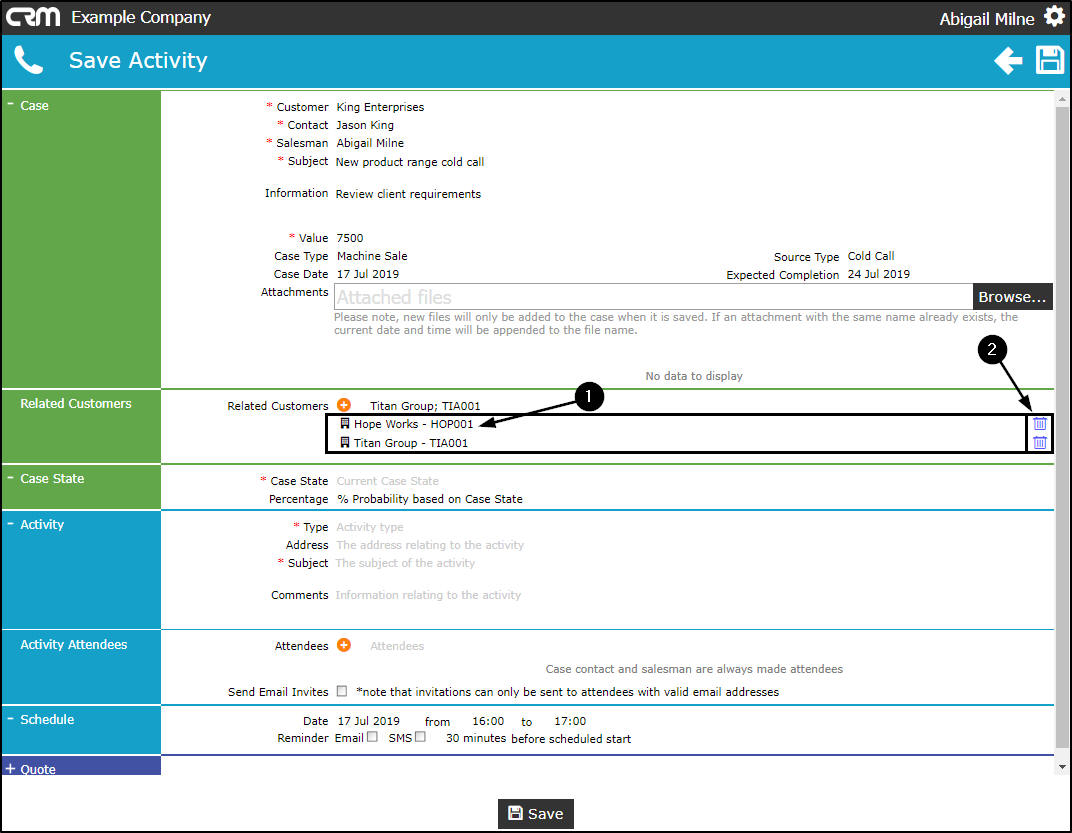
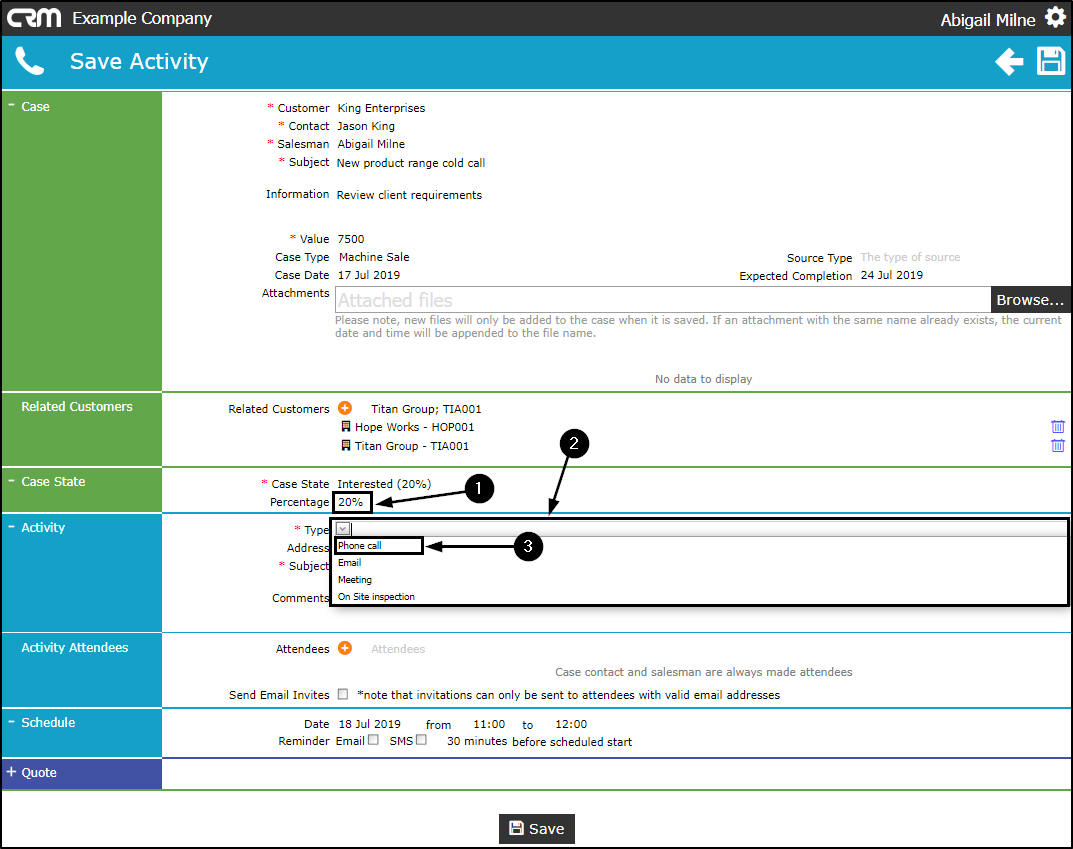
Case State
- Hover over the Case State field to reveal the drop-down arrow, click on this arrow.
- A list of Case State Descriptions and their related Percentages (% probability based on Case State) will be displayed.
- Select the Case State Description that applies to this activity.
- Note 1: If this Case Type has Stage Gates enabled, you can select whether to update the Stage Gates settings after saving the Case.
- Note 2: If this Case Type has Stage Gates enabled, the Case State will update automatically to the first Case State configured (You will need to update the Stage Gate Answers to move to the next Case State). Otherwise, select the Case State.
- Note 3: The Case State Percentage will update based on the Case State selected.
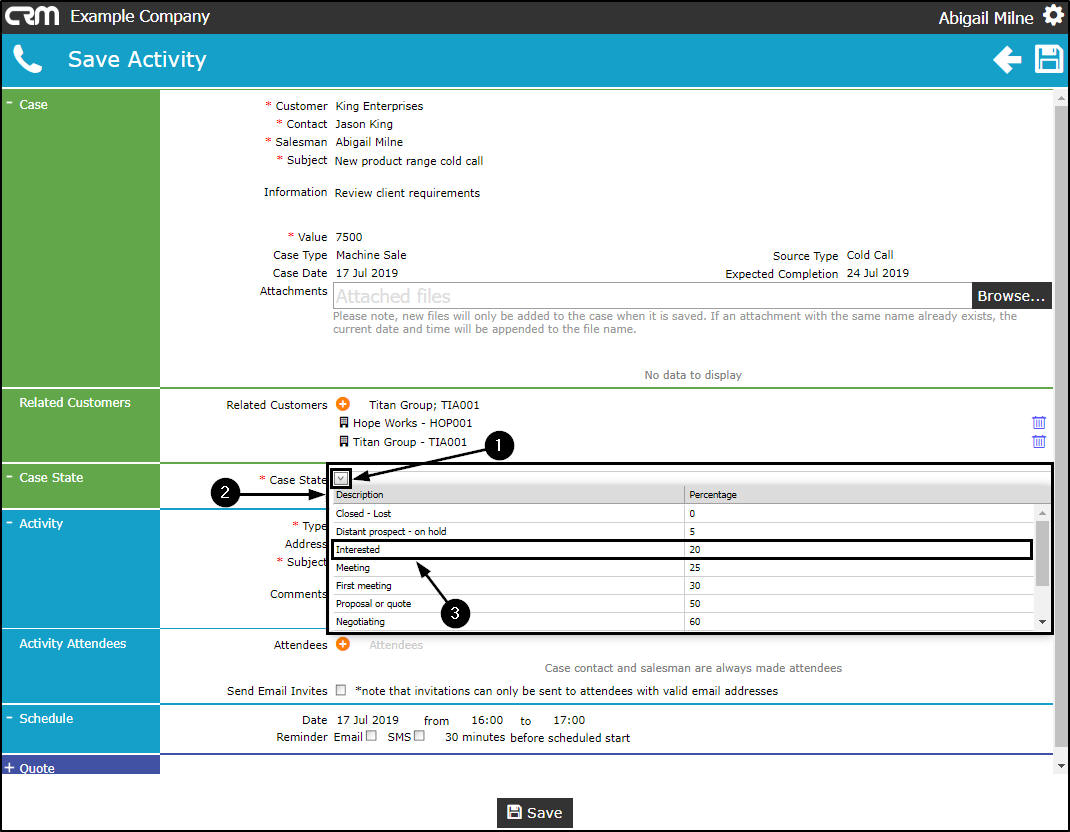
- The Percentage field will populate according to the Case State selected.
Activity
- Click in the Type field to display an Activity Type drop-down list.
- Select from this list the applicable type (e.g. Phone call).
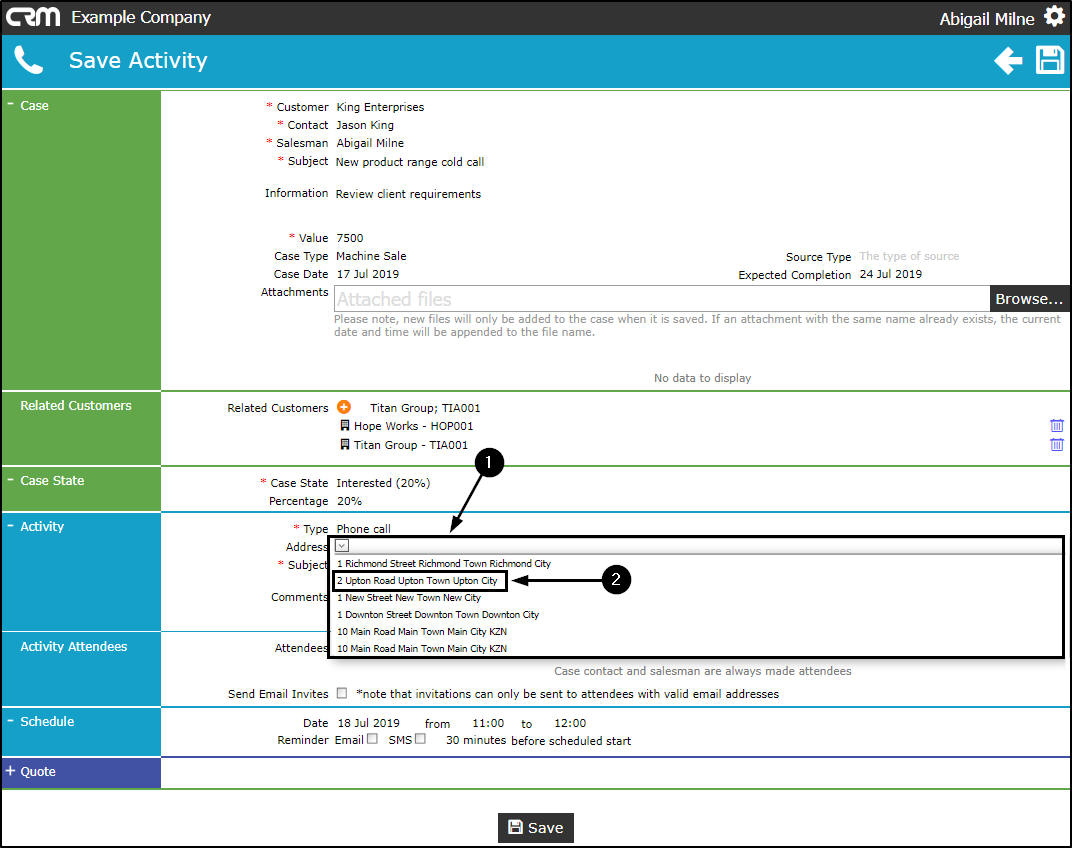
- Click in the Address field, a list of all addresses linked to the customer will be displayed.
- Select the applicable address from this list.
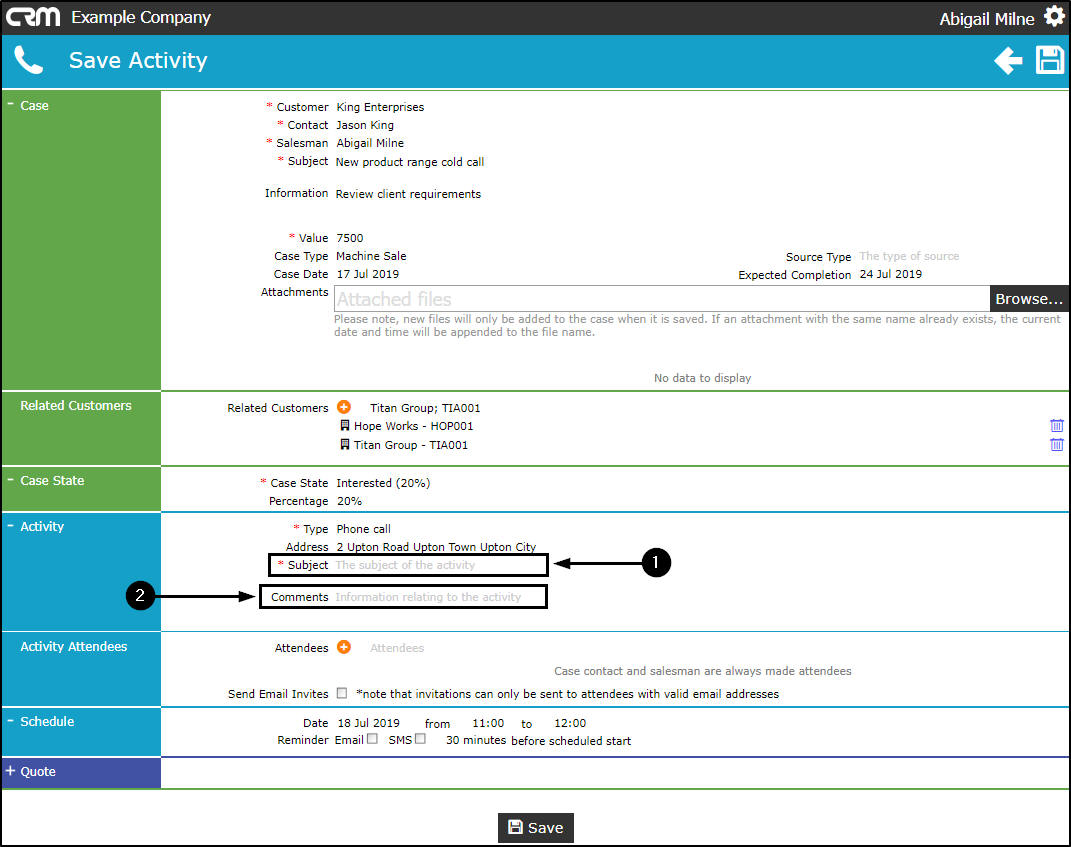
- Type in the Subject of this Activity (e.g. Phone call to discuss present client requirements and give overview of new product range).
- Type in a Comment relating to this Activity (e.g. Customer currently rents Model: xxyyx).
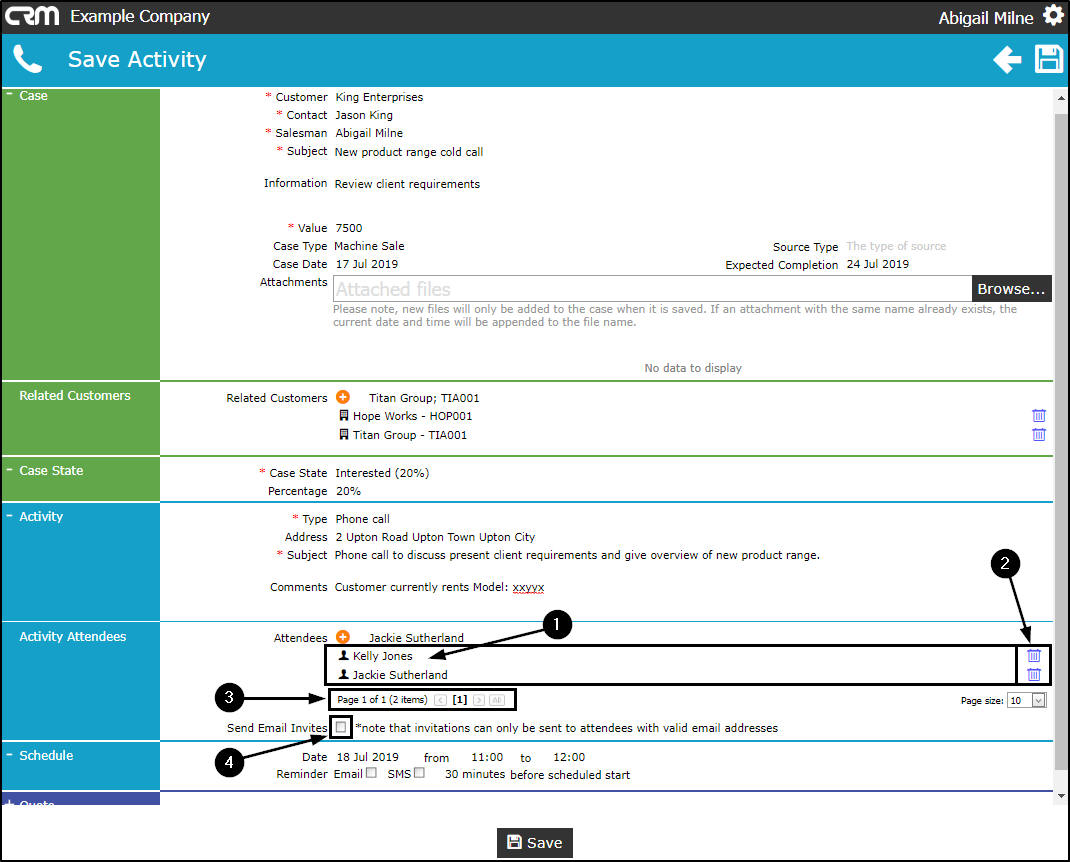
Activity Attendees
- Hover over the Attendees field to reveal the drop-down arrow, click on this arrow.
- A list of Attendee Names and and the Customer Name that each is linked to, will be displayed.
- Select the Attendee that you wish to add to this Activity.
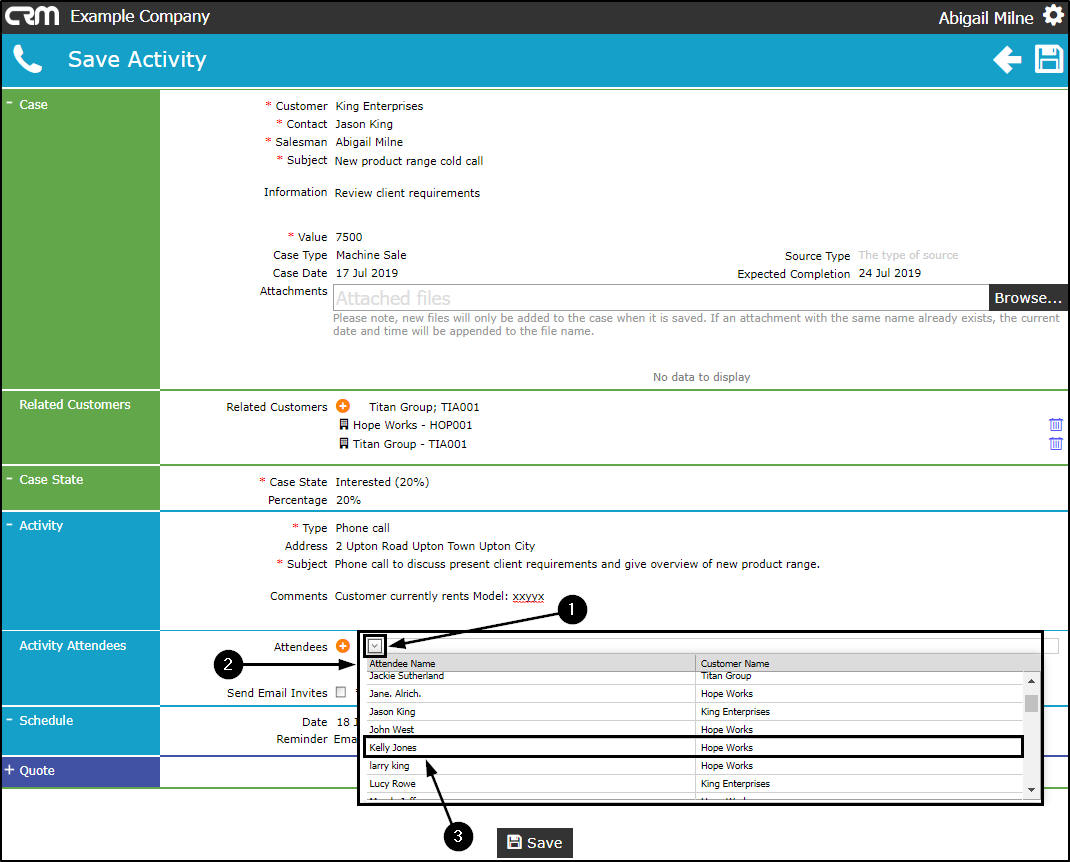
- The selected Attendee Name will populate the Attendees field.
- Click on the plus[+] button.
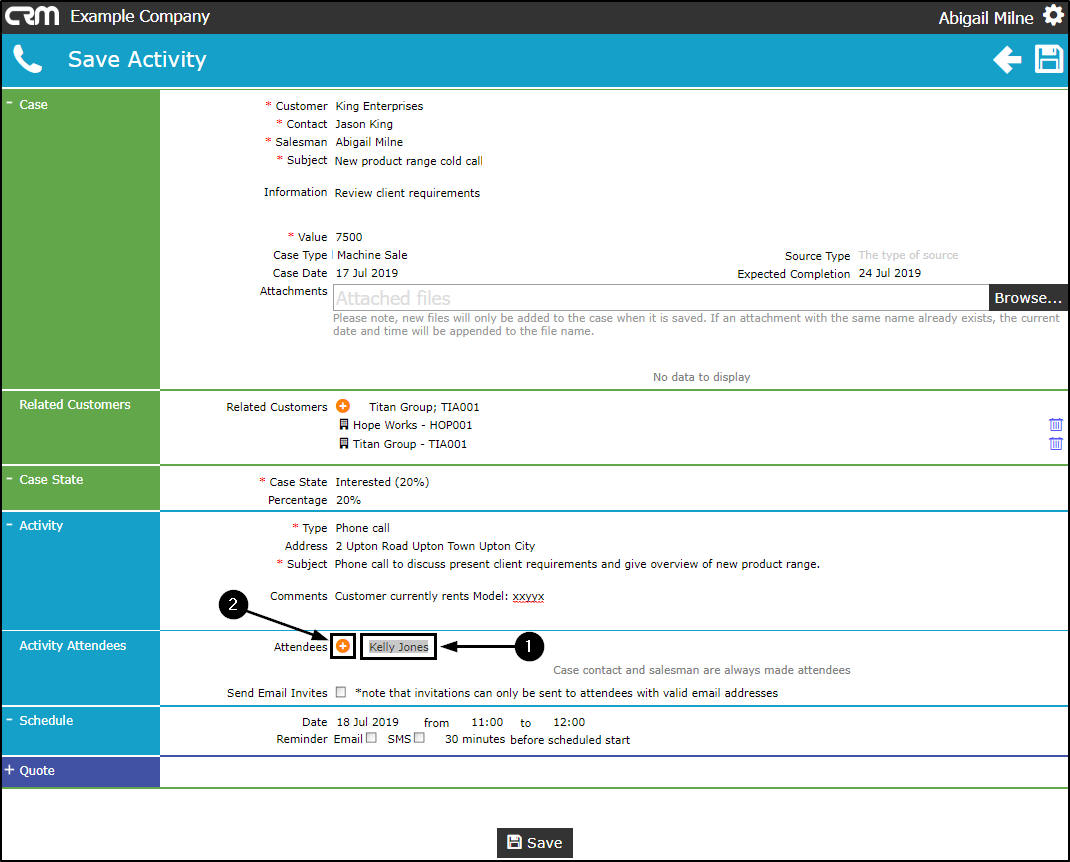
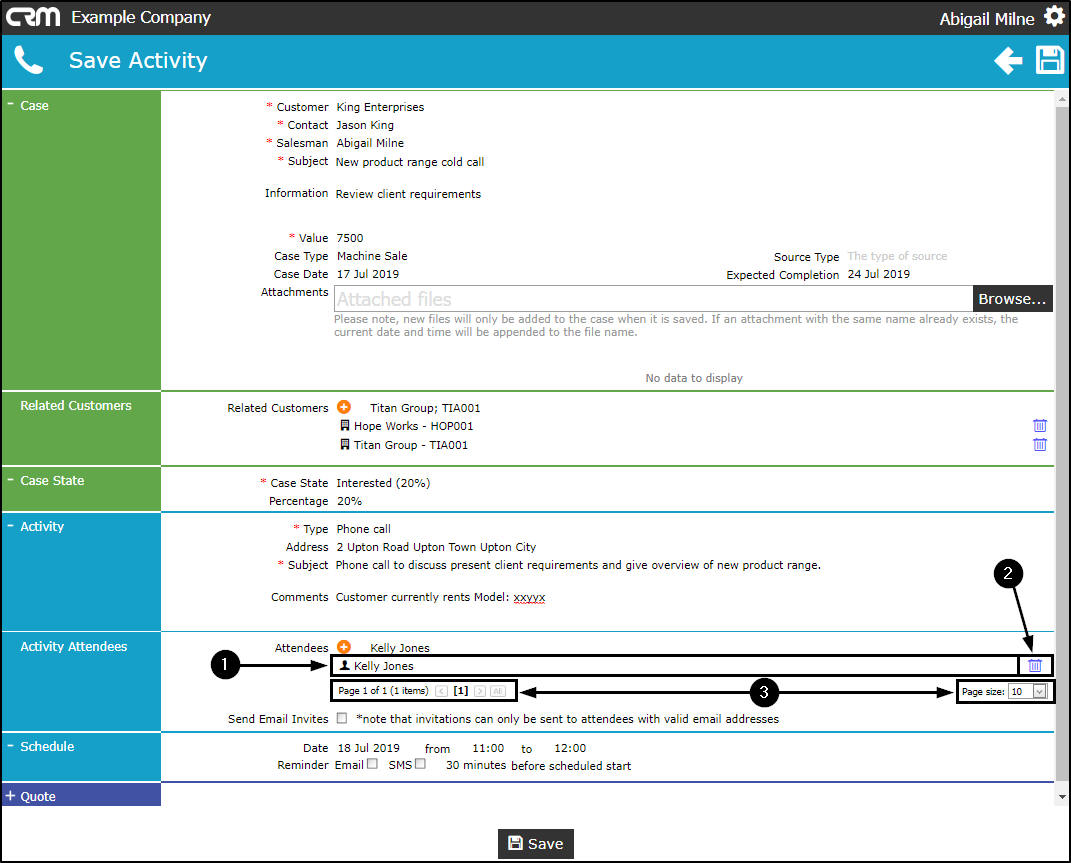
- The selected Attendee Name will now appear in the data grid below this field.
- You can now view a Bin icon - you can use this to delete the Attendee from this data grid, if required.
-
Note that there is now a
Page Reference
field that reflects the contents of this data grid:
- (Page 1 of 1 ( 1 items).
Link Additional Attendee(s)
- Hover over the Attendees field again to reveal the drop-down arrow, click on this arrow.
- The list of Attendee Names will display again.
- Select the additional Attendee that you wish to add to this Activity.
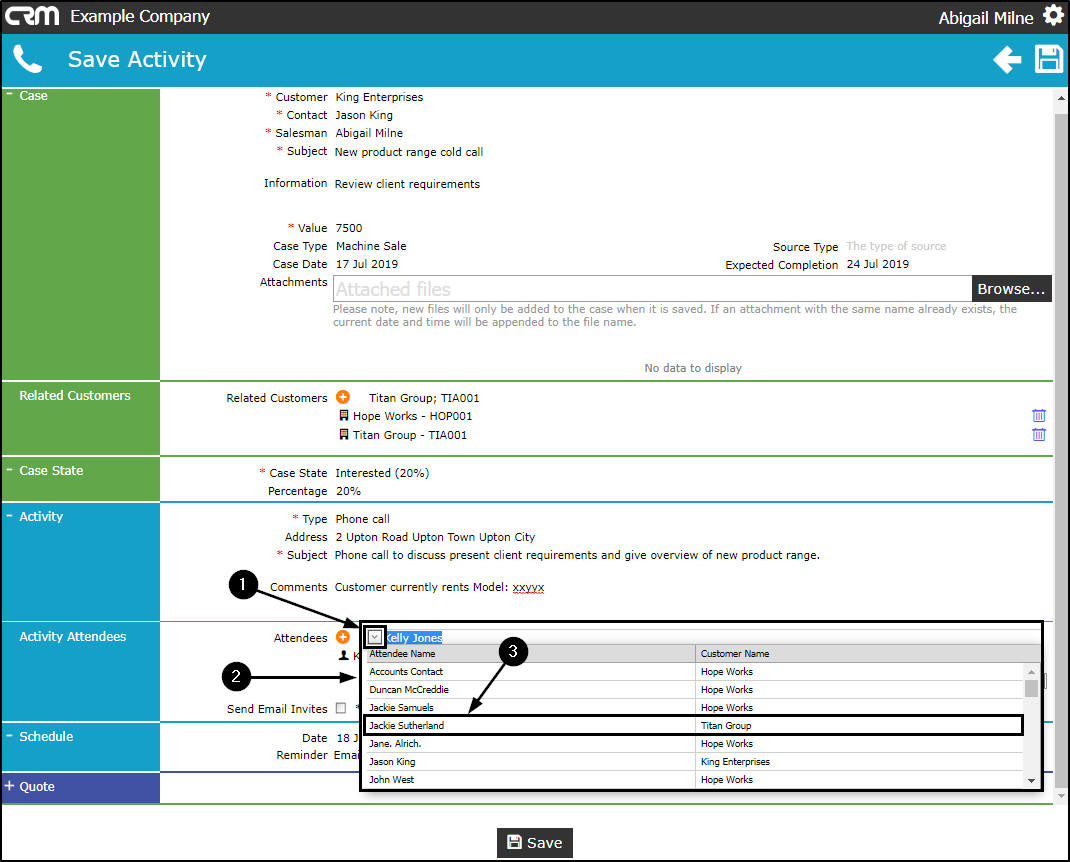
- The additional Attendee Name will populate the Related Customers field.
- Click on the plus[+] button.
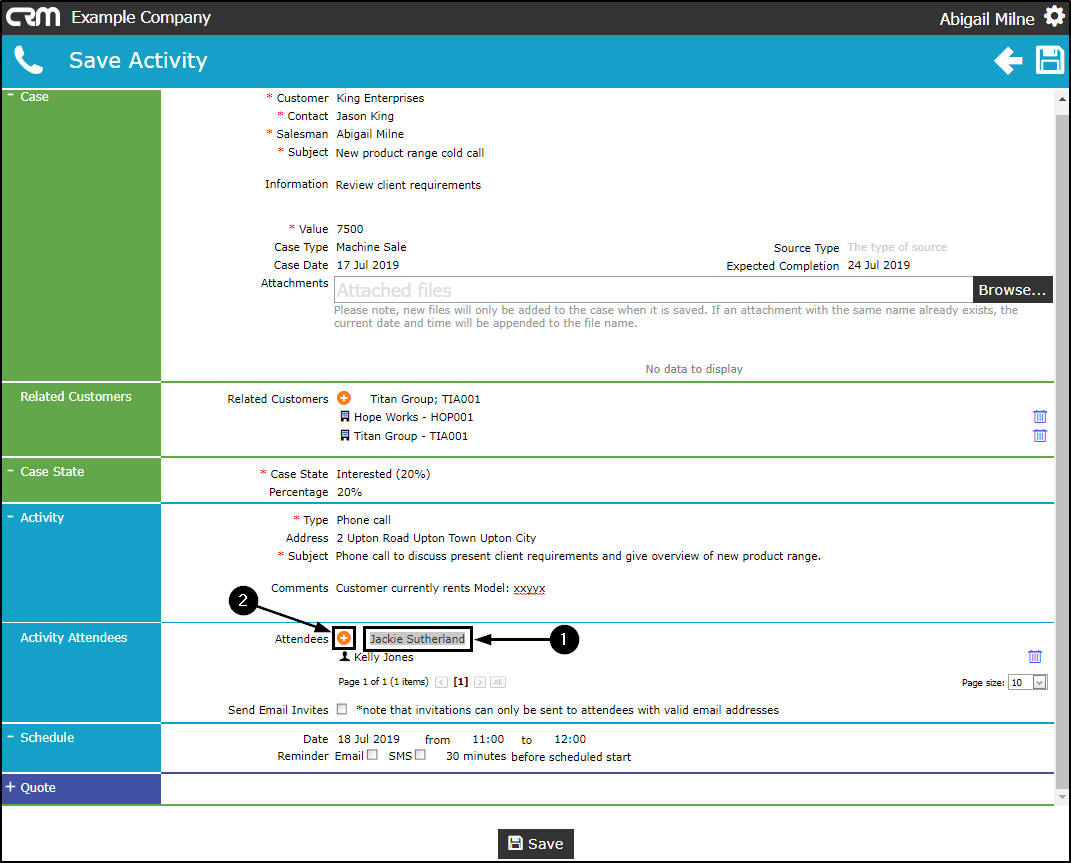
- The additional Attendee Name will now populate the data grid.
- Note the additional bin - to enable you to remove this additional attendee, if required.
-
Note that the
Page Reference
field has updated to reflect the additional attendee:
- (Page 1 of 1 ( 2 items).
You can continue to add attendees in this way until you have all the attendees required, listed in the data grid.
- Send Email Invites: Select this check box if you wish to invite these attendees via email.
- Each attendee must have a valid email address set up to receive an email invitation.
Schedule
- The Date and Time of this Activity will auto populate with the current date and time.
- Either type an alternative date directly into this field or click in the drop-down arrow.
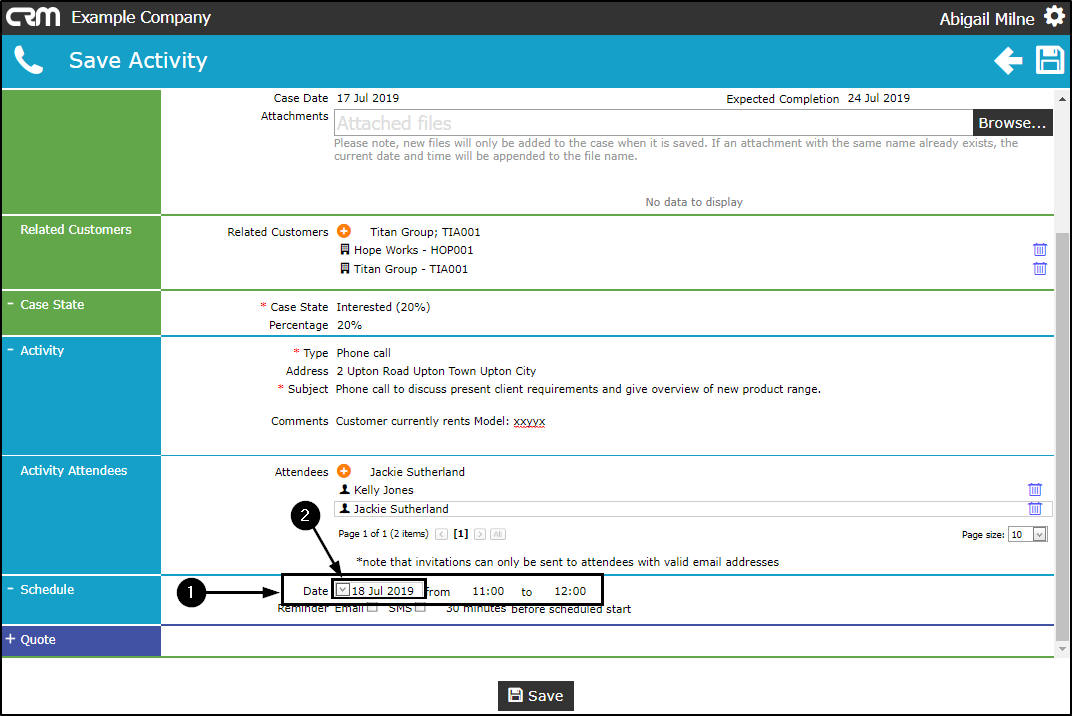
- The calendar function will pop up.
- Select an alternative date, if required.

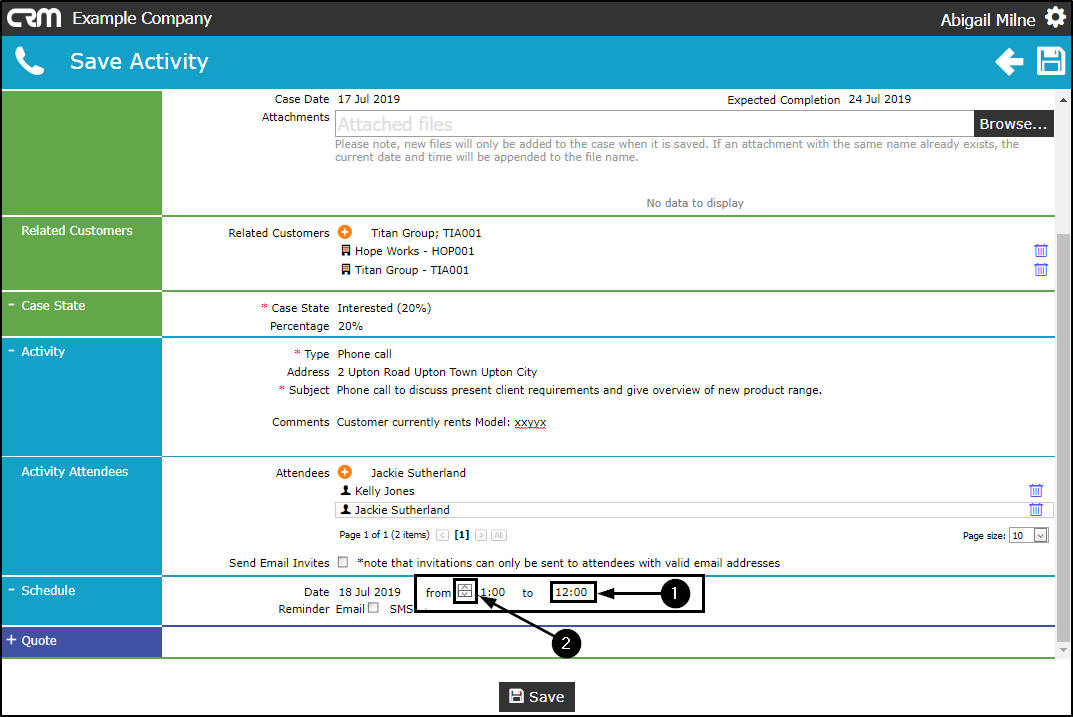
In the time from and to fields:
- Either type the alternative time directly in the field,
- Or, click in the field to display directional arrows, use these to select an alternative time.
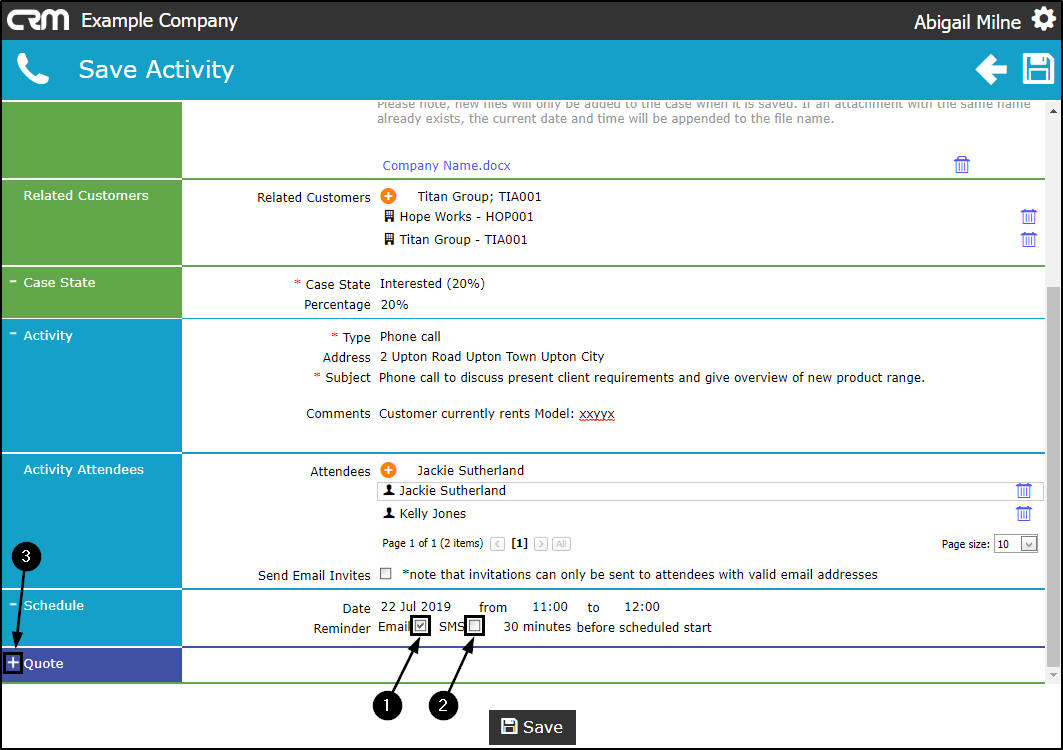
Reminder Email / SMS
- Reminder Email: Select this check box if you wish to have a reminder email sent to you, 30 minutes before the Activity start time.
- Reminder SMS: Select this check box if you wish to have a reminder SMS sent to you, 30 minutes before the Activity start time.
- Note: These reminders will only work if your mobile number and email address have been configured in Nucleus Service.
Save Activity
You can now skip the next few steps and Save the activity if you do not wish to add a quote. Otherwise follow the process below to add a quote.
Add a Quote - Optional
- Click on the expand icon [+] in the Quote frame.
- The Quote section will be expanded to expose the:
- Quote Financials
- Add Quotes Items
- and Quote Items frames.
- Quote Settings: As the Quote section is expanded, the system will pull through the customer default information and populate the following fields:
- Quote Contact: This will populate with the contact selected in the Case section.
- You can click on the drop-down arrow and select an alternative contact from the drop-down list, if required.
- Date: This will populate with the current date.
- You can either type directly in this field to change the date, or click on the drop-down arrow and use the calendar function to select an alternative date if required.
- Site: This will auto populate with the site set up on the customer.
- Print Layout: This will auto populate with Sales Quote.
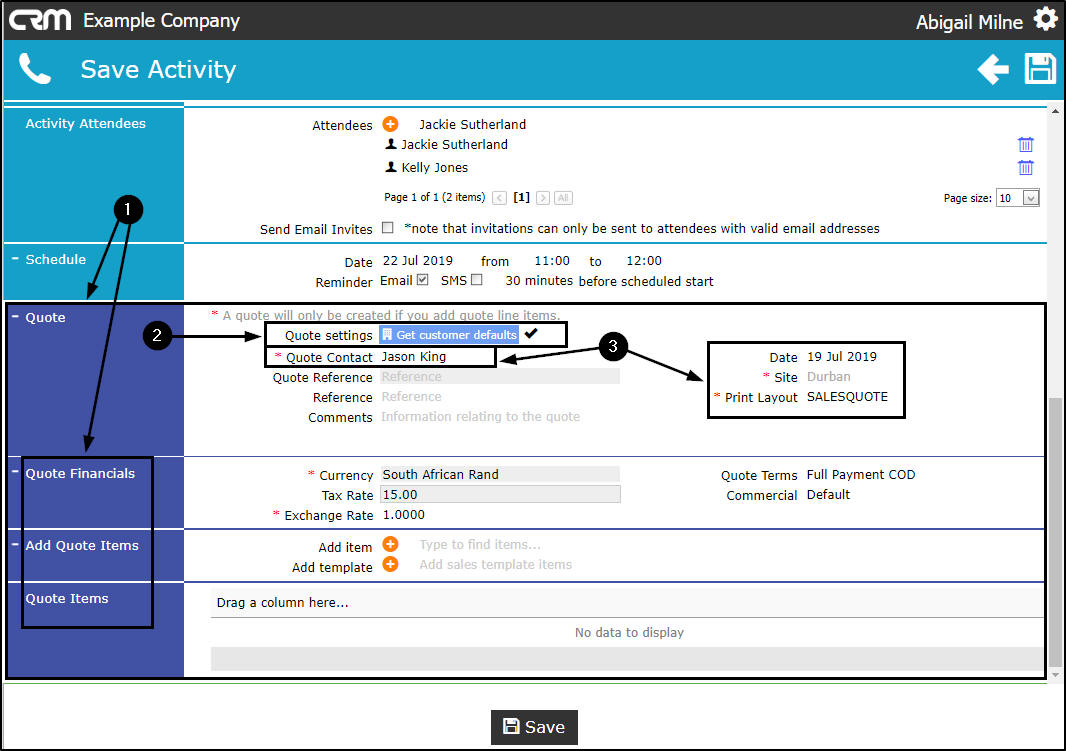
- Quote Reference: The system will allocate a reference number as the quote is saved.
- Reference: Type in a reference for this quote.
- Comments: Type in a comment / additional information relating to this quote.
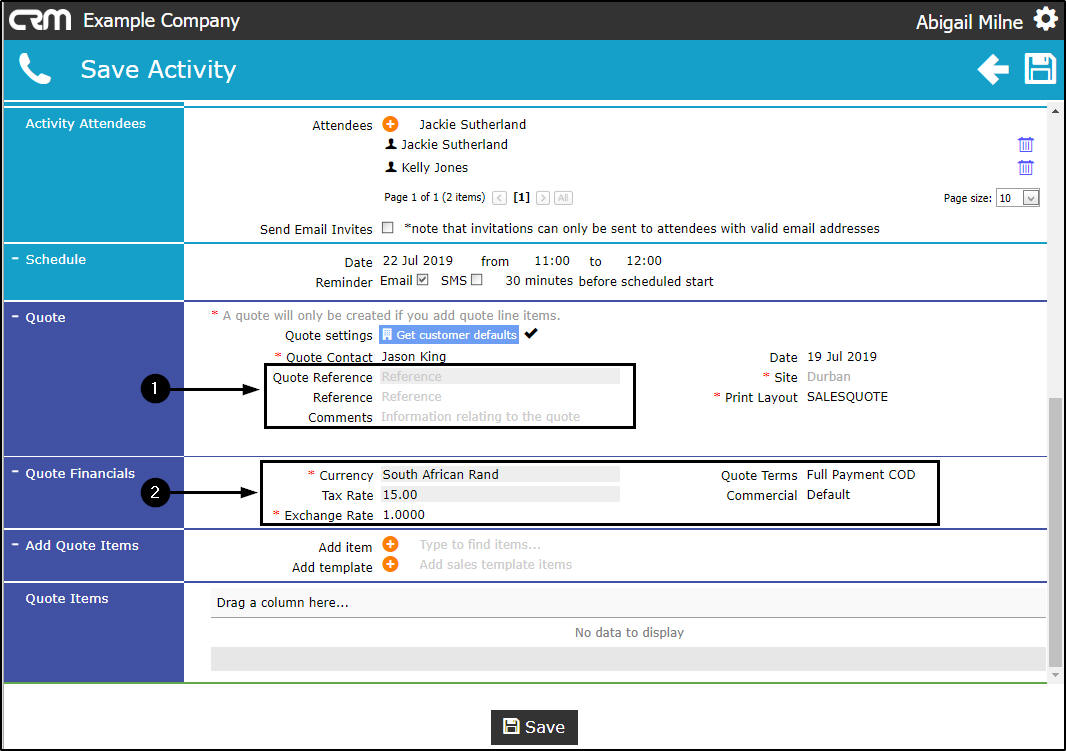
Quote Financials
- Currency:
This will auto populate with the currency set up on the customer.
- You can click on the drop-down arrow and select an alternative currency, if required.
- Tax Rate: This will auto populate with the tax rate set up on the customer.
- Exchange Rate: This will auto populate with the exchange rate set up on the customer.
- Quote Terms:
This is the quote repayment factor and should be configured in
Static Data: Sales Quote Terms or Repayment Method
This will auto populate with Full Payment COD.
- You can click on the drop-down arrow and select an alternative payment period, if required.
- Commercial:
This will auto populate with the
commercial
set up on the customer.
- You can click on the drop-down arrow and select an alternative commercial, if required.
Add Quote Item
You now have the ability to add single items to a quote.
- Note: For Part Numbers to pull through to this list - you need to ensure that the Quote Products are specified .
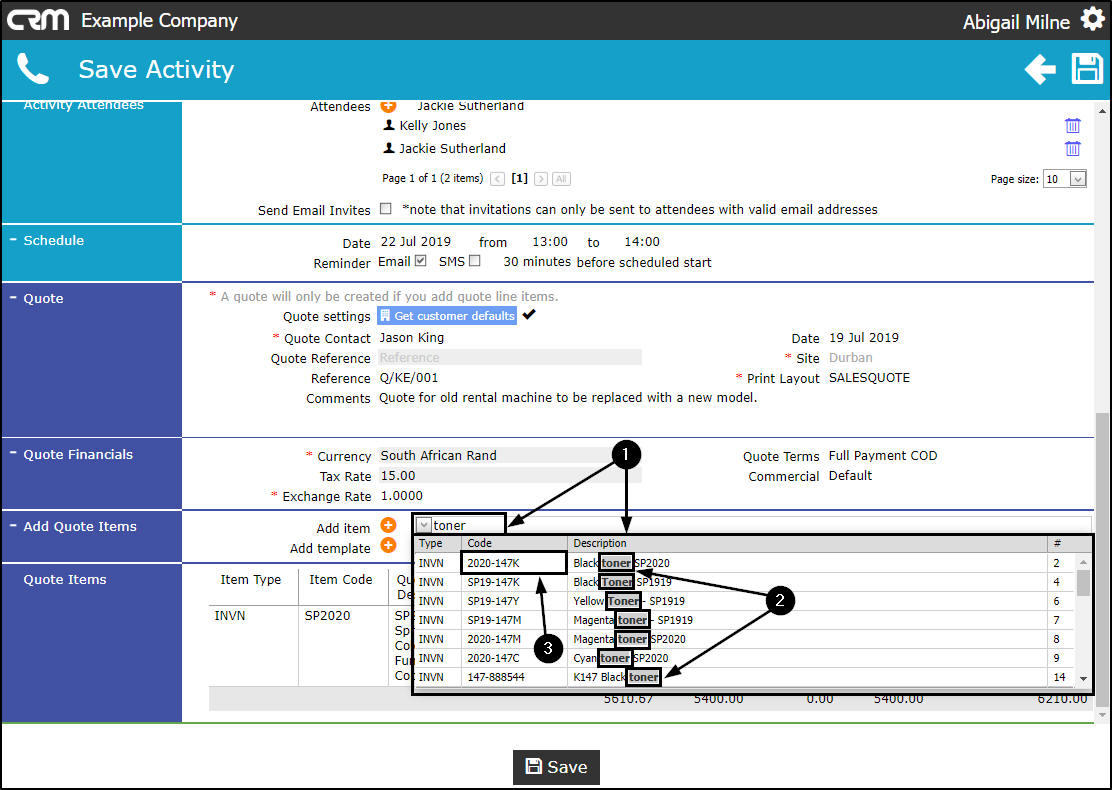
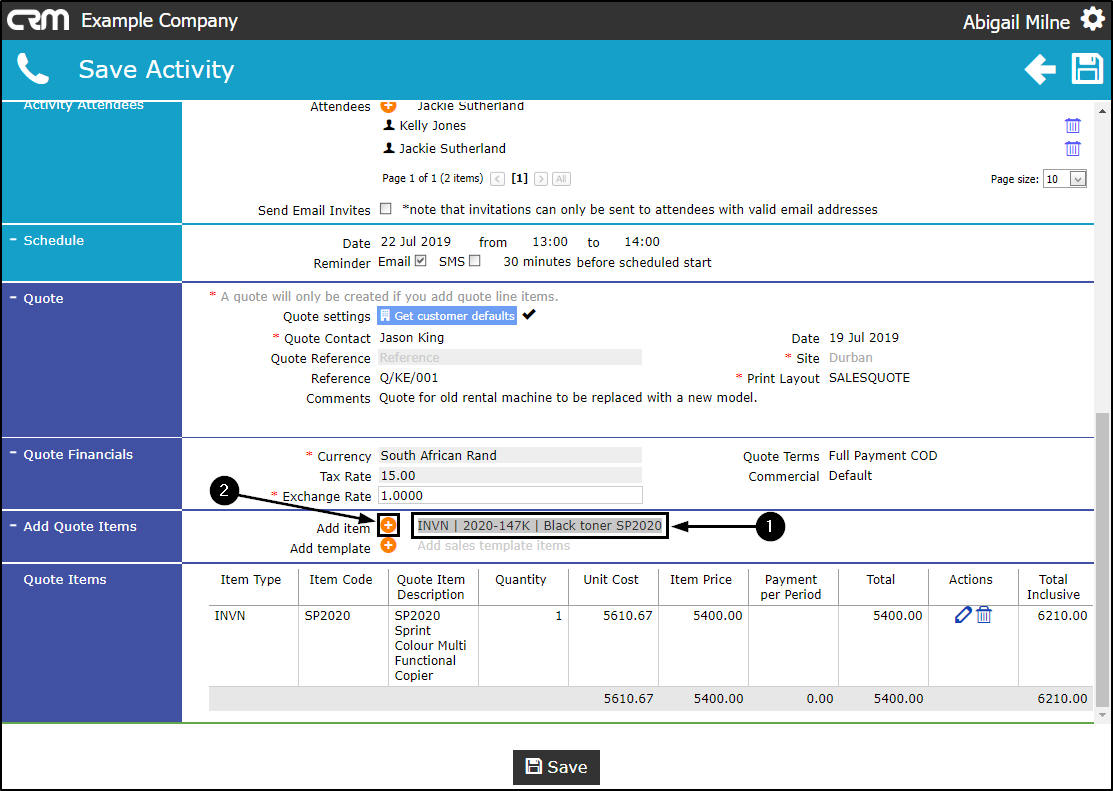
- In the Add item field, start typing the code or description of the item you wish to link to this quote.
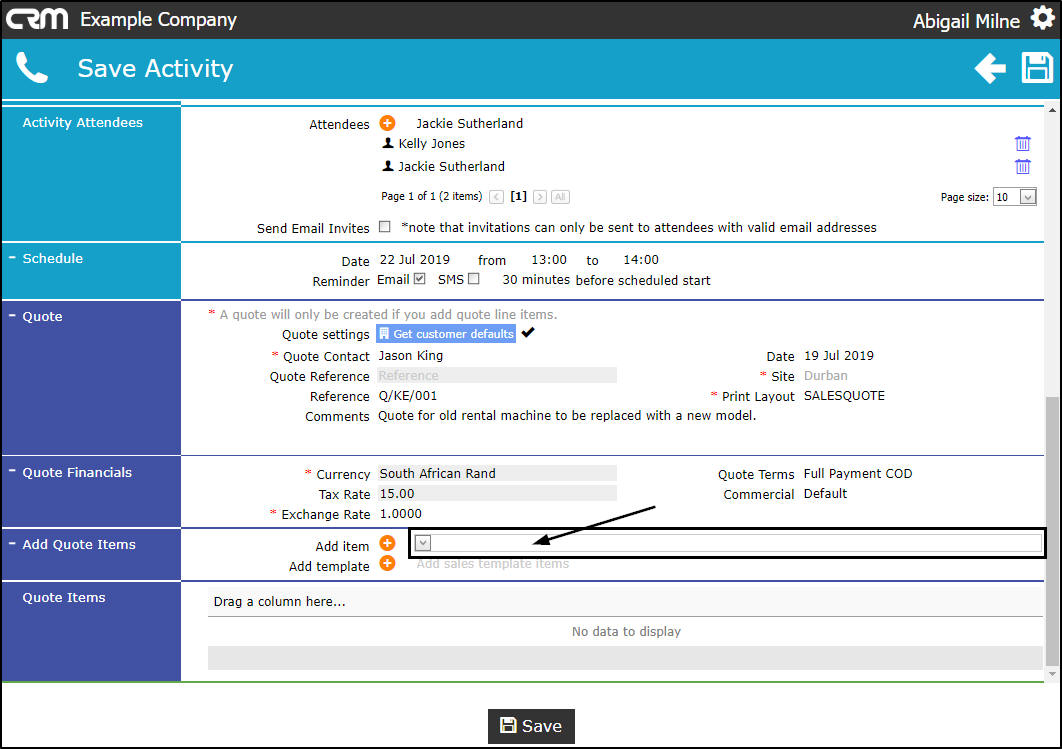
- As you start typing in the field, a Type, Code and Description list of all items on the system, will be displayed.
- The system will filter for the item that you are searching for.
- Select the applicable item from this list.
- The selected item code and description will populate the Add item field.
- Click on the plus[+] button.
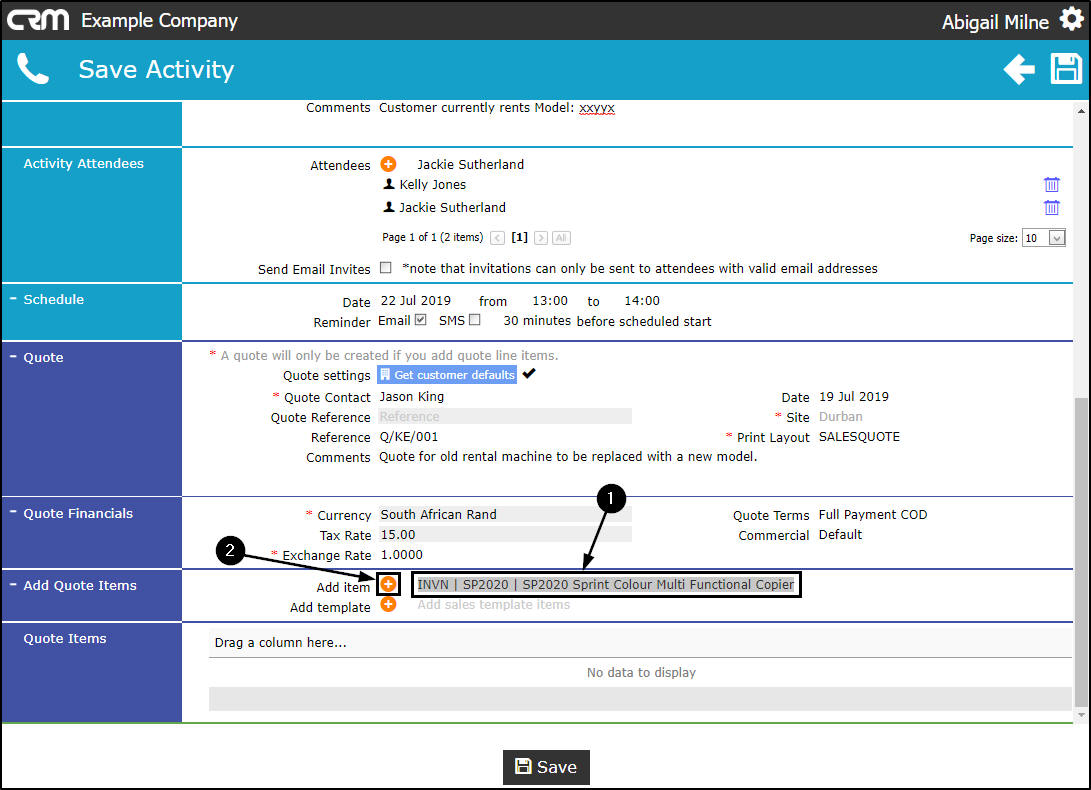
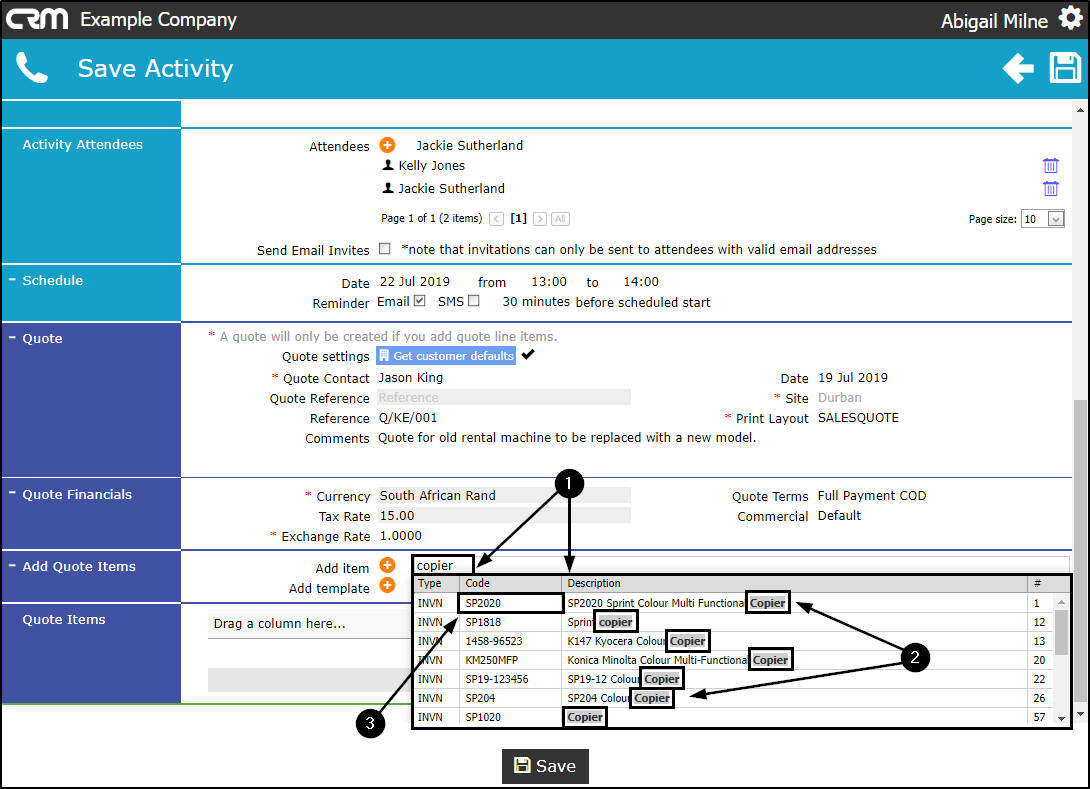
- The item will be added to the Quote Items frame.
- You will note that there are 2 action buttons linked to this item.
- An Edit button. This will enable you to edit the item details e.g. quantity, price, if required.
- A Delete button. This will enable you to delete the item from the quote, if required.
Edit Quote Item
- Click on the Edit button.

- An edit item frame will be displayed.
-
Here you can make changes to the following details:
- Item Description
- Item Quantity
- Item Unit Cost
- Item Price
- Click on the Apply Changes icon [ ] to save your changes or the the Cancel changes icon [x] to cancel the changes, as required.
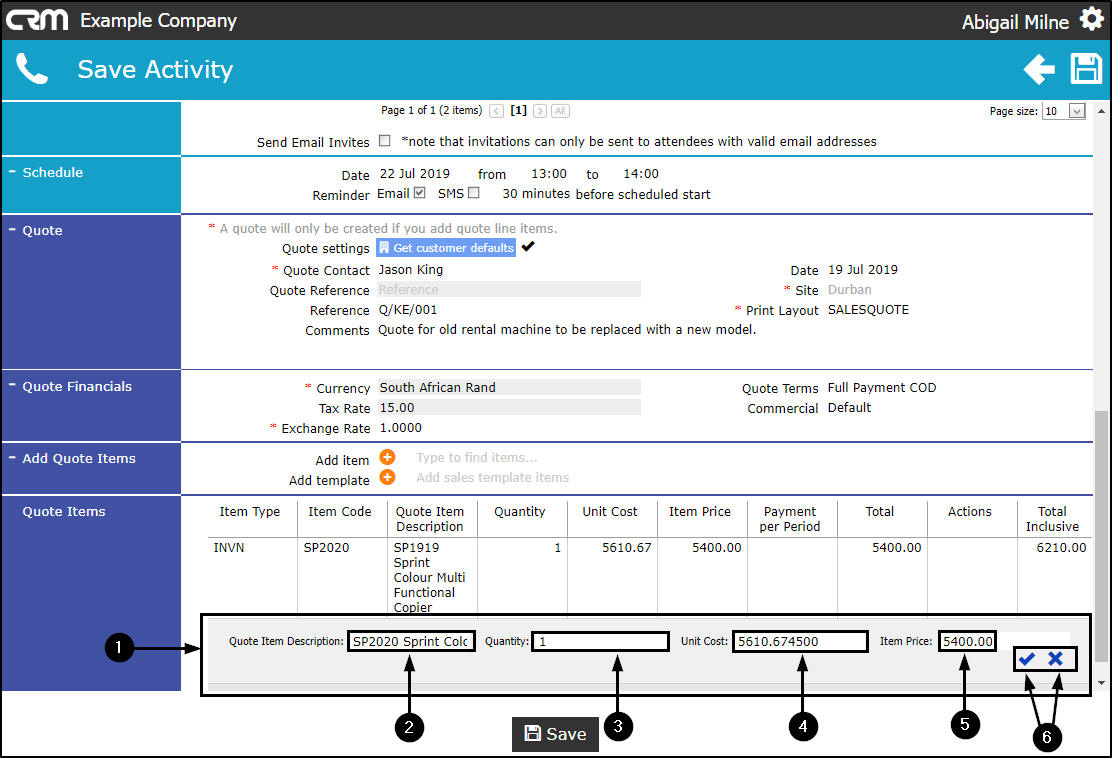
- In this example, the changes have been cancelled and the original item details remain.
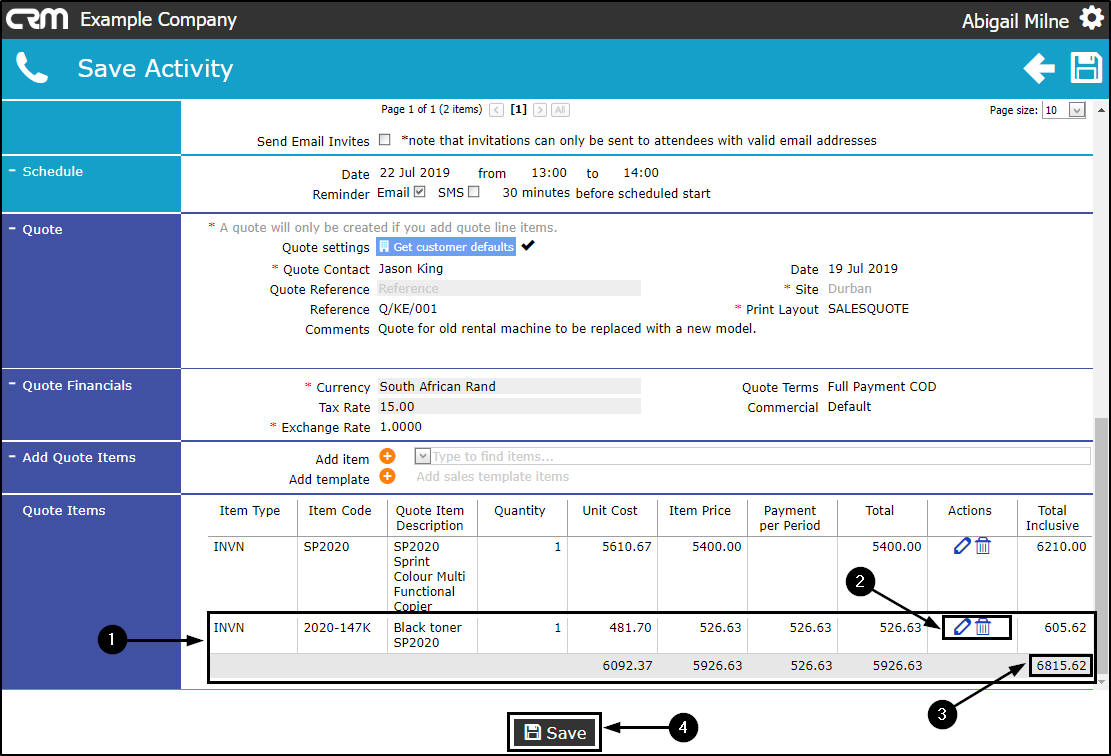
Link Additional Quote Items
- In the Add item field, start typing the code or description of the next item that you wish to add to the quote.
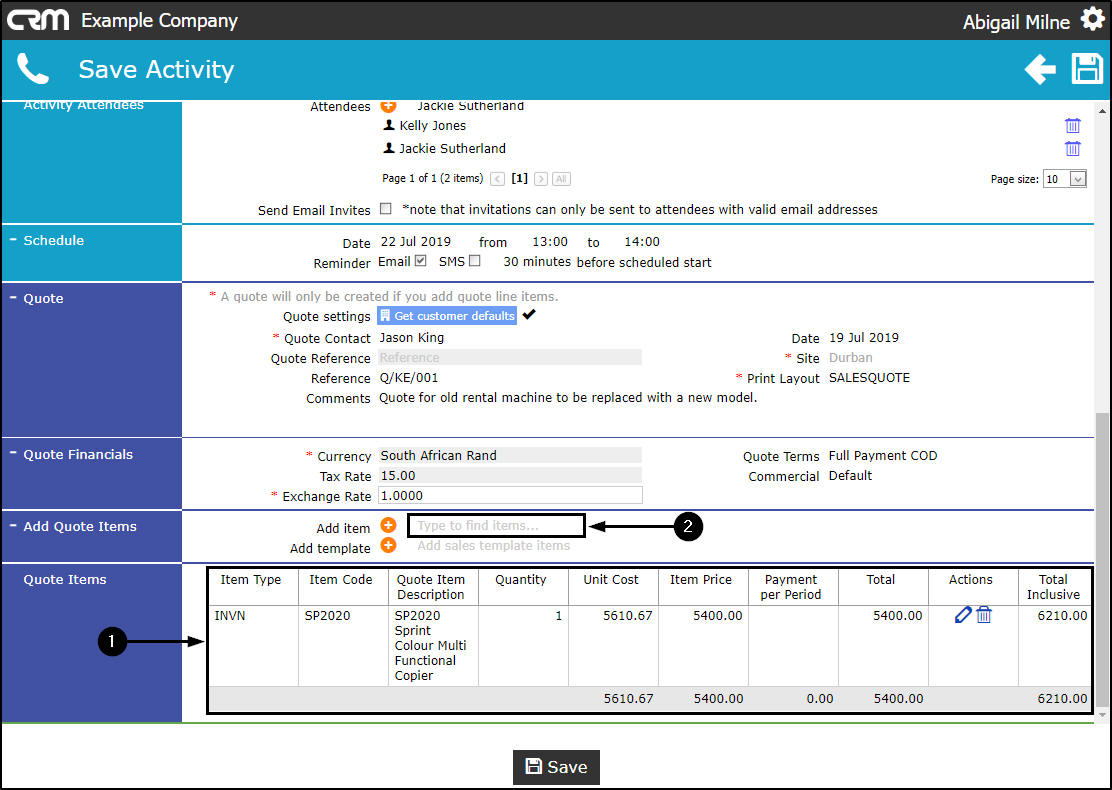
- As you start typing in the field, the Type, Code and Description list will again be displayed.
- The system will filter for the item that you are searching for.
- Select the applicable item from this list.
- The additional item code and description will populate the Add item field.
- Click on the plus [+] button.
- The additional item will be added to the Quote Items frame.
- Edit the details, if required.
- The quote Total Inclusive amount will update to include this item.
Save Activity
- When you have finished adding items to the Quote sections, click on Save.
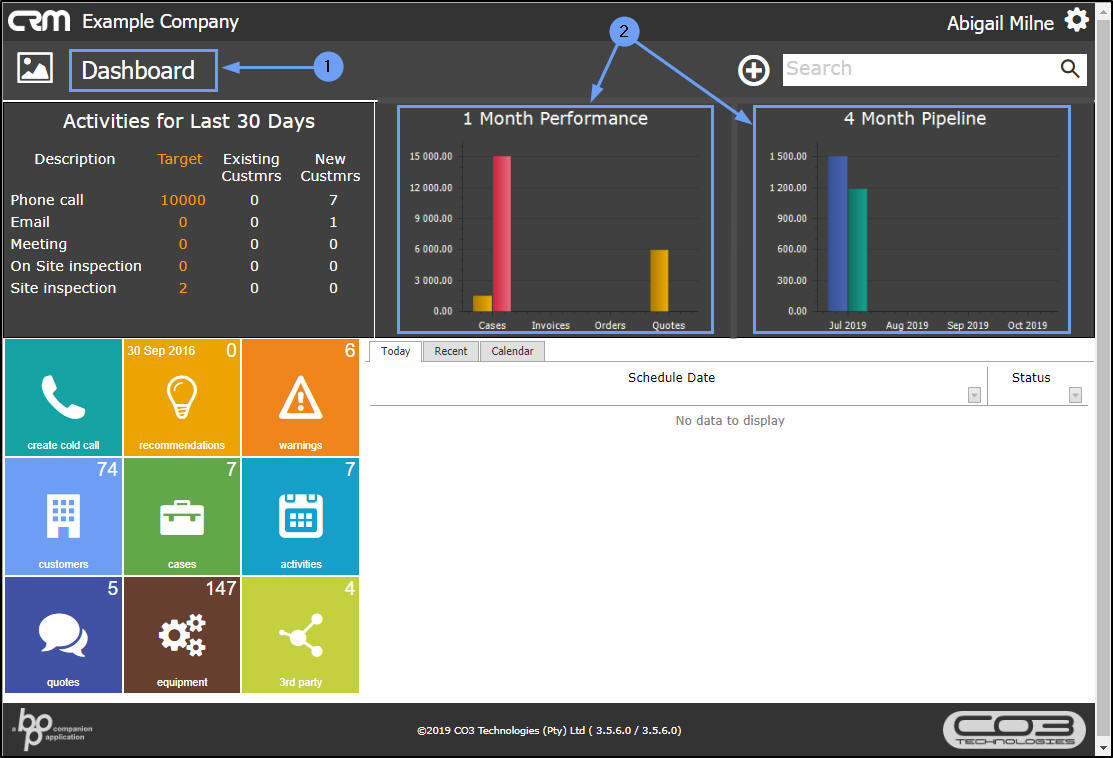
- You will return to the Homepage.
- The 1 Month Performance and 4 Month Pipeline graphs will update to include the new quote statistic.
CRM.000.006