We are currently updating our site; thank you for your patience.
Contract
Awaiting Contract
This screen displays items that have been processed but still need to be linked to a new or existing contract. The items displayed can be:
- A or B-class internal assets issued (New Deal Rental)
- A or B-class serialised stock invoiced and issued (New Deal Sale)
- A or B-class customer assets.
| Ribbon Access: Contract > Awaiting Contract |

The Items Awaiting Contract listing screen will be displayed.
Screen Overview
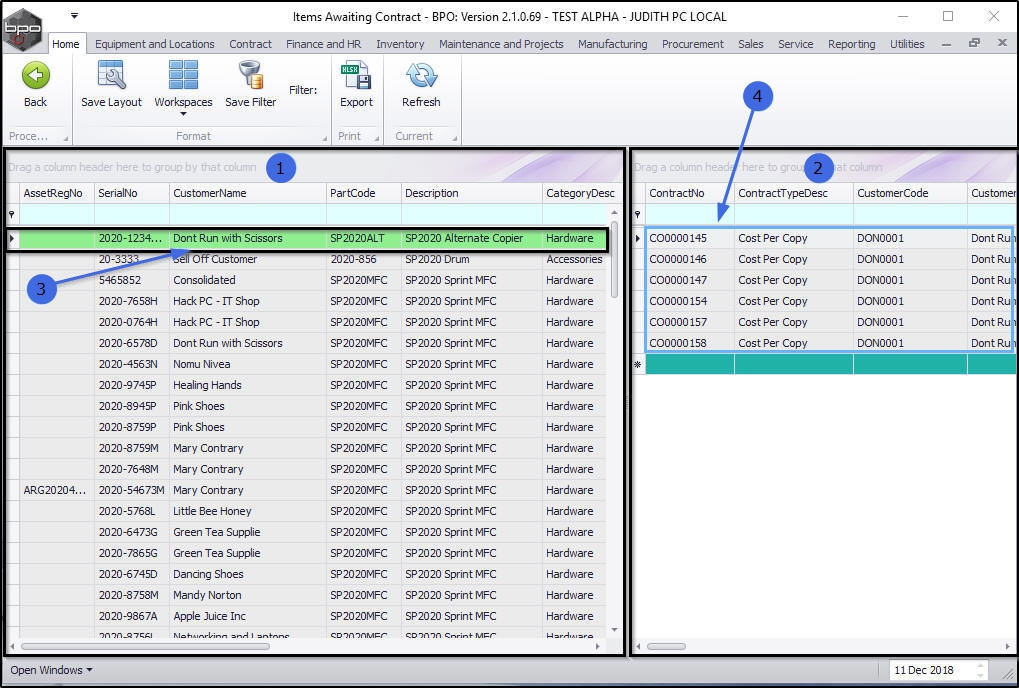
The screen is divided into 2 data grids.
- Data grid 1: displays all the items waiting to be allocated to a contract. These items can either be customer assets orinternal assets. For internal assets to be displayed, a New Deal Rental process has to be completed first.
- Data grid 2: displays all the existing contracts for the customer linked to the machine serial no. selected in data grid 1.
- For example in this image, a machine with serial no: 2020-12341IA linked to customer Don't Run with Scissors is selected in data grid 1,
- Therefore all contracts linked to customer Don't Run with Scissors are displayed in data grid 2.
- Note: Deleted or Closed contracts will not be displayed in this data grid.
Link Single Item to Existing Contract
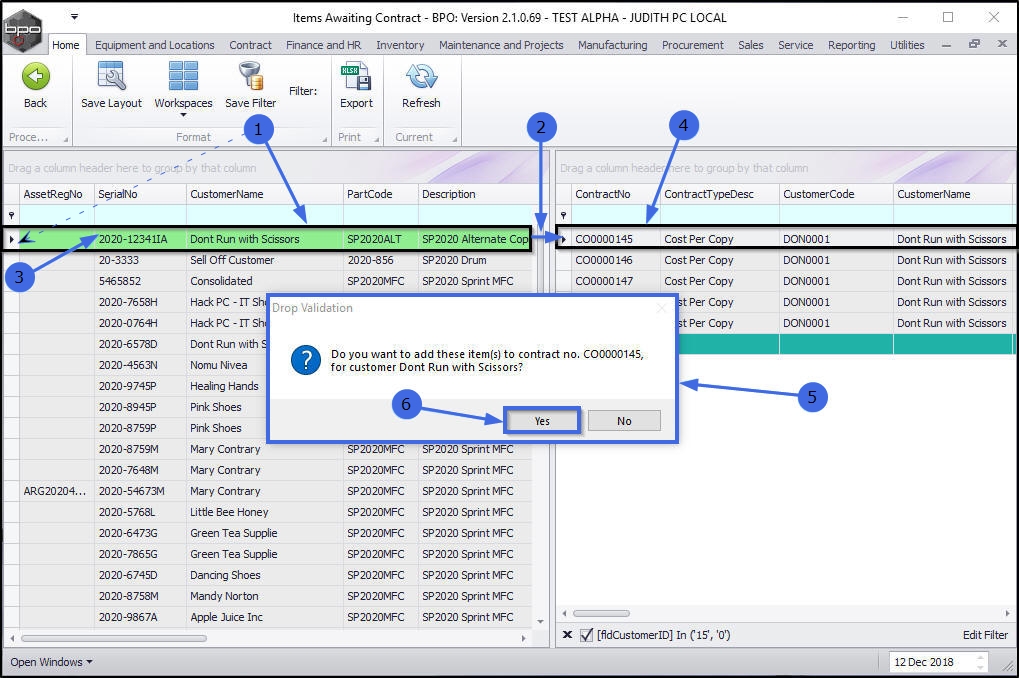
- Click and hold on the contract item in data grid 1.
- Note: You may need to click and hold from the row selector column in the row.
- Drag the contract item to an existing contract displayed in data grid 2.
- In this example, serial no. 2020-12341IA has been selected, and will be dragged and dropped onto
- Contract no. CO0000145.
- As it is 'dropped', a Drop Validation message box will pop up asking;
- Do you want to add these items(s) to contract no. [ ], for customer [ ]?
- Click on Yes.
The Maintenance for Contract No.: [ ] screen will open.
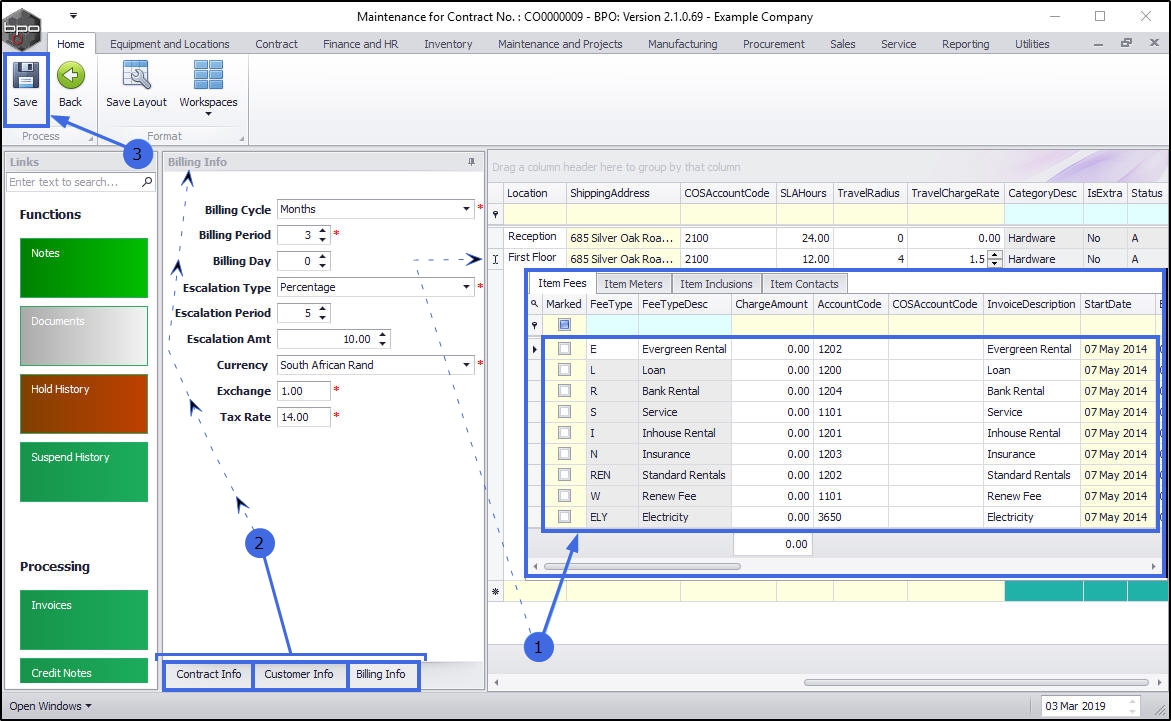
Add Items Details/Fees
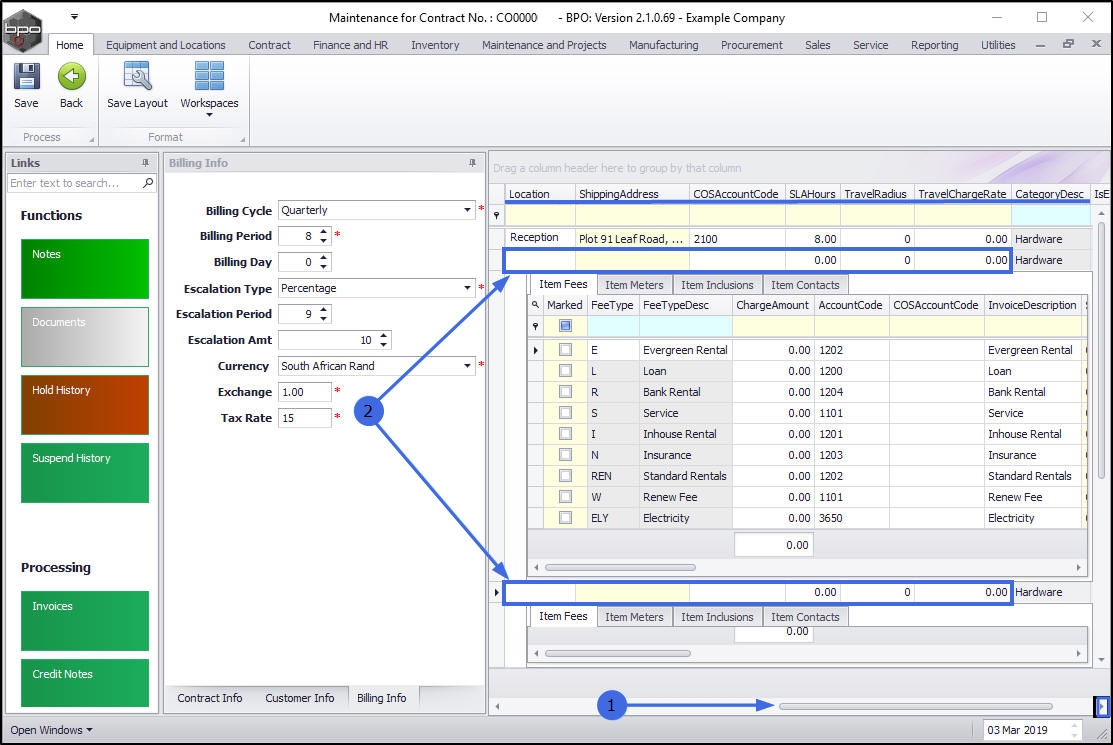
- The contract item you have added will be listed last in the Parts data grid.
- The Items frame sub grids - linked to this part - will be auto expanded and displayed, ready for adding information:
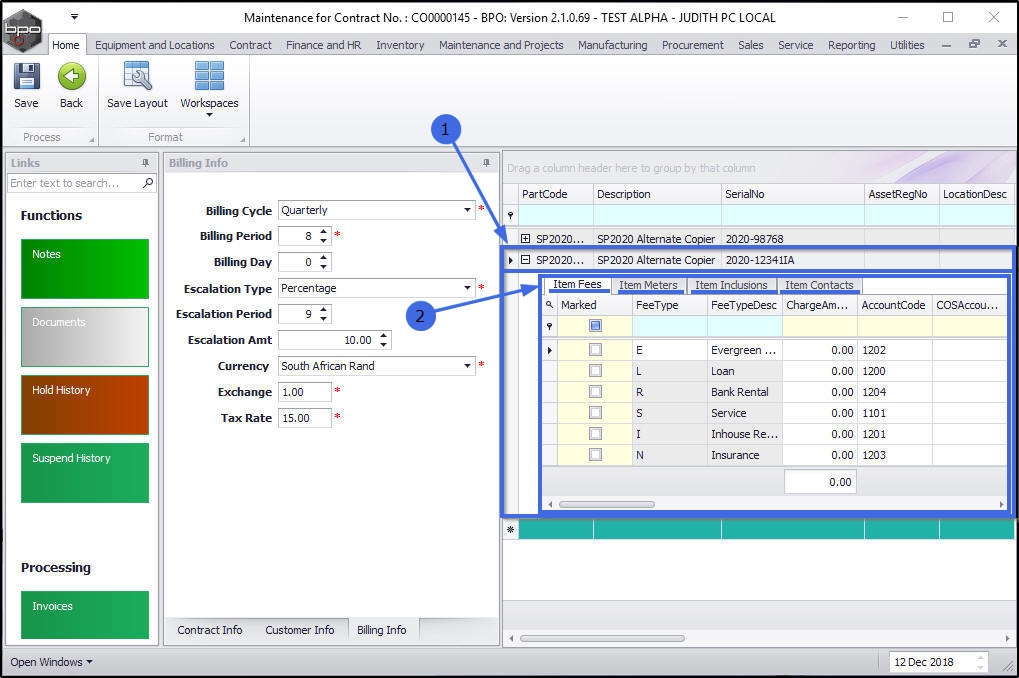
- Scroll right in the row of the contract item to view more information.
- You can update/edit the following fields:
- Link a Location
- Link a Shipping Address
- Link a COS Account Code
- Link a SLA Hours
- Link a Travel Radius
- Link a Travel Charge
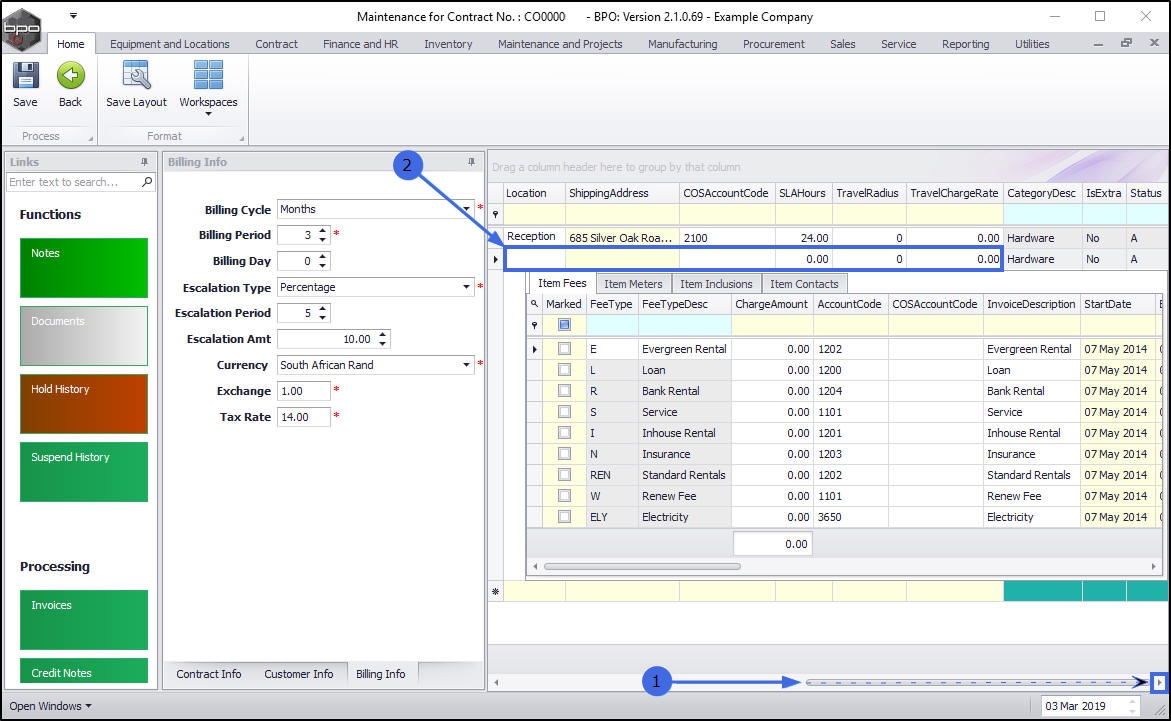
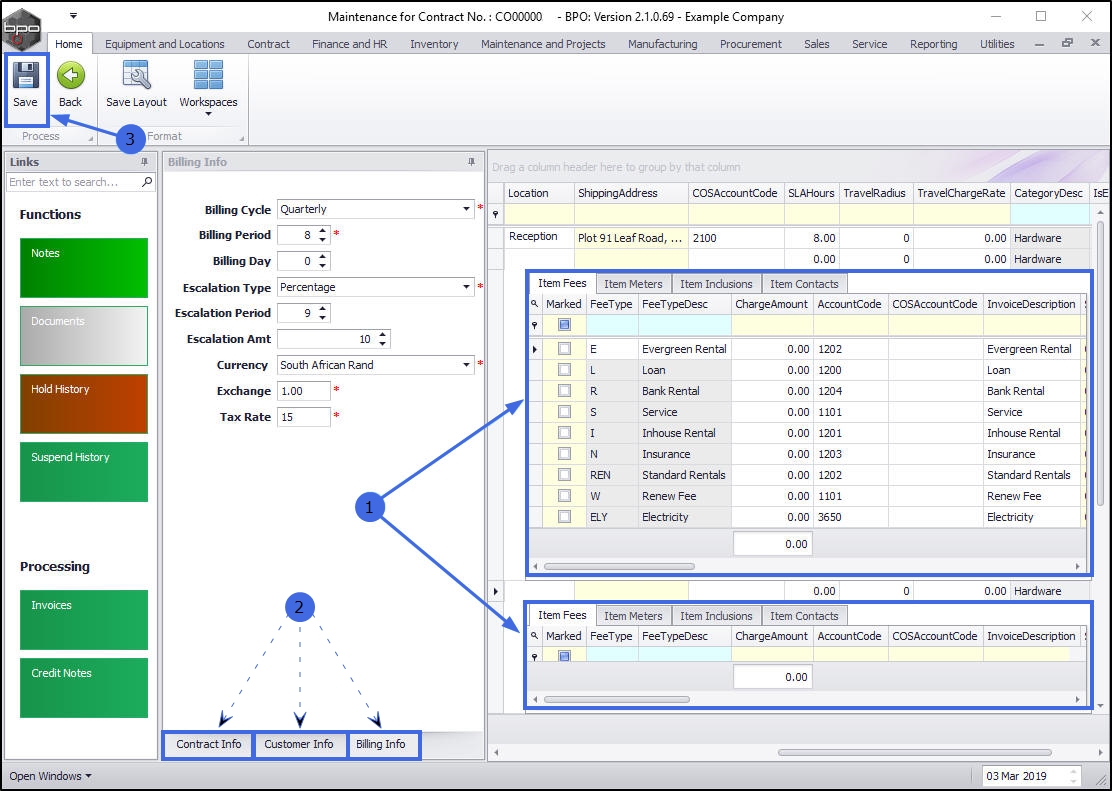
- When you have added the Contract Item and Item Fee information as required,
- You can move across to the Contract Information frames: Contract Info Panel, Customer Info Panel and Billing Info Panel. These can be left as is, unless a particular change has been requested and you are authorised to do so.
Save Single Linked Item
- Click on Save.
-
The linked item will be saved to the contract and you will return to the Items Awaiting Contract screen.
Link Multiple Items to Existing Contract
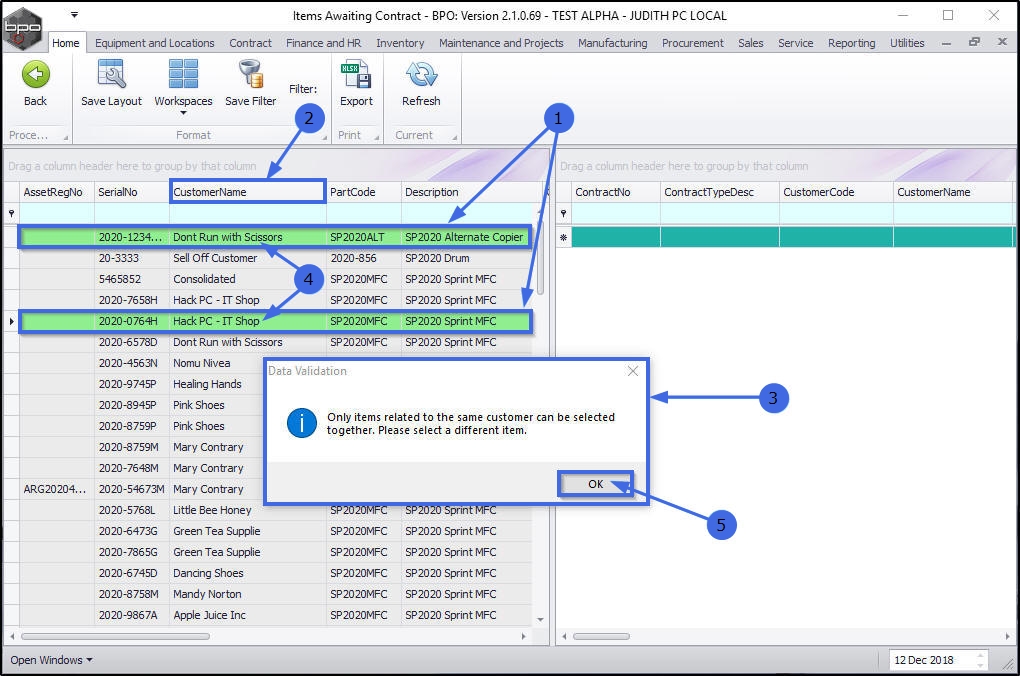
- In the Items Awaiting Contract screen, select the multiple items in data grid 1 that you wish to be linked to an existing contract.
- In order to be able to select more than one item on this data grid, press and hold Ctrl on the keyboard as you use your mouse to click on each item.
- Important Note: The items selected have to belong to the same customer.
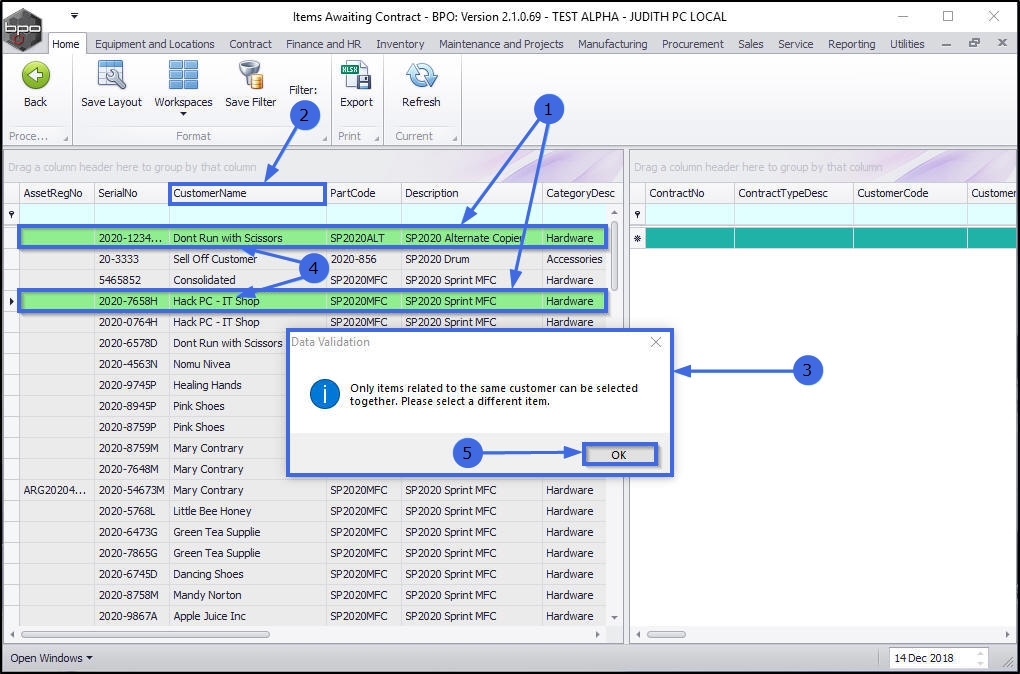
- If you select items belonging to different customers then a Data Validation message box will pop up advising you that;
- Only items related to the same customer can be selected together. Please select a different item.
- In this example an item linked to customer Don't Run with Scissors and another item linked to customer Hack PC - IT Shop have been incorrectly selected.
- Click on OK to clear the message and restart the selection.
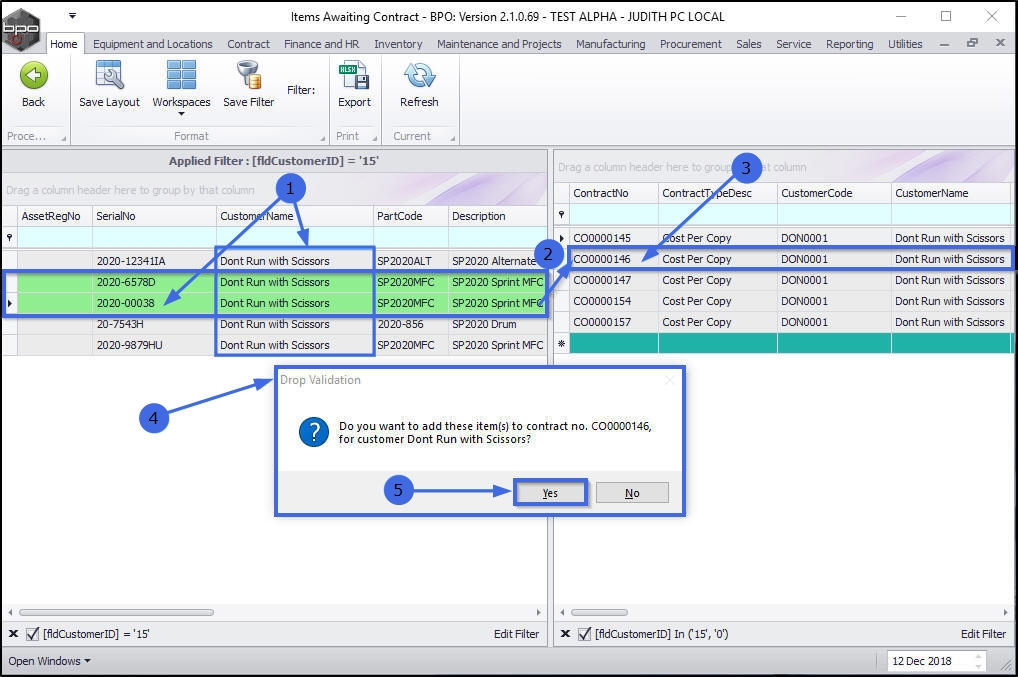
- Select all the contract items that you wish to link.
- Drag the items to an existing contract in data grid 2.
- In this image, serial no 2020-00038 and 2020-6578D have been selected, dragged and dropped on to contract no CO0000146.
- A Drop Validation message box will pop up asking;
- Do you want to add these items(s) to contract no. [ ] for customer [ ]
- Click on Yes.
The Maintenance for Contract No [ ] screen will be displayed.
Add Item Details/Fees
- The items you are adding to the contract will be listed last in the Parts data grid.
- The Items sub grids linked to these parts will be auto expanded and displayed ready for adding information:
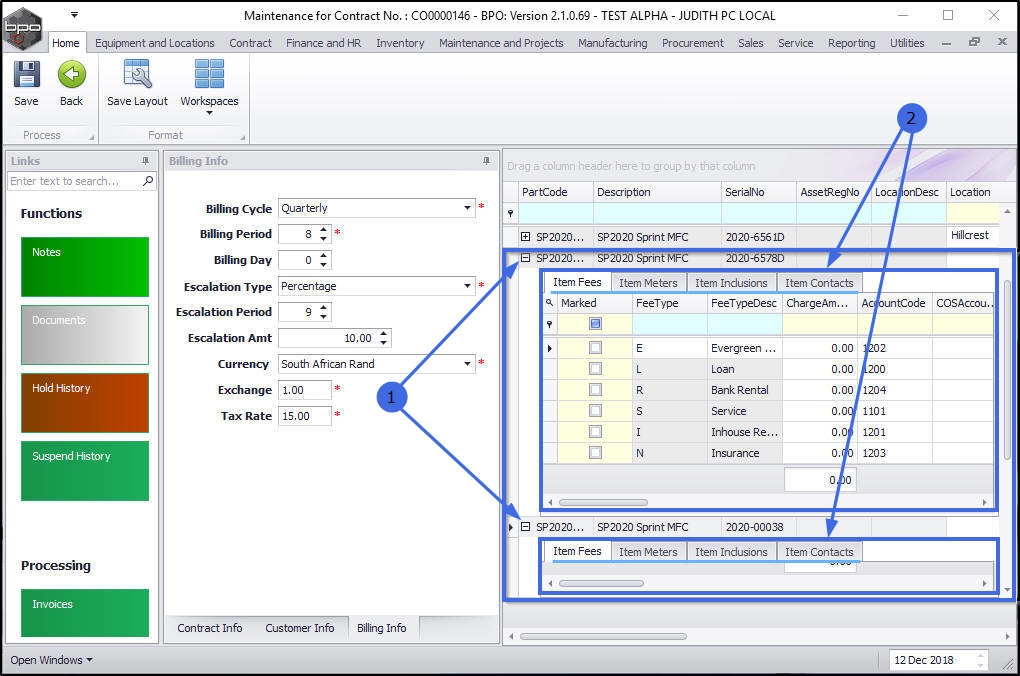
- Scroll right to view all the contract item information.
- You can update/edit the following fields:
- Link a Location
- Link a Shipping Address
- Link a COS Account Code
- Link a SLA Hours
- Link a Travel Radius
- Link a Travel Charge
- You can input relevant data for the Parts (Equipment Item) frame.
- Leave the Contract Info Panel, Customer Info Panel and Billing Info Panel as is.
Save Multiple Linked Items
- Click on Save.
Link Single Item to a New Contract
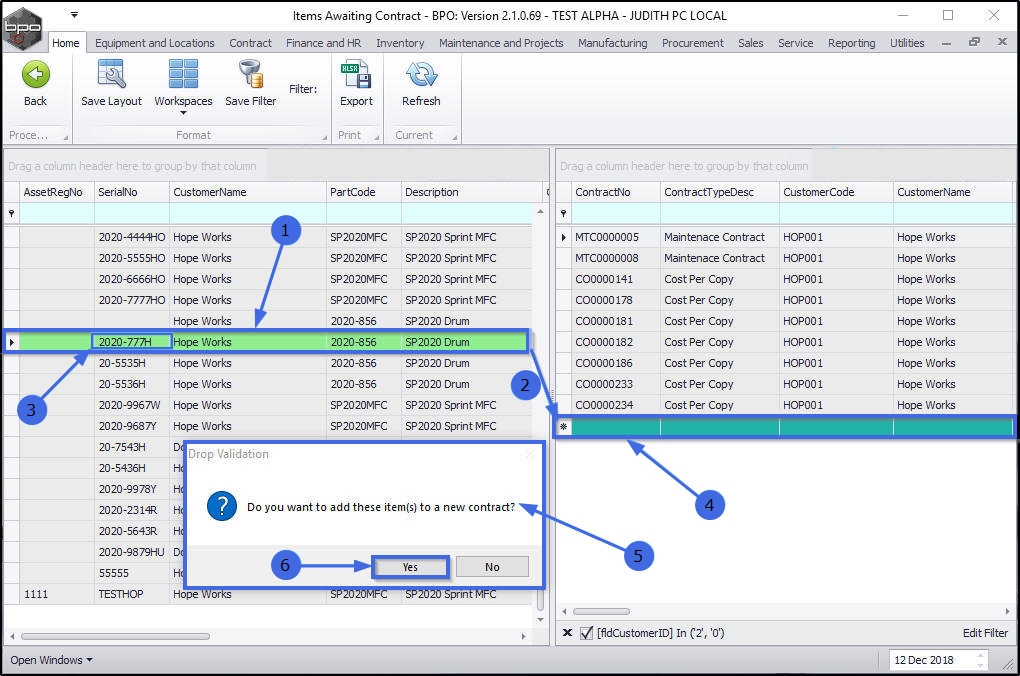
- In the Items Awaiting Contract screen, click on the single item in data grid 1 that you wish to add to a new contract
- Drag the item to the last, blank row in data grid 2. This row contains an asterisk in the row selector column.
- In this example, serial no 2020-777H has been selected, dragged and dropped to
- the final blank row in data grid 2 .
- A Drop Validation message box will pop up asking;
- Do you want to add these items(s) to a new contract?
- Click on Yes .
- The Select a contract type for the new contract screen will pop up.
- Click anywhere in the row of the contract type you wish to add.
- Click on OK.
- In this image, CPC - Cost Per Copy has been selected
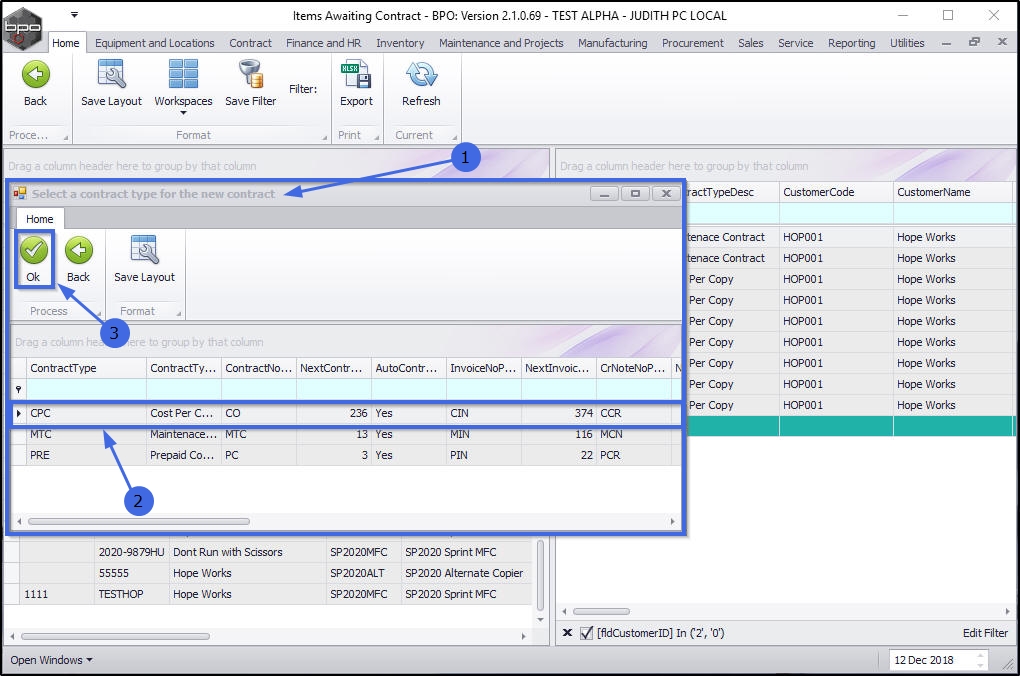
The Add a new contract screen will be displayed.
Add Item Details/Fees
- The item you are adding to the new contract will be listed in the Parts data grid.
- The Items sub grids linked to this part will be auto expanded and displayed ready for adding information:
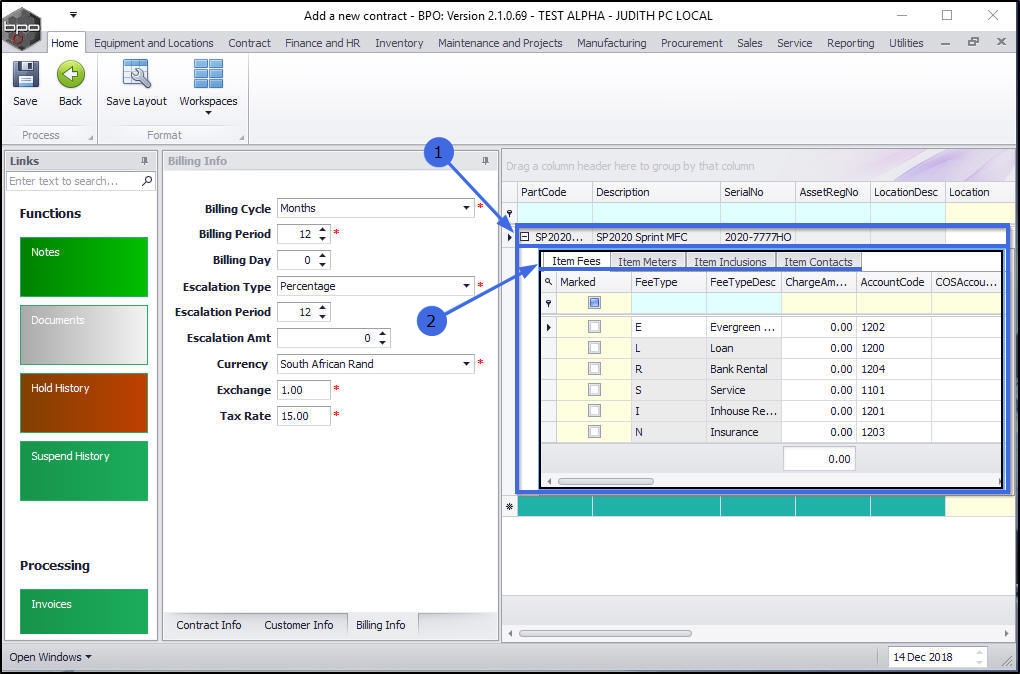
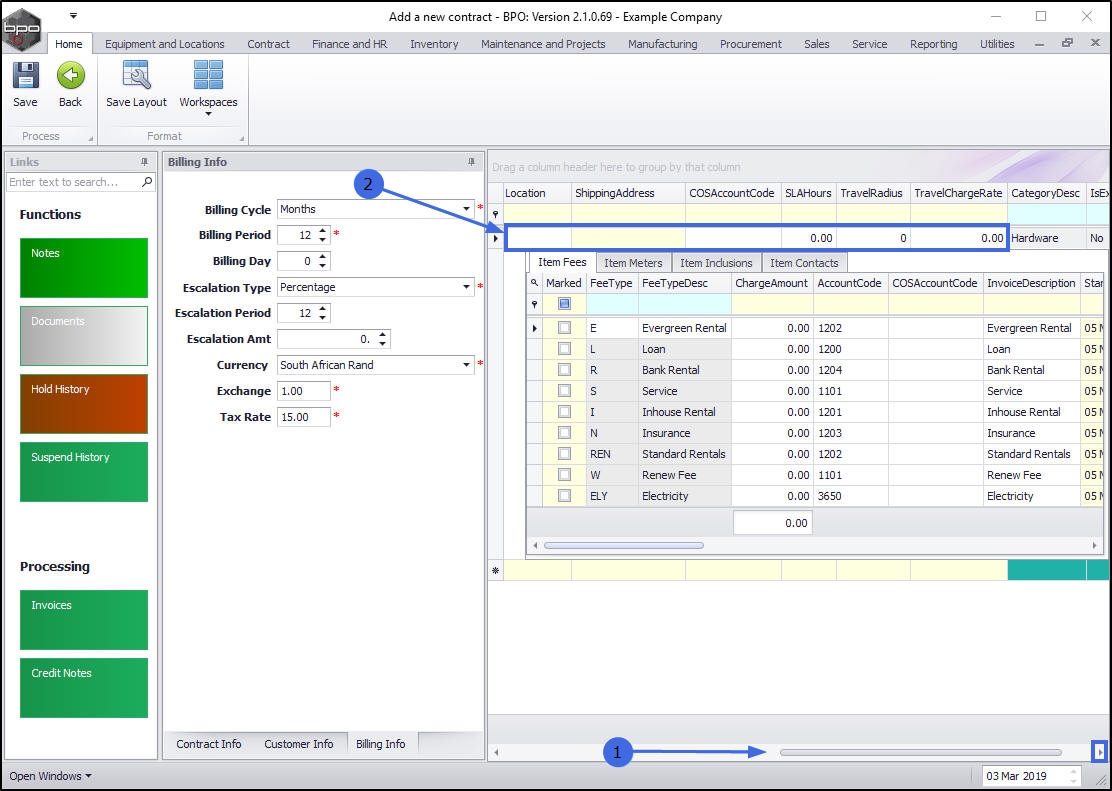
- Scroll right to view all the contract item information.
- You can update/edit the following fields:
- Link a Location
- Link a Shipping Address
- Link a COS Account Code
- Link a SLA Hours
- Link a Travel Radius
- Link a Travel Charge
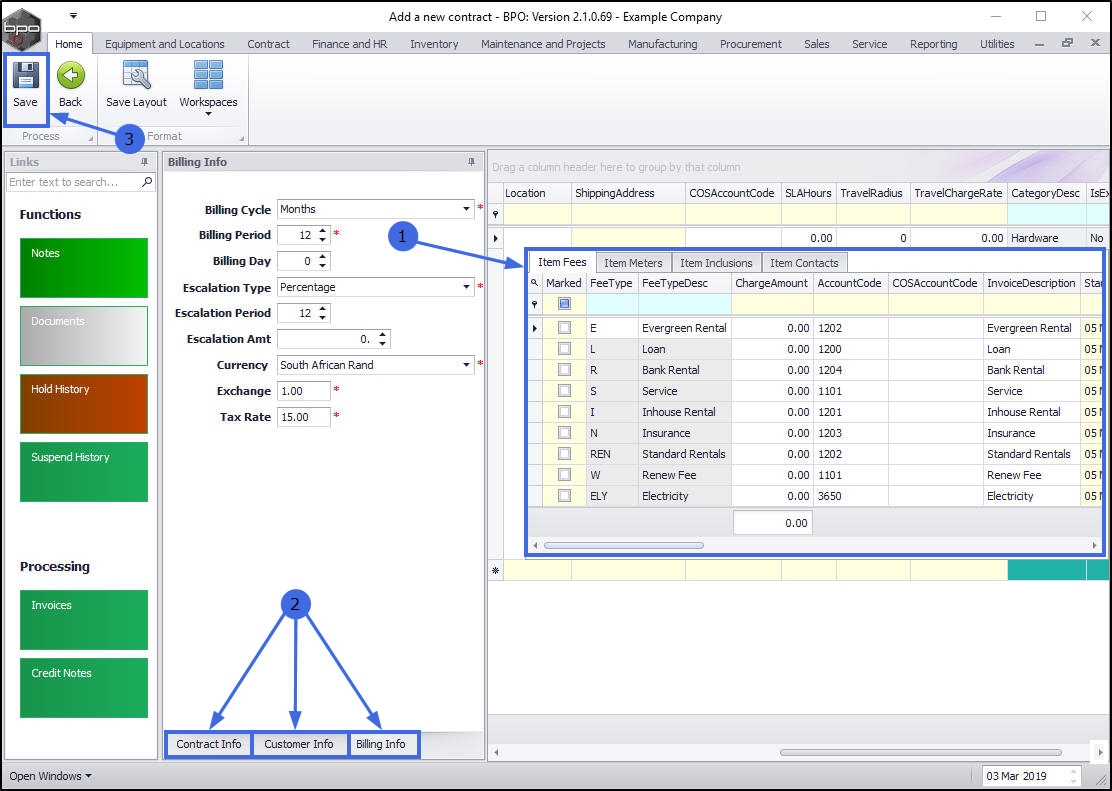
- You can input relevant data for the Part Item frame.
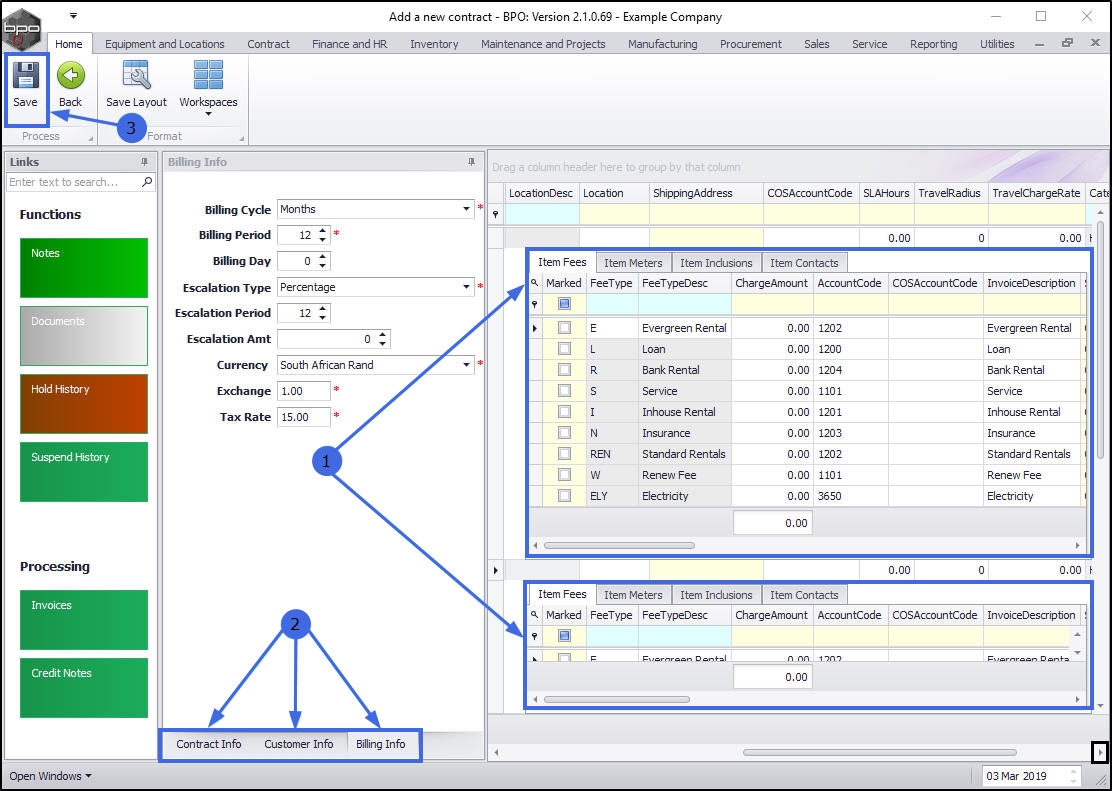
- Add the new contract details to the; Contract Info Panel, Customer Info Panel and Billing Info Panel panels.
Save Linked Item
- Click on Save.
- The item will be linked to the new contract and the contract details will be saved.
- You will return to the Items Awaiting Contract listing screen.
Link Multiple Items to a New Contract
- In the Items Awaiting Contract screen, select the multiple items in data grid 1 that you wish to link to a new contract.
- In order to be able to select more than one item on this data grid, press and hold Ctrl on the keyboard as you use your mouse to click on
each item.
- Important Note: The items selected have to belong to the same customer.
- If you select items belonging to different customers then a Data Validation message box will pop up advising you that;
- Only items related to the same customer can be selected together. Please select a different item.
- In this example an item linked to customer Don't Run with Scissors and another item linked to customer Hack PC - IT Shop have been incorrectly selected.
- Click on OK to clear the message and restart the selection.
- As you select the second item line linked to the same customer, the system will auto filter the item lines in data grid 1, to display only the items linked to that customer.
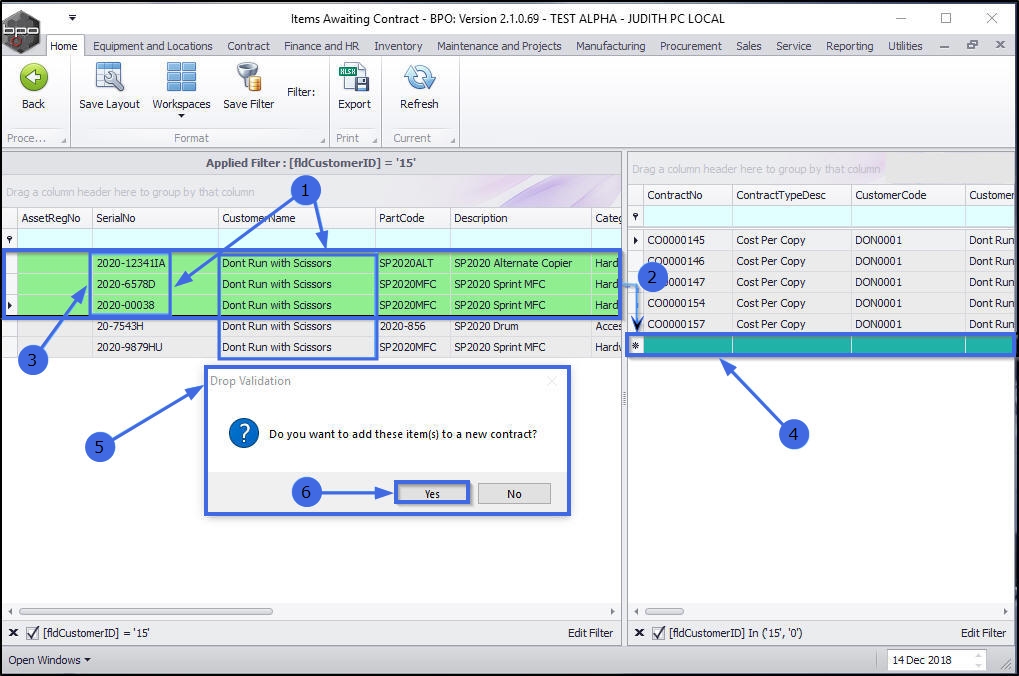
- Drag the items to the last, blank row in data grid 2. This row contains an asterisk in the row selector column.
- In this image, serial no's 2020-12341IA , 2020-6578D and 2020-00038 have been selected, dragged and dropped on to
- the final blank row in data grid 2 .
- A Drop Validation message box will pop up asking;
- Do you want to add these items(s) to a new contract?
- Click on Yes.
- The Select a contract type for the new contract screen will pop up.
- Click anywhere in the row of the contract type you wish to add.
- Click on OK.
- In this image, CPC - Cost Per Copy has been selected.
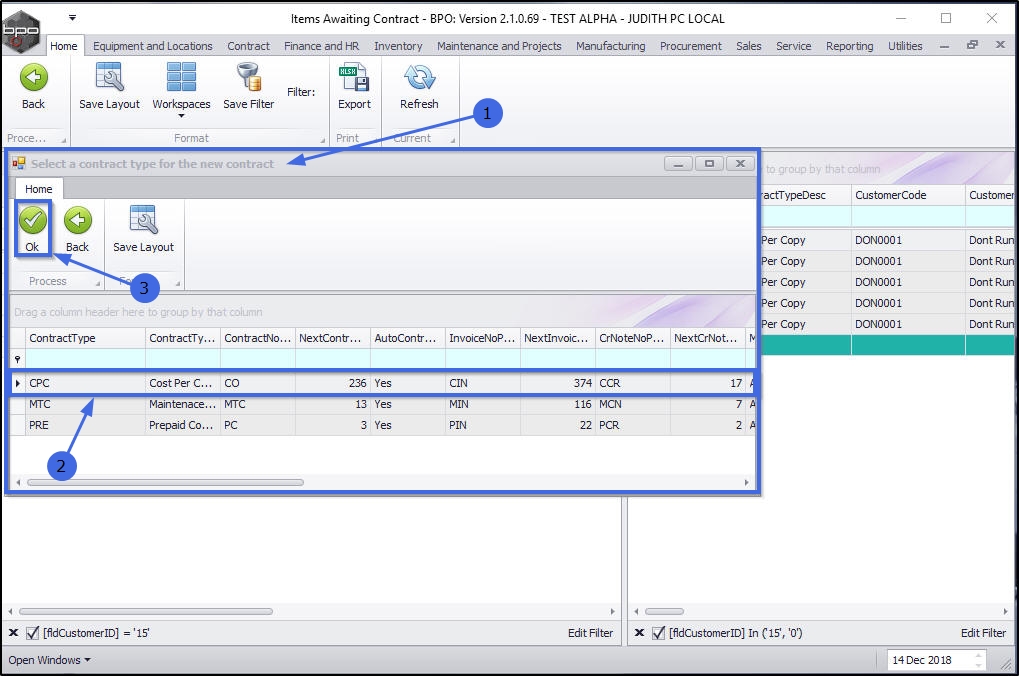
- The Add a new contract screen will be displayed.
- The items that you are adding to the new contract will be listed in the Parts data grid.
Add Item Details/Fees
- The Items sub grids linked to this part will be auto expanded and displayed ready for adding information:
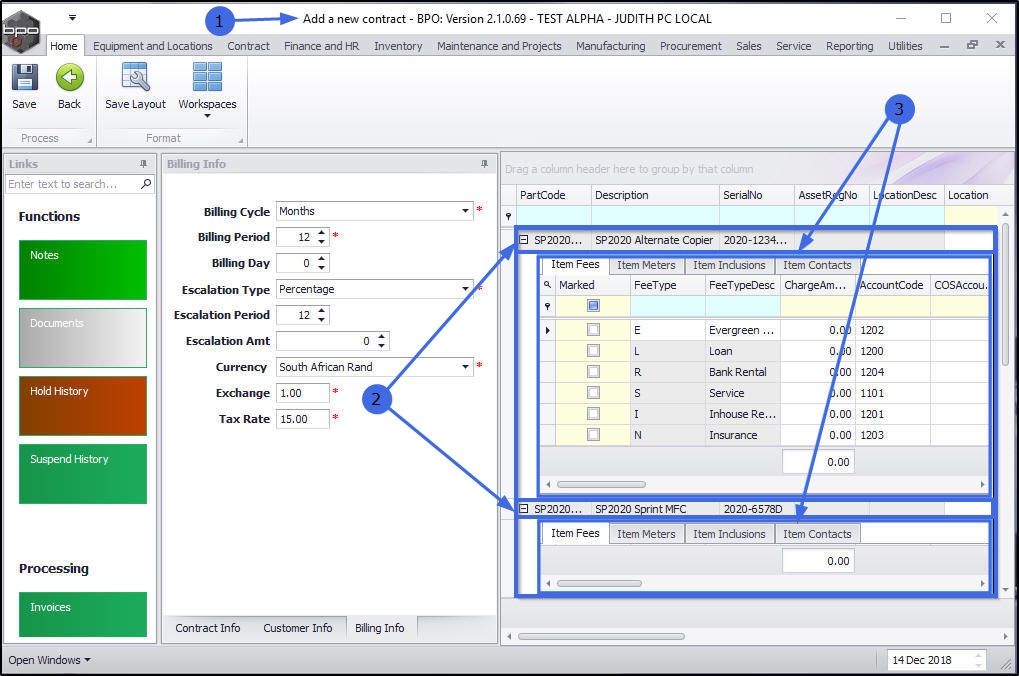
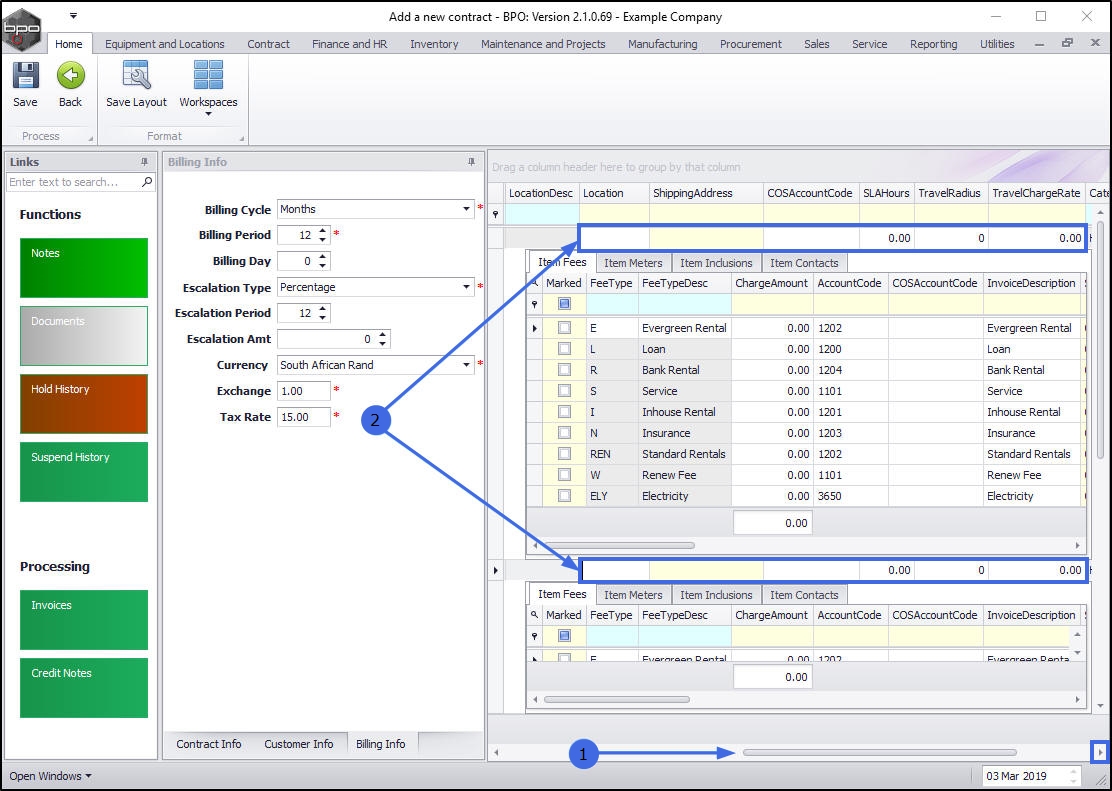
- Scroll right to view all the contract items information.
- You can update/edit the following fields:
- Link a Location
- Link a Shipping Address
- Link a COS Account Code
- Link a SLA Hours
- Link a Travel Radius
- Link a Travel Charge
- You can input relevant data for the Parts Item frames.
- Add the new contract details to the; Contract Info Panel, Customer Info Panel and Billing Info Panel panels.
Save Multiple Linked Items
- Click on Save.
- The items will be linked to the new contract and the contract details will be saved.
- You will return to the Items Awaiting Contract listing screen.
MNU.112.045