We are currently updating our site; thank you for your patience.
Sales
Customers - Equipment
The Equipment tile in the Customer Listing screen tile directs you to the Machine Listing screen for the selected customer. From here you can View, Add, Edit and Delete the serialised equipment items (machines) that are linked to the Customer.
A Customer Asset should only be added in this manner when a customer brings in a machine, for service or repair, that was bought elsewhere and would therefore be a Customer Owned Asset. Refer to Introduction to Assets.
For the purpose of this process, we will navigate from the Customer Listing screen. A customer asset can also be added from the Asset Listing screen. Refer to Add Customer Asset
A customer may have customer assets and internal assets linked.
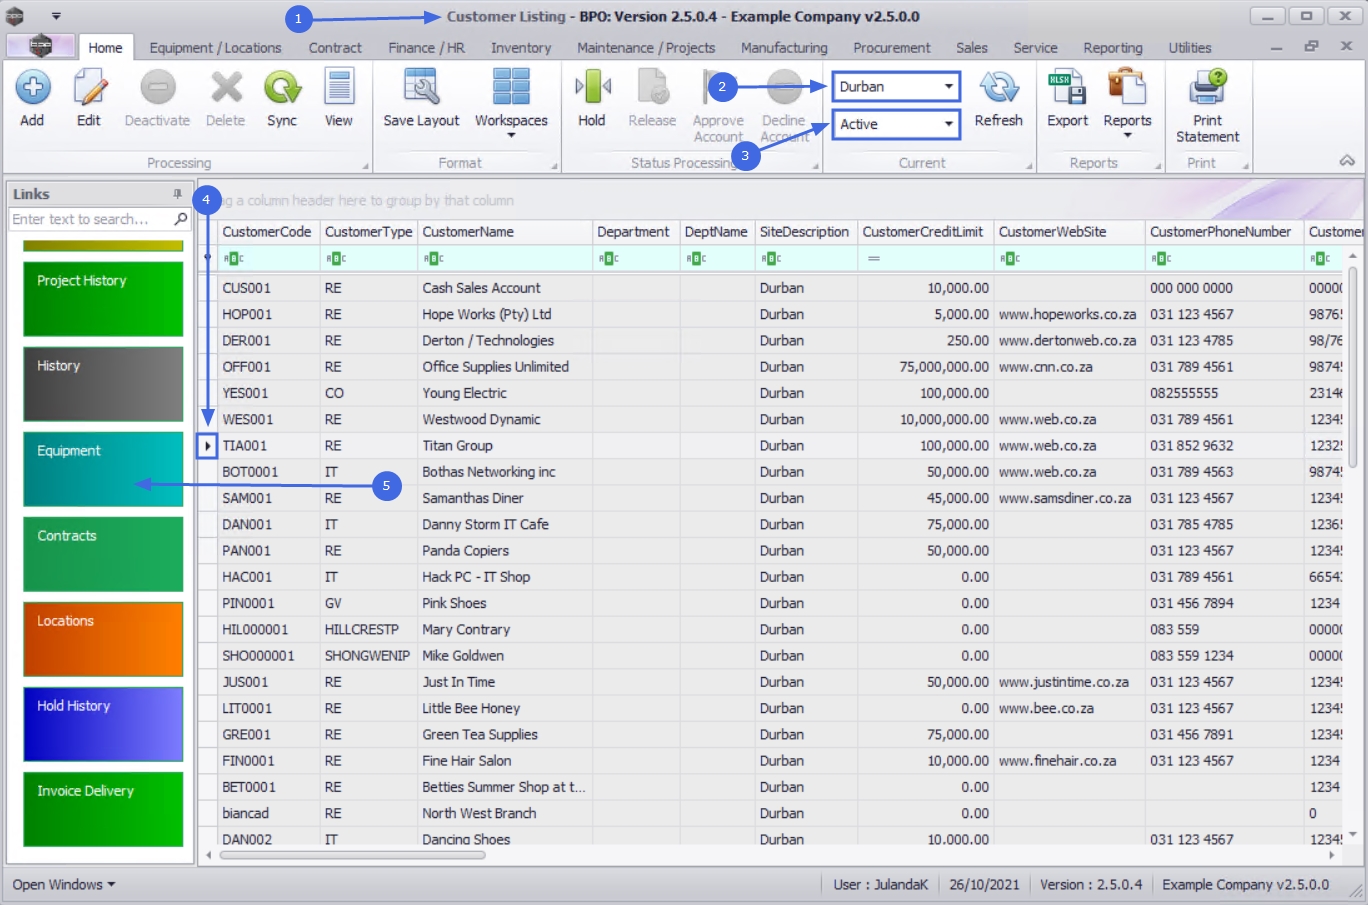
| Ribbon Access: Sales > Customers |

- The Customer Listing screen will be displayed.
- Select the Site where the customer can be located.
- The example has Durban selected.
- Select the Status for the customer.
- The example has Active selected.
- Select the row of the customer where you wish to link a customer-owned asset / machine.
- Click on the Equipment tile.
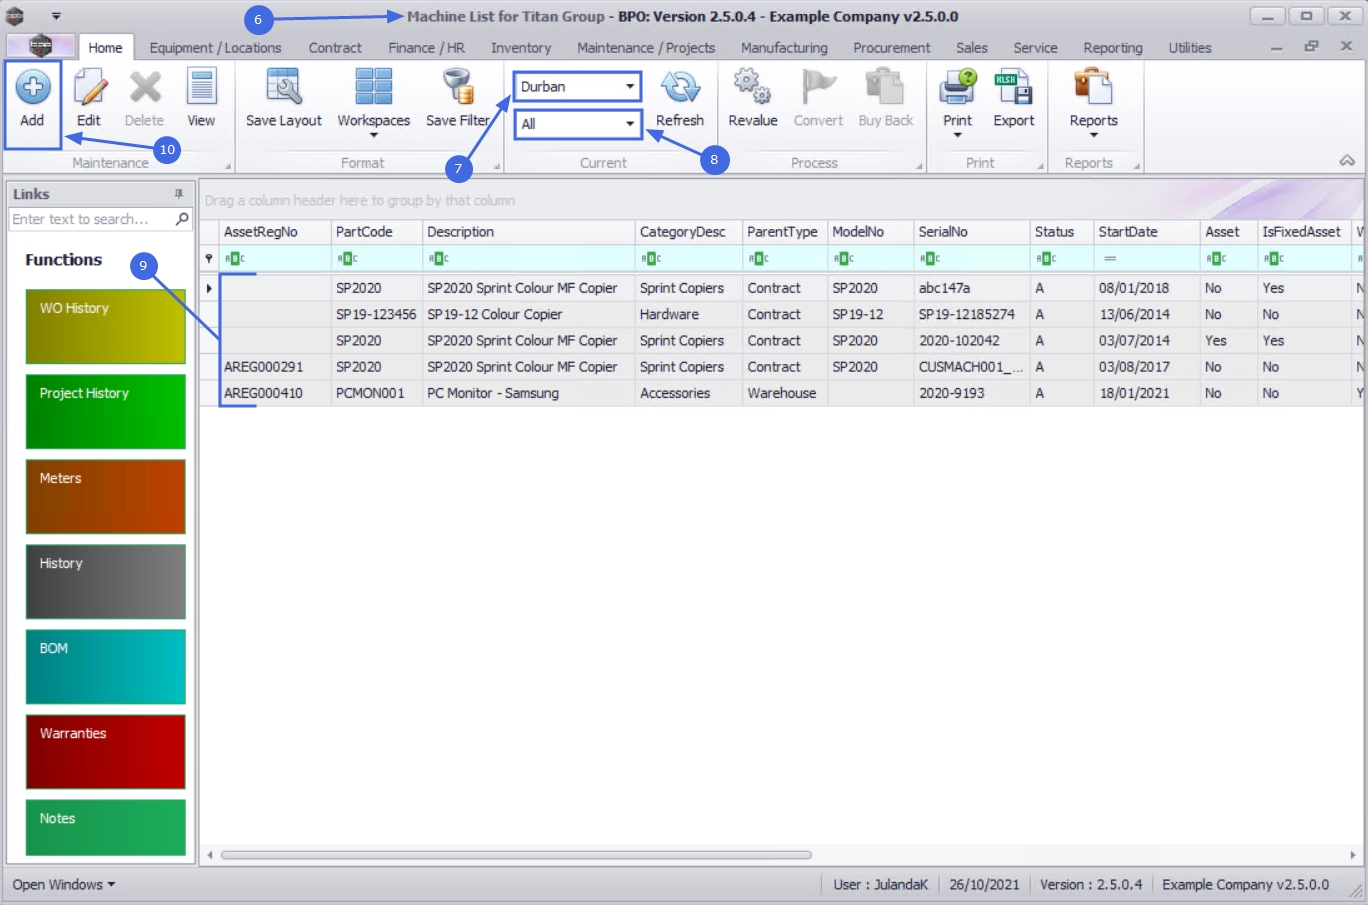
- The Machine List for [customer name] screen will be displayed.
- You can change the Site if the selected Customer has multiple sites.
- The Status will default to All. Click on the down arrow to display the drop-down menu to refine the Equipment list for the Customer.
- A - All
- C - Client Machines
- I - Internal Assets
- S - Serialised Stock
- A list of all the Assets that have already been linked to the customer will be listed on this screen.
Add Customer Asset
- Click on Add.
![]() Short cut key: Right click to display the All groups menu list. Click on Add.
Short cut key: Right click to display the All groups menu list. Click on Add.
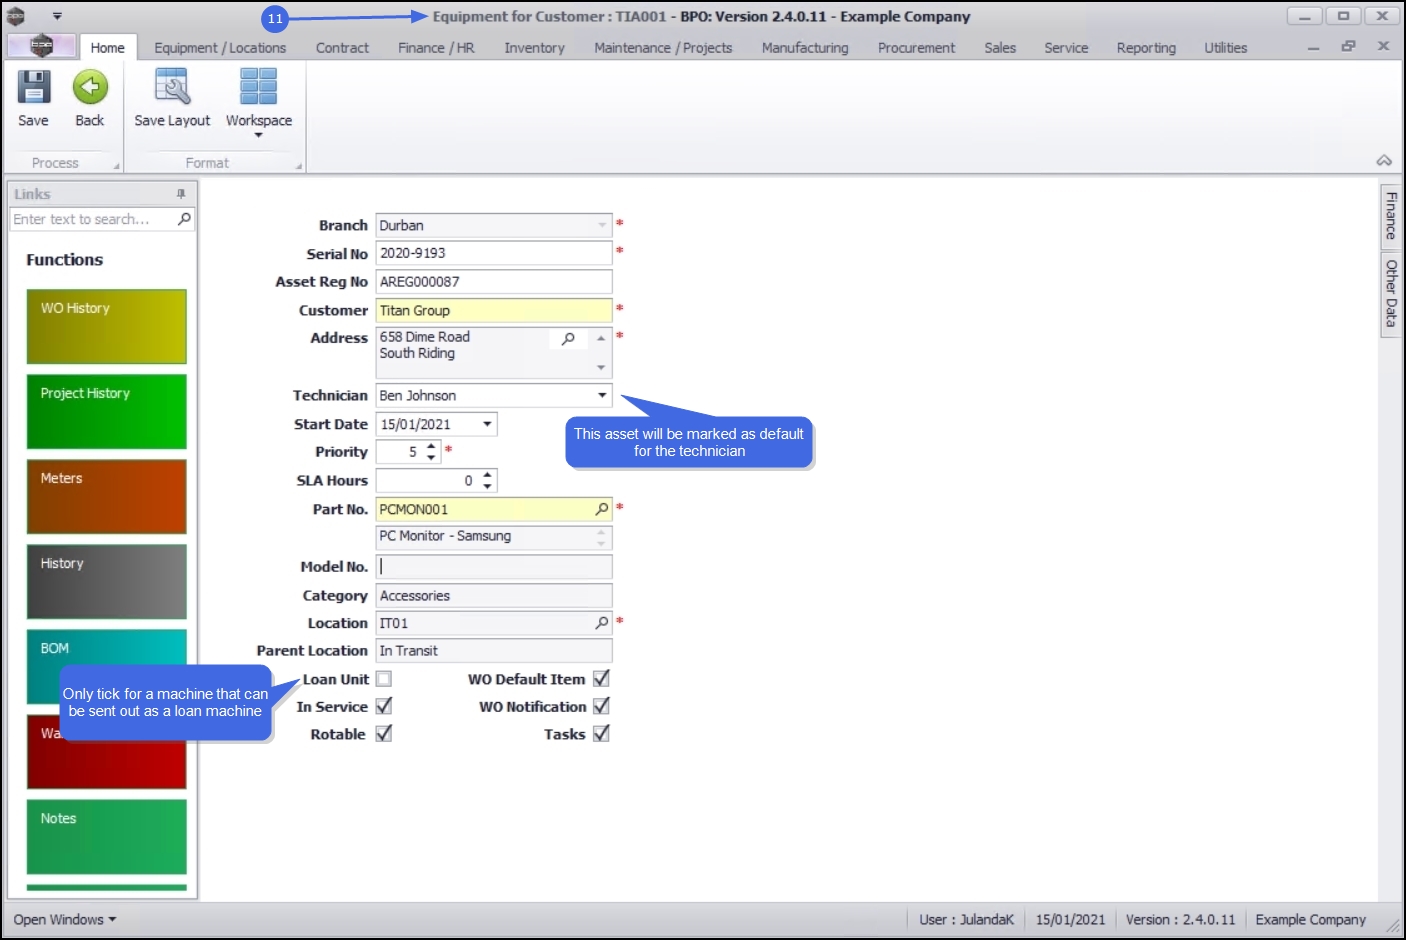
- The Equipment for Customer : [customer code] screen will display.
Customer Asset Details
- Branch: This field will auto populate with the site you have selected from the Customer Listing screen.
- Serial No: Click in the field to type in the customer asset/machine serial number.
- Asset Reg No: Not applicable, as this is a customer asset/machine.
- Customer: This field will auto populate with the customer you have selected from the Customer Listing screen.
- Address: Click on the search button to display the Select and address for this machine screen. Select and add the address where this machine will be located.
A new company config flag (AutoUpdateShippingAddress) is available in BPO2 v2.5.0.8 (or higher) / Nucleus Service to control automated shipping address updates in the system between contract items and equipment shipping addresses/ functional location shipping address and ensures the shipping address correlates to contract items shipping address. When you update the shipping address on a contract the shipping address will reflect on the asset or functional location. If the user updates the asset or functional location’s shipping address, the shipping address will reflect on the contract item.
- Technician: Click on the down arrow to link a technician to this asset.
 Note that this asset will be marked as Is Default in the employee look-up when assigning a technician.
 - Start Date: This field will auto populate with the current date.
- Type in or click on the down arrow to use the calendar function to select and alternative date.
- Priority: Select the work order priority level for a service or repair on this asset.
- SLA Hours: Select the Service Level Agreement response time to a call logged (in hours).
- Part No and Description: Click on the search button to display the Select a parts to configure the supply info screen. Select and add the part number for the asset.
- Model No: This field will auto populate, depending on the asset you have selected, or type in the model number for the Asset.
- Category: This field will display the category of the Asset e.g. Hardware, Accessories.
- Location: Click on the search button to select the designated Customer Asset Warehouse and Bin.
- Parent Location: This will auto populate with the location you have selected.
- Loan Unit: Do not tick this check box for a customer asset.
- This field is only ticked if this is a loan machine to be issued and sent out to a customer whilst their machine is being repaired.
- In Service: Tick this check box if the Asset falls within a Service plan and needs to be periodically serviced, similar to a vehicle having a service plan.
- Rotable
 A servicing method in which an already-repaired equipment is exchanged for a failed quipment item, which in turn is repaired and kept for another exchange:
Select this check box to indicate whether this asset is included in a rotable service plan.
A servicing method in which an already-repaired equipment is exchanged for a failed quipment item, which in turn is repaired and kept for another exchange:
Select this check box to indicate whether this asset is included in a rotable service plan. - WO Default Item: If this option is set in the company configuration, one machine per customer needs to be marked as the default. The default machine will pull through automatically when a customer is selected on a new call.
- WO Notification: Select this check box to indicate whether this machine is linked to up an automated / scheduled task set up. A work order notification will be sent out when the machine is due to be serviced.
- Tasks: Tick this check box if a task need to be issued for this machine. This function is linked to the Maintenance / Projects. Refer to Introduction to Tasks.
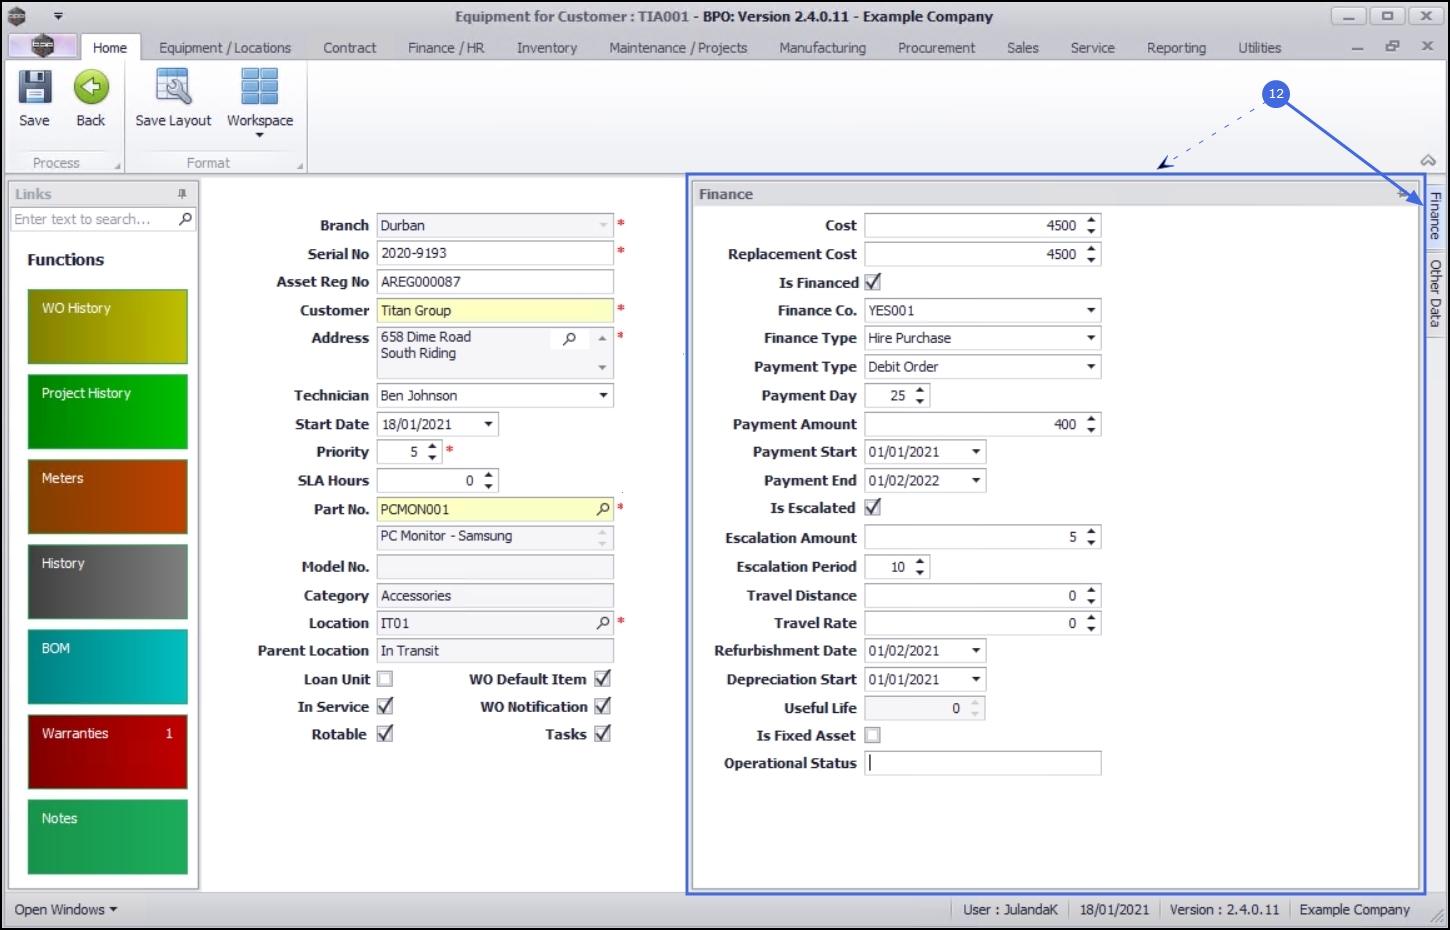
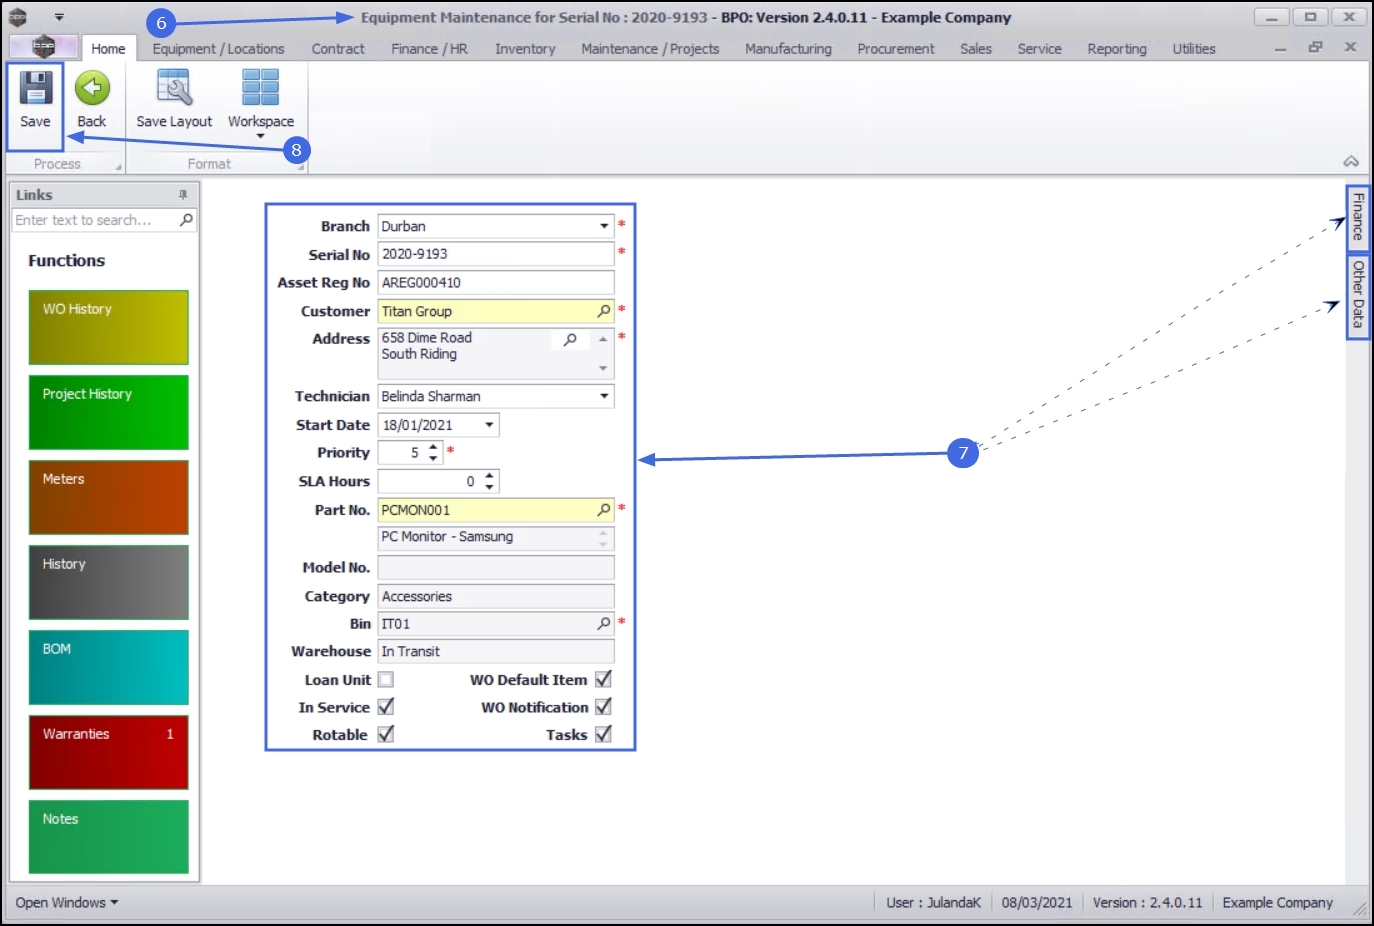
Finance Frame
- Click on the Finance tab to display the Finance details frame. Complete the finance details, if applicable.
- Cost: Type in or use the arrow indicators to enter the cost of the customer machine.
- Replacement Cost: Type in or use the arrow indicators to enter the replacement cost of the customer machine.
- Is Financed: Click on this check box if this customer machine is financed.
- Finance Co: Click on the down arrow to select the finance company that is supplying finance for this machine if it is financed.
- Finance Type: Click on the down arrow to select the finance type, for example Hire Purchase, Lease Agreement, Rental Agreement, etc.
- Payment Type: Click on the down arrow to select the payment type, for example Debit Order, Cheque Payment, Bank Transfer, etc.
- Payment Day: Type in or use the arrow indicators to enter the day of the month that this payment will be made.
- Payment Amount: Either type in or use the arrow indicators to enter the payment amount that is to be paid monthly.
- Payment Start: Type in or click on the down arrow to select the payment start date using the calendar function.
- Payment End: Type in or click on the down arrow to select the payment end date using the calendar function.
- Is Escalated: Click on the check box if this payment amount is to be escalated after a period of time.
- Escalation Amount: Type in or use the arrow indicators to enter the escalation amount.
- Escalation Period: Type in or use the arrow indicators to enter the period after which this payment amount will be escalated.
- Travel Distance: Type in or use the arrow indicators to enter the total travel distance in kilometres, if you would like the system to include the travel on all call invoices raised for the asset.
- Travel Rate: Type in or use the arrow indicators to enter the travel rate if using Travel Distance.
- Refurbishment Date: This date will default to the current date. Type in or click on the down arrow to set the date at which this item should be due for refurbishment, using the calendar function.
- Depreciation Start: This date will default to the current date. Type in or click on the down arrow to set the date from which this item will start depreciating.
- Useful Life The estimated life span of a depreciable item - how many years it is likely to remain in service. This is important from an accounting perspective, where the usefulness of a machine is calculated before it gets written off:
This field is not required when adding a customer asset.
- Type in the number of months that the item will be in condition before it is considered a write off. This field is affected by depreciation, if it is enabled.
- Is Fixed Asset: Do not tick this check box for a customer asset.
- Operational Status: Click in the text box to add information or comments related to the machine, for example, machine passed Useful Life, or may be stripped for parts, or may still be useful for short term loan out. This function provides information about the suitability of the item for operation. Type in whether the item is operational or not and why, if required.
Other Data Frame
- Click on the Other Data tab to expand the Other Data frame.
- There are 10 fields in this screen that can be utilised for additional information that you would like to log against an asset. Note that these field labels can be re-named to suit your company requirements. Contact your BPO specialist or CO3 Support for assistance
Save Customer Asset
- When you have finished adding the customer asset, click on Save.

- You will return to the Machine List screen where you can view the customer asset you have created.
- Click on Close to return to the Customer Listing screen.

Edit Customer Asset
- From the Machine List for [customer name] screen,
- Ensure that the correct Site has been selected. You can change the Site from here if the selected Customer has multiple sites.
- The example has Durban selected.
- The Status will default to All. To refine the list, click on the down arrow to select the status from the drop-down menu, of the equipment you wish to edit.
- A- All
- C - Client Machines
- I - Internal Assets
- S - Serialised Stock
- Select the row of the Customer equipment item you wish to modify.
- Click on Edit.
![]() Short cut key: Right click to display the All groups menu list. Click on Edit.
Short cut key: Right click to display the All groups menu list. Click on Edit.
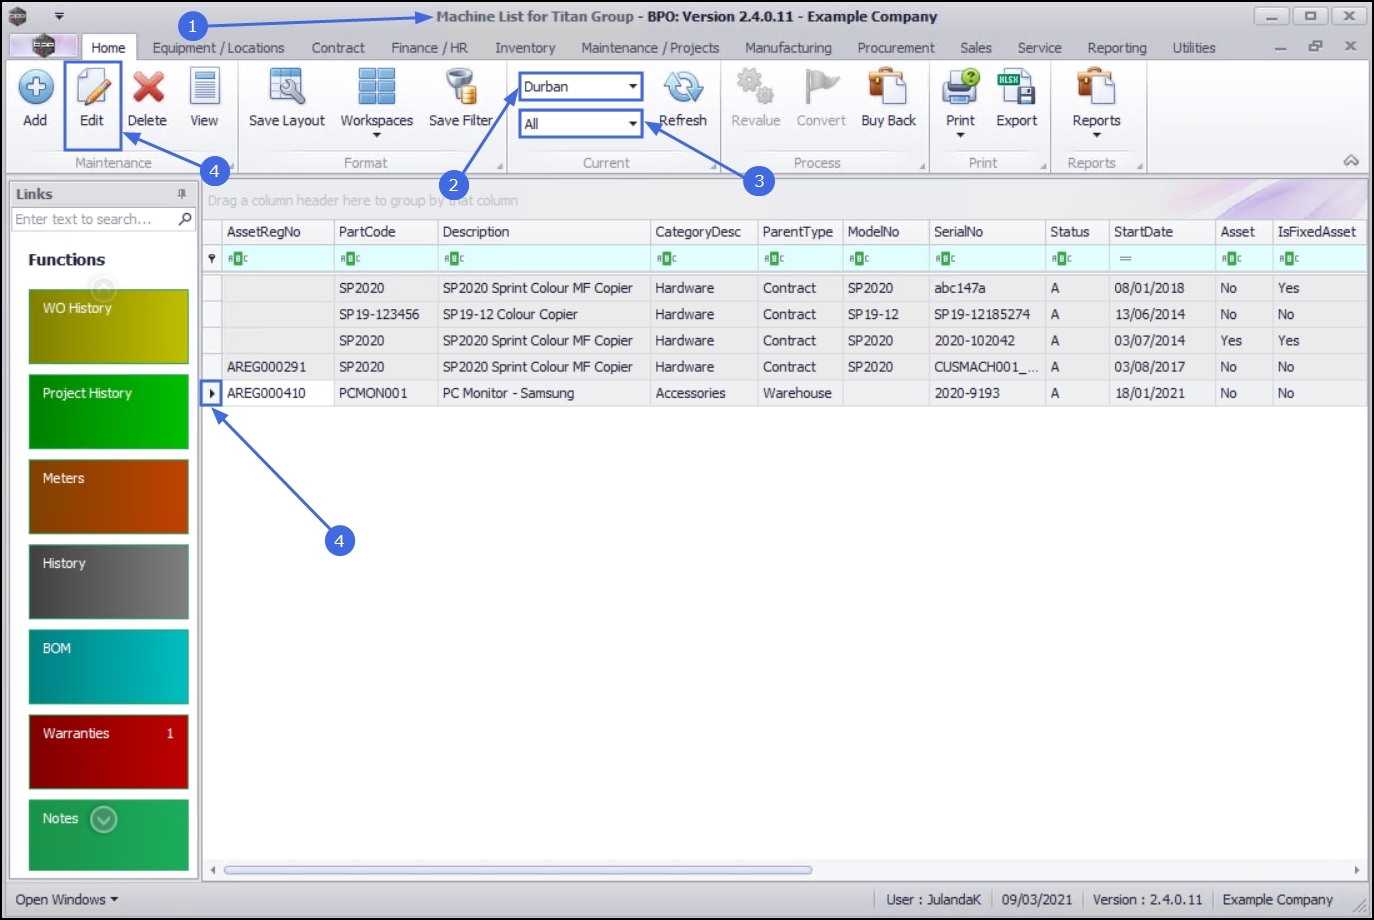
- The Equipment Maintenance for Serial No: [serial number] screen will display.
- Update the required Asset, Finance or Other Data information and
- Click on Save to keep the changes and to return to the Machine List screen.
Delete / Inactivate Customer Equipment
- If a customer asset is no longer required on the system for contract billing or service calls, then the customer asset can be deleted.
- A customer asset cannot be deleted if it is currently on contract.
- This process is only for customer-owned assets.
- Only customer assets, assets with Fixed Asset column set to No can be deleted, all other assets with Fixed Asset column set to Yes cannot be deleted since they are internal assets rented out to the customer.
- From the Machine List for [customer name] screen,
- Ensure that the correct Site has been selected. You can change the Site from here if the selected Customer has multiple sites.
- The example has Durban selected.
- Click on the arrow to select the required Status from the Status drop-down Menu.
- A - All
- C - Client Machines
- I - Internal Assets
- S - Serialised Stock
- The example has All selected.
- Select the row of the Customer equipment item that you wish to remove / inactivate.
- Click on Delete.
![]() Short cut key: Right click to display the All groups menu list. Click on Delete.
Short cut key: Right click to display the All groups menu list. Click on Delete.

- When you receive the Delete Machine message to confirm;
- Are you sure you want to inactivate this machine, code [serial number]?
- Click on Yes if you are certain about your selection.

The machine has been removed from the Machine List screen.
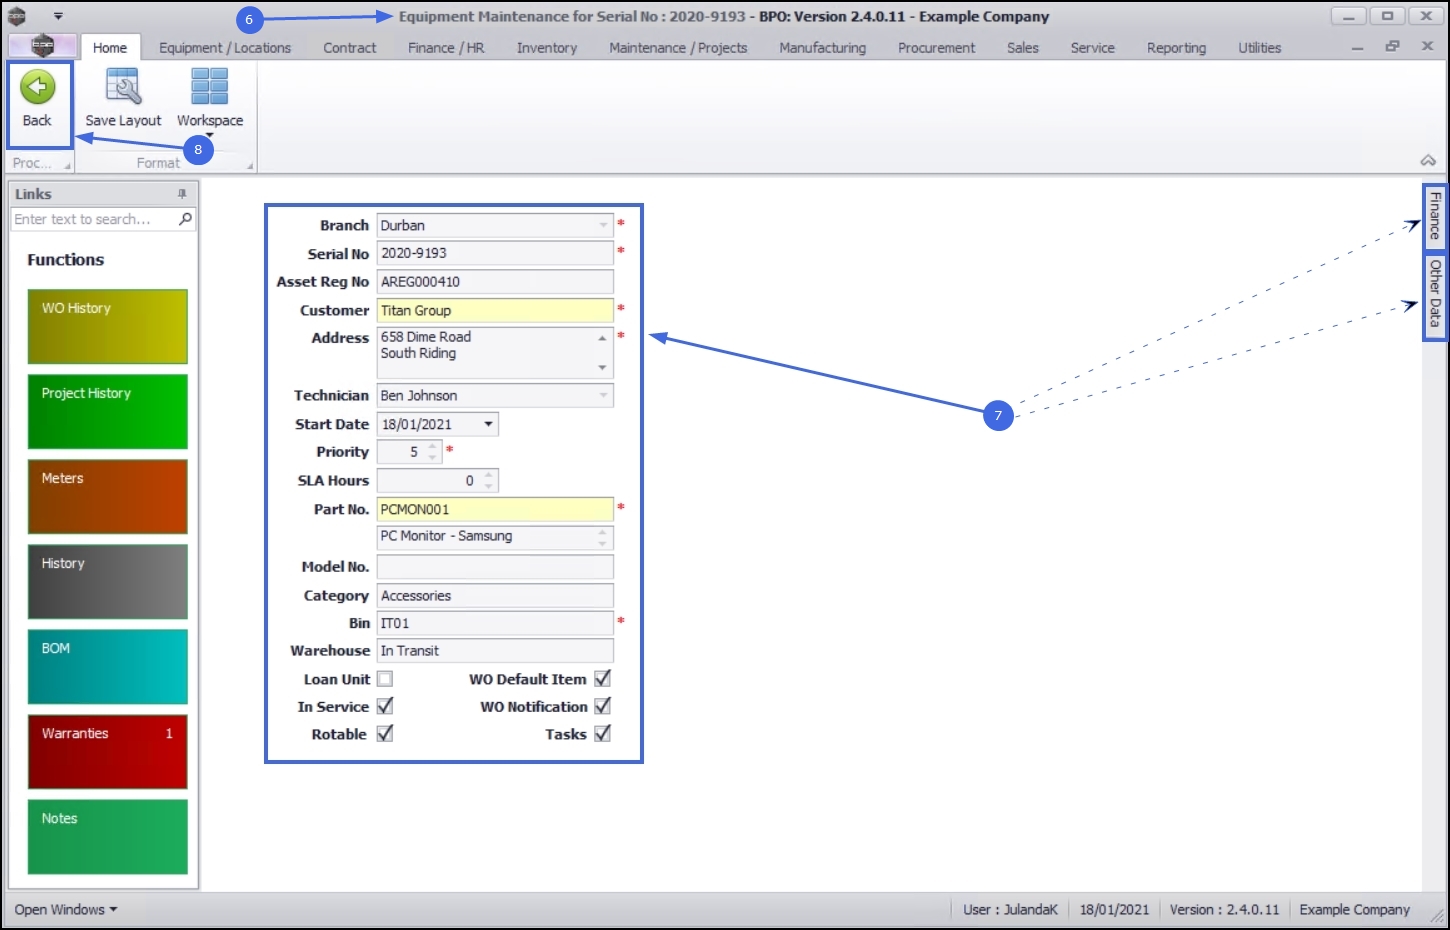
View Customer Equipment
- From the Machine List for [customer name] screen,
- Ensure that the correct Site has been selected. You can change the Site from here if the selected Customer has multiple sites.
- The example has Durban selected.
- Click on the arrow to select the required Status from the Status drop-down Menu.
- A - All
- C - Client Machines
- I - Internal Assets
- S - Serialised Stock
- The example has All selected.
- Select the row of the Customer equipment you wish to view.
- Click on View.

- The Equipment Maintenance for Serial No: [serial number] will be displayed.
- You can only view the Equipment details, Finance details or Other Data details, no changes can be made here.
- Click on Back to return to the Machine List screen.
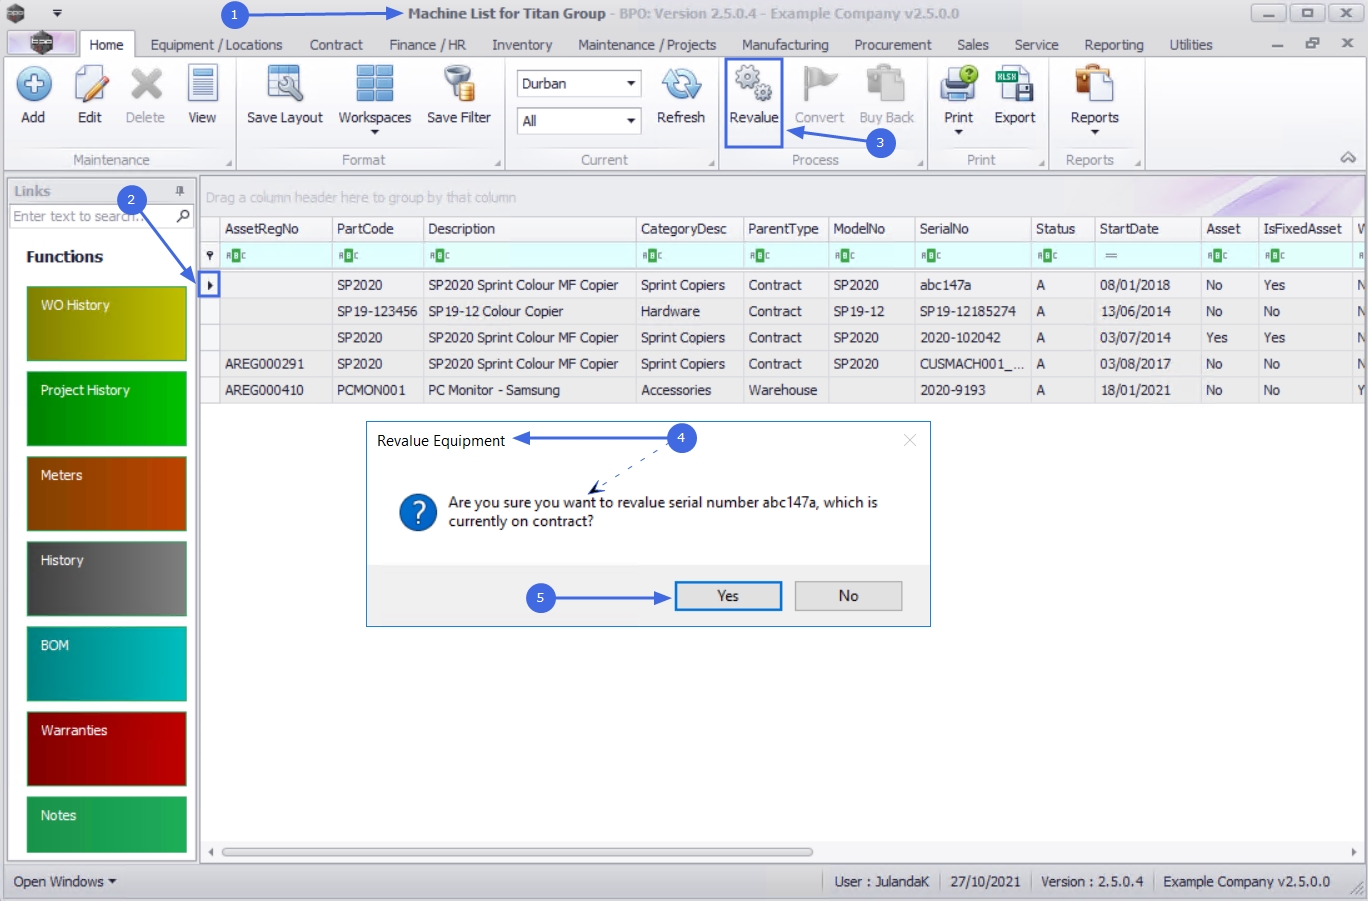
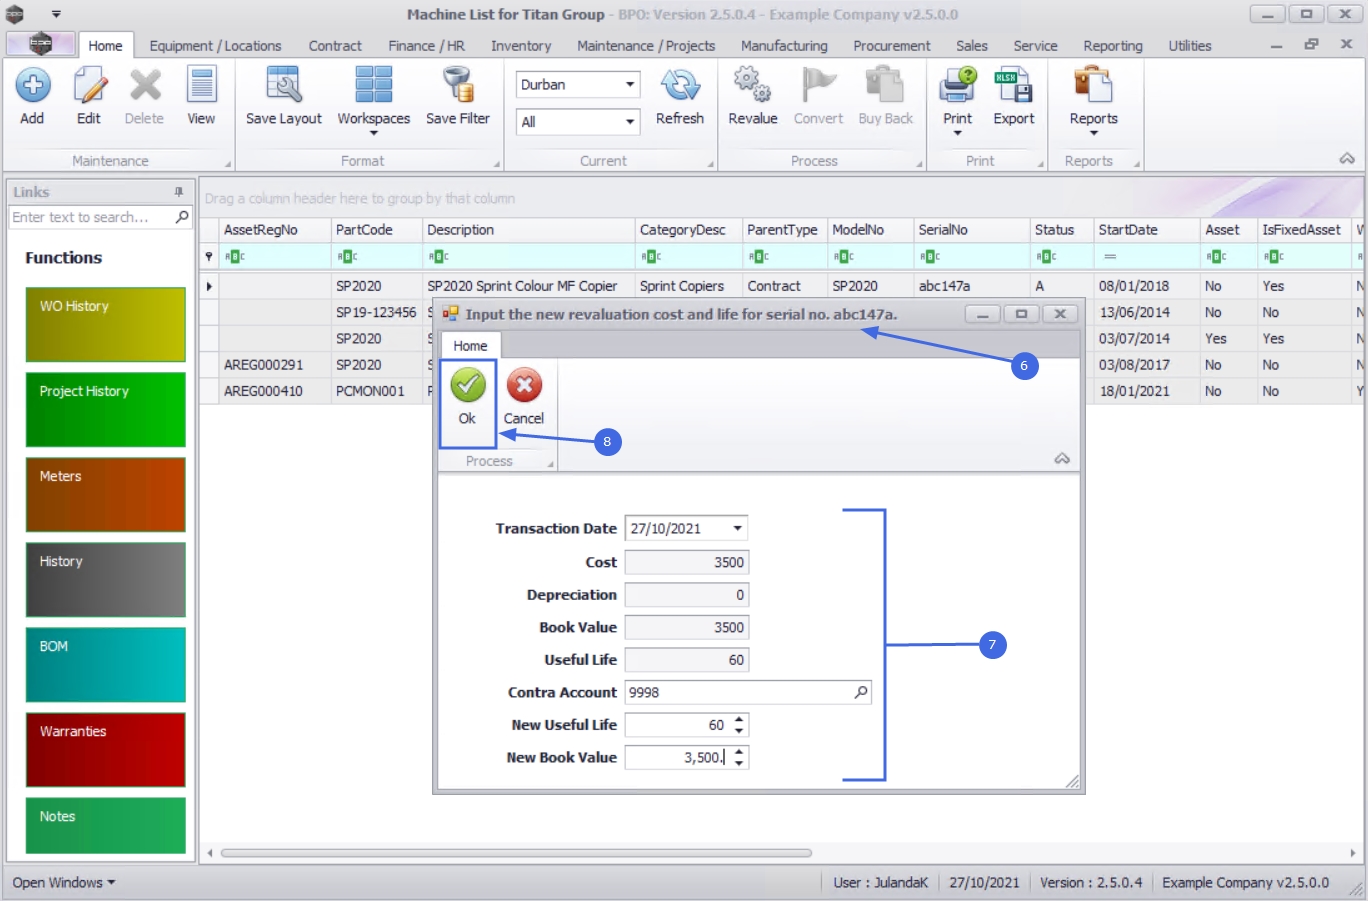
Revalue Customer Machine
Only company internal assets linked to the customer, can be revalued.
- From the Machine List for [customer name] screen,
- Click in the row of the machine where you wish to edit the value.
- Click on Revalue Revaluation is the Net Realisable Value and is used to appreciate or depreciate an item.
![]() Short cut key: Right click to display the All groups menu list. Click on Revalue.
Short cut key: Right click to display the All groups menu list. Click on Revalue.
- A Revalue Equipment message box will pop up asking;
- Are you sure you want to revalue serial number [ ], which is currently on contract?
- Click on Yes.
- The Input the new revaluation cost and life for serial no. [serial number] screen will display.
- Edit the revaluation details, as required:
- Transaction Date: This field will auto populate with the current date. Type in or click on the down arrow to use the calendar function to enter an alternative date.
- Cost: This field will auto populate with the cost price of the item and cannot be edited.
- Depreciation: This field will auto populate with the depreciation amount, if specified and cannot be edited.
- Book Value The book value of an asset is an item's original cost, less any accumulated depreciation and impairment charges that have been subsequently incurred:
This field will auto populate with the book value of the item and cannot be edited.
- Useful Life: This field will auto populate with the useful life specified when the customer item was created. This field cannot be edited.
- Contra Account A contra account is used in a general ledger to reduce the value of a related account when the two are netted together. A contra account's natural balance is the opposite of the associate account, e.g. if a debit is the natural balance recorded in the related account, then the contra account records a credit:
Click on the search button to display the Select a contra account for this adjustment screen. Select and add the contra account for the adjustment.
- New Useful Life: Type in or use the arrow indicators to select the new useful life for the item.
- New Book Value: Type in or use the arrow indicators to select the new book value.
- When you have updated the Date (if necessary), the Contra Account, New Useful Life and New Book Value, click on OK.
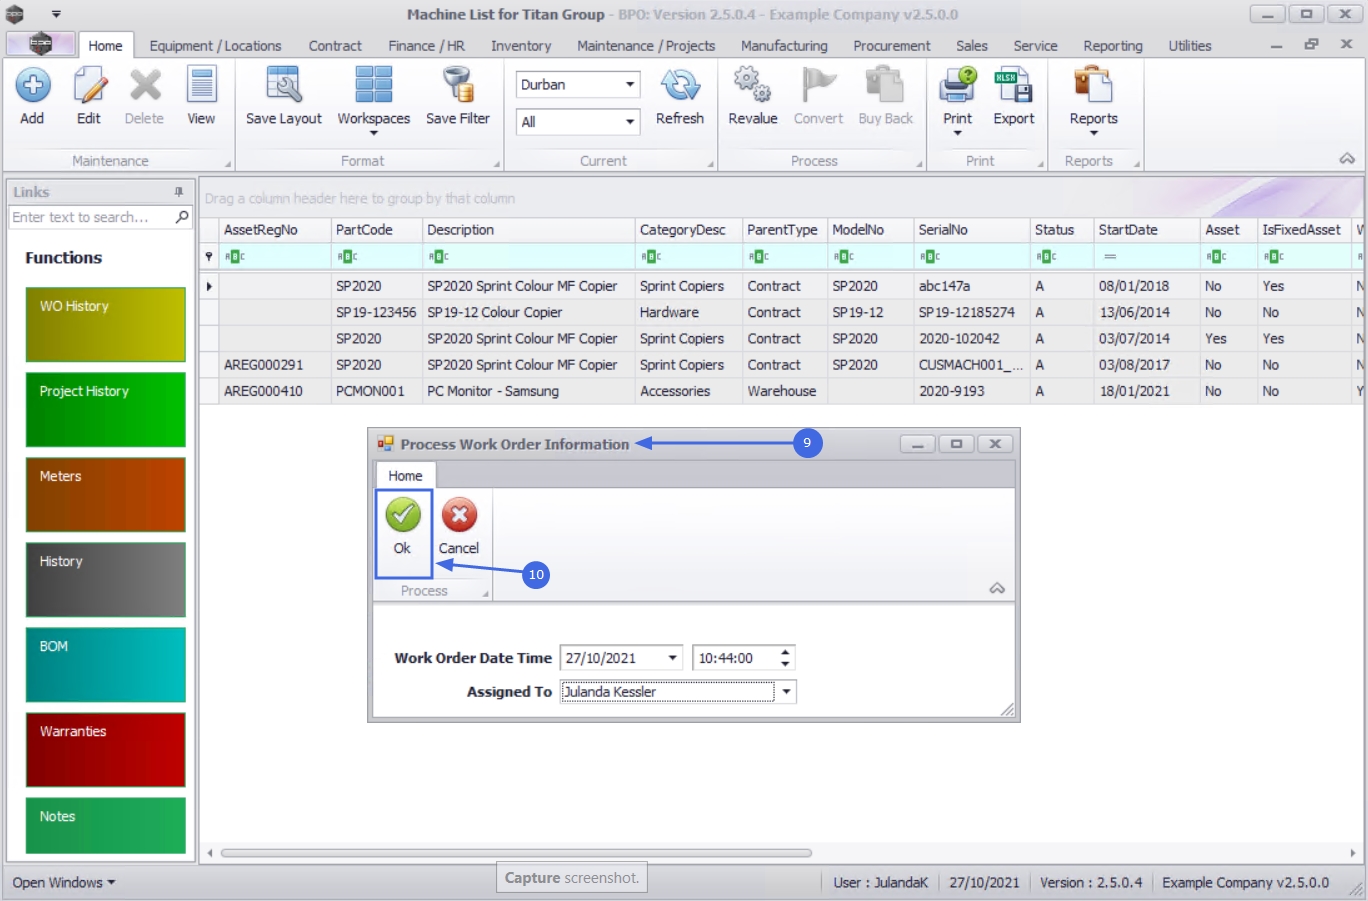
- The Process Work Order Information screen will display.
- Work Order Date and Time: This will auto populate with the current date and time. Type in or click on the down arrow to choose an alternative date and time.
- Assigned to: This will auto populate with the person currently logged onto the system. Click the down arrow to select the technician you wish to assign to this work order, if required.
- Click on OK.
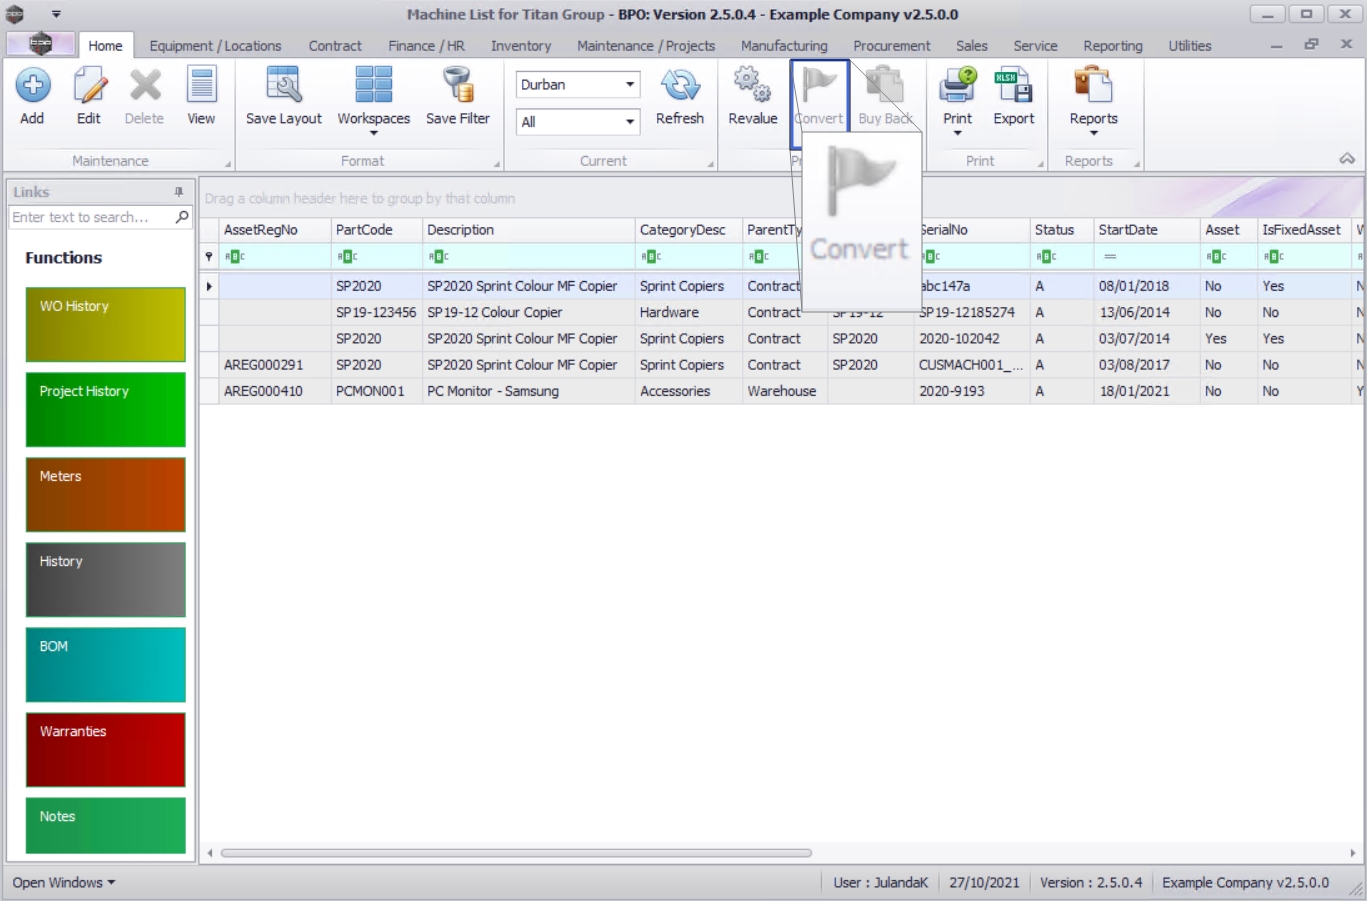
Convert Customer Equipment Item
You will not be able to convert a Customer equipment item from this screen. The button will be inactive (greyed out).
- You can only use this button to convert a stock item to an internal asset,
![]() For more information refer to Convert Stock to Asset
For more information refer to Convert Stock to Asset
- or to convert an internal asset to a stock item.
![]() For more information refer to Convert Asset to Stock.
For more information refer to Convert Asset to Stock.
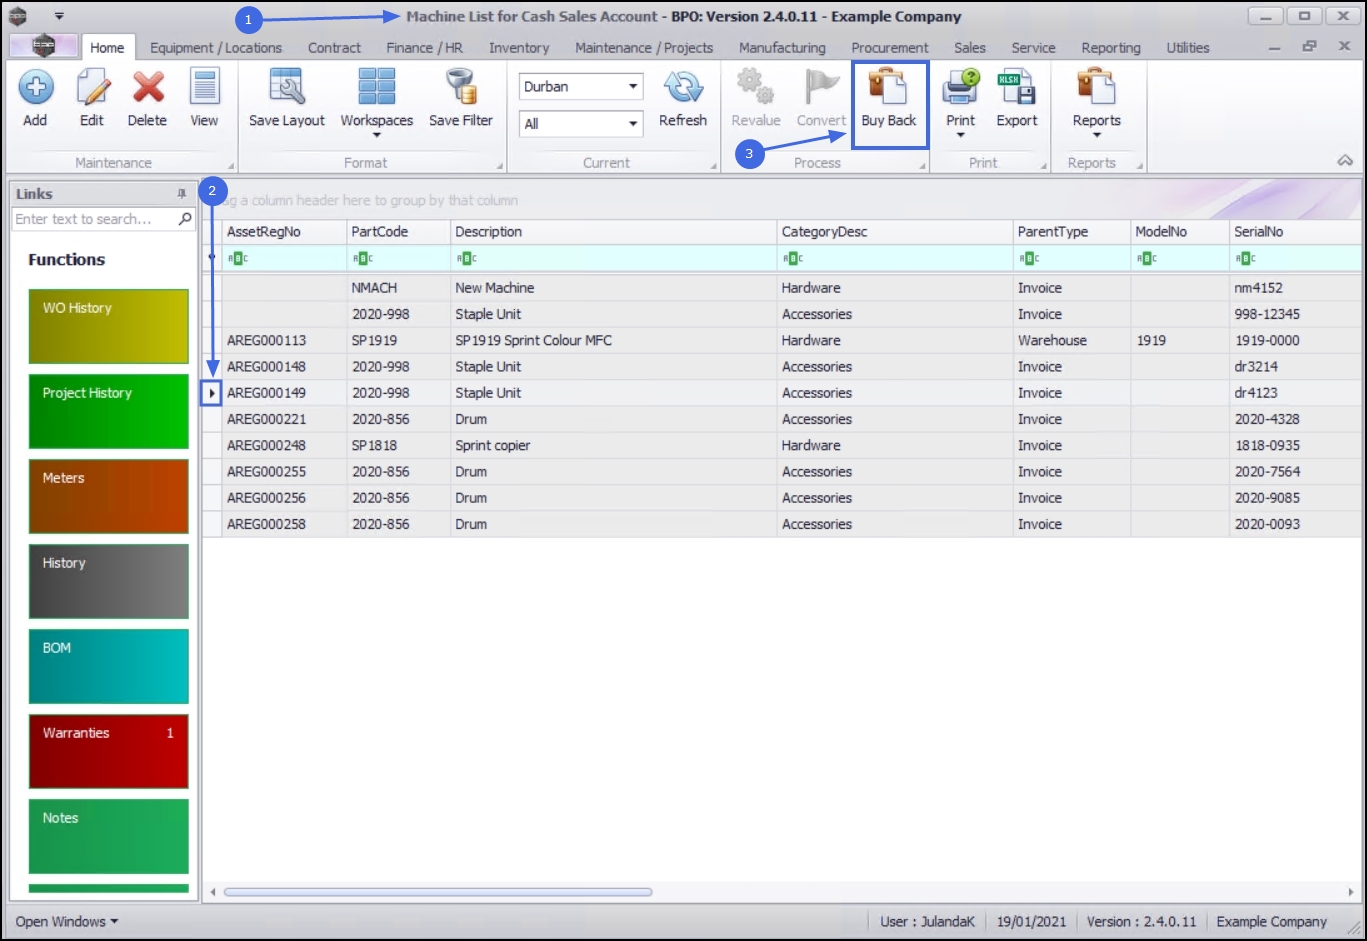
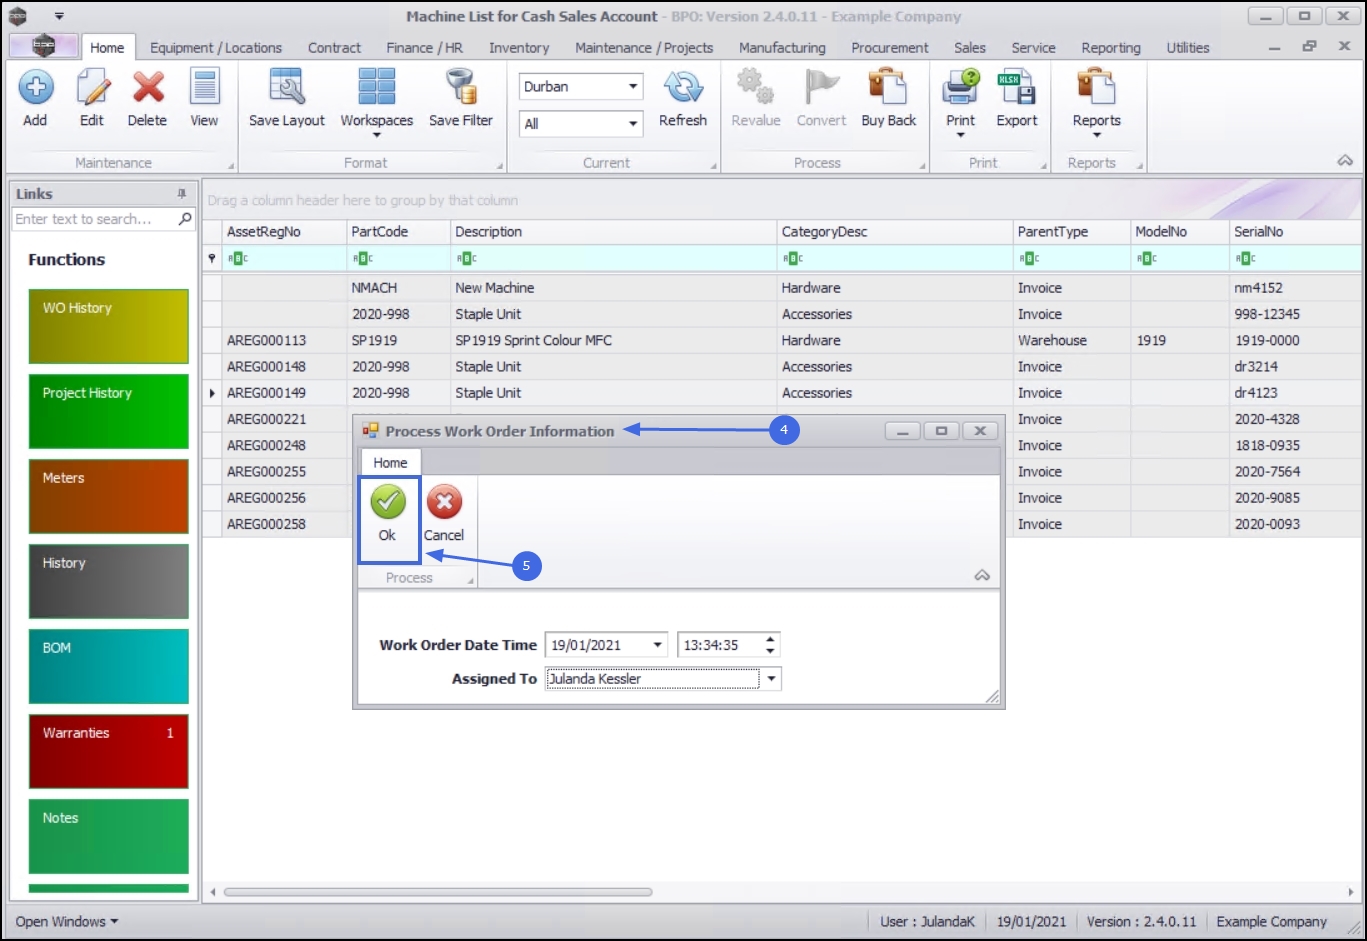
Buy Back Customer Equipment Item
You can Buy Back an equipment item linked to the Customer.
![]() Refer to Customer Asset Buy Back for a detailed handling of the process.
Refer to Customer Asset Buy Back for a detailed handling of the process.
- From the Machine List for [customer name] screen,
- Select the row of the Customer Asset / equipment item that you wish to buy back.
- Click on Buy Back.
![]() Short cut key: Right click to display the All groups menu list. Click on Buy Back.
Short cut key: Right click to display the All groups menu list. Click on Buy Back.
- The Process Work Order Information screen will be displayed.
- Work Order Date and Time: This information will be auto populated with the current date and time. Type in or click on the down arrow to choose an alternative date and time.
- Assigned To: This information will be auto populated with the person currently logged onto the system. Click on the down arrow to select the technician you would like to assign the work order to.
- Click OK.
- The Input the buy back price for serial no. [serial number] will display next.
- Transaction Date: Type in or click on the down arrow to select the transaction date using the calendar function.
- Buy Back Price: Type in the buy back price.
- Click on OK.
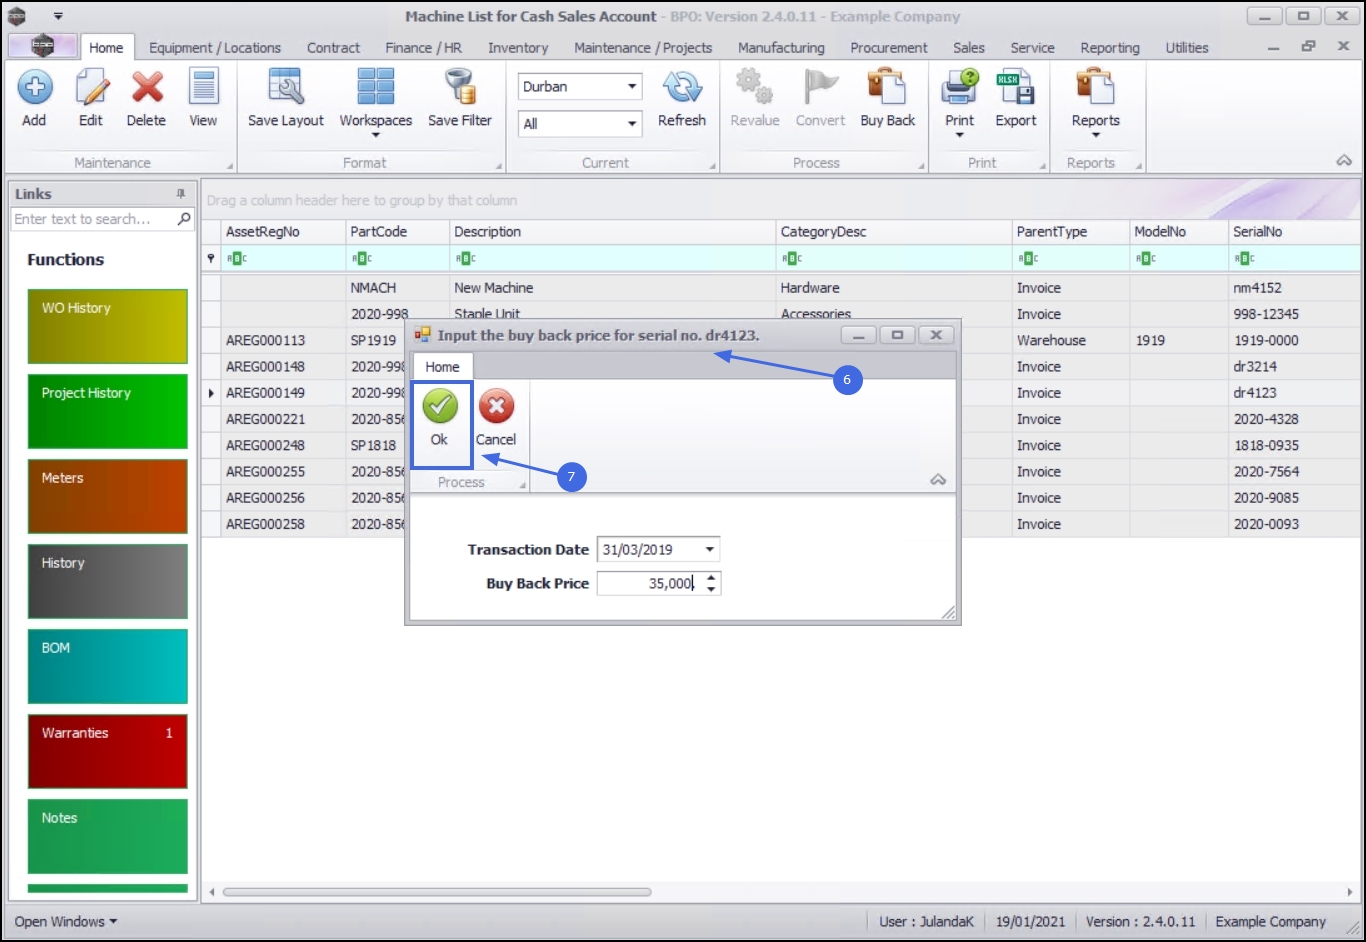
The item that you bought back will now display in the Machine List screen where the Status is has been set to Serialised Stock.
Functions Tiles
The Machine Lists for [customer name] screen has its own set of Functions tiles which will direct you to more information for the selected customer equipment item.

|
The WO History tile will display a list of all the Work Orders that have been linked for the customer machine. You can Add , Edit, View, Reinstate, Close or Complete a Work Order from the Work Orders for machine screen. Refer to Introduction to Work Orders for a detailed handling of the topic. |
|
The Project History tile will display the Project Listing for equipment screen where you can Add, Edit , Apply Project Methodology, Adjust Project Baseline and Close the Project. Refer to Introduction to Projects for a detailed handling of this topic. |

|
The Meters tile will display the Meter Listing for Serial No screen. You can Add, Delete and Reset Readings for the Customer equipment item. Refer to Introduction to Assets for a detailed handling of the topic. |

|
The History tile will display all the Transaction History for Equipment screen. The information can be viewed only and no changes can be made from this screen. |

|
The BOM tile will display the BOM Listing for Equipment screen. You can Add, Delete and View the Bill of Materials for a customer equipment item. Refer to BOMs - Introduction to BOMsfor a detailed handling of the topic. |

|
The Warranties tile will display the Warranties for Equipment screen. You can Add, and View warranties linked to the equipment item. Refer to Assets - Warranties - View, Add, Edit for a detailed handling of the topic. |

|
The Notes tile will display the Note Listing for Serial No screen. You can Add notes for the equipment item. Refer to Assets - Notes - View, Add for a detailed handling of the topic. |
|
The Documents tile will display the Documents for Equipment screen. You can Add to, and View, the digital documents linked to this items. Refer to Equipment Documents for a detailed handling of the topic. |

|
The Maintenance tile will display the Maintenance Methodology for Asset screen. You can Add, Edit and Delete a maintenance methodology for the asset. Refer to Link a Task for a detailed handling of the topic. |

|
The Depreciation tile will display the Asset Depreciation screen. You can Process the depreciation for the selected item from here. Refer to Asset Depreciation History for a detailed handling of the topic. |
MNU.061.015