We are currently updating our site; thank you for your patience.
Equipment
Assets - Warranties - View, Add, Edit
Warranties can be assigned:
- Either through the auto apply warranty feature when the asset is GRN'd.
- Or by assigning the machine to the warranty.
Follow the process below to view, add or edit a Warranty directly from the Asset Listing (Machine List for []) screen.
| Ribbon Access: Equipment and Locations > Assets |
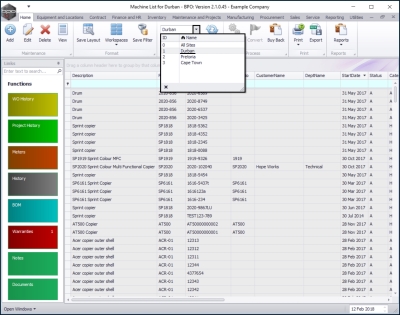
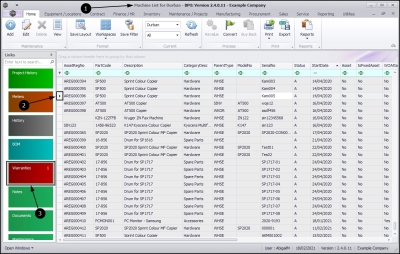
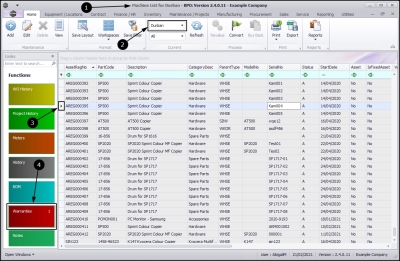
The Machine List for [ ] screen will be displayed.
Select the Site and Status
- Although it is not necessary in this process, it good practice to begin a process by selecting the site where an asset is linked.
- In this image Durban is selected.
- This screen will open by default in the All status. You do not need to change this status in order to view or add asset warranties. If this screen is already open in another status e.g. Internal Assets, then click on the drop-down arrow and select from the list, the right status that contains the asset you wish to work with.
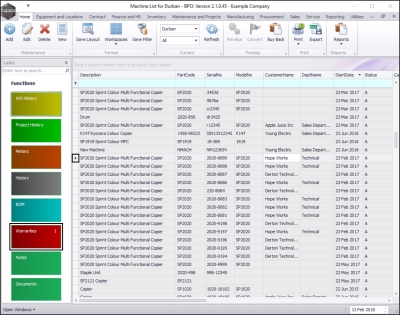
Select the Asset
- Select the row of the asset where you wish to view or add a warranty.
- Click on the Warranties tile.
View Warranty
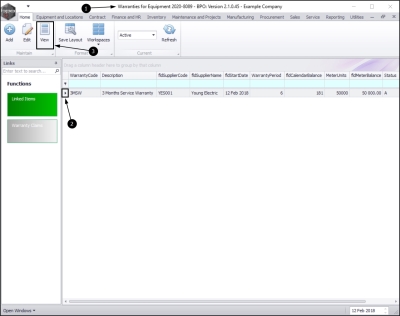
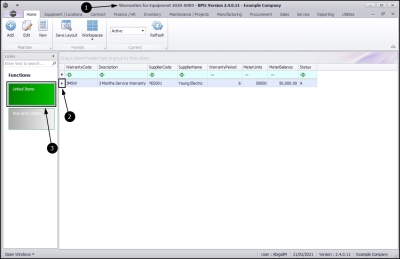
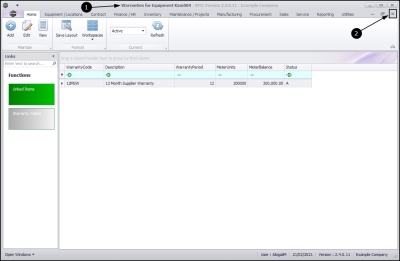
- The Warranties for Equipment [ ] screen will be displayed.
- If there are any currently linked warranties, they will be listed in this screen.
- Relevant details, such as warranty expiry can be viewed.
- If there is more than one linked warranty in the list, select the row of the warranty that you wish to view.
- Click on View.
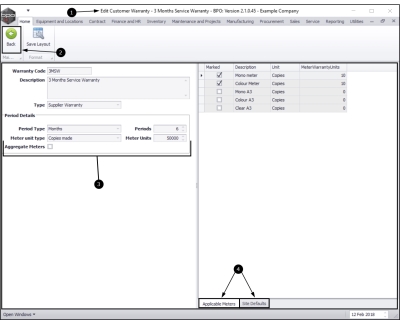
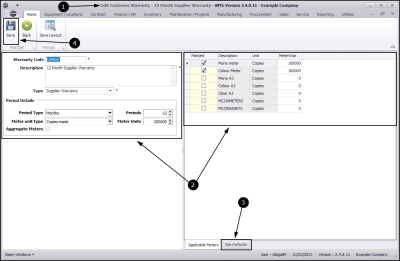
- The Edit Customer Warranty - [] screen will open.
- As you clicked on the View button to open this screen (and not the Edit button), all the information in this screen is uneditable. There is a Back button but no Save button.
- Here you can view the selected warranty and validity information.
- Click on the tabs to bring the relevant frame to the fore:
- The Applicable Meters frame displays a list of the Meter Types linked to the warranty.
- The Site Defaults frame displays a list of the Sites linked to the warranty.
Click on Back to return to the Warranties for Equipment [] screen.
View Linked Items
- In the Warranties for Equipment [] screen,
- Select the row of the warranty where you wish to view the associated items.
- Click on the Linked Items tile.
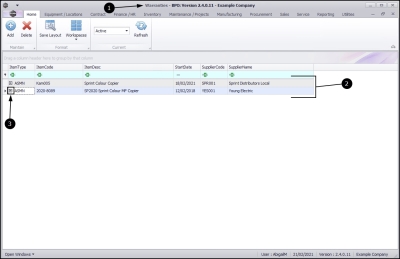
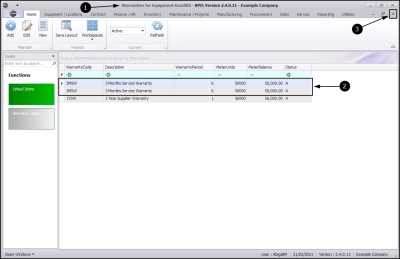
- The Warranties listing screen will open. The list will only display the items linked to the selected warranty.
- In this example there are 2 items currently linked.
- Note: From this screen you can also follow the process to add another customer asset to this warranty, if required.
View Meters of the Linked Items
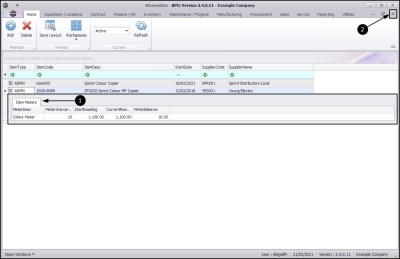
- Click on the expand icon in a row of a linked item.
- You will be able to view the linked Items Meters in the expanded frame.
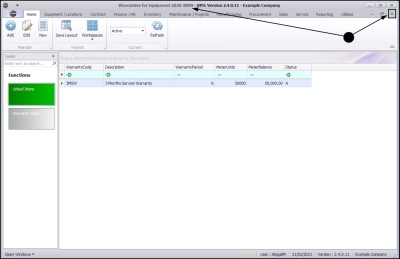
- Collapse the frame and Close the screen to return to the Warranties for Equipment [] screen.
Close the Warranties for Equipment [] screen to return to the Machine List for [] screen.
Add a Warranty
- In the Machine List for [] screen, select the site where you wish to proceed.
- Ensure that you select the row of the asset where you wish to add a warranty.
- Click on the Warranties tile.
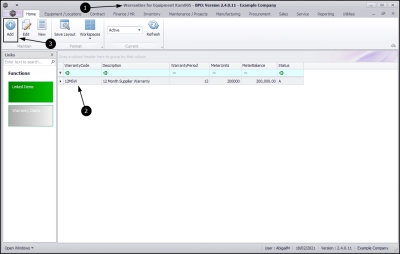
- The Warranties for Equipment [] screen will open.
- Note the 12MSW warranty already linked to this asset.
- Click on Add.
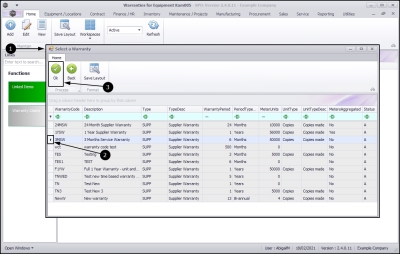
- The Select a Warranty screen will pop up.
- Select the row of the warranty you wish to add.
- Click on Ok.
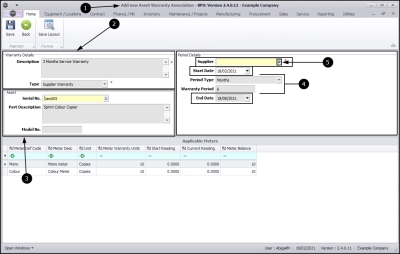
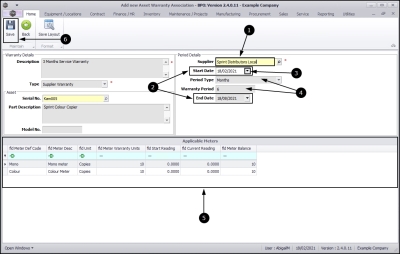
- The Add New Warranty Association screen will open.
Warranty Details
- This will populate with the warranty definition Description and Type.
- You cannot edit this information from this screen.
Asset
- This will populate with the asset Serial No., Part Description and Model No., if applicable.
- You cannot edit this information from this screen.
Period Details
- This will populate with the Period Type and Warranty Period as set up on the warranty definition.
- Note: In this frame, the Supplier, Start Date and End Date fields are editable.
Supplier
- Click on the search button in the Supplier field.
- The Select the Supplier screen will pop up.
- Select the row of the supplier that you wish to link to this warranty.
- Click on Ok.
- The Supplier field will now populate with the selection in the previous step.
- Note that the Start Date will populate with the current date and in this example, the End Date will auto populate 6 months after the Start Date, as the Warranty Period is 6 months.
- If it was a 12 month Warranty Period then the End Date will auto populate 12 months after the Start Date.
- You can click on the drop-down arrow and select an alternative Start Date, if required. The End Date will re-calculate to be 6 months ahead of your selected date.
- The Period Type and Warranty Period are uneditable in this screen.
- The Applicable Meters frame contains details of the meter types linked to this warranty. The details are uneditable from this screen.
- When you have finished adding the details, as required, click on Save.
- You will return to the Warranties for Equipment [] screen.
- The added warranty can now be viewed in this screen.
- Close this screen to return to the Machine List for [] screen.
Edit a Warranty
- In the Machine List for [] screen,
- Select the Site you wish to work in.
- Select the row of the asset where you wish to edit the warranty.
- Click on the Warranties tile.
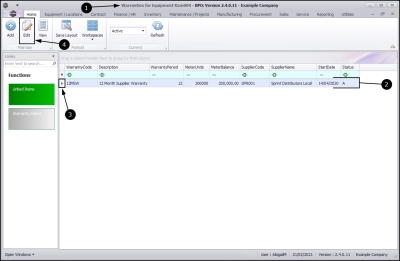
- The Warranties for Equipment [ ] screen for the selected asset will open.
- In this example there is only one warranty linked to this asset.
- If there is more than one warranty, ensure that you select the row of the one that you wish to work with.
- Click on Edit.
- The Edit Customer Warranty - [ ] screen will open.
- Make the required changes in the relevant fields
- If you wish to make changed to the associated Site(s), click on the Site Defaults tab to open the frame and enable editing.
- When you have made your changes, click on Save.
- You will return to the Warranties for Equipment [] screen.
- Close this screen to return to the Machine List for [] screen.
Note on Deleting a Warranty
You cannot delete a warranty from an asset in this screen. Follow the process to open the Warranties listing screen, then select the specific warranty and click on the Linked Items tile. In the subsequent screen, select the row of the asset which is to be 'unlinked' from the selected warranty and click on the Delete button. Save the deletion and return to the Machine List for [] screen. When you select the row of the asset and then click on the Warranties tile, the asset will no longer be linked to the warranty.
MNU.007.019

