We are currently updating our site; thank you for your patience.
Inventory
Part Requests - Issue Stock Items
- Depending on your company configuration, the initial part requests may need to be authorised by a technical or service manager before stores will receive the request and the stock can be issued.
- Part Issue Notes and Delivery Notes are crucial in good business practice.
- Issue Notes are evidence of a physical outbound movement of items from the company warehouse to another location. They result in a decrease of items in a warehouse. These notes are internal documents signed by both the storeman and the delivery person (or technician).
- Issue Note Scenario: The storeman will give the delivery person (or technician) the issued items and the Issue Note which they will both sign. Thus stock is recorded as going out by the storeman (1st signature) and is now in the hands of the delivery person (2nd signature) who will take it to the customer. Both signatures ensure that all parties take responsibility for their part in the process and that stock is accounted for.
- Delivery Notes are evidence of the receipt of items from the delivery person (or technician) to the recipient (Customer). They contain details such as the type and quantity of the items delivered. It is imperative to keep records of this document in case there is a discrepancy between what is expected by the recipient (customer) and what is actually received e.g. there could be a shortage of items received or some items may be damaged. These notes are external documents signed by the recipient (customer) and the deliverer. It is good practice to have 2 copies of a Delivery Note - one for your company and one for the recipient (customer).
- Delivery Note Scenario: The delivery person (or technician) will arrive at the customer's location. The items being delivered will be checked by the customer for the expected quantity and quality. The delivery person and the customer will sign the Delivery Note with any comments if necessary i.e. comment if there is a shortfall or if an item is damaged. The delivery person will bring this document back to the storeman who will match it to the issue note. If there is a problem later and the customer claims not to have received the items, the storeman can check the signed Delivery Note. This document protects both the delivery person and the customer.
Note: If you are using the Stock Batch Tracking option, make sure you select the correct Batch Number for C-Class (non-serialised) items, when issuing stock. For more details, refer to Inventory: Stock Batches.
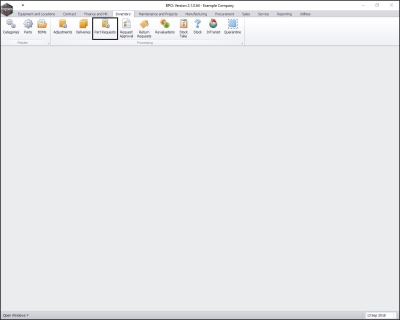
| Ribbon Access: Inventory > Part Requests |
Part Requests Linked to an Invoice
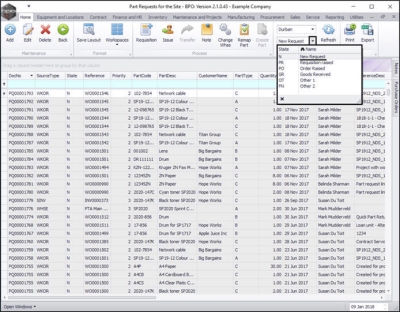
The Part Requests for the site listing screen will be displayed.
Select the Site and Status
- Select the Site.
- In this image Durban has been selected.
- Select the Status.
- This should be set to New Request.
Single Part Request Issue linked to an Invoice
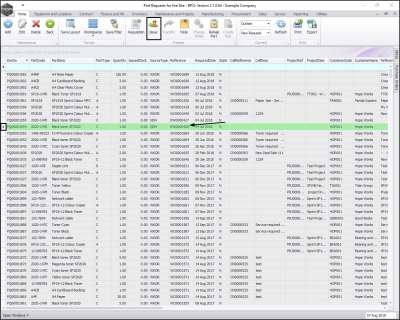
- Click on the row selector in front of the single part request that you wish to issue stock for.
- You will note that this request is not linked to a work order but a single part request linked to an invoice.
-
Either,
- Click on Issue
-
Or
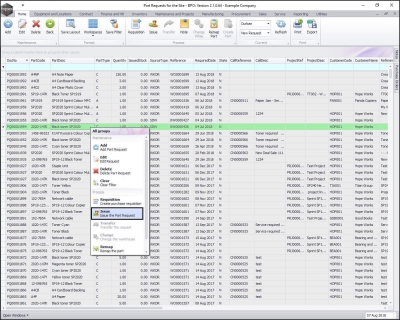
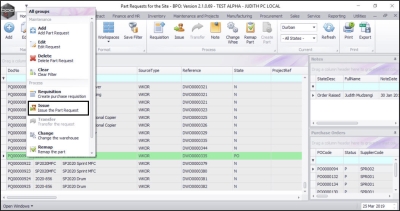
- Right click anywhere in the row of that single part request.
- A part requests Maintenance menu will be displayed.
- In this menu, click on Issue - Issue the Part Request.
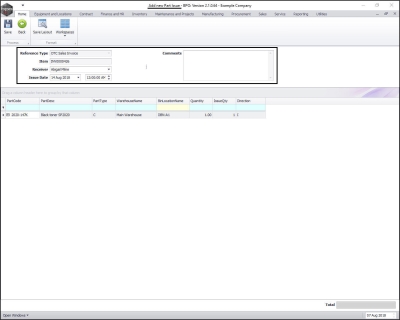
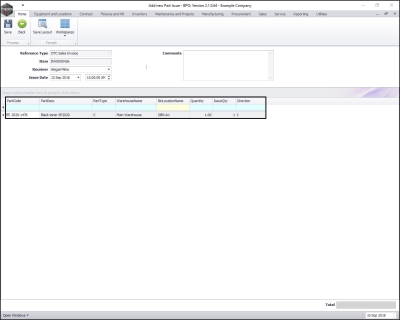
As this is a single part request not linked to a work order, the system will take you directly to the Add New Part Issue screen
- Reference Type: This will auto populate with the reference type linked to this part request - in this example, an OTC Sales Invoice.
- Item: This will auto populate with the reference number of the reference type linked to this part request - in this example, Invoice INV000426.
- Receiver: This will auto populate with the person currently logged on to the system. You can click on the drop-down arrow and select an alternative person, if required.
- Issue Date and Time: This will auto populate with the current date and time.
- Date: You can either type in or click on the drop-down arrow and use the calendar function to select an alternative date if required.
- Time: You can either type in or use the directional arrows to select an alternative time if required.
- Comments: Type in a comment relevant to this part issue, if required.
Move down the screen to the Parts data grid.
- Part Code: This will auto populate with the selected Part Code.
- Part Description: This will auto populate with the selected Part Description.
- Part Type: This will auto populate with the selected Part Type.
- Warehouse Name: This will auto populate with the warehouse selected on the initial part request.
- Bin Location Name: This will auto populate with the default bin location linked to the warehouse above.
- Quantity: This will populate with the quantity requested on the initial part request.
- Issue Qty: This will populate depending on the part type:
- A-Class and B-Class Items: The Issue Qty text box will populate with 0 as you need to manually select the unique serial number of the A or B-Class item to be issued.
- C-Class Items: The Issue Qty text box will populate with the quantity requested on the initial part request that can be issued out from the default warehouse if there is stock available in this warehouse.
- Note 1: If the Issue Qty does not equal the Quantity due to short stock then you will either need to request an interwarehouse transfer to bring these items into the default warehouse or you will need to follow the process to procure stock.
- Note 2: You can issue partial quantities by selecting an issue quantity that is less than the requested quantity.
- Direction: This will auto populate with I - Issue.
Part Issue C-Class items
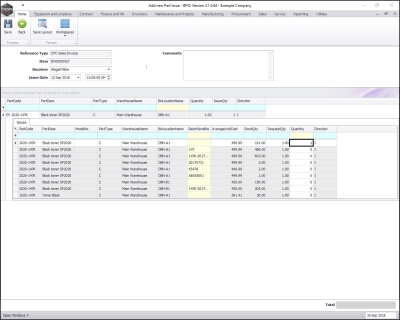
- The Issue Qty text box will auto populate with the quantity requested on the initial part request that can be issued out from the default warehouse (if there is stock available in this warehouse) but you can edit this.
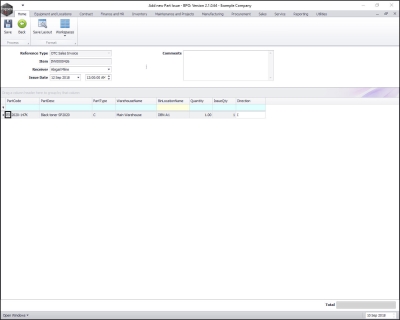
- Click on the Expand button in front of the part code.
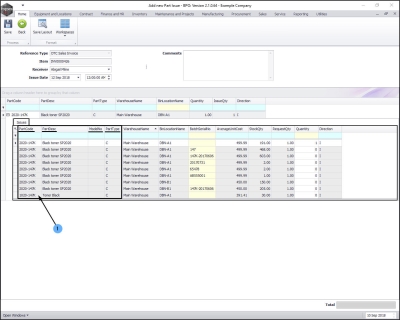
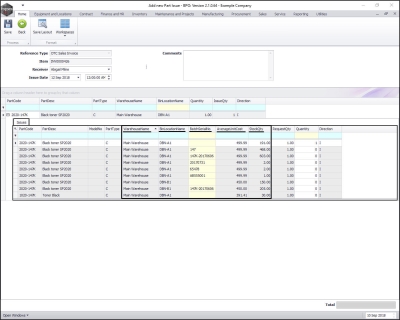
- The Issues frame will be expanded. This will give more detail regarding the stock in the warehouse:
- the Batch Numbers of the items (if Batch tracking is used)
- the average unit cost of the items (C-Class items only)
- the available stock quantity (the amount of the item currently in the warehouse bins)
- In this frame, you can now select to issue the part from a specific stock batch number if your company is using the Stock Batch Tracking option.
- Part Code: This column will populate with the part code of all the stock batches linked to this part definition if batch tracking is enabled.
- You will note that substitute parts will also be listed in this frame whether batch tracking is enabled or not. Remember, for a substitute item to be displayed, a substitute part should be already linked to the requested part.
- In this example [1] points to Part Code 1020-147K. This is listed as it is linked as a substitute for Part Code 2020-147K.
- Part Description: This column will auto populate with the corresponding part code description.
- Model No: This column will populate with the model no of each part code stock batch if applicable.
- Part Type: This column will populate with the part type of each part code stock batch.
- Warehouse Name: This column will populate with the default stock warehouse linked to each batch number.
- Bin Location Name: This column will populate with the bin location of each batch number.
- If there is stock in more than one bin of the default warehouse, then each bin that contains the requested stock will be listed here.
- Batch Serial No: This column will populate with each batch number linked to this part code.
- Average Unit Cost: This column will populate with the weighted average cost. This is calculated over multiple batches, within the same bin location.
- Stock Quantity: This column will populate with the stock quantity of each batch available in each bin location.
- The system will automatically issue a part from the first batch in the list.
Select a Part from an Alternative Batch
- You can select to issue from an alternative batch if required.
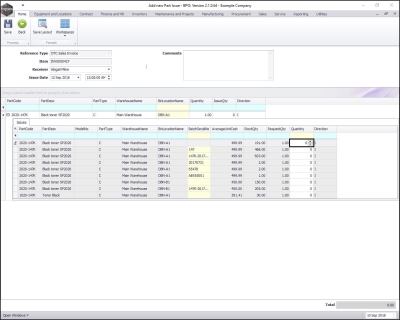
- Click in the Quantity text box.
- Either type in or use the directional arrows to set the quantity to 0.
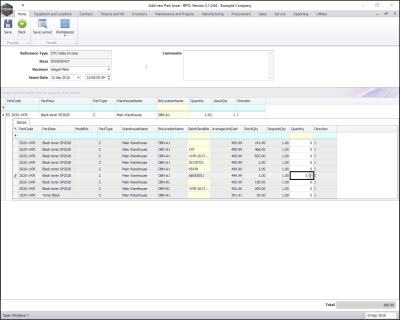
- Click in the Quantity text box in the row of alternative batch number that you wish to issue this part from.
- Either type in or use the directional arrows to type in the quantity requested from the alternative batch number.
- Note 1: The system will prevent you from issuing more than the total quantity on the request item. (An Error message box will pop up)
- Note 2: The system will prevent you from issuing more than the Stock Quantity. (An Error message box will pop up)
- Note 3: You can select from more than one batch. For example if 5 toners have been requested. You can select 2 from one batch and 3 from an alternative batch.
- For information on how to issue A / B class items, refer to Part Issue - A or B class items .
Save Part Issue
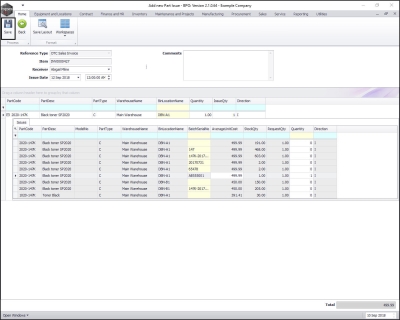
- When you have finished selecting the batch(es) that the part(s) will be issued out from, click on Save.
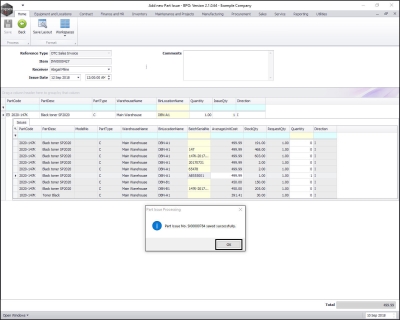
- A Part Issue Processing message box will pop up informing you that;
- Part Issue No. [ ] saved successfully.
- Click on OK.
Print Part Issue Note
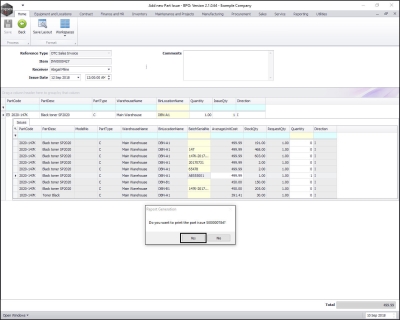
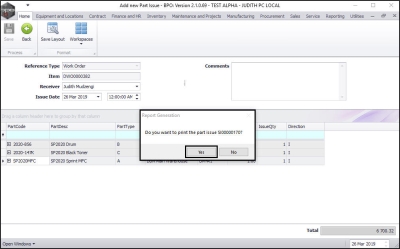
- A Report Generation message box will pop up asking;
- Do you want to print the part issue [ ]?
- Click on Yes.
- Note: The Issue Note is a very important part of the Issuing Stock Process:
Print Delivery Note
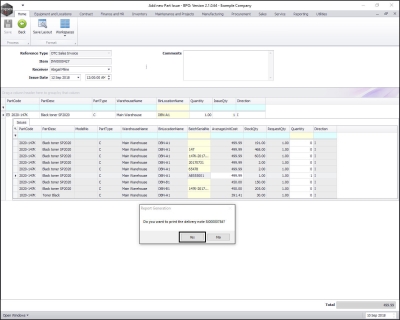
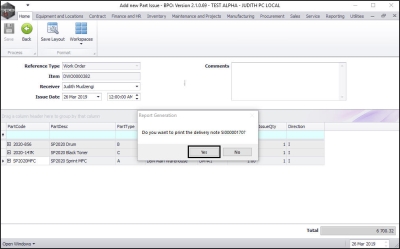
- A second Report Generation message box will pop up asking;
- Do you want to print the delivery note [ ]?
- Click on Yes.
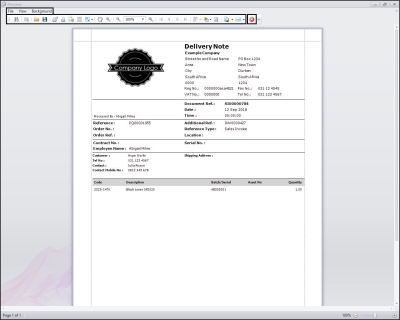
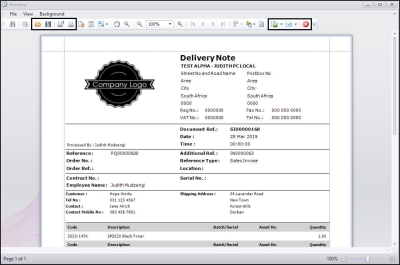
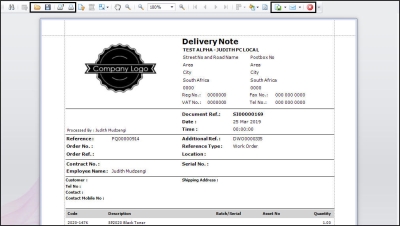
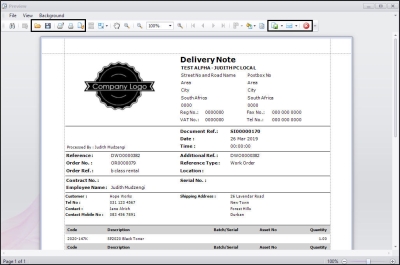
- The Report Preview screen for the Delivery Note will pop up first.
- From here you can View, Print, Export or Email the Delivery Note.
- Close the Report Preview screen when done.
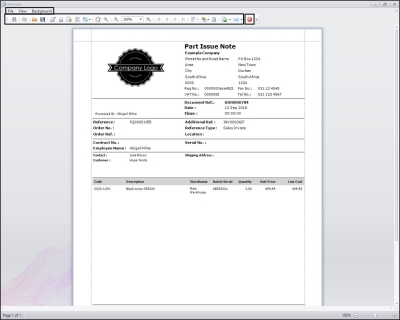
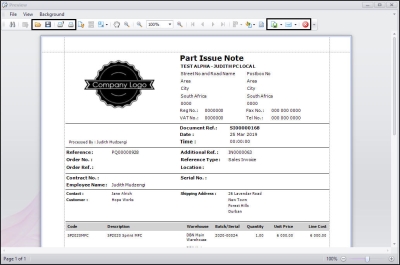
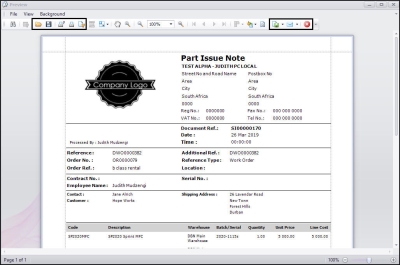
- You will then see the Part Issue Note Report Preview screen.
- From here you can View, Print, Export or Email the Issue Note.
- Close the Report Preview screen when done.
You will return to the Part Requests for the Site listing screen.
Multiple Part Request Issue linked to an Invoice
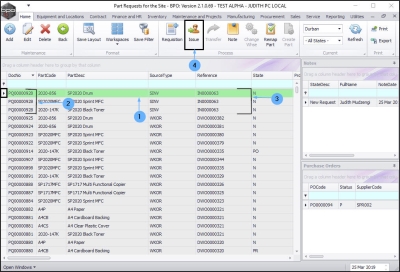
In this example, you can see
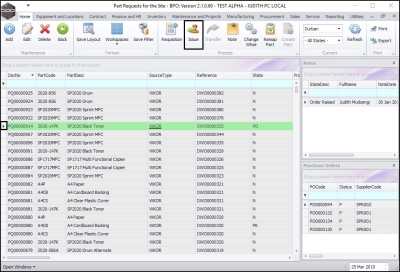
- The row selector has highlighted 1 item (SP2020 Drum) from the part request PQ00000928.
- There are 3 items linked to this part request.
- All three items on this part request are linked to one invoice INV0000063.
- Click on Issue.
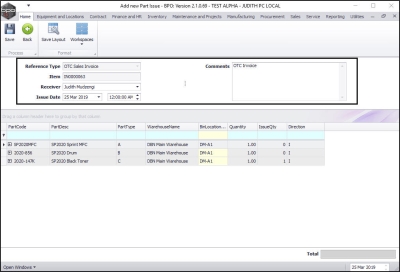
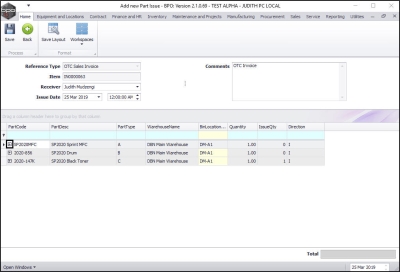
As this is a multiple part request linked to a Sales Order, not linked to a Work Order, the system will take you directly to the Add New Part Issue screen.
- Reference Type: This will auto populate with the reference type linked to this part request - in this example, an OTC Invoice.
- Item: This will auto populate with the reference number of the reference type linked to this part request - in this example, Invoice: INV0000063.
- Receiver: This will auto populate with the person currently logged on to the system. You can click on the drop-down arrow and select an alternative person, if required.
- Issue Date and Time: This will auto populate with the current date and time.
- Date: You can either type in or click on the drop-down arrow and use the calendar function to select an alternative date if required.
- Time: You can either type in or use the directional arrows to select an alternative time if required.
- Comments: Type in a comment relevant to this part issue, if required.
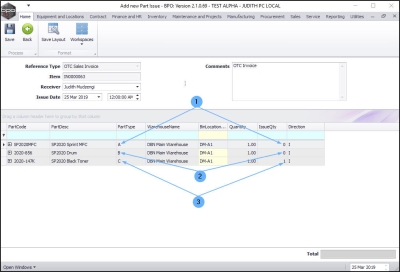
Move down the screen to the Parts data grid. You will see that the system has pulled across all the items linked to the part request, even though only the one item line was selected.
- Part Code: This will auto populate with the selected Part Code(s) of the all the items linked to the part request.
- Part Description: This will auto populate with the selected Part Description(s) of the all the items linked to the part request.
- Part Type: This will auto populate with the selected Part Type(s) of the all the items linked to the part request..
- Warehouse Name: This will auto populate with the default stock warehouse.
- Bin Location Name: This will auto populate with the default bin location linked to the default warehouse.
- Quantity: This will auto populate with the quantity requested on the initial part request.
- Issue Qty: This will populate depending on the part type:
- A-class Items: The Issue Qty text box will populate with 0 as you need to manually select the unique serial number of the A Class item to be issued.
- B-class Items: The Issue Qty text box will populate with 0 as you need to manually select the unique serial number of the B-Class item to be issued.
- C-class Items: The Issue Qty text box will populate with the quantity requested on the initial part request that can be issued out from the default warehouse if there is stock available in this warehouse.
- Note 1: If the Issue Qty does not equal the Quantity due to short stock then you will either need to request an interwarehouse transfer to bring these items into the default warehouse or you will need to follow the process to procure stock.
- Note 2: You can issue partial quantities by selecting an issue quantity that is less than the requested quantity.
- Direction: This will auto populate with I - Issue.
Part Issue - A or B-class Items
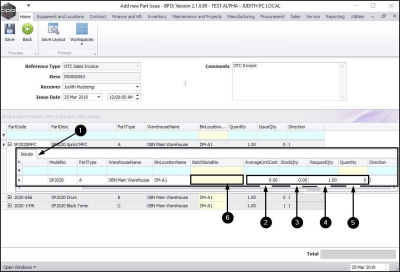
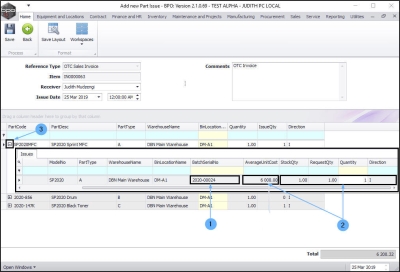
- Click on the Expand button in front of the A / B-Class item Part Code.
- The Issues frame for this A / B-Class item will be expanded.
- Average Unit Cost is set to 0. This will only populate when the user selects the unique serial number of the A or B-Class item to be issued out.
- Stock Qty is set to 0. This will only populate with 1 when the user selects the unique serial number of the A or B-Class item to be issued out.
- Request Qty is set to 1. Only 1serialised item can be selected per line e.g. if your requested quantity is 2, then 2 lines will be displayed, each with a Request Quantity of 1.
- Quantity is set to 0. This will only populate with 1 when the user selects the unique serial number of the A or B-Class item to be issued out.
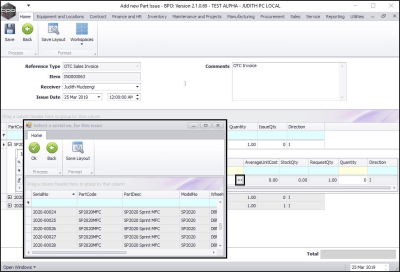
- Click in the Batch Serial No text box.
- An ellipsis button will be revealed.
- Click on this button to display the Select a serial no. for this issue pop up screen.
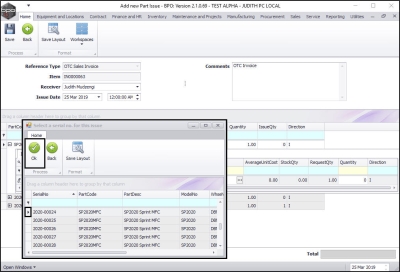
- Click on the row selector in front of the serial number of the item that you wish to issue out.
- Click on Ok.
- The BatchSerialNo text box will populate with the selected serial number.
- Average Unit Cost: This will now populate with the cost of the selected A or B-Class item to be issued out.
- Stock Quantity: This will now populate with 1.
- Quantity: This will now populate with 1.
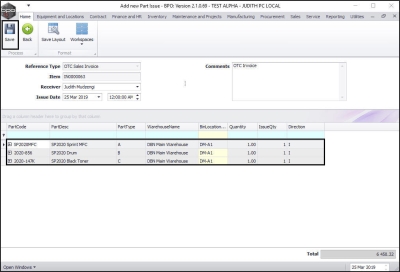
- Collapse the A / B-Class item Issues frame when you have finished editing / viewing it.
- For information on how to issue C class items, refer to Part Issue - C class items .
- Check that all details are correct.
- Click on Save.
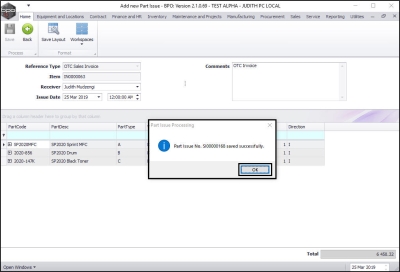
- A Part Issue Processing message will be displayed telling you;
- Part Issue [ ] saved successfully.
- Click on OK.
Print Part Issue Note
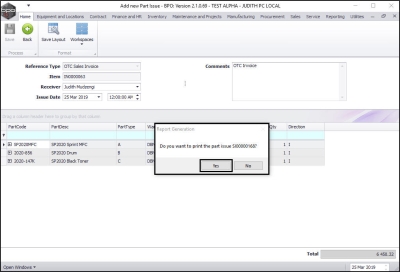
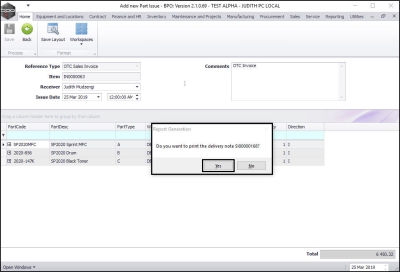
- A Report Generation message will be displayed asking you;
- Do you want to print the part issue [ ]?
- Click on Yes if you want to print the part issue report and No if you do not want to print the part issue report.
- For the purpose of this manual, Yes was selected.
- The Part Issue Note will be displayed.
- You can View, Print, Save and Email this note.
- Click on Close to exit this report.
Print Delivery Note
- A Report Generation message will be displayed asking you;
- Do you want to print the delivery note [ ]?
- Click Yes if you want to print the delivery note and No if you do not want to print on the delivery note.
- For the purpose of this manual, Yes was selected.
- Note: This pop up message might be displayed within the Part Issue Note screen or Add new Part Issue screen.
- The Delivery Note will be displayed.
- You can View, Print, Save, Email this note.
- Click on Close to exit this report.
Part Requests Linked to a Work Order
Part Request Issue Linked to a Work Order
- Click on the row selector in front of the part request linked to a Work Order that you wish to issue stock for.
- You can either click on Issue.
- or you can right click and select Issue from the menu.
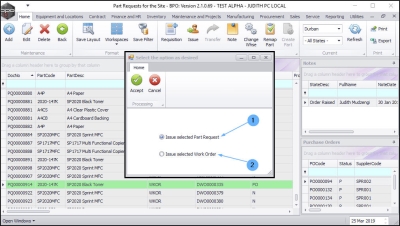
- As this part request is linked to a Work Order, a Select the option as desired screen will pop up with 2 options:
- Issue selected Part Request
- Issue selected Work Order
- Select the Part Request option if you only want to issue the initially selected part request.
- Select the Work Order option if you want to issue all part requests linked to this work order.
Single Part Request Issue on Work Order with Multiple Parts Requests Linked
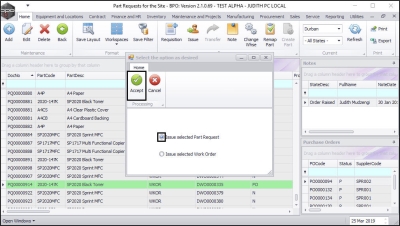
- In the Select the option as desired screen,
- Click on Issue selected Part Request.
- Click on Accept.
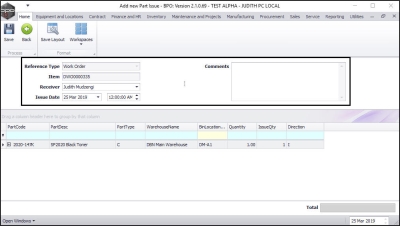
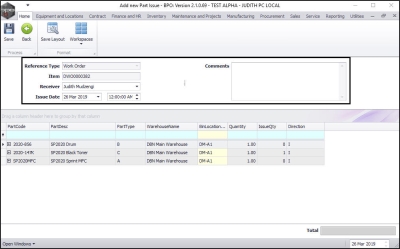
The Add new Part Issue screen will be displayed.
- Reference Type: This will auto populate with Work Order.
- Item: This will auto populate with the linked work order number.
- Receiver: This will auto populate with name of the person currently logged on to BPO2. You can click on the drop-down arrow and select an alternative receiver if required.
- Issue Date: This will auto populate with the current date but you can click on the drop-down arrow and use the calendar function to select an alternative date if required.
- Comments: Type a relevant comment in this text box if required.
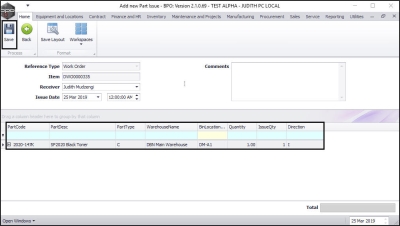
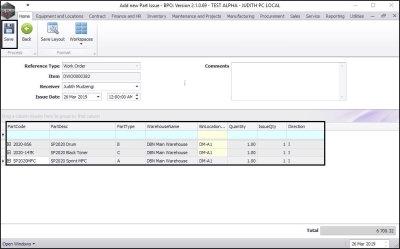
- The Parts data grid will contain only the part requested on the initially selected Part Request. For information on how to issue items, refer to Part Issue - C class items and Part Issue - A / B class items.
- Check that all the part details are correct.
- Click on Save.
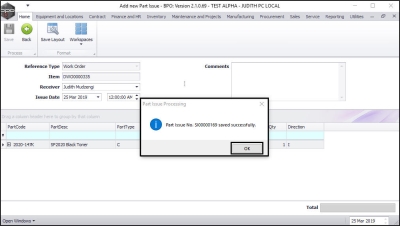
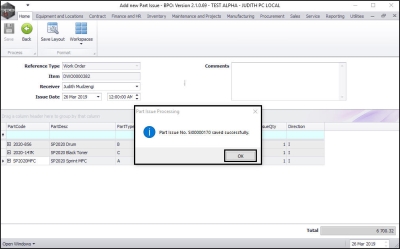
- A Part Issue Processing message will be displayed asking you;
- Part Issue No [ ] saved successfully.
- Click on Ok.
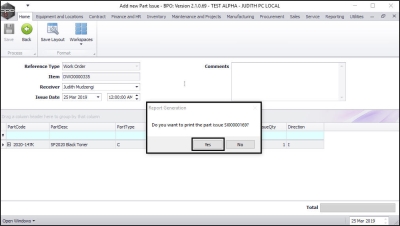
- A Report Generation message box will pop up asking;
- Do you want to print the part issue [ ]?
- Click on Yes if you want to print the part issue and No if you do not.
- For the purpose of this manual, Yes was selected.
- The Part Issue Note Preview screen will be displayed.
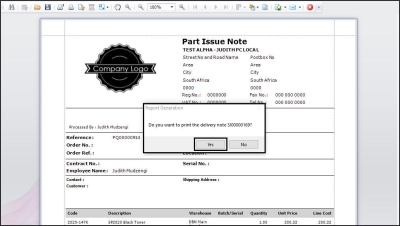
- Within this screen, a Report Generation message box will pop up asking;
- Do you want to print the delivery note [ ]?
- Click on Yes if you want to print the delivery note and No if you do not want to print the delivery note.
- For the purpose of this manual, Yes was selected.
- The Delivery Note will be displayed.
- You can View, Print, Email, Save this note.
- Click on Close to exit this screen.
Multiple Part Request Issue Linked to Work Order
- In the Select the option as desired screen,
- Click on Issue selected Work Order.
- Click on Accept.
The Add new Part Issue screen will be displayed.
- Reference Type: This will auto populate with Work Order.
- Item: This will auto populate with the linked work order number.
- Receiver: This will auto populate with name of the person currently logged on to BPO but you can click on the drop-down arrow and select an alternative receiver if required.
- Issue Date: This will auto populate with the current date but you can click on the drop-down arrow and use the calendar function to select an alternative date if required.
- Comments: Type a relevant comment in this text box if required.
You will notice that all the parts requested against the Work order are listed in the data grid.
- For more information on how to issue parts in this screen, refer to Part Issue - C class items and Part Issue - A/B class items .
- Check that all the part details are correct.
- Click on Save.
- A Part Issue Processing message will be displayed asking you;
- Part Issue No [ ] saved successfully.
- Click on Ok.
Print Part Issue Note
- A Report Generation message box will pop up asking;
- Do you want to print the part issue [ ]?
- Click on Yes if you want to print the part issue or No if you do not.
- For the purpose of this manual, Yes was selected.
Print Part Delivery Note
- A second Report Generation message box will pop up asking;
- Do you want to print the delivery note [ ]?
- Click on Yes if you want to print the delivery note and No if you do not.
- For the purpose of this manual, Yes was selected.
- The Report Preview screen for the Delivery Note will pop up first.
- From this screen you can View, Print, Export, Email the Delivery Note.
- Click on Close to exit this screen.
- The Report Preview screen for the Part Issue Note will be displayed.
- From this screen you can View, Print, Export, Email the Part Issue Note.
- Click on Close to exit this screen.
MNU.032.001
_thumb_400_400.jpg)
