We are currently updating our site; thank you for your patience.
Contract
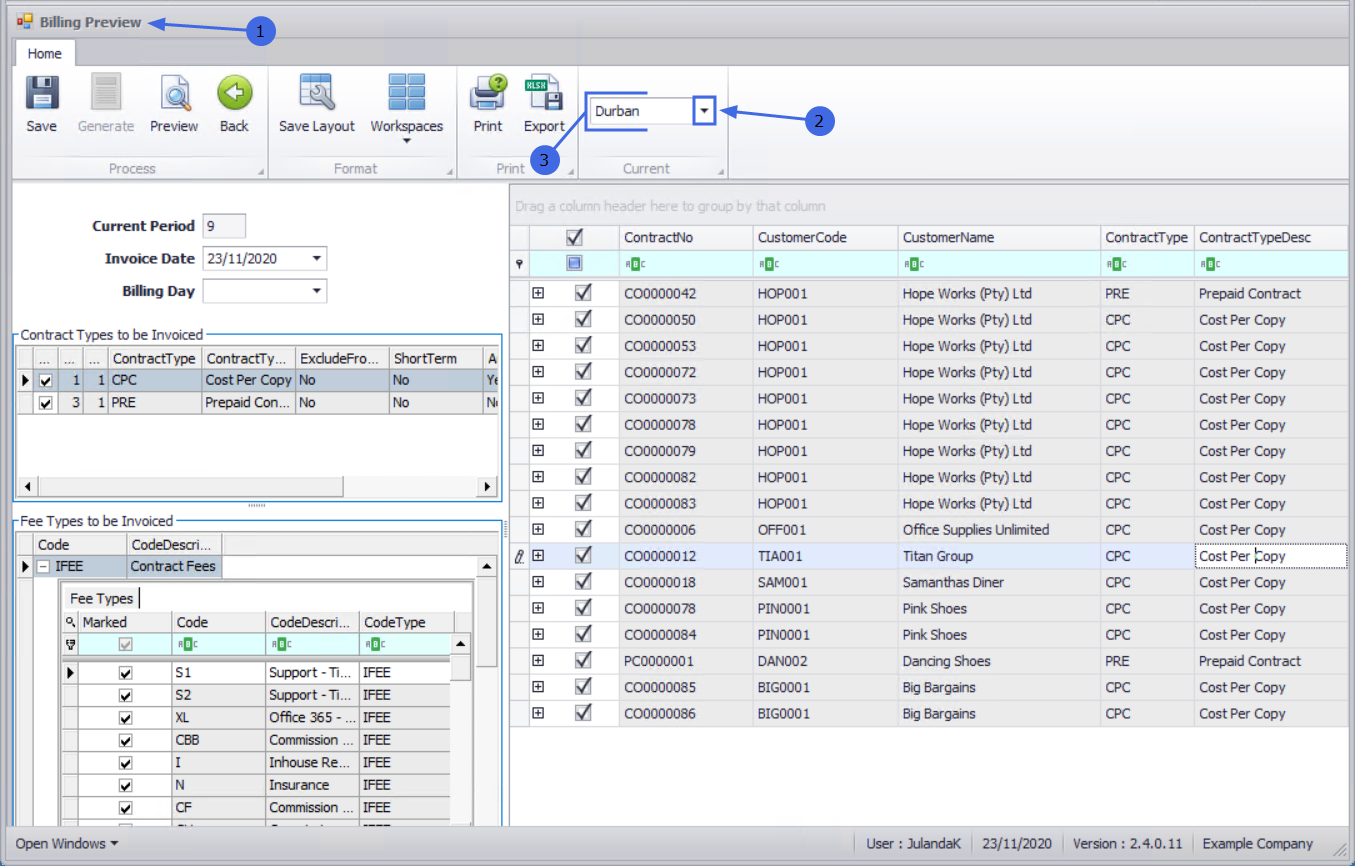
Billing Preview
Before doing the month end Billing Run, you have the option to do a Billing Preview. This enables you to check that all contracts have been billed correctly to assist in eliminating errors in the actual Billing Run.
| Ribbon Access: Contract > Billing Preview |

- The Billing Preview screen will be displayed.
- Select the Site that you wish to work in.
- In this example, Durban is selected.
Current Period
- Current Period: The current Billing Period is auto-populated.
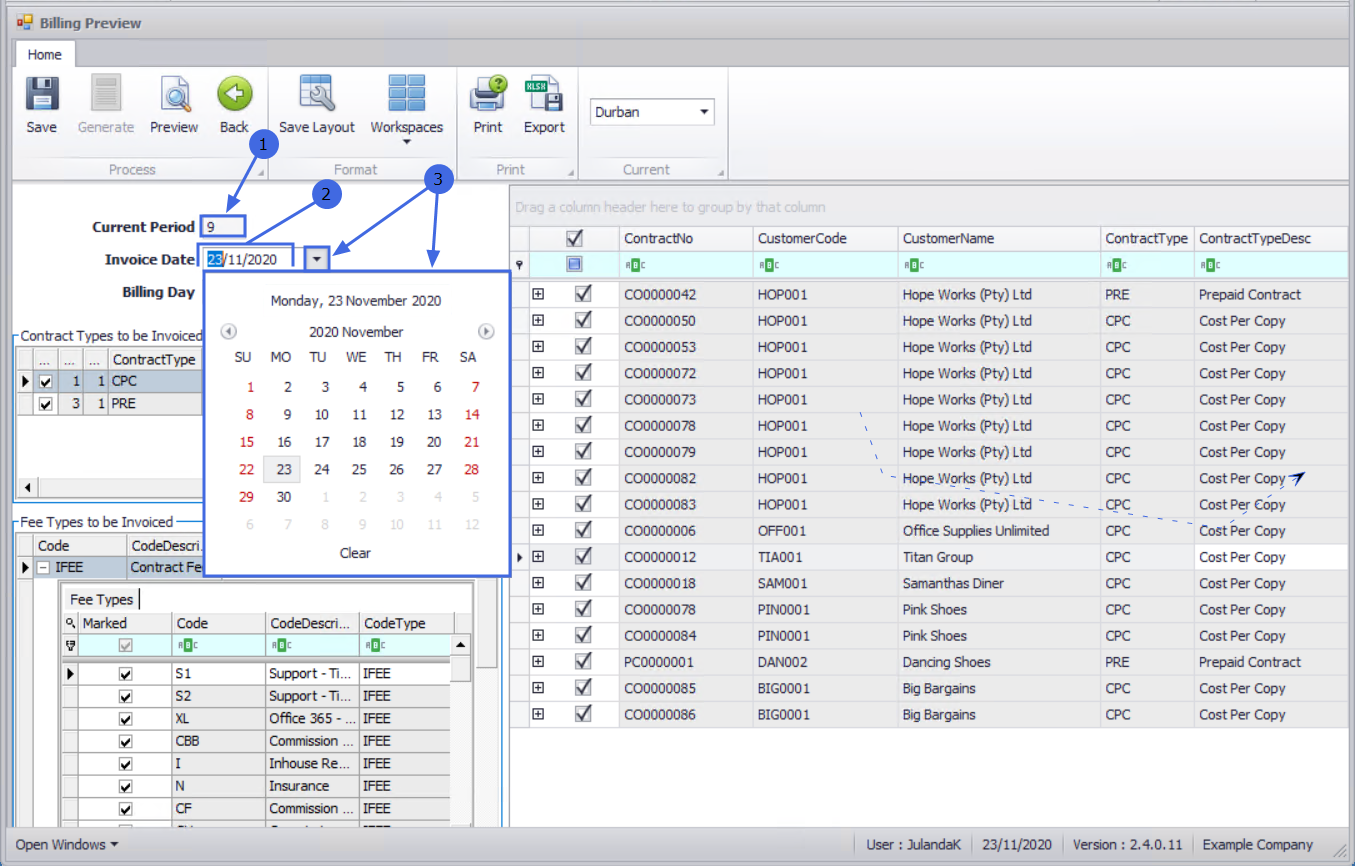
Invoice Date
- Invoice Date: The current date will be displayed by default. Ensure you select the correct invoice date - this is the date that will reflect on the contract invoice(s).
- Click on the drop-down arrow and use the calendar function to select an alternative date, if required.
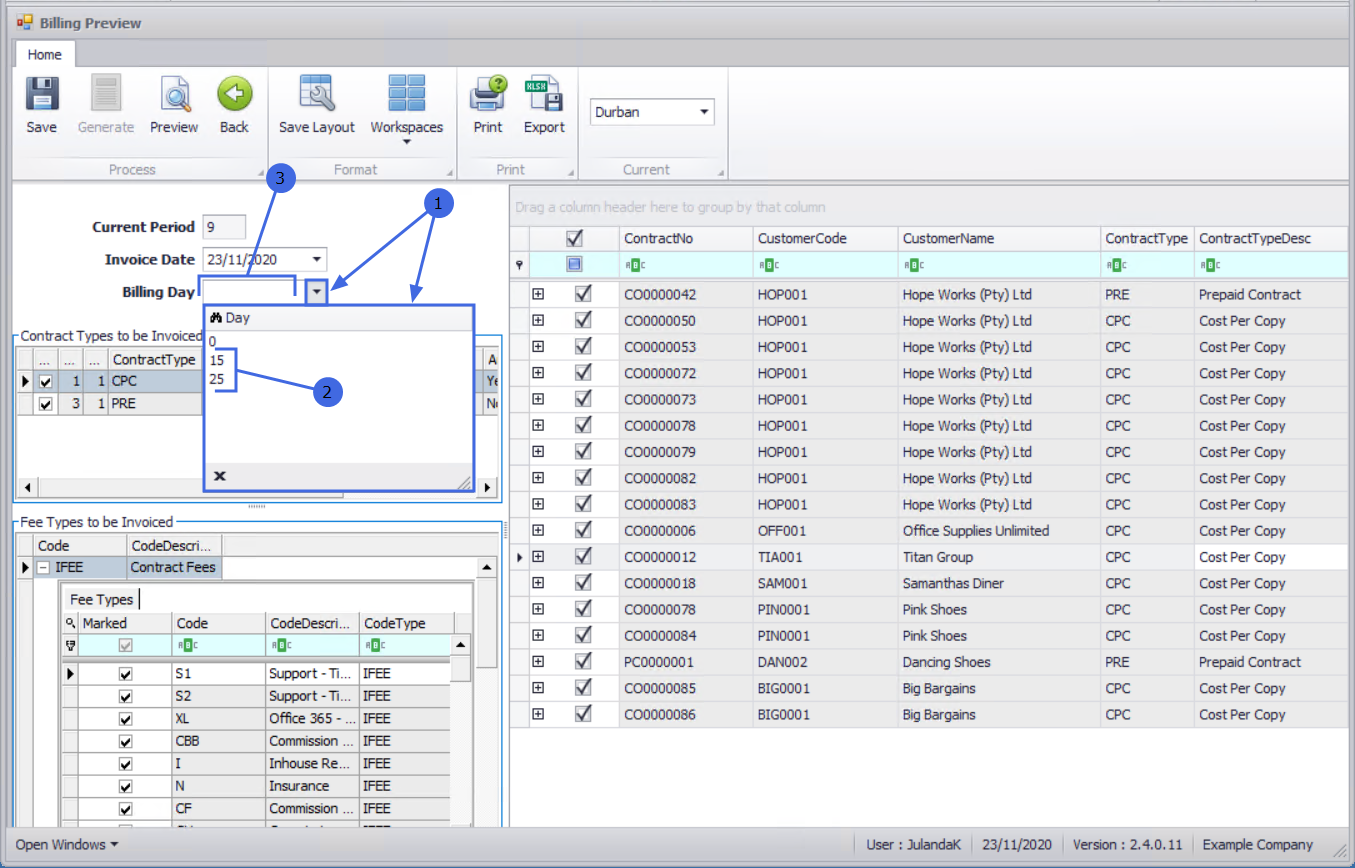
Billing Day
Billing Day: When setting up contracts, the Billing Day field can be used if you wish to bill different contracts on different days.
In the Billing Preview screen, this is an optional selection - and will give you the ability to select contracts by the Billing Day set up in the contract.
- Click on the drop-down arrow in the Billing Day field to display the Day selection list.
- In this example, Billing days have been set up on the 15th and 25th. By selecting a number from this list, only Contracts with the same Billing Day as the selection will be displayed in the contract list.
- Leave the field as 0 if you wish to display all the contracts.
Contract Types to be Invoiced
- Upon opening, the Billing Preview screen will have all the Contract Types selected by default.
- In the Marked column, click on the check box next to the Contract Type(s) that you wish to deselect from the Billing Preview.
- In this example, Prepaid Contract has been deselected.

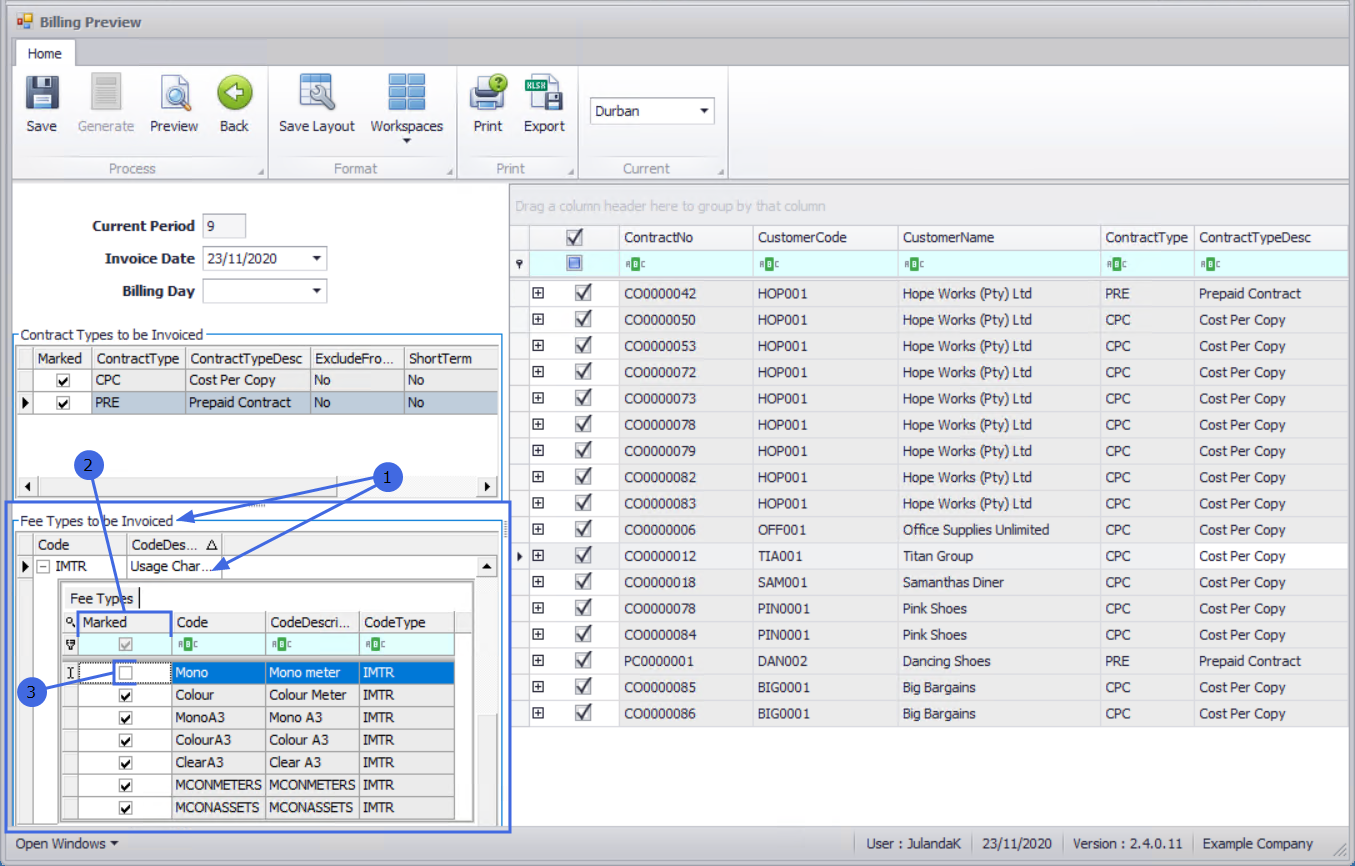
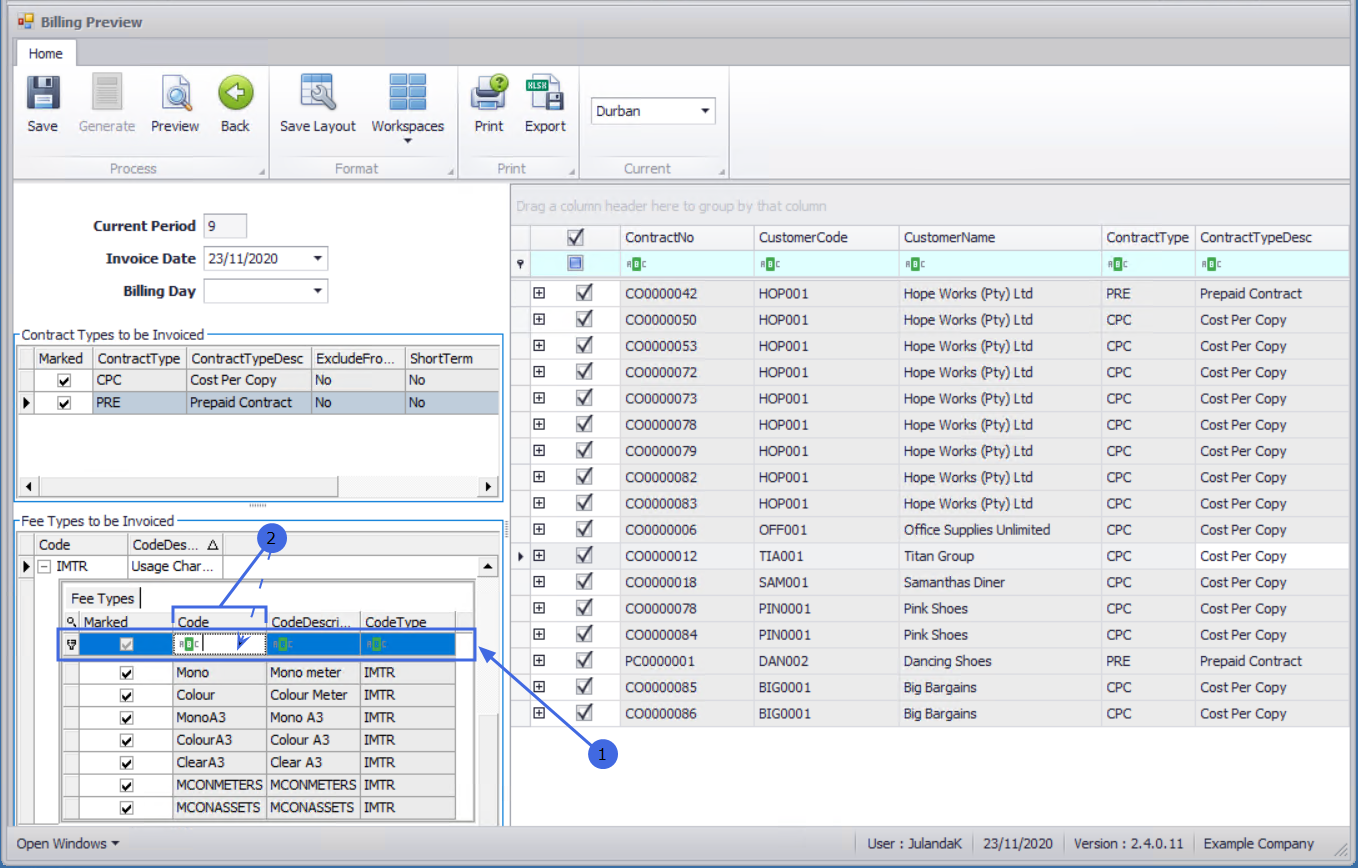
Fee Types to be Invoiced
- Fee Types are divided into 2 groups, namely:
- Contract Fees
- Usage Charges
- All the Fee Types are selected by default.
- Upon opening, the Billing Preview screen will have both Fee type sub-grids (FEE: Contract Fees and MTR: Usage Charges) expanded.
Short Fee Type List
- If your Fee Type list is short, then you can deselect the Fee Types you wish to exclude, by clicking on the check box in the Marked column next to the Fee Type Code. In this example, Mono is deselected.
Long Fee Type List
- If you have a long list of Fee Types, you can make use of the filter search row.
- In this row, click in the column where you wish to activate the filter option. In this example, the Code column is selected and the filter option is activated (the field is now white).
- Type in the Code of the Fee Types that you wish to exclude / deselect from the Billing preview. In this example 'Mon' for Mono is typed into the field.
- As you type, the system will filter for the typed letters and the data grid will display the result of the filter.
- The Edit Filter row / table will list which column you filtered for and the text or number you typed in for filtering.
- Now that the list is reduced, you can simply deselect the required Fee Types by clicking on the check boxes in the Marked Column next to the applicable Fee Types Code. In this example, Both the Mono meters have been deselected.

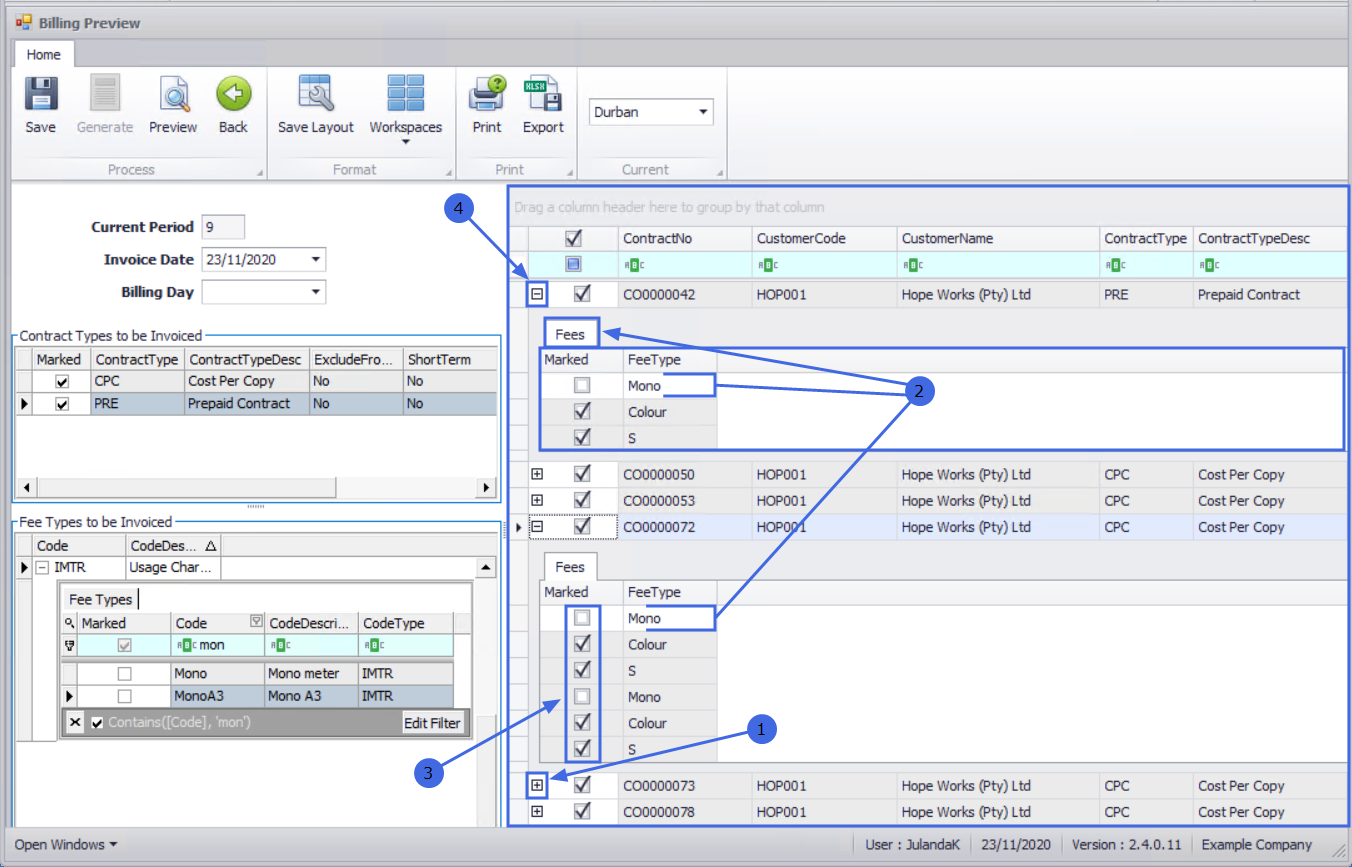
Contracts Frame
This frame lists Contracts that are available for billing. Upon opening the Billing Preview screen, all Contracts are initially selected by default. If you have selected a Billing Day or deselected any Contract Types and/or any Fee Types in the previous steps, then your selection results will be displayed in this frame:
- In any row of this frame, click on the expand [+] button to view the related Contract Fees sub-grid.
- In this expanded view, note that the Mono Meter Fee Type has been deselected under each contract where there is a Mono Meter.
- You will not be able to select/deselect any Fee Types from this Contract Frame. All selections must be made and saved in the Fee Types frame.
- Collapse a row to hide the Fees sub-grid again.
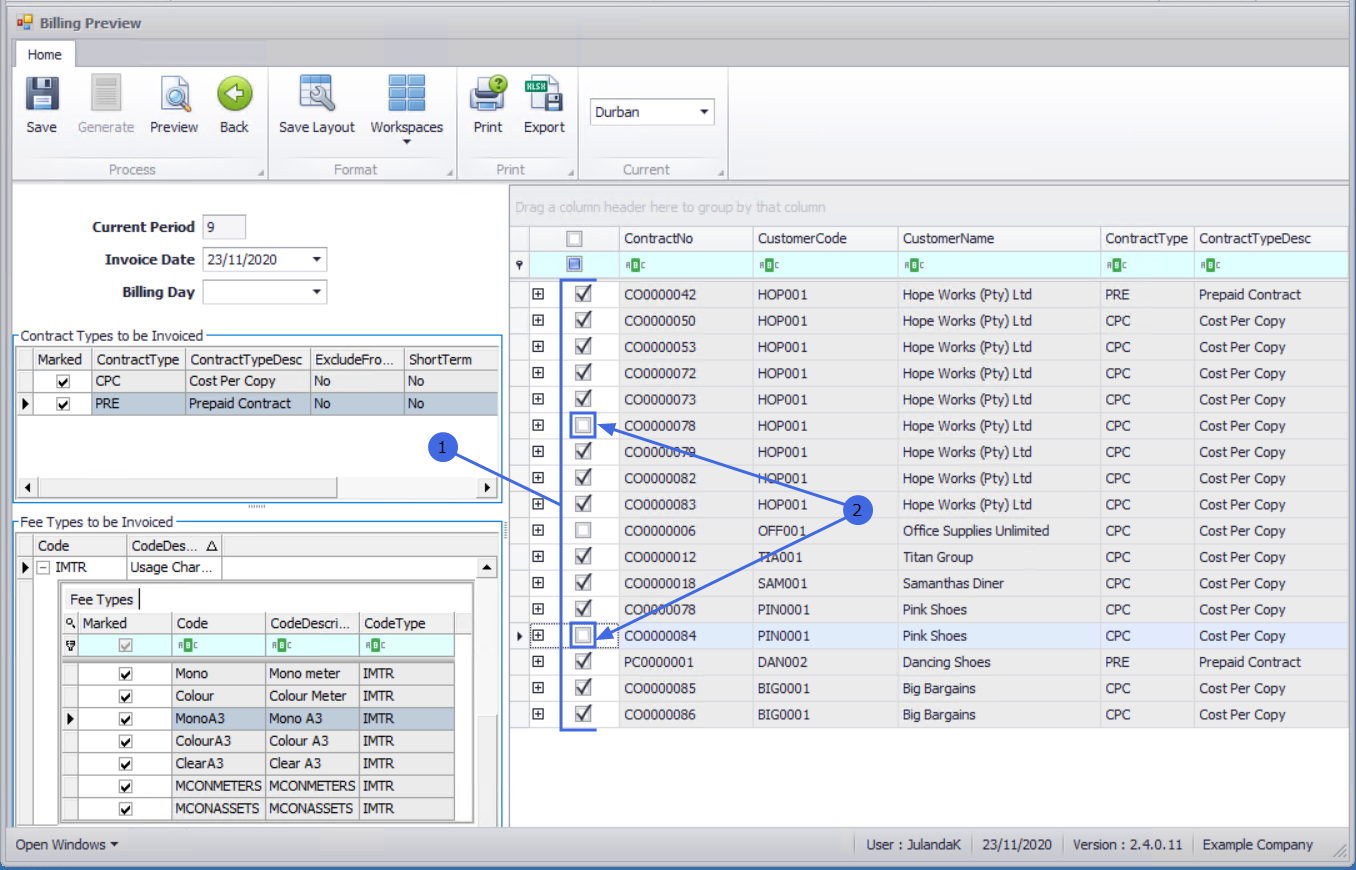
Select Contracts for Preview
Short List of Contracts
- For a short list of Contracts, you may choose to exclude individual contracts from the Billing Preview, by deselecting the check box next to the Contract Number.
- In this example, Contracts 78 and 84 have been deselected.
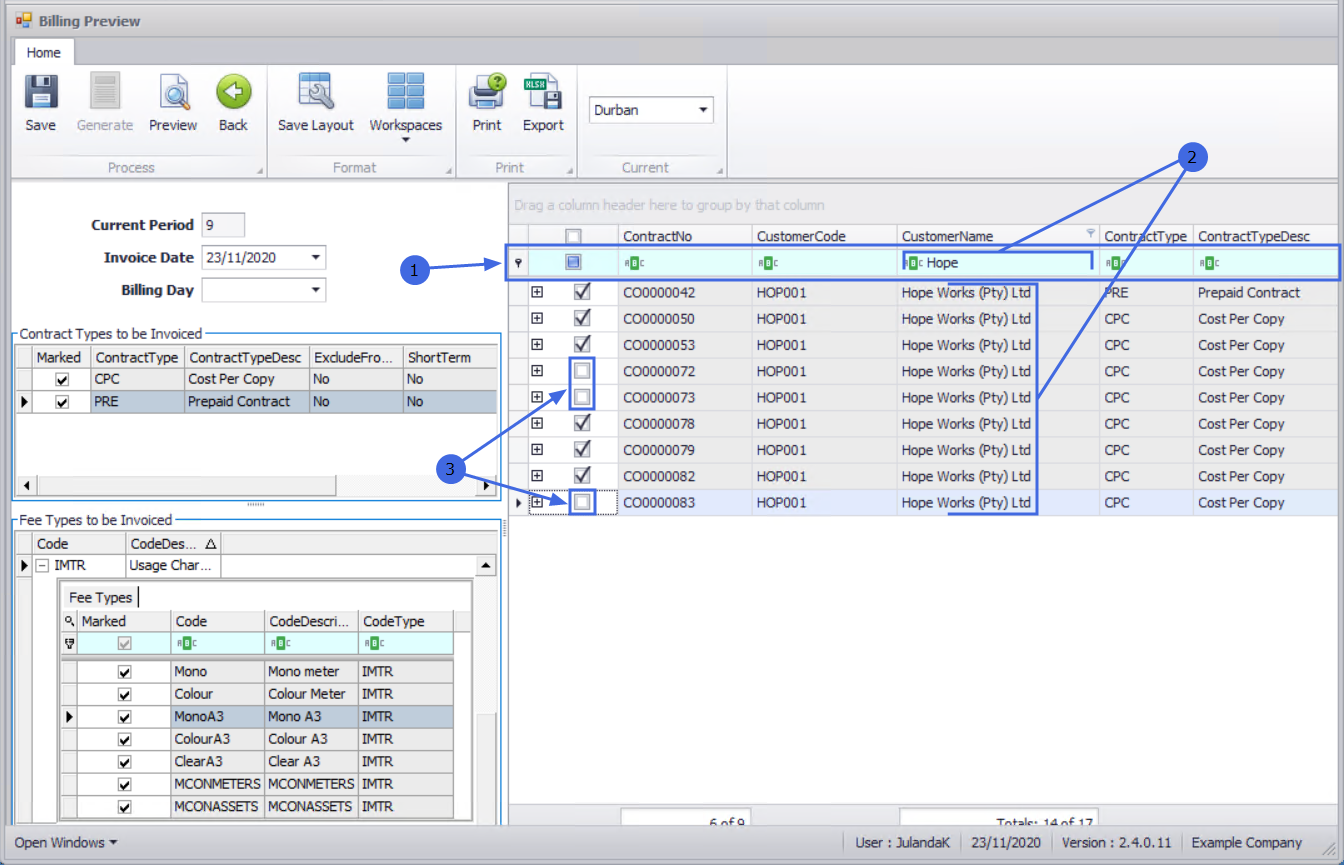
Long List of Contracts
- For a long list of Contracts or to exclude a specific Customer from the Billing Preview, you will need to make use of the filter search row.
The example below is using the filter search row to list all the contracts linked to the customer “Hope Works (Pty) Ltd”.
- Click in the Customer column of the filter search row and start typing the name of the customer. As you type, the system will filter for the typed letters and the data grid will display the result of the filter- in this case, all the contracts linked to the Customer “Hope Works (Pty) Ltd”.
- You can now click on the specific contract(s) that you wish to deselect.
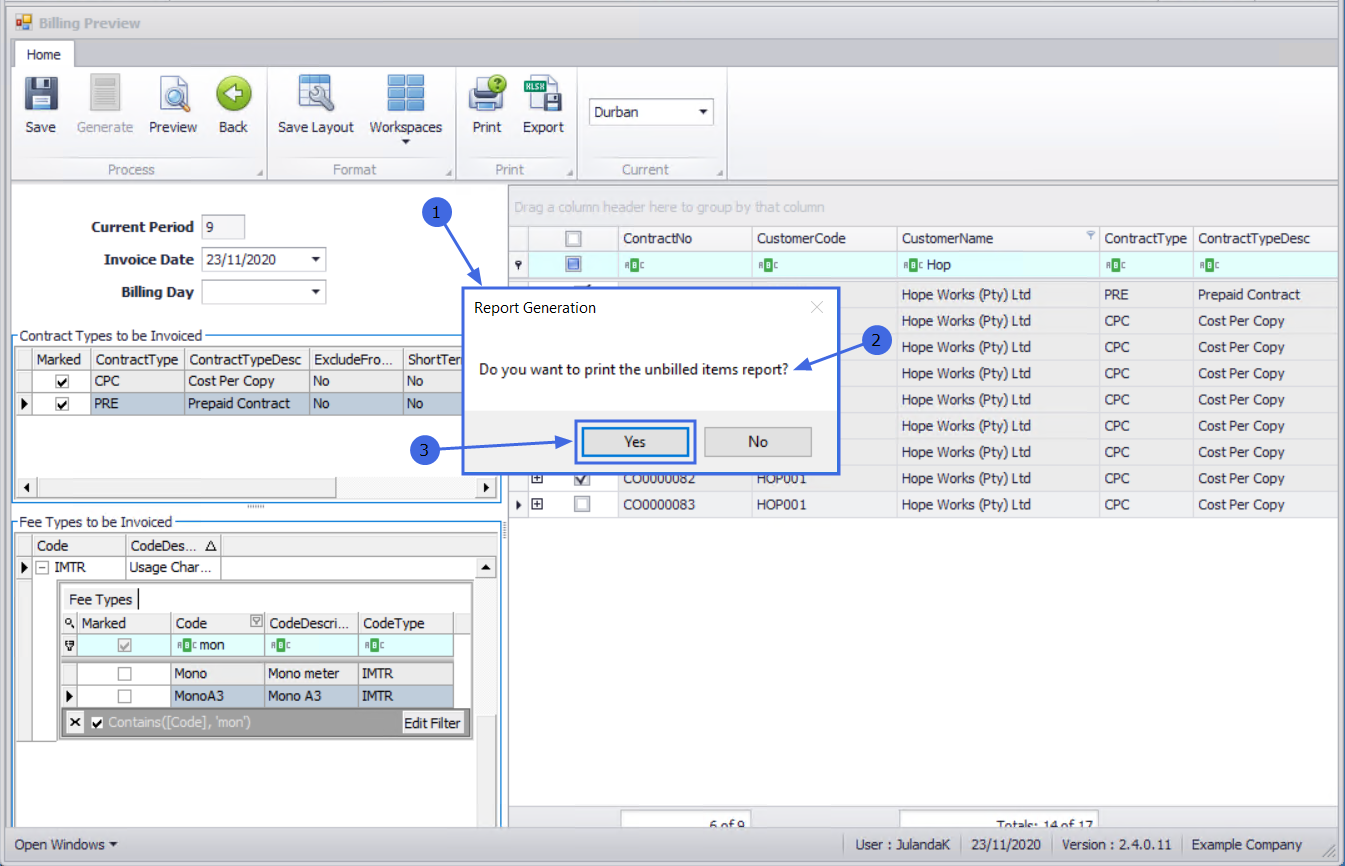
Print Unbilled Items Report
Click on Print on the Billing Preview ribbon.

- A Report Generation message box will pop up asking;
- Do you want to print the unbilled items report?
- Click on Yes if you wish to print the report.
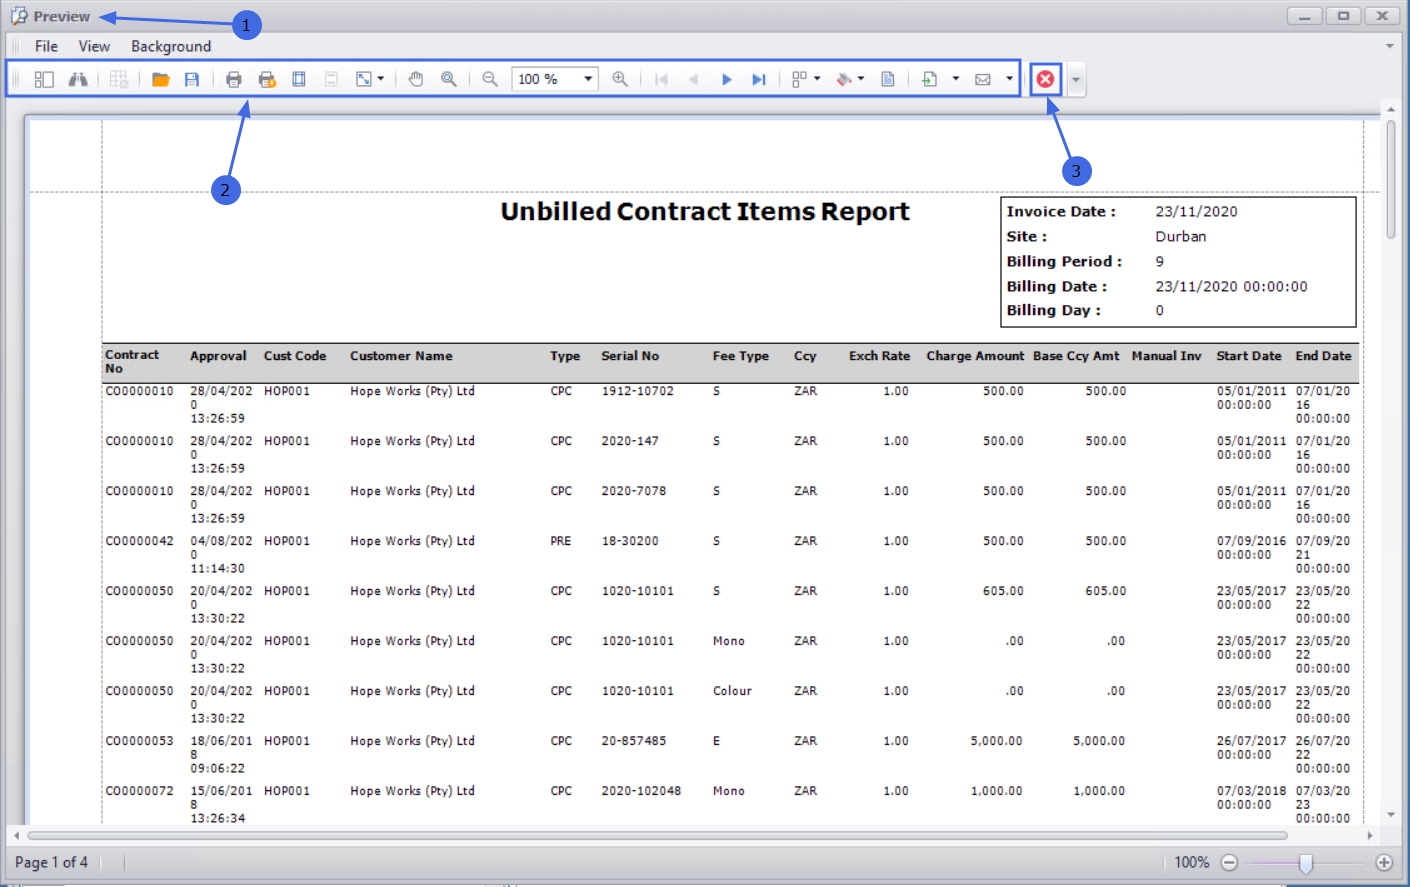
- The Report Preview screen will be displayed.
- You can email, print, export or save this report.
- Close the Report Preview screen to return to Billing Preview screen.
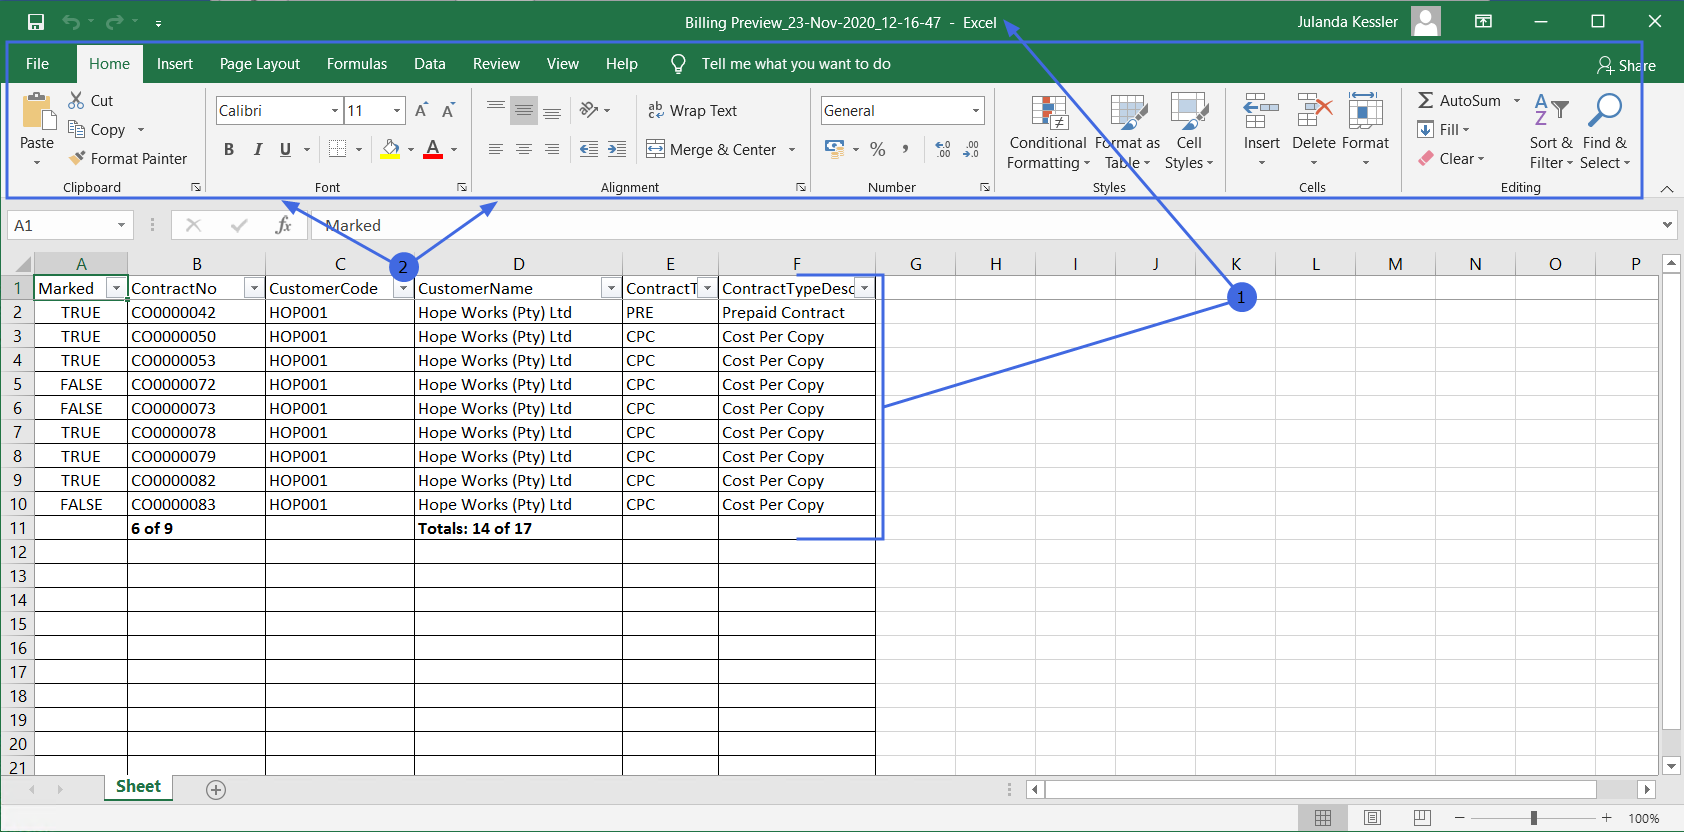
Export to Excel
Select Export from the Billing Preview ribbon to export the contracts to Microsoft Excel.

- This will open MS Excel with a new spreadsheet and load all the data from the Contracts data grid into that spreadsheet.
- You can then view the data, search for specific data, prepare the spreadsheet for printing, etc. When you have finished working in the spreadsheet, save your changes, if required, and close Excel to return to the Billing Preview screen.
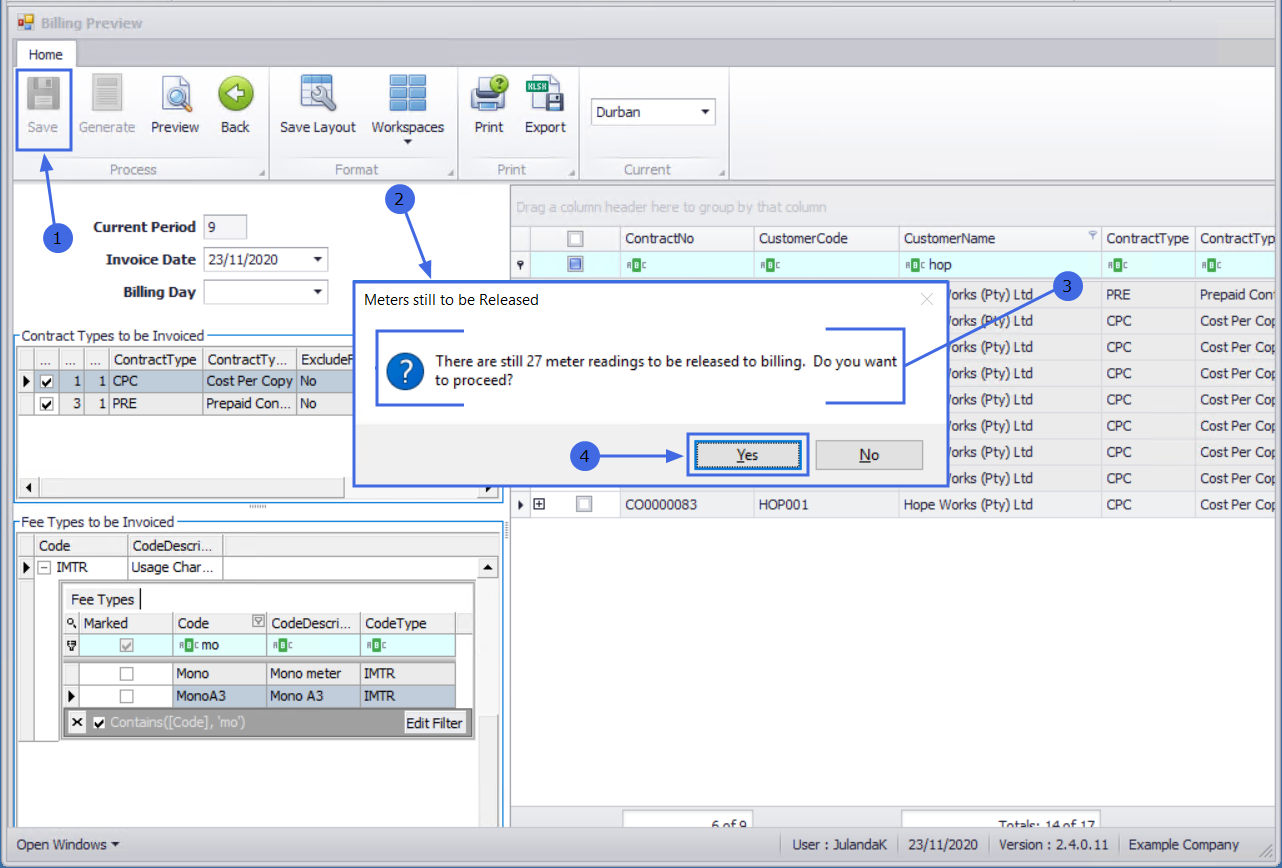
Save Batch Settings/Filters
- Once you have finished filtering and selecting the billing batch settings that you require, click on Save in the Billing Preview ribbon.
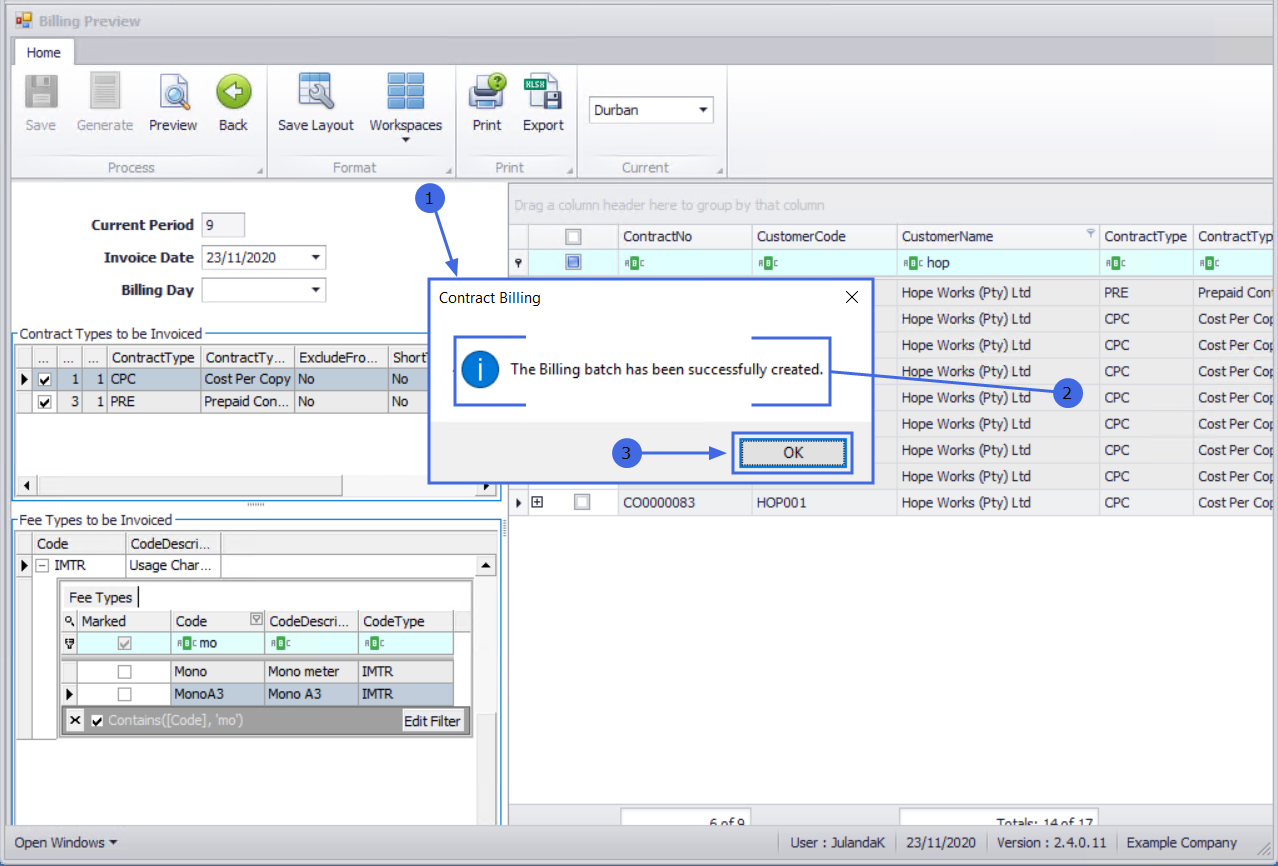
Meters Still to be Released
- If there are any meter readings that need to be released on the contracts then the Save button will become grey and a Meters still to be Released message will pop up with the following prompt:
- There are still [ ] meter readings to be released to billing. Do you want to proceed? (For more information refer to Meter Usage - Release to Billing.)
- Select Yes to proceed without releasing meter readings to billing, or No to return to the Billing Preview. For the purpose of this manual, Yes is selected.
- A Contact Billing message box will pop up informing you that;
- The Billing batch has been successfully created.
- Click on OK.
Note on Auto Bill Settings
Auto Bill set to 'Yes'
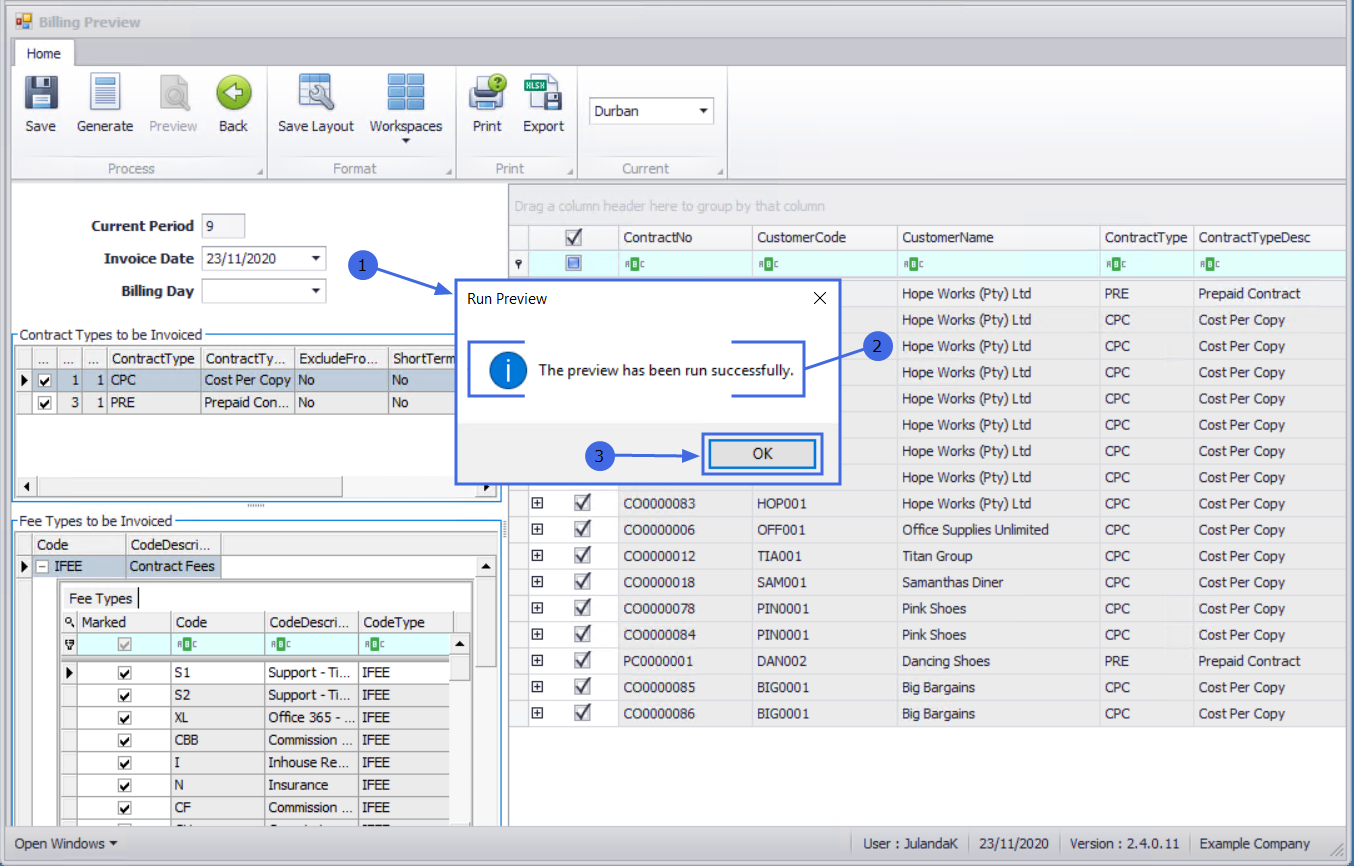
If the Auto Bill flag has been set to 'Yes' in Configurator > Contract > Configuration:
- Then a Run Preview message box will pop up informing you;
- The preview has been run successfully.
- Select OK.
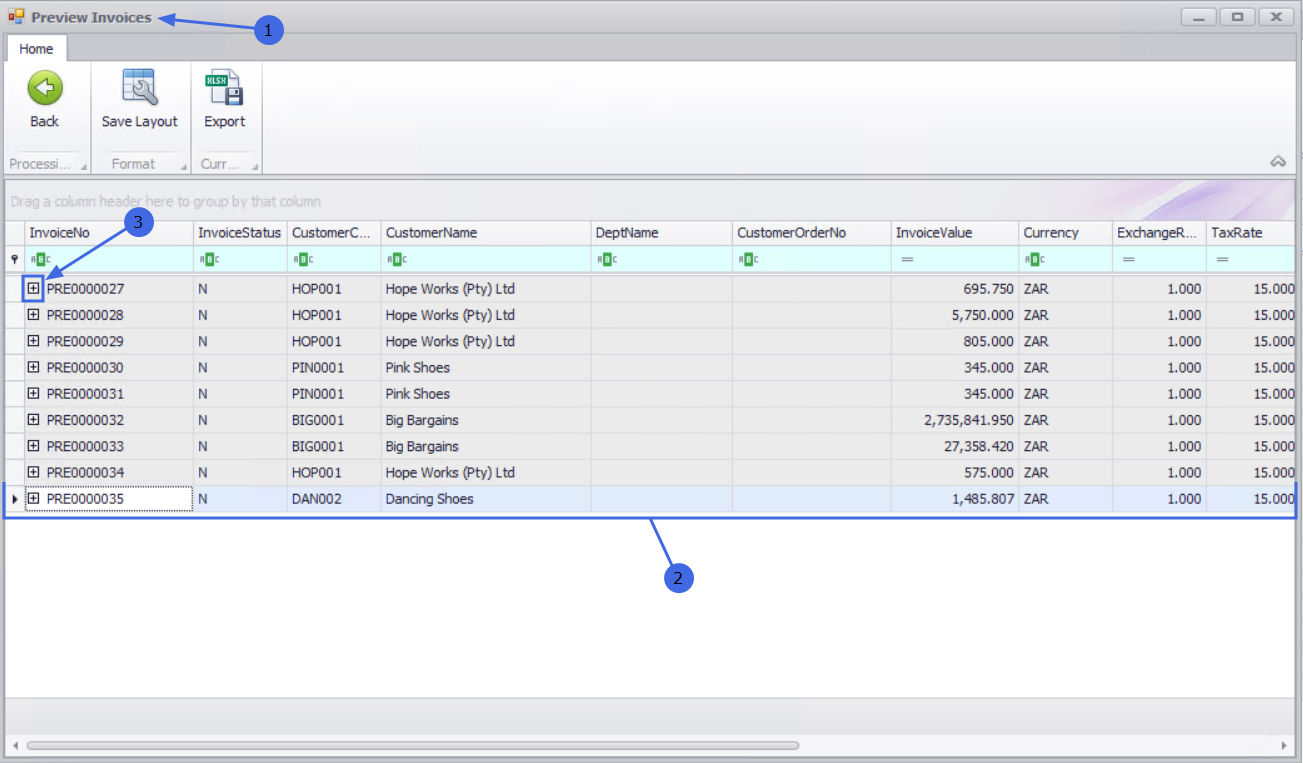
- The Preview Invoices screen will open.
- Here you can view details regarding the selected contract invoices.
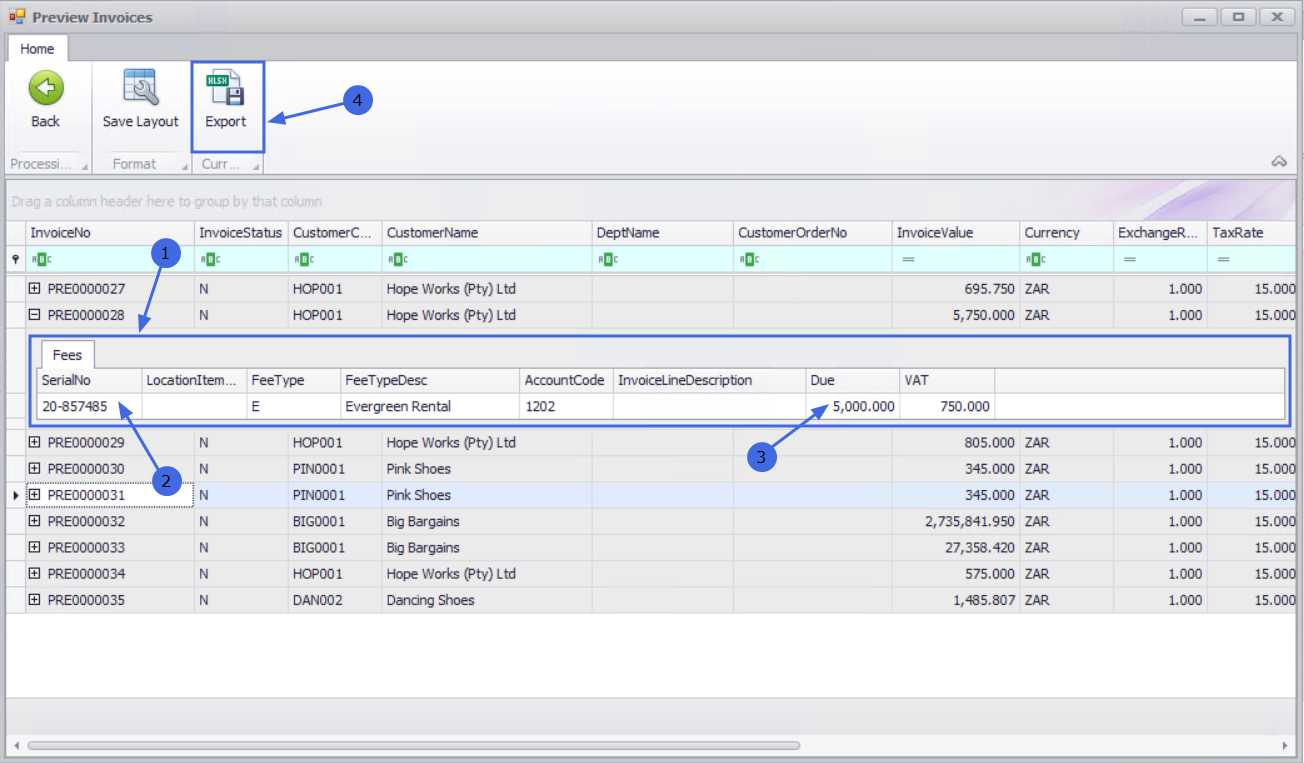
- Click on the expand button in a row of any invoice to view the Fees sub-grid.
Auto Bill set to 'No'
If the Auto Bill flag has been set to 'No' in Configurator > Contract > Configuration:
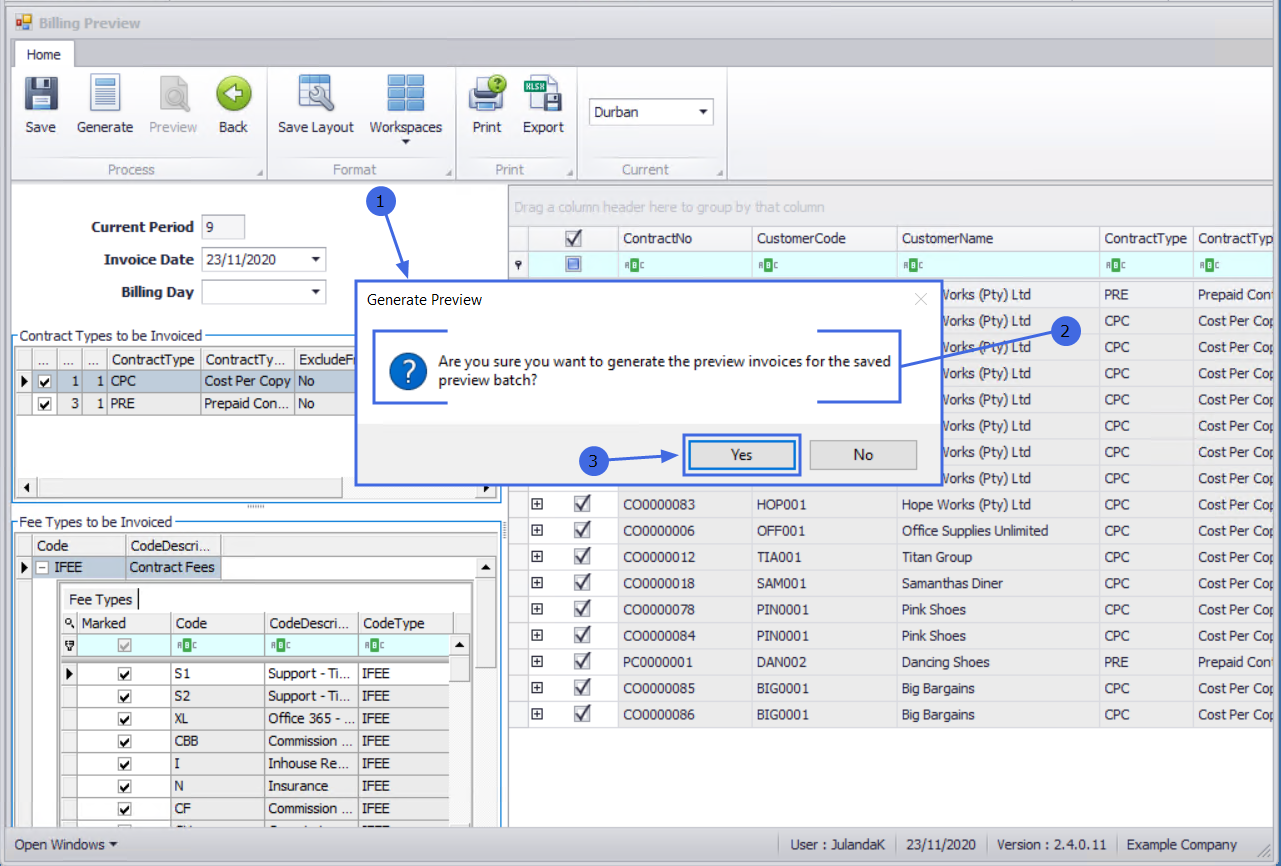
- Then after Saving Batch Settings / Filters, you will return to the Billing Preview screen and the Generate button will now be available in the Billing Preview ribbon. Select this button.

- A Generate Preview message box will pop up asking;
- Are you are sure you want to generate the preview invoices for the saved preview batch?
- Select Yes.
- The Run Preview message box will pop up informing you;
- The preview has been run successfully.
- Select OK.
- The Preview Invoices screen will now be open.
- Here you can view details regarding the previously selected contract invoices.
- Click on the expand button in a row of any invoice.
- The Fees sub-grid will be expanded.
- Here you can view more information including the linked Serial No. and the
- Due amount.
Export the Preview Invoices
- You can Export the Preview Invoices data to Microsoft Excel by selecting the Export button on the Preview Invoices ribbon.
- The invoices data will be exported to Microsoft Excel.
You can then view the data, search for specific data, prepare the spreadsheet for printing, etc.
- When you have finished working in the spreadsheet, save your changes, if required, and close Excel to return to the Preview Invoices screen.

Click on Back in the Preview Invoices ribbon to return to the Billing Preview screen.

The Preview button will be available on Billing preview after the batch of Invoices has been saved for Preview.
If you wish to preview the invoice list again, you only need to click on Preview to return to the Preview Invoices screen from the Billing Preview ribbon as your settings have been saved.

If you wish to view a different batch of invoices, then you will need to start the Preview process from the Select Contract Types to be Invoiced step. If you wish to preview invoices from a different site then begin from the Site selection step.
MNU.112.048