We are currently updating our site; thank you for your patience.
CRM Basics
Warnings
Warnings are notifications of overdue activities, that can be directly actioned from the Warnings page using the Activity Action buttons.
A full list of warnings for all Customers can be accessed from the Homepage as set out below.
Client-specific warnings can be accessed from the from the Customer Homepage.
| Access: Webpage - http://[servername]:[portno]/BPOCRM/User.aspx |
Access Warnings from Home page
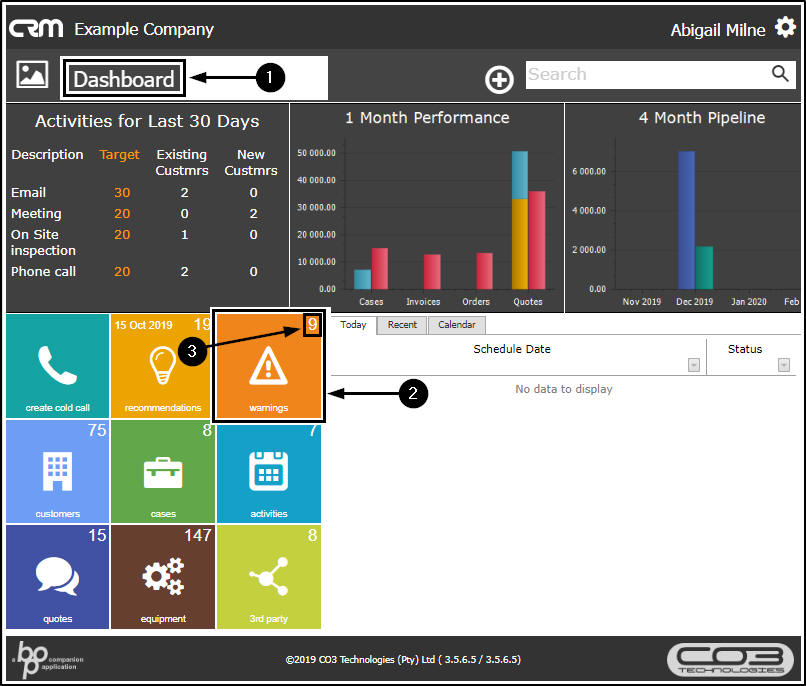
- In the Dashboard (Home page),
- Click on the Warnings tile.
- Note: The number in the top right of this tile indicates how many warnings are pending in total for all customers.
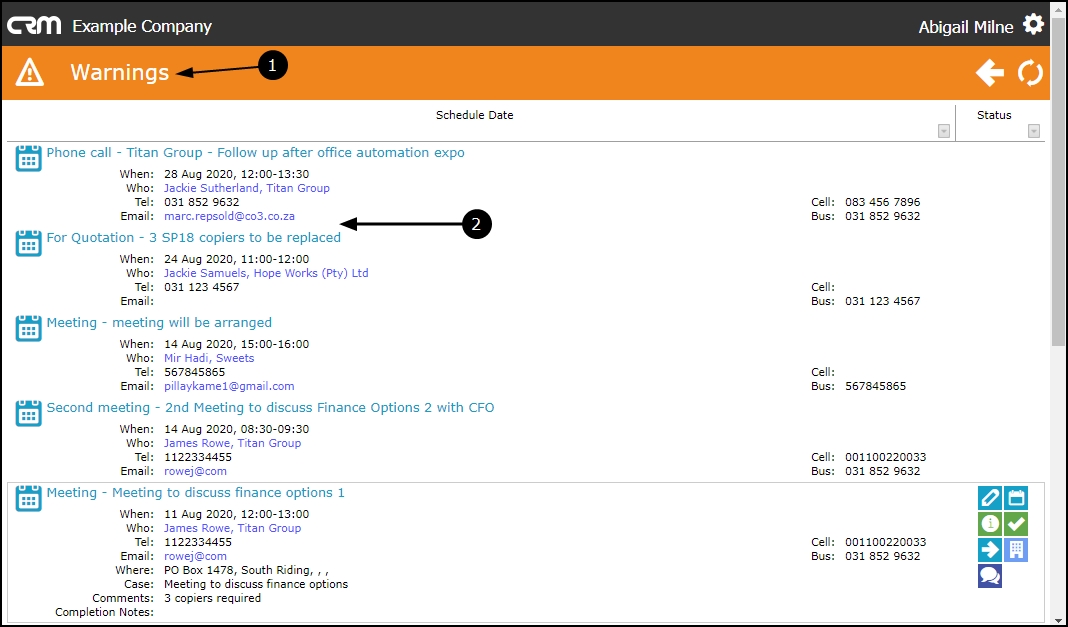
Warnings Page - All Customers
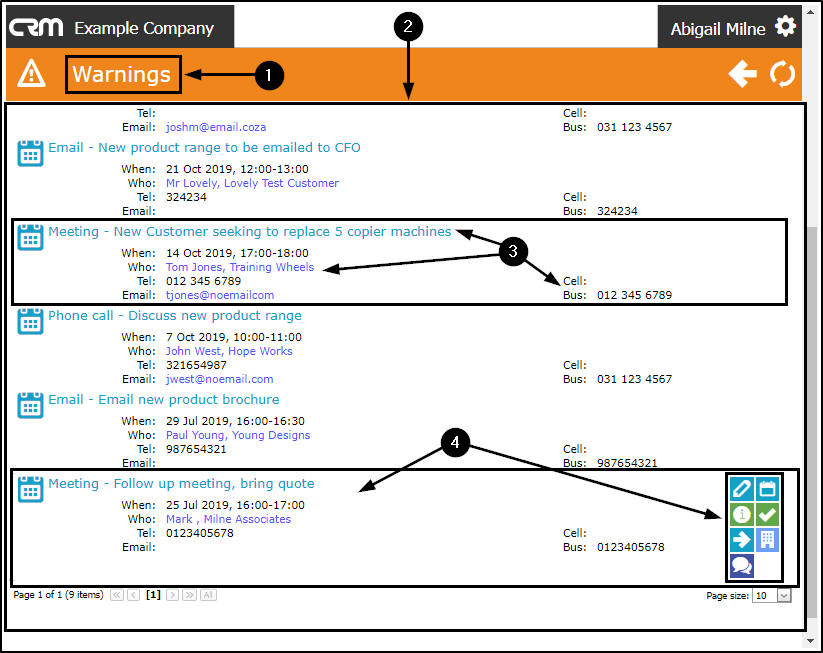
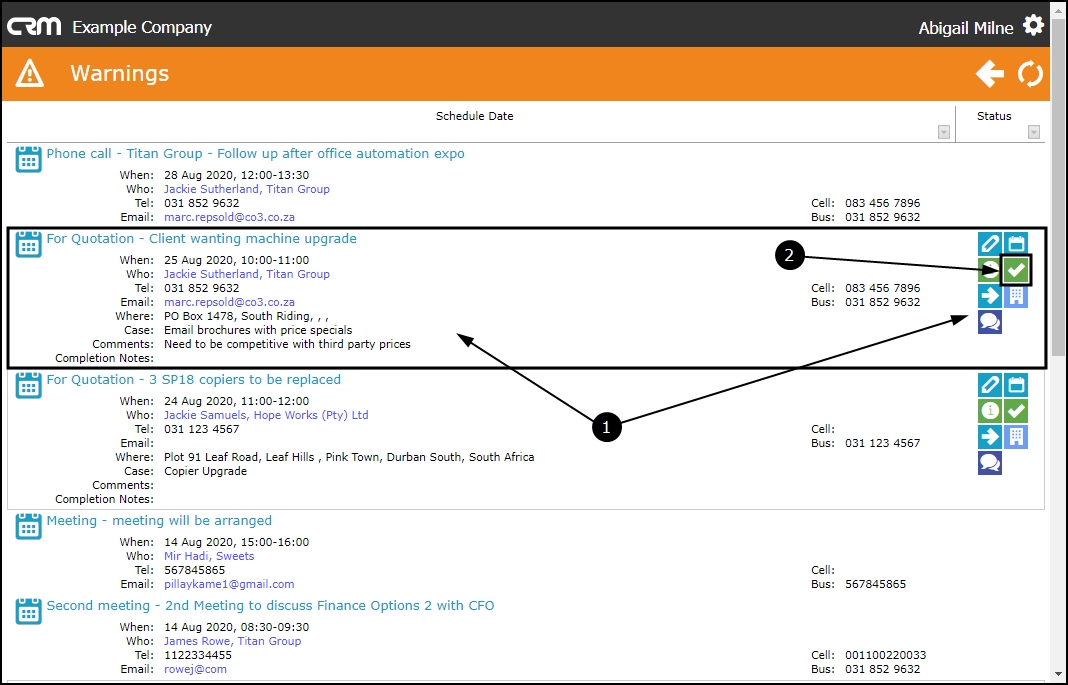
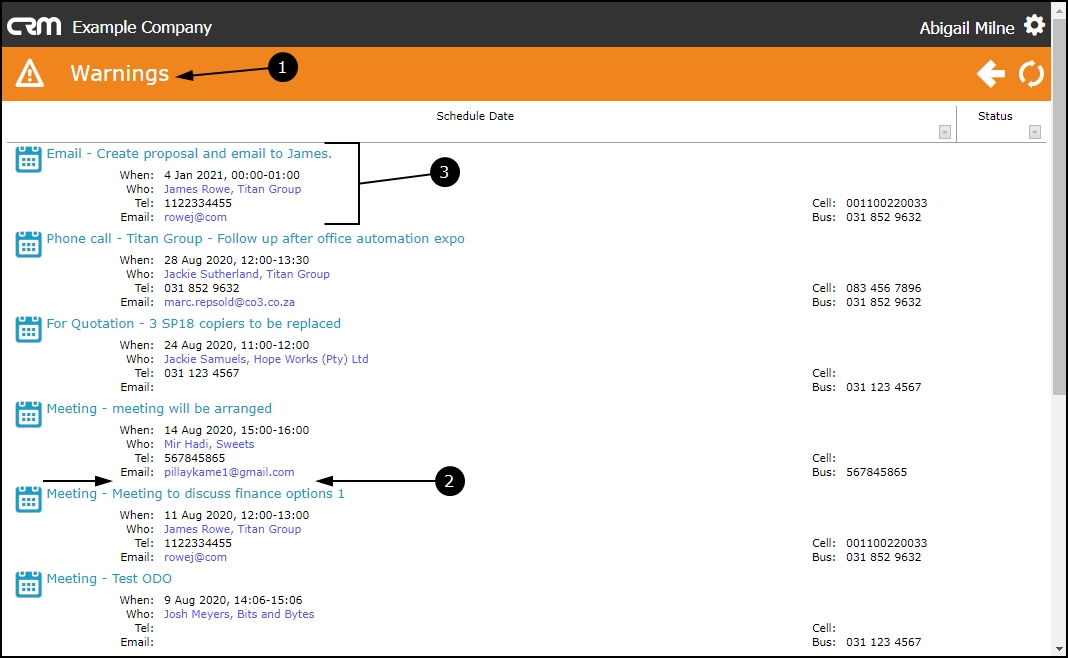
- The Warnings page will open.
- Here you can view a list of all the warnings, for all customers - where you have activities pending.
List of Activities Pending
- Each warning lists:
- The activity subject
- When the activity was scheduled for
- Who the activity was scheduled with
- Contact details for the activity:
- Tel:
- Email:
- Cell:
- Business No:
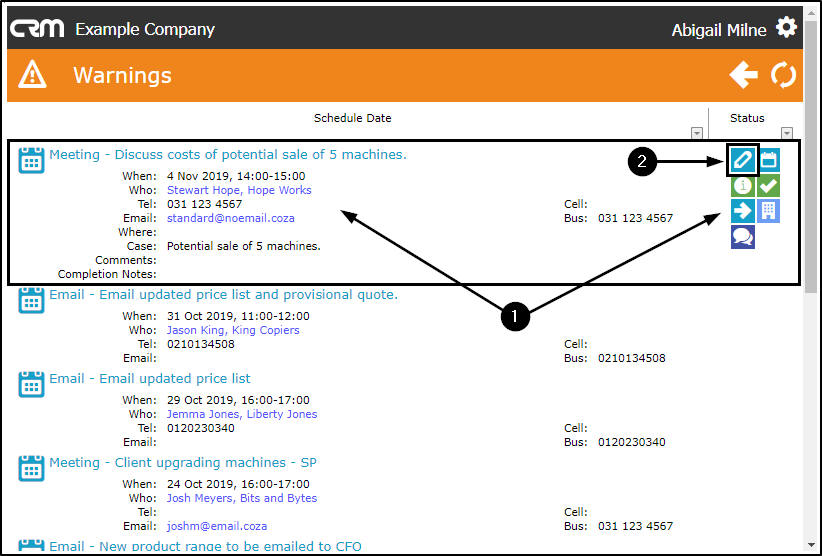
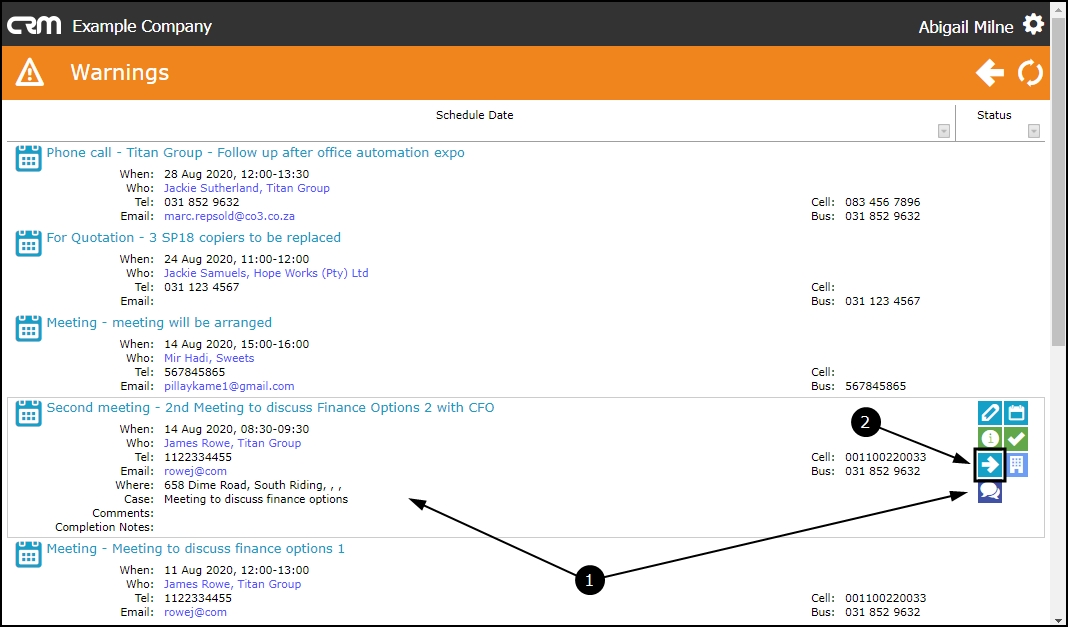
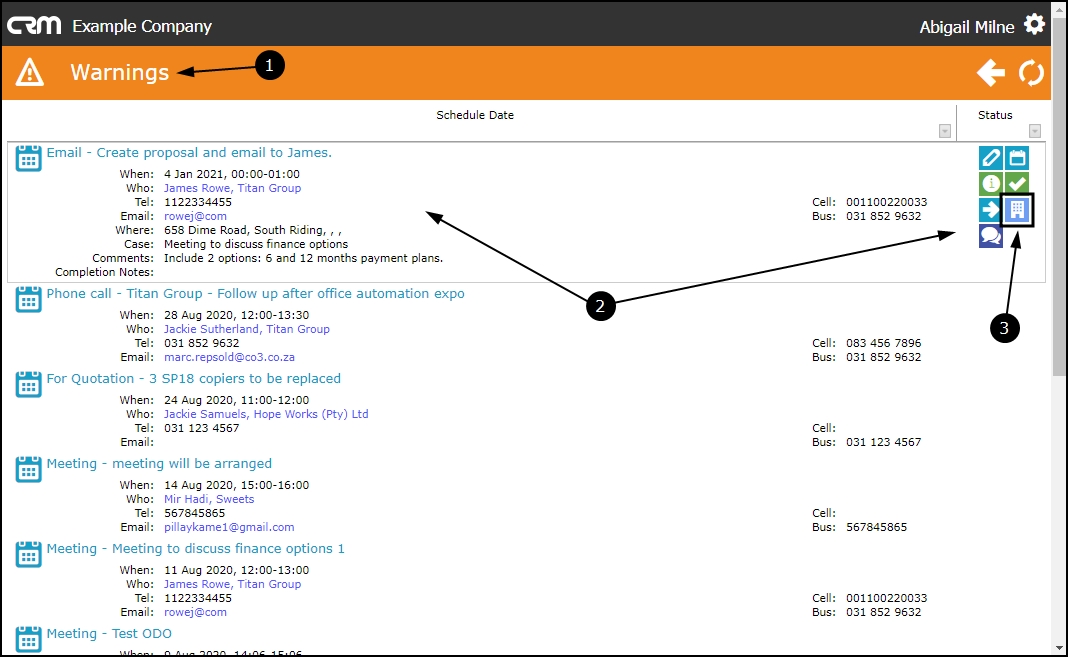
Activity Action Buttons
- Hover over any activity to reveal the Activity Action Buttons:
- View / Edit this Activity
- Reschedule this Activity
- View Case info and history
- Close this case
- Next Action (close current Activity and create new Activity)
- View customer
- New Quote
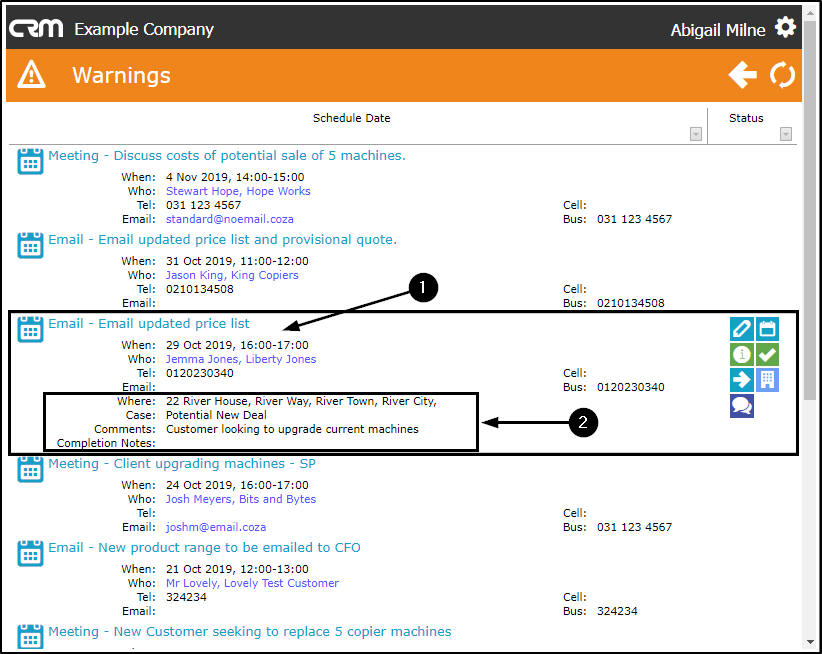
View Activity Summary
- Single click on any Activity.
- To access a summary of the Activity information.
Select Schedule Date
You can select / change the Schedule Date parameters.
- Click on the drop-down arrow in the Schedule Date frame to display the Select Schedule screen.
- Type in the date parameters in the From and To fields,
- Click on the drop-down arrows in the From and To fields and use the calendar function to select the dates.
- Alternatively, select the check boxes that correlate to the time periods that you wish to view. For example, you could select This Week and Last Week.
- When you are happy with your selections, click on OK.
Either
Or
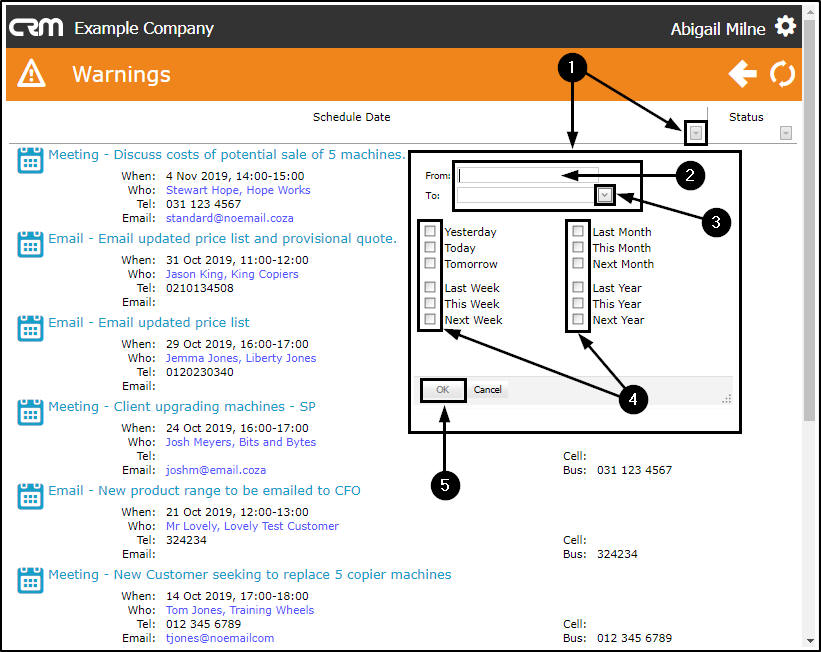
- The screen will refresh to display only the warnings in the selected date parameters.
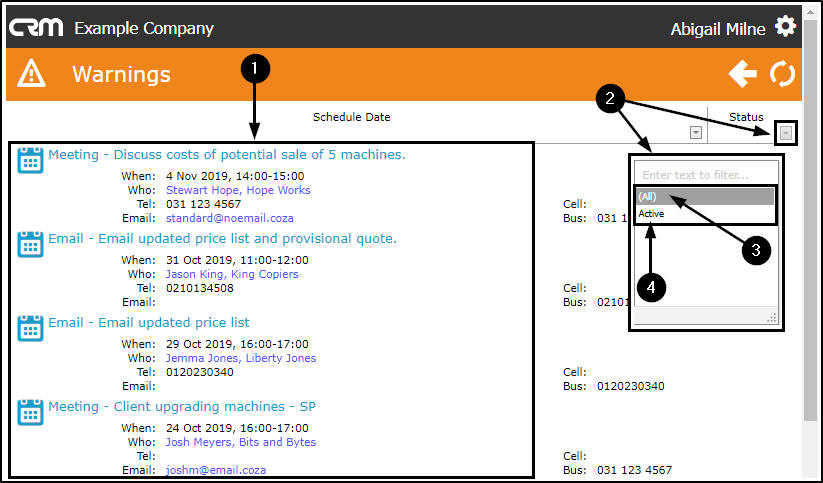
Select Status
You can also select to view the Warnings that are in a particular Status.
- Click on the drop-down arrow in the Status frame to display the Select Schedule screen.
- Select All (to view all the warnings pending),
- Select Active (to view only the Active warnings).
Either
Or
As you click on your choice, the page will refresh to display the results of your selection.
Activity Action Buttons Processing
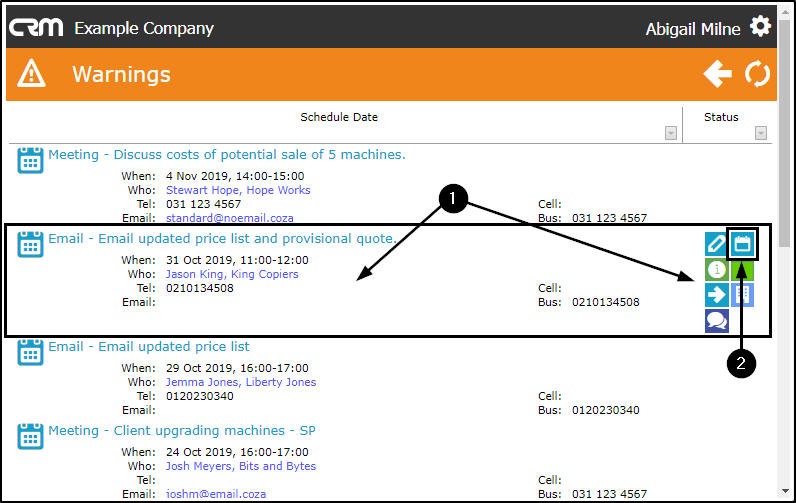
View/Edit this Activity
- Hover over an activity, to reveal the Activity Action buttons.
- Click on the View/Edit this Activity button.
- The Save Activity page will open.
- View and/or Update the Activity details as required.
- For more information regarding this page refer to View/Edit an Activity.
- Click on Save to keep your changes,
- or the Back button to return to the Warnings page.

Reschedule Activity
- In the Warnings page, hover over an activity, to reveal the Action buttons.
- Click on the Reschedule this Activity icon
- The Save Activity page will open.
- Reset the Activity Schedule Date and Reminder details, as required.
- For more information regarding this page refer to Scheduling.
- Click on Save to keep any changes made or
- Click on Back to return to the Warnings listing page.

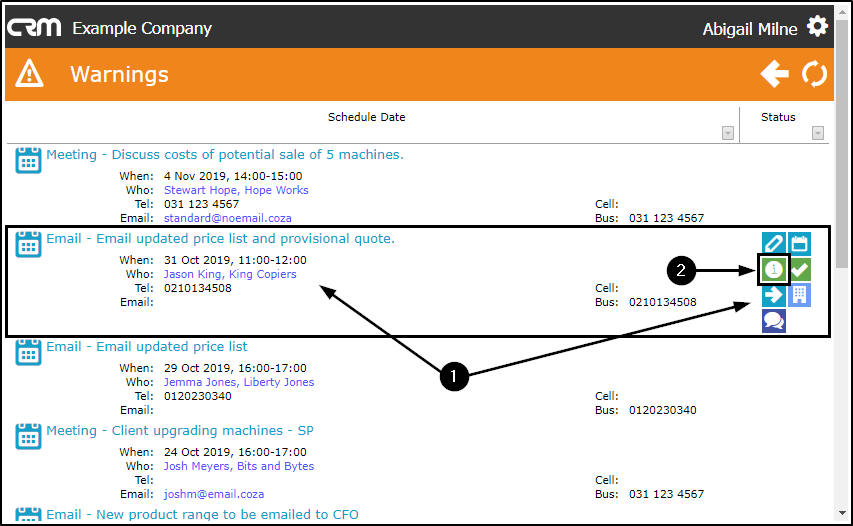
View Case Info and History
- In the Warnings page, hover over an activity, to reveal the Action buttons.
- Click on the View Case Info and History icon
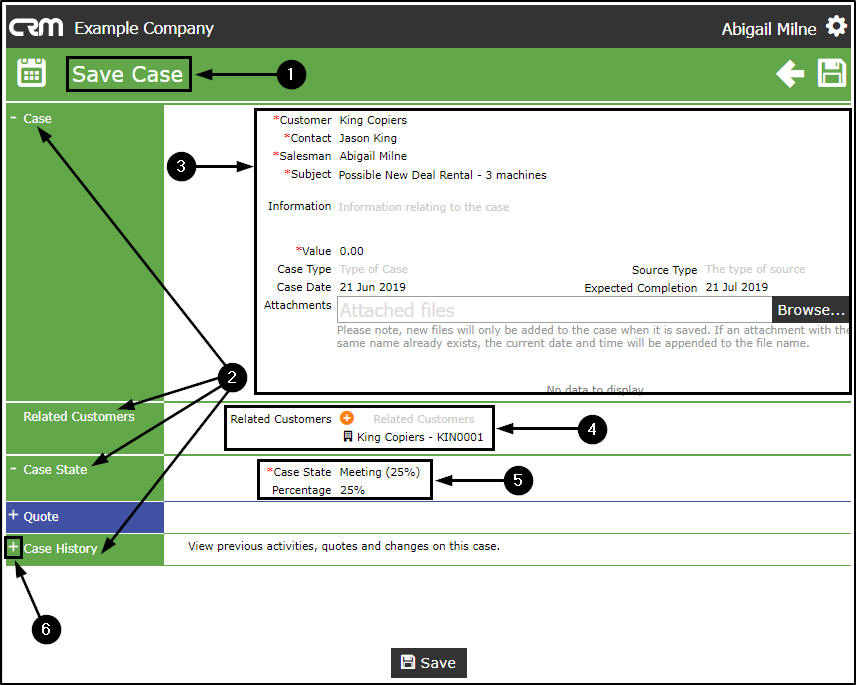
- The Save Case page will open.
- The following frames will be auto-expanded:
- Case
- You will note that the case details are auto populated. You can edit all these details, except for the Customer, Salesman, Subject and Information fields.
- Related Customers
- You will note that the Customer Name will be auto populated, you can add more Related Customers, if required.
- Case State
- The Case State and Percentage will be auto populated. You can edit the Case State, if required (which will update the Percentage).
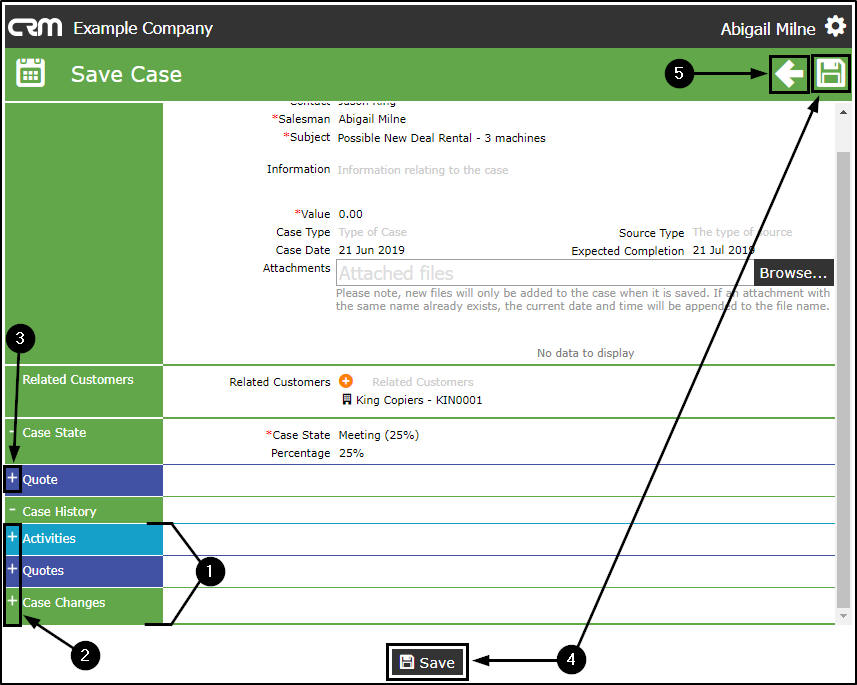
- Case History
- Here you can expand the Case History frame.
- The 3 Case History sub-frames can now be viewed.
- Expand these sub-sections to:
- view an historical list of Activities and if an Activity is open it can be actioned using the Action buttons,
- view and edit linked Quotes and
- view any Case Changes.
- In this page, you can create a new Quote linked to this Case. Refer to Add a new Quote linked to this Case for more information.
- Click on Save to keep any changes made or
- Click on Back to return to the Warnings listing page.
Close this Case
- In the Warnings page, hover over an activity, to reveal the Action buttons.
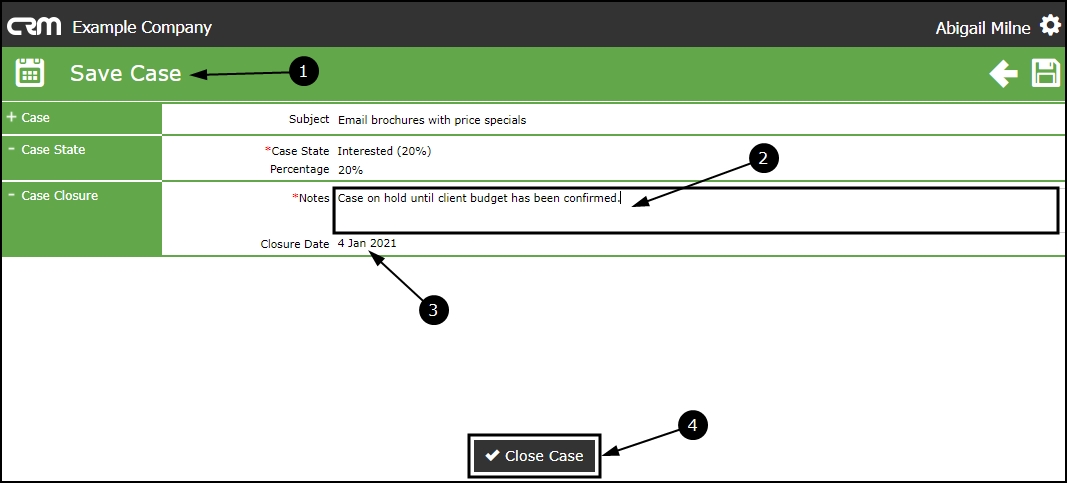
- Click on the Close this Case icon.
- The Save Case page will open.
- Type in the completion Notes. (This is mandatory.)
- The Case Closure Date will be auto populated.
- Click on Close Case.
- Note: This will close the Case and any related Activities, this action cannot be undone.
- You will return to the Warnings page.
- The Warning (Case) that you selected to close, will be removed from the list.
Next Action
This option will complete the current activity and create a new activity.
- In the Warnings page, hover over an activity, to reveal the Action buttons.
- Click on the Next Action icon.
- The Next Activity page will open.
- Ensure that you update the Completed Activity *Notes, this is mandatory.
- Fill in the information for the New Activity.
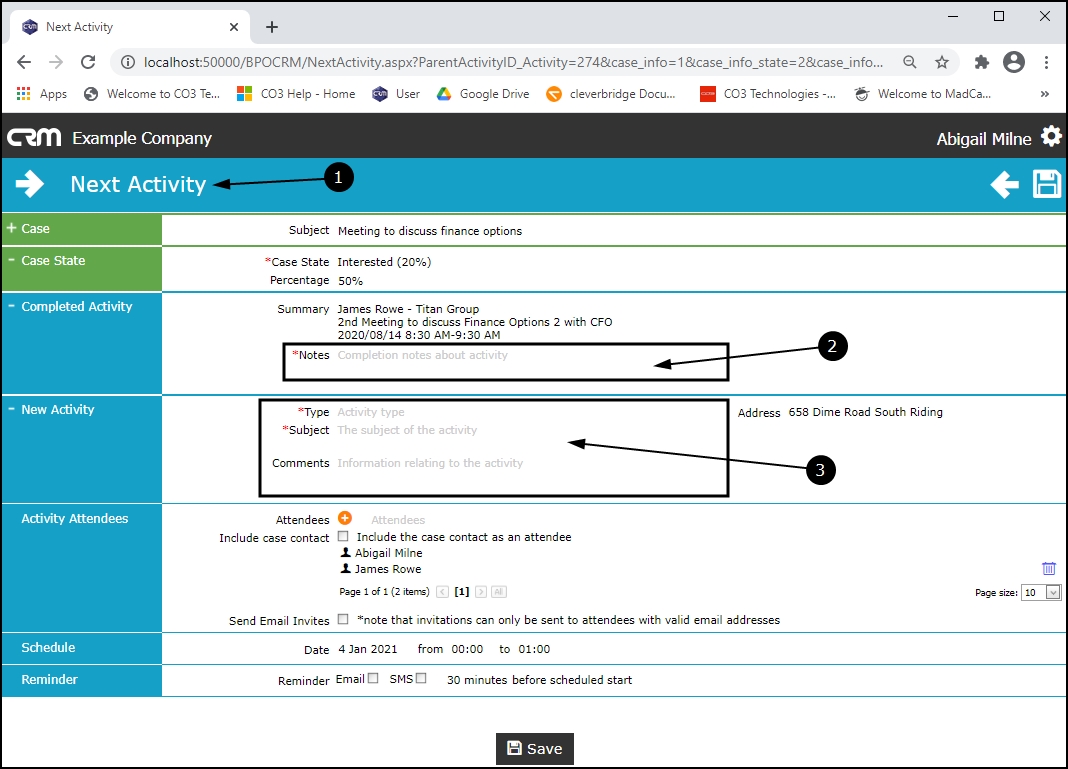
- When you have added the Notes and New Activity information,
- You can Schedule the date of the New Activity and set a Reminder at this point, if you wish.
- Note: If you do not set the date then it will auto populate with the current date, and the time will be set to a 1 hour time slot ahead of the current time.
- When you have entered the required information, click on Save.
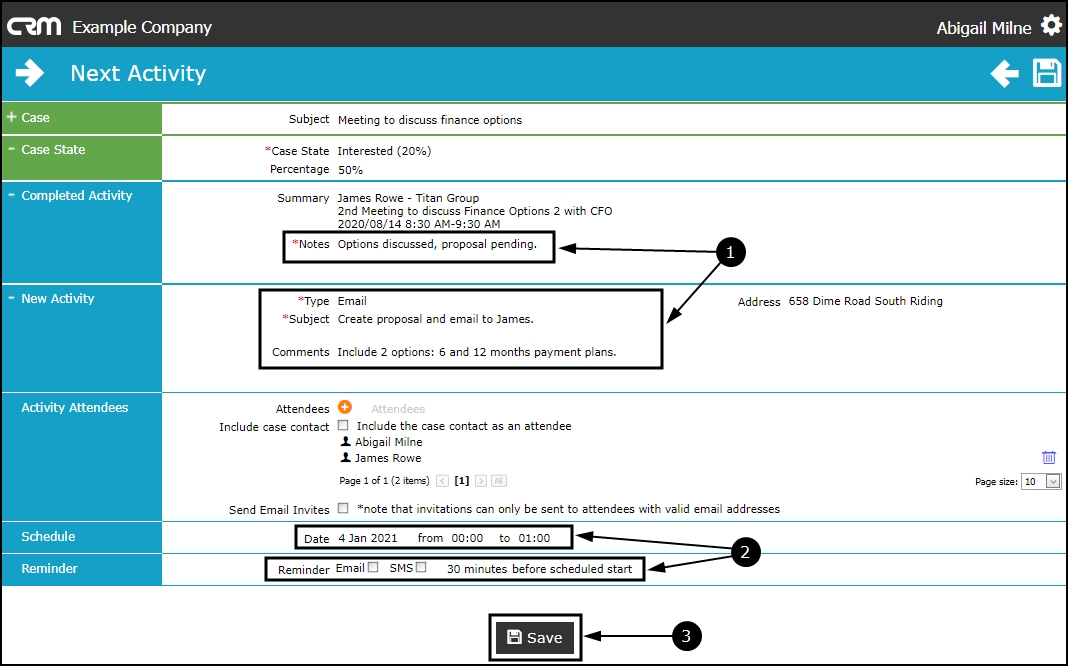
- You will return to the Warnings page.
- The originally selected Warning will be removed from the list.
- If you did not set the date and time of the New Activity, it will present in the Warnings list, as in this image.
- If you set an alternative date, ahead of the current date, it will not appear until the Activity moves into the Warning date/time parameters.
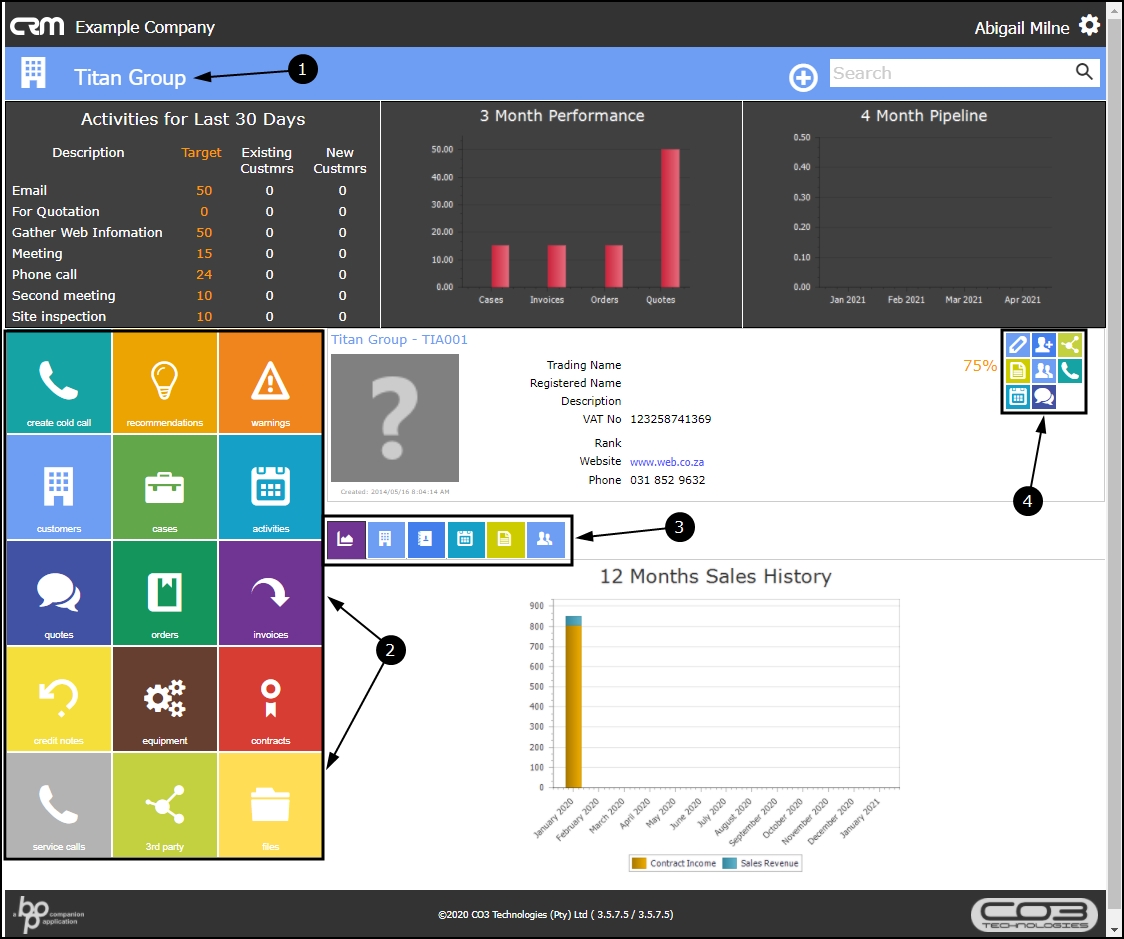
View Customer
- In the Warnings page, hover over an activity, to reveal the Action buttons.
- Click on the View Customer icon.
- The Customer page will open.
- From here, you can access the Customer Dashboard Tiles,
- the Customer Information Tiles and the
- Customer Action buttons.
- Use your browser's back button to return to the Warning List / Close the 'View Warnings' form.
New Quote
You can create a new quote from the Warnings page.
- In the Warnings page, hover over an activity, to reveal the Action buttons.
- Click on the Quote icon.
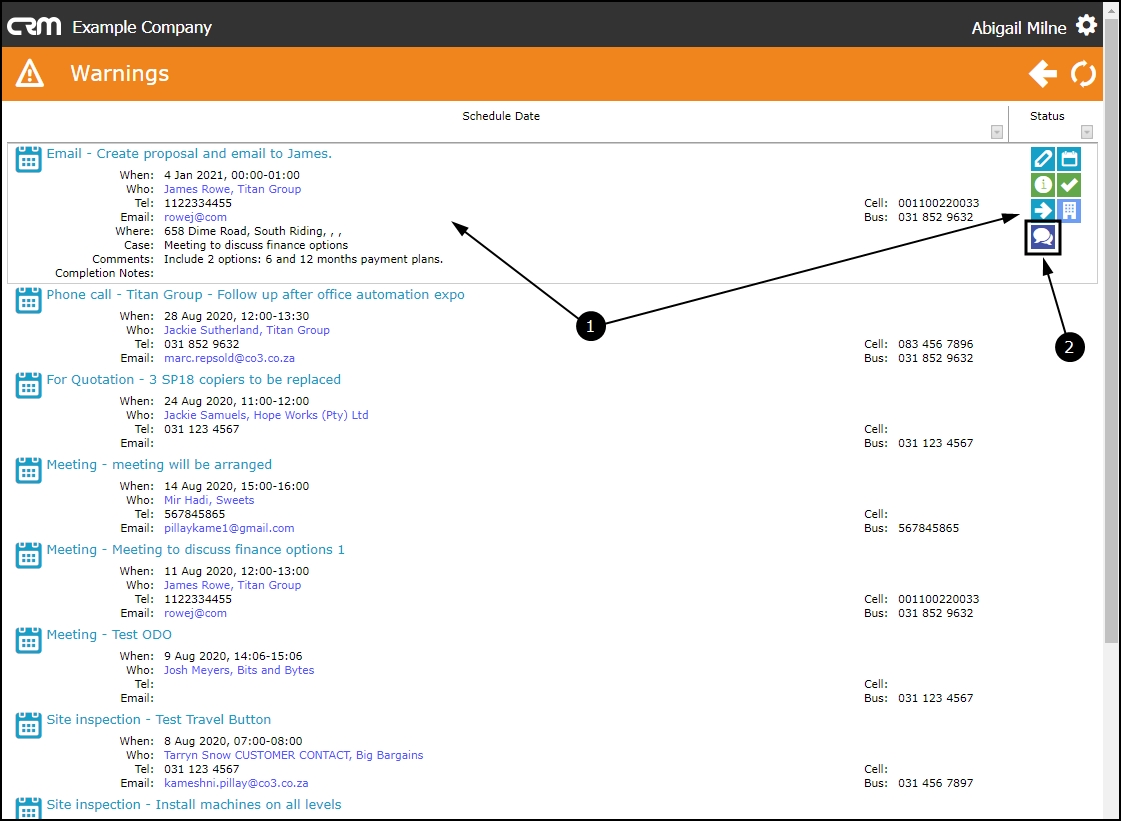
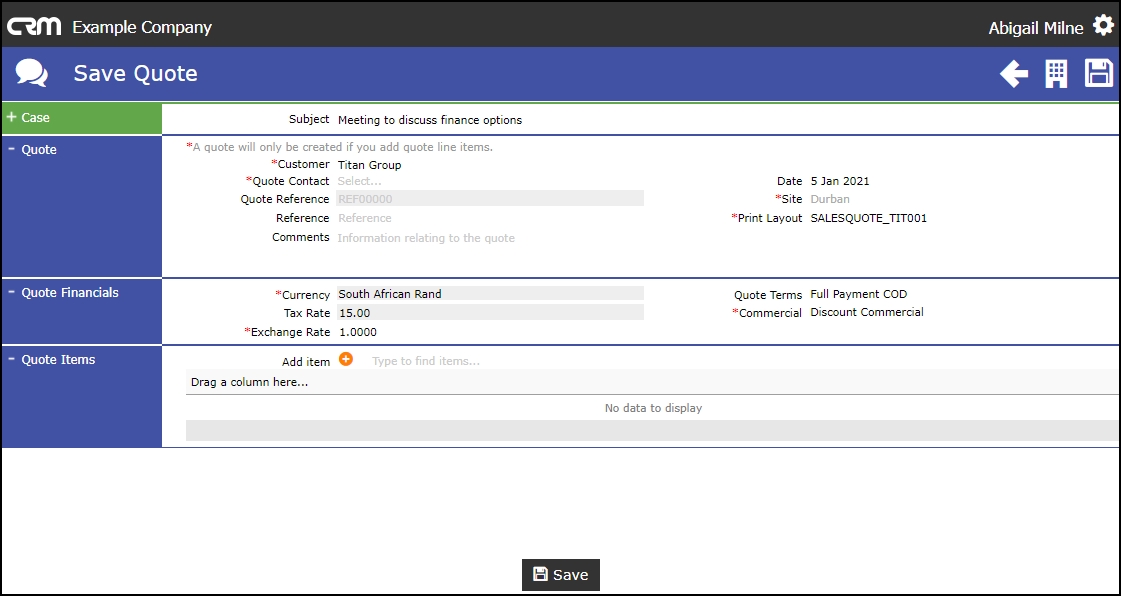
- The Save Quote page will open.
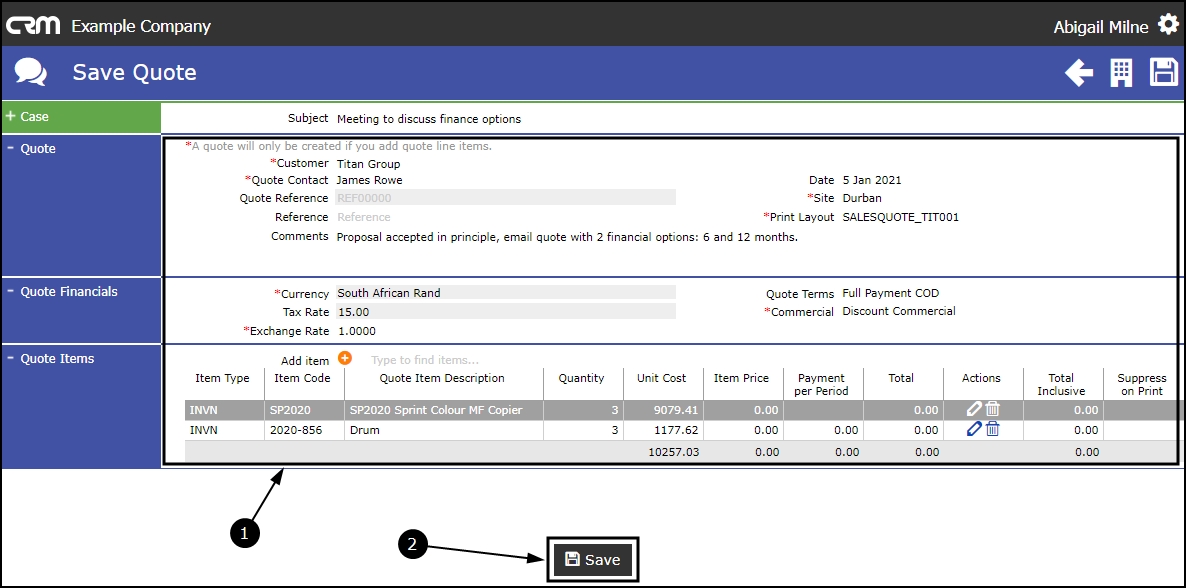
- Add the quote details as required, by referring to Add a New Quote.
- Note: A quote will only be created if you add quote line items.
- When you have added the required quote details,
- click on Save.
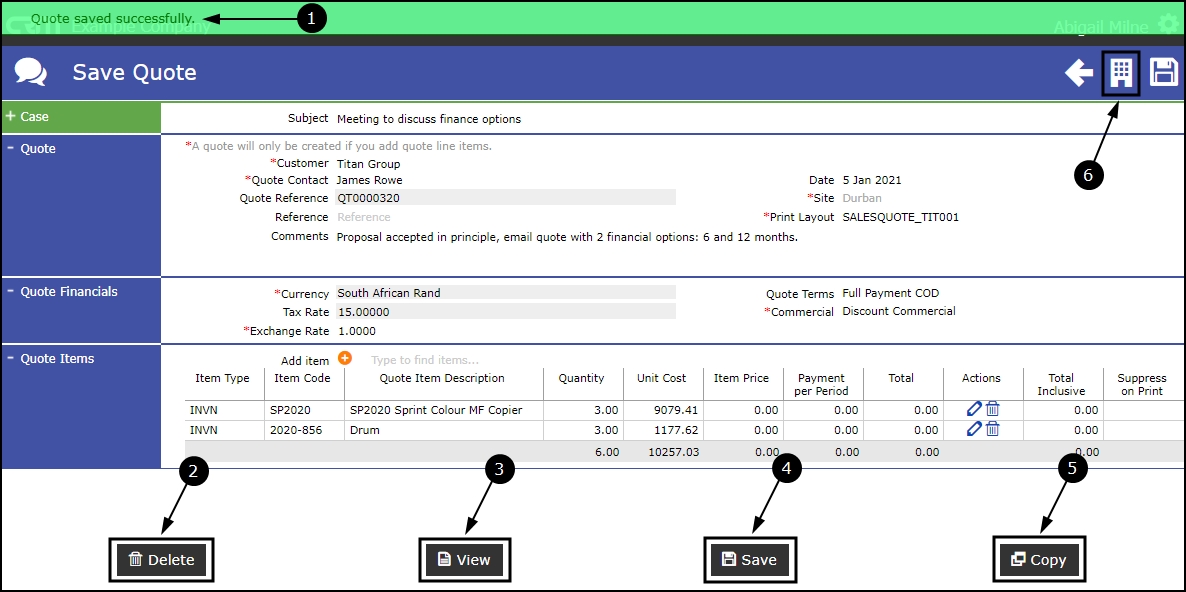
- A Quote saved successfully message box will pop up.
You now have the option to:
- Delete
- View
- Save and
- Copy this new quote.
- To return to the Warnings page, first select the Back to Customer page icon. In the opened Customer Home page, select the Warnings tile.
CRM.000.011