We are currently updating our site; thank you for your patience.
Sales
Introduction to Customers
A customer can be a Debtor or a Cash Sales Customer. You will need to set up a customer in order to create many of the documents in BPO2, for example:
- Quotes
- Orders
- Calls
- Invoices
- Contracts
- Credit Notes
By setting up the customer as Is Debtor, BPO will create an account for this customer in your financial system. You do not need to specify an account code for the customer in BPO.
If you do not set up the customer as a Debtor, then the customer will be treated as a Cash Sales customer. You will then need to specify a GL Account Code for the customer in BPO, in order to post to your Cash Sales account in your financial system.
You can set up customer credit limits, credit checks and credit terms. Any changes you make to these, will update in Pastel.
Must Haves:
- An Accounts Contact (Pastel account contact)
- A Primary Contact (Pastel account contact if Account Contact is not set up & Call Notification Contact)
- An Invoice Delivery method (for contract billing - invoice emailing)
- One Billing address (and only 1 billing address)
- At least 1 Shipping address (for Sales Shipping and Machine Location links)
| Ribbon Access: Sales > Customers |

- The Customer Listing screen will be displayed.
- From this screen you can view a list of all your customers for the site and status selected.
- This screen will open by default in the Active status.
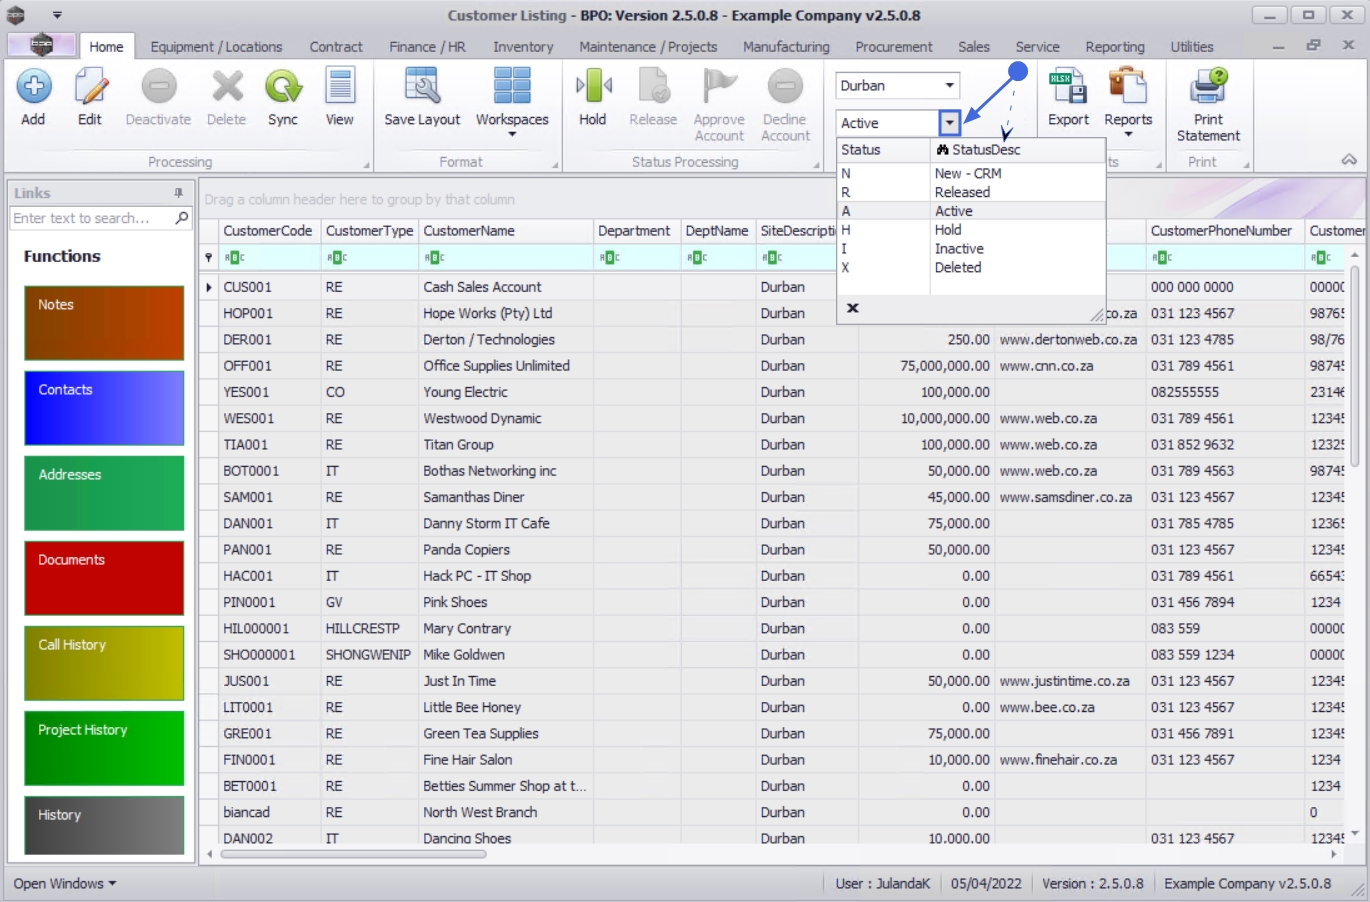
Customer Status
All the customers in the Customer Listing screen are sorted depending on the Site and Status selected:
- New - CRM
- Released
- Active
- Hold
- Inactive
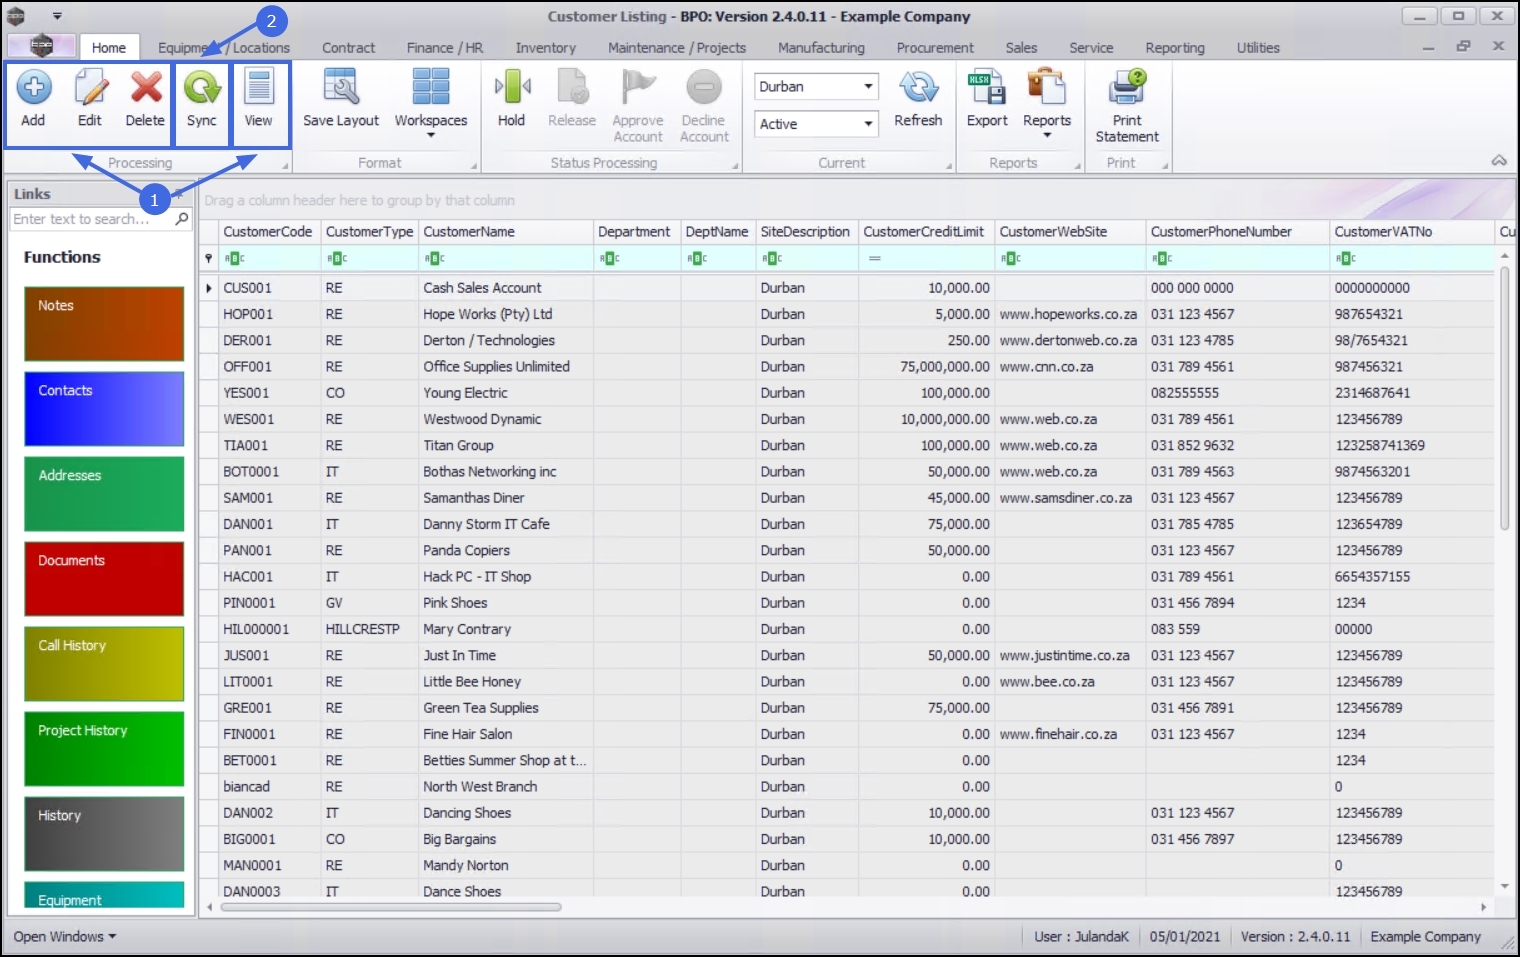
Ribbon Action Buttons
Customer ribbon action buttons will be available (bold) or unavailable (greyed out) depending on the status selection.
- In this screen, you can Add, Edit, Delete or View, a customer.
- You can synchronise customers with your financial system.
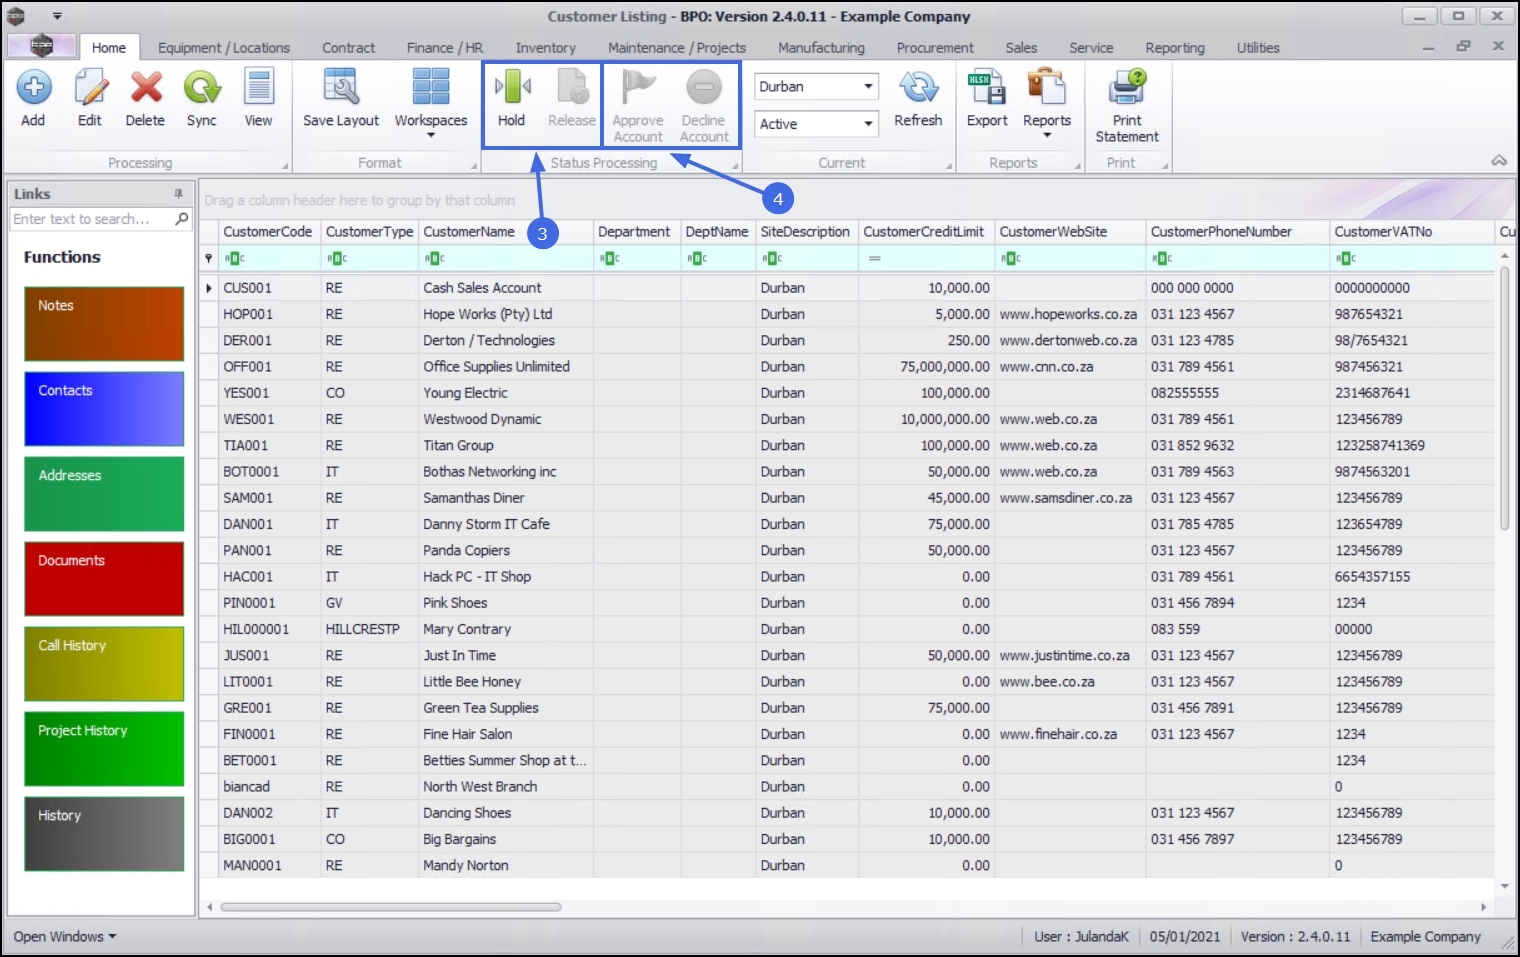
- You can place a customer on Hold or Release a customer from Hold.
- You can Approve or Decline a CRM customer account.
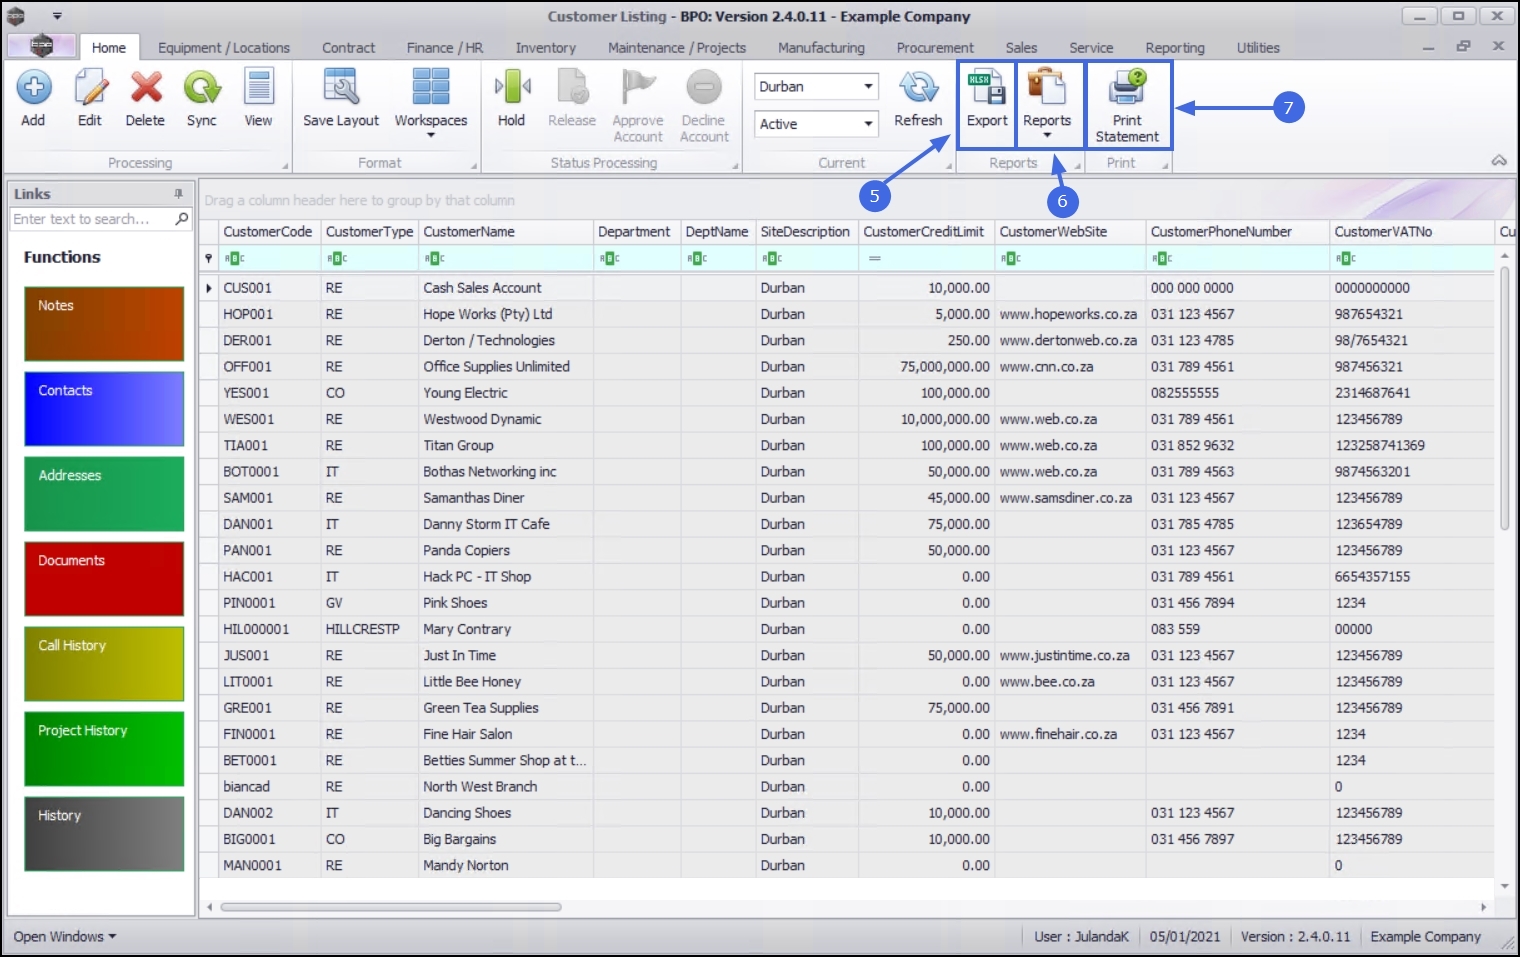
Export
- Export allows you to export a Customer List to Microsoft Excel.
Reports
- Reports allows you to print Customer Reports e.g. Invoices, Credit Notes, Debit Orders, Performance, etc. For more information on selecting and running a report refer to Introduction to All Reports - Run a Report.
Print Statement
- Print Statement allows you to print and/or email a Customer Statement directly from this screen.
 [
[
Functions and Processing Tiles
On the left side of the View Customer screen is the Links panel which contains the Customer Functions and Processing tiles. Each tile, when clicked on, will take you to further information concerning the selected customer. For the purpose of this manual, we are reviewing each tile from the Customer Listing screen.
These tiles can be accessed from the following screens:
- Customer Listing
- View Customer
- Customer Maintenance
- Add Customer
- Edit Customer
Important Note: If you are working from the Customer Listing screen, ensure that you have selected the correct customer before you click on any tile.
Functions Tiles

|
The Notes tile will direct you to the Customer Note Listing where you can Add, View and Modify customer notes. Refer to Customers - Notes |

|
The Contacts tile will direct you to the Contacts for Customer where you can Add, Edit, Delete and View the contacts for the Customer e.g. Account contact, Primary contact, etc. Refer to Customers - Contacts |

|
The Addresses tile will direct you to the Addresses for Customer where you will be able to Add, Edit and Delete the Shipping and Billing Addresses for the Customer. Refer to Customers - Addresses |
|
The Documents tile will direct you to the Documents for Customer screen where you can Add, Edit Delete and View digital documents for the customer. Refer to Customers - Documents |

|
The Call History tile will direct you to the Calls for Customer screen where you can Add, Edit, Close or Complete a Call, as well as Release, put a call on Hold or Pending status. Refer to Customers - Call History |
|
The Project History tile will direct you to the Project Listing for Customer screen where you can Add, Edit, Apply a Project Methodology or Adjust Project Baseline, as well as maintain the Employee and Project Time. Refer to Customers - Project History |

|
The History tile will direct you to the History Listing for the Customer displaying a data grid of the historical changes made for the Customer. Refer to Customers - History |

|
The Equipment tile will direct you to the Machine List screen where you can Add,View, Edit and Delete all serialised items (machines) that are linked to the customer. Refer to Customers - Equipment |

|
The Contracts tile will direct you to the Contracts for Customer screen which will allow you to View the Contracts linked to the Customer. Refer to Customers - Contracts |

|
The Locations tile will direct you to the Functional Locations for Customer screen where you can create a Main Location, Parent and Sub-Locations. Refer to Customers - Locations |

|
The Hold History tile will direct you to the Hold Listing for Customer screen where you can be view hold information for the customer. Refer to Customers - Hold History |
|
The Invoice Delivery tile displays how invoices will be delivered for the Customer. From the Invoice Delivery Methods for Customer screen you can Add, Edit, View and Delete an Invoice Delivery Method. Refer to Customers - Invoice Delivery Method |

|
The Commercial Exceptions tile will display the Commercial Exceptions for the customer you have selected. You can Add, Edit and Delete the Commercial Exceptions for this customer. These are the parts, labour and/or services that are excluded from the commercial details set up on the customer. Refer to Customers - Commercial Exceptions |

|
The Commercial Details tile will display the Commercial Maintain information for the Customer. You will only be able to view the Commercial information and not changes or additions can be made. Refer to Customers - Commercial Details |

|
The Statement Run tile will display the Statement Run for Customer screen to generate Customer Statements and/or Invoices. Refer to Customers - Statement Run |
Processing Tiles

|
The Journals tile will direct you to the Accounts Journals for Customer screen. From here you can view all transactional information on the Customer's account in Sage Evolution that has a transaction balance and an outstanding balance. Refer to Customers - Journals |

|
The Quotes tile will direct you to the Sales Quotes for Customer screen. You have to option to create a sales order from a quote, raise a Quote against a Customer on Hold or Clone a quote. Refer to Customers - Quotes |
|
The Orders tile will direct you to the Sales Orders for Customer screen where you will be able to convert a Sales Quote into a Sales Order, or create a Sales Order. Refer to Customers - Orders |

|
The Invoices tile will direct you to the Sales Invoices for Customer screen, where you can view, add, edit and reprint invoices. Refer to Customers - Invoices |

|
The Contract Invoices tile will direct you to the Contract Invoices for Customer screen will be displayed. Here, you can Add and View contract invoices for this customer. Refer to Customers - Contract Invoices |

|
The Credit Notes tile will direct you to the Sales Credit Notes for Customer screen. Refer to Customers - Credit Notes |
|
The Contract Credit Notes tile will direct you to the Contract Credit Notes for Customer screen. You will be able to Add, View, Delete and Release or Remove or Reject a contract credit note for this customer with Auto Re-Invoice or without Auto Re-Invoice. Refer to Customers - Contract Credit Notes |
BPO.MNU.061