We are currently updating our site; thank you for your patience.
Sales Connect
Environment
There are two main screens in the Sales Connect environment. After login the Activities screen will open. Selections made in this screen will direct you to the Activity Details screen. From here you are able to navigate to 3 subsidiary screens: the Call screen, the Compose screen and the Start Travel screen, as well as three edit activity screens: Reschedule Activity, Add Photo and Add Activity Note.
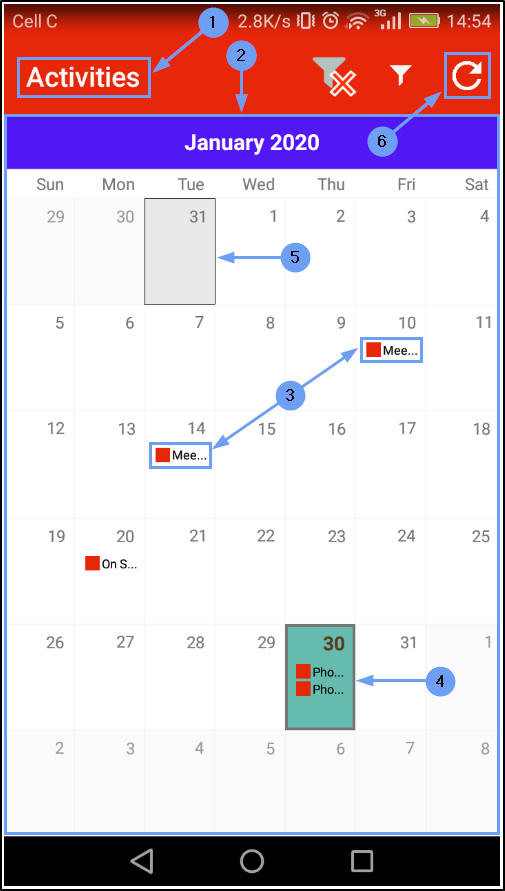
Activities Screen Overview
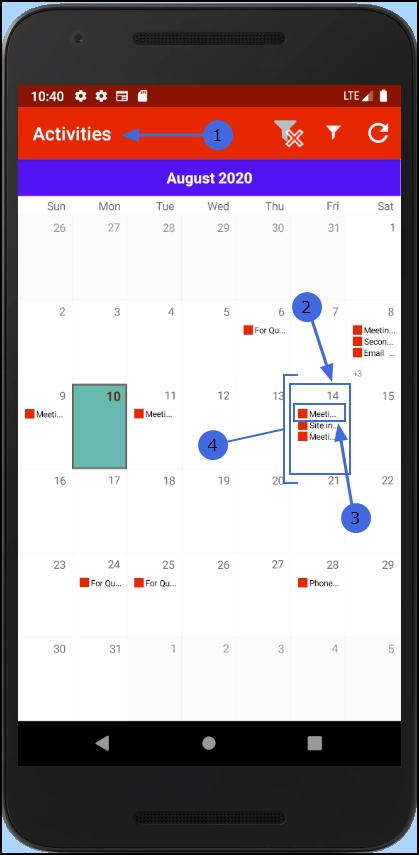
- After initial login the Activities screen will open.
- This will display a calendar view of the current month.
- Swipe left to view future months.
- Swipe right to view previous months.
- Touch and hold an area on your device with two fingers, then pinch them together to zoom out to see the year view.
- Touch and hold an area with two fingers. Then spread them apart to zoom back in to the month view.
- The salesperson activities will display as red squares on the particular day that they are due.
- The current day will be highlighted in colour.
- Any day you tap on will be highlighted grey.
- If there was a period where you did not have internet connection, you can select Refresh to check for any activities recently added in CRM.
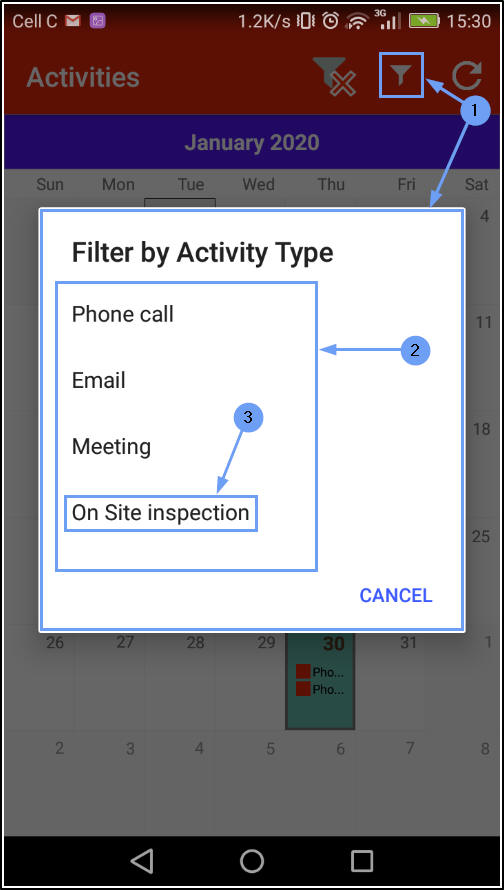
Filter by Activity Type
- Tap on the Filter icon to display the Filter by Activity Type menu.
- Select an Activity Type from the list.
- In this example, Site Inspection has been selected.
Note: All Activity Types can be configured in CRM according to your company requirements.
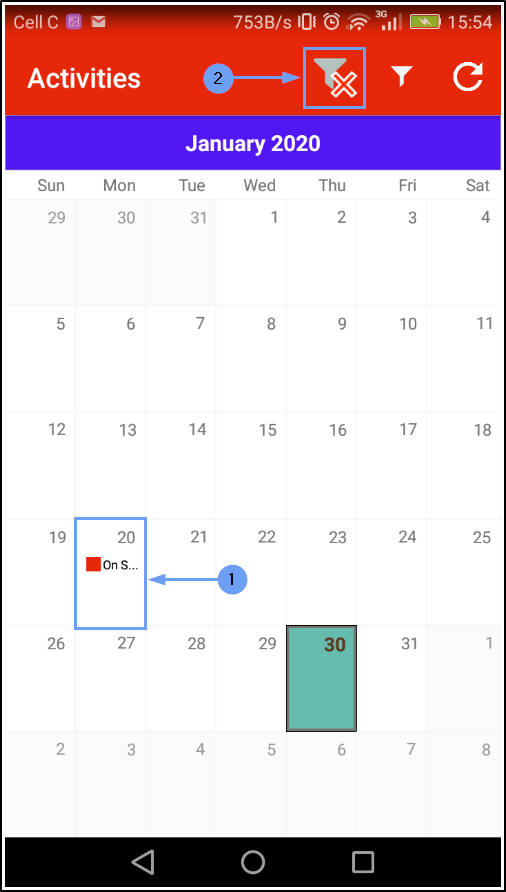
- The screen will filter and display on the calendar, only the activity types selected in the previous step. In this example only Site Inspection activities are now displayed.
Remove Activity Type Filter
- Tap on the Clear Filter icon to display all the activity types again.
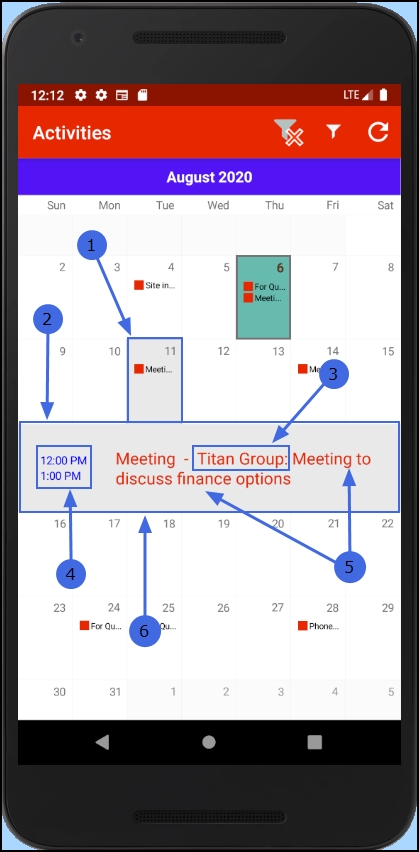
Quick View Activity Information
- Tap on a date that contains an activity.
- In this example the 11th has been selected - this date contains a Meeting activity.
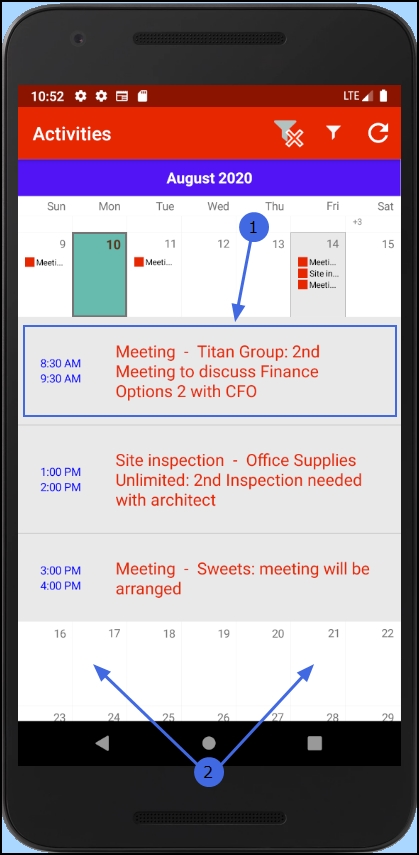
- A text box will pop up with more information regarding the activity.
-
You can now view:
- the name of the customer linked to the activity,
- the time of the activity and
- a brief description of the subject of the activity.
- Tap on the text box.
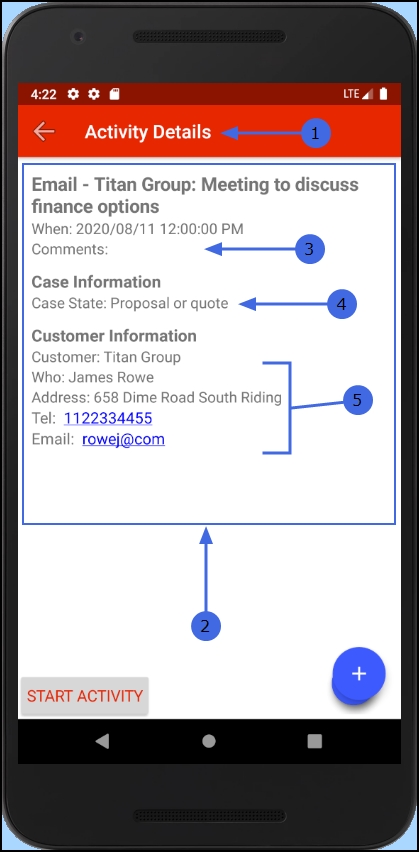
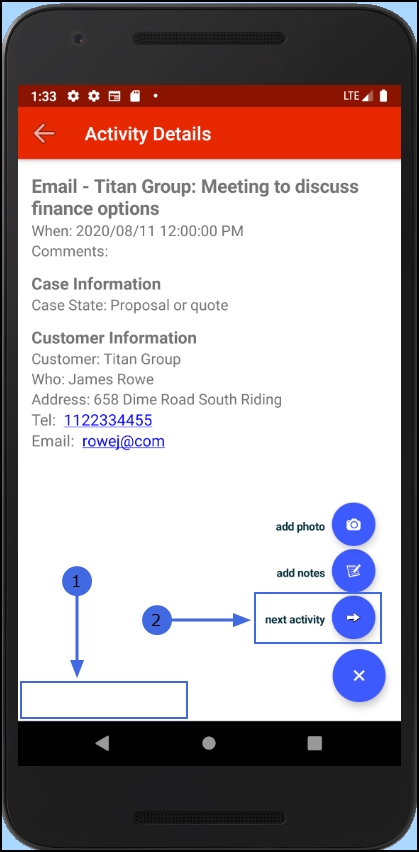
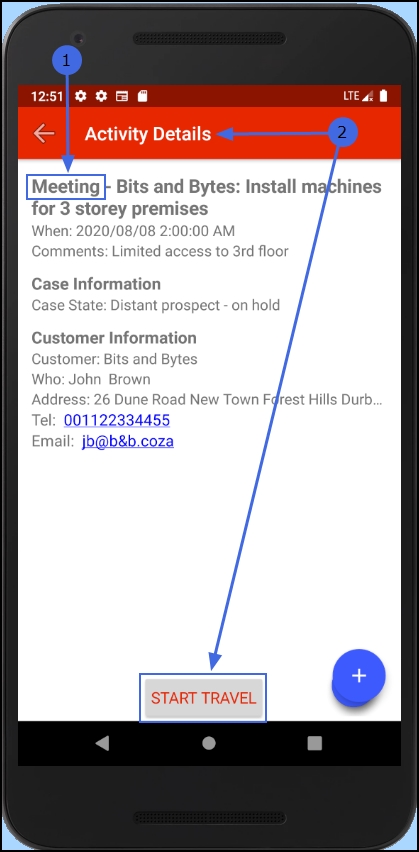
The Activity Details Screen
- The Activity Details screen will be displayed.
- Here you can view much more information regarding the activity:
- any linked Comments (if text has been typed into the Activity 'Comments' section in CRM),
- the Case State and
- More Customer specifics, such as:
- who the meeting is with and where it is (the address )
- the Telephone No. and Email Address of the customer (if these details have been entered onto CRM/BPO).
Call Customer - from the Activity Details Screen
- Tap on the blue customer Telephone Number in this screen.

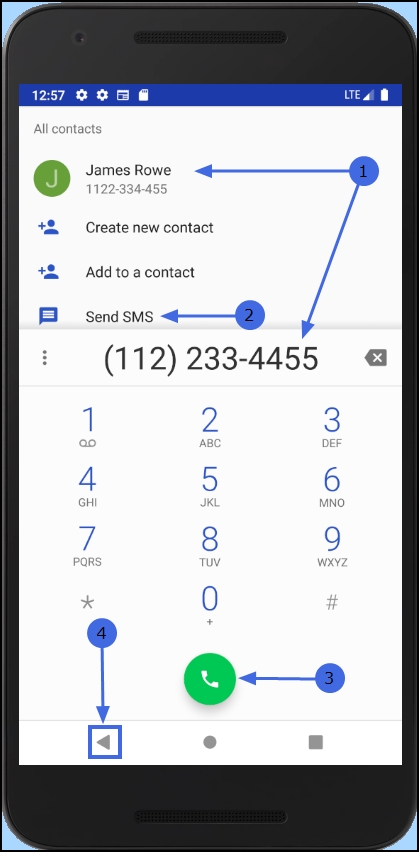
The Call (Phone) Screen
- The Call (Phone) screen will be displayed. Here you can view: the customer name and number
- You can select whether to
- send an sms or
- call your customer
Cancel Call / Exit Call (Phone) Screen
- Tap on the Back button to return to the Activity Details screen.
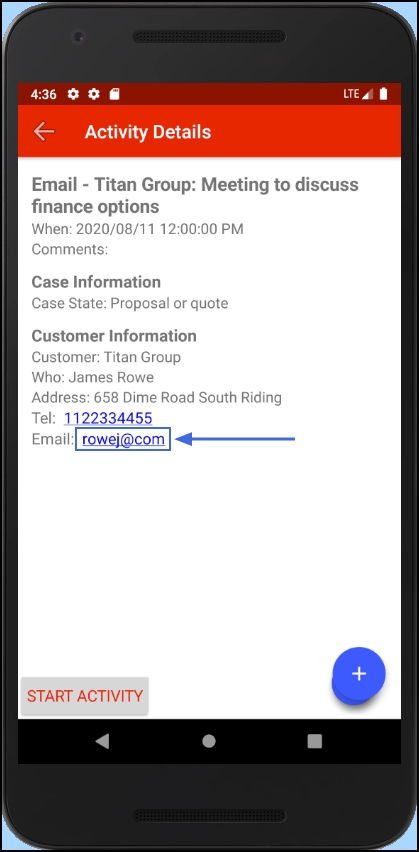
Email Customer - from the Activity Details Screen
- In the Activity Details screen, tap on the blue customer Email Address.
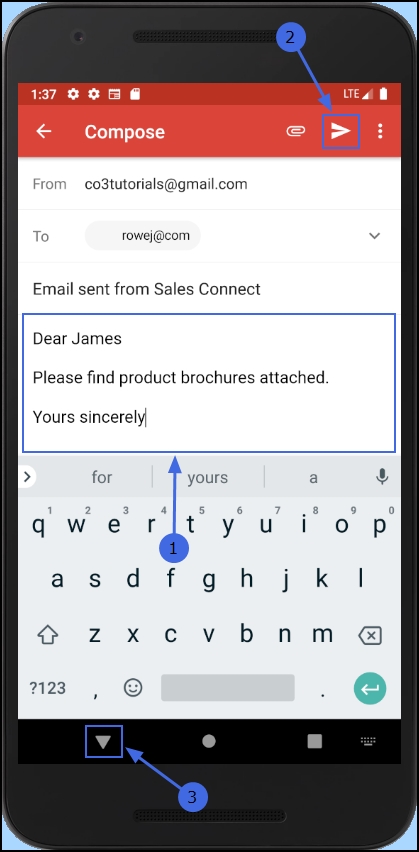
The Compose (Email) Screen
- The Compose (Email) screen will be displayed. Here you can view:
- From: the address from which this email will be sent.
- To: the destination address.
- Email header: This will be auto populated but you can replace the header text with your own words.
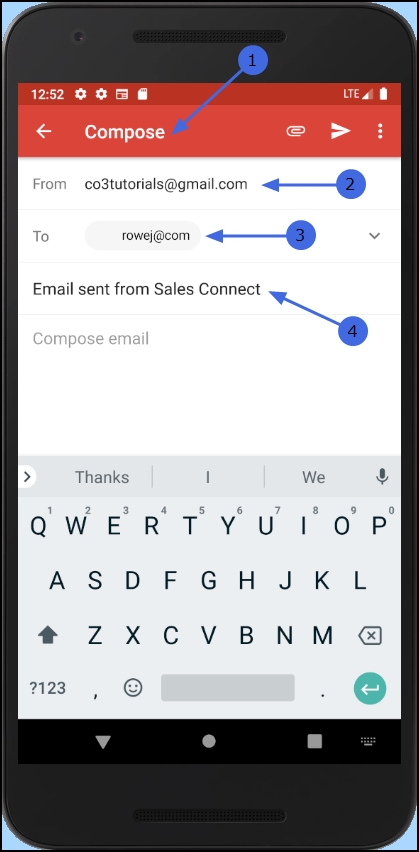
- When you have composed your email content, either tap on
- Send to dispatch your email, (you will then return to the Activity Details page) or
- tap on Back to discard the email and return to the Activity Details page.
The Activity Edit Buttons
- In the Activity Details screen,
- tap on the expand [+] button.
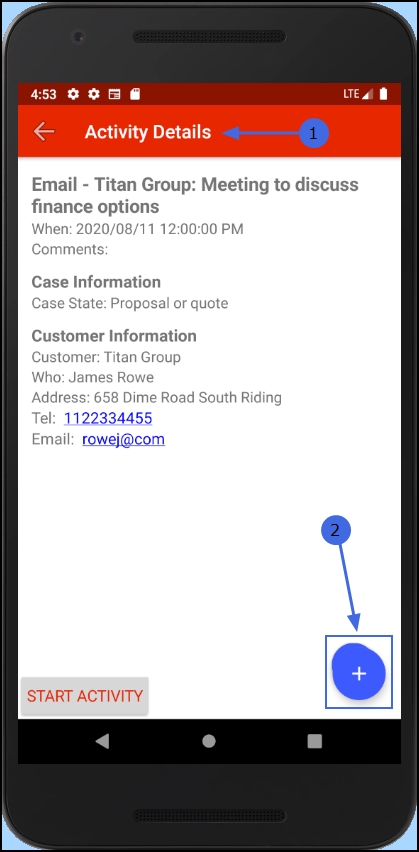
- The screen will now display 3 editing buttons:
-
These are covered in more detail in the Related Topics manuals.
- Tap on [x] to collapse the edit buttons.

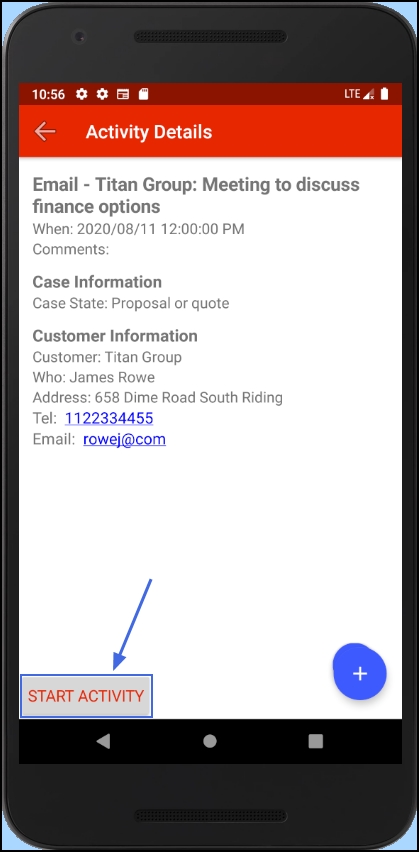
The Start / End Activity Button
- If the activity that you have selected to view has not yet begun, a Start Activity button will be available in this screen.
- When you are ready to begin the activity, tap on this button.
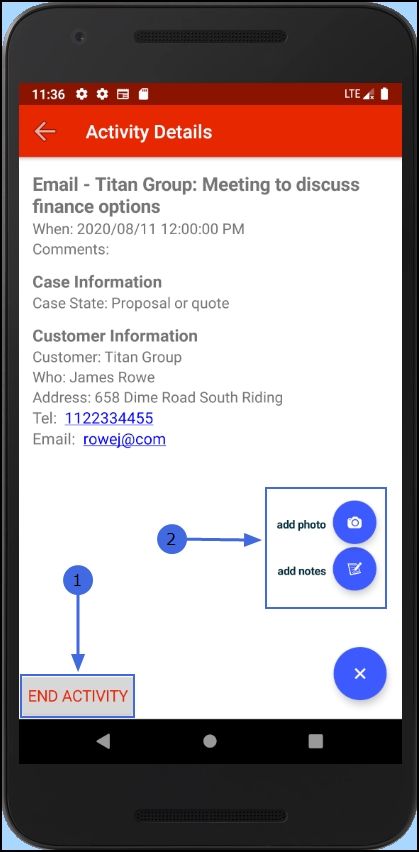
The screen will refresh
- The button will now be replaced with the End Activity button.
- If you tap on the expand [+] button, you will note that the reschedule activity button is no longer available. This is because the activity has already started, it can no longer be rescheduled. You are still able to link Notes and /or Photos to this activity.
End Activity / Next Activity Button
If you tap on the End Activity button, the screen will refresh,
- the button will disappear and
- the [+] button will automatically expand to display a new Next Activity button. Tap on this button.
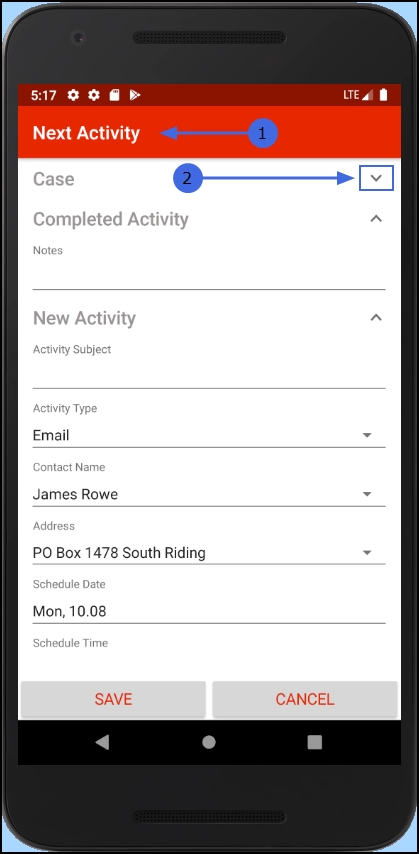
The Next Activity Screen
The Next Activity screen will be displayed. All the fields except the Case section are editable.
Case: tap on the drop-down arrow to expand this section.
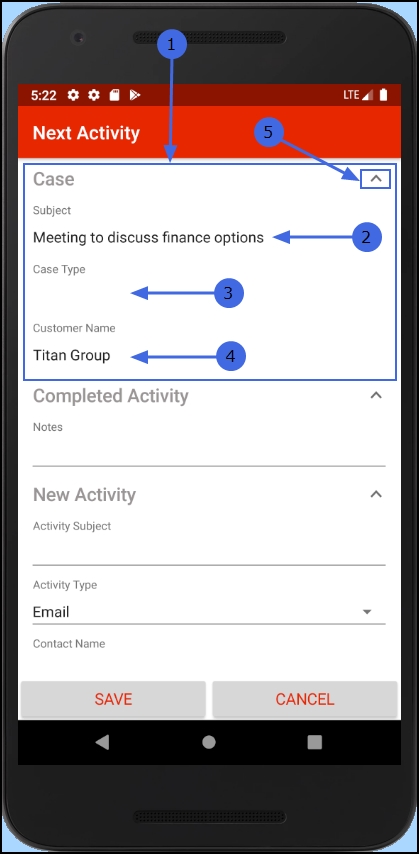
- The expanded Case section will now display:
- the Case Subject
- the Case Type and
- the Customer Name
These fields are populated from information entered into CRM and are uneditable in Sales Connect.
- Collapse the section when you have finished looking at it, to enable you to view and edit the remaining sections.
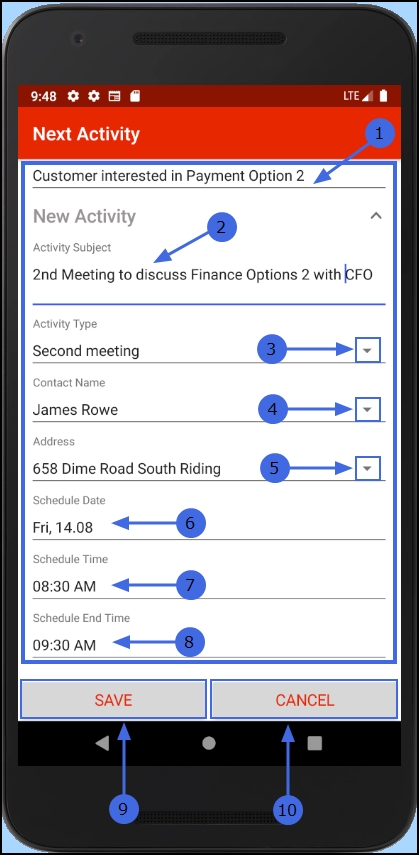
- Completed Activity: Type in a note regarding the outcome of the completed activity, (for example any progress made).
- New Activity: Type in a brief description regarding the subject of next activity.
- Activity Type: Tap on the drop-down arrow and select from the menu, the type of this next activity.
- Contact Name: Tap on the drop-down arrow and select from the menu, the contact you wish to link to this next activity.
- Address: Tap on the drop-down arrow and select from the menu, the address you wish to link to this next activity.
- Schedule Date: Tap on the date already populated in this field, to display the Calendar function. Select the date for the next activity.
- Schedule Time: Tap on the time already populated in this field, to display the Clock function. Select the start time for the next activity.
- Schedule End Time: Tap on the time already populated in this field, to display the Clock function. Select the end time for the next activity.
- If you are happy with your changes, tap on Save,
- or tap on Cancel to return to the Activity Details screen.
For the purpose of this manual, Save is selected.
- The screen will refresh and the Activities screen will be displayed.
- In the calendar, navigate to the date you selected for the new activity.
- A new red square with the new Activity Type can be seen in this date.
- Tap on the date.
- A 'quick view' of the new activity will pop up. It has been successfully added to the calendar.
- Tap anywhere on the calendar, outside of the 'quick view' text box, to return to the Activities screen.
The Start Travel Button
Sales Connect allows you to link travel time directly to your Meeting activities.
- Firstly, ensure that you have selected a Meeting activity.
- In the Activity Details screen, tap on the Start Travel button.
The Start Travel Screen
- The Start Travel screen will open.
-
Type in:
- your vehicle registration number and
- your odometer start reading and
- Either, select to Save the details,
- Or, tap on Cancel to void any changes and return to the Activity Details screen.
For more information refer to Activity Start Travel.
- Click on Back to return to the Activity Details screen.

MNU.160.003