We are currently updating our site; thank you for your patience.
CRM Basics
Add / Edit a Customer
A customer can be added in CRM in order to follow up on leads, i.e. to create Cases and Activities for the Salesperson to further action.
These customers need to be checked in BPO for all details (such as VAT No, Credit Limit, etc.), and approved in BPO.
Note 1: You will only be able to view and / or edit current Customers where you are the main Salesperson, or are linked as a Salesperson, or configured as an Administrator.
Note 2: After you save the customer, you need to add a contact / alternatively, use the Add Contact method - which allows you to either just add a Contact or add a new Customer and a new Contact.
| Access: Webpage - http://[servername]:[portno]/BPOCRM/User.aspx |
Add a New CRM Customer
In the CRM Dashboard screen,
- Click on the Add [+] icon.
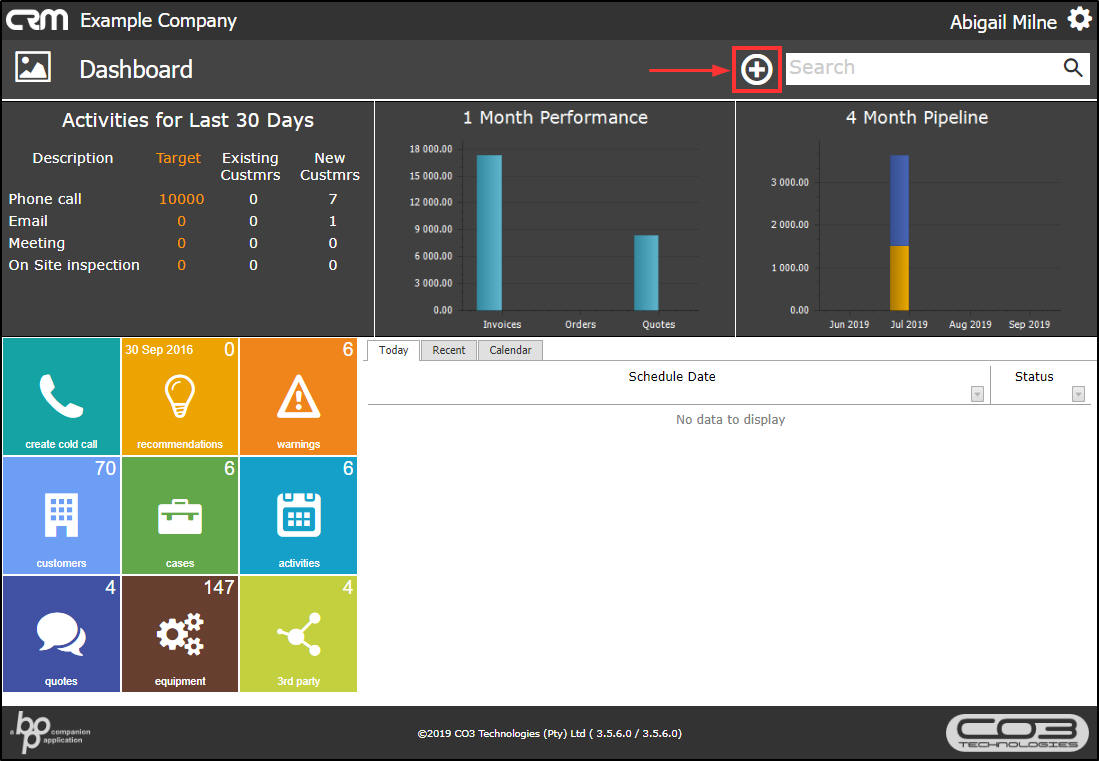
- The Add pop up menu will appear.
- Click on the Customer icon.
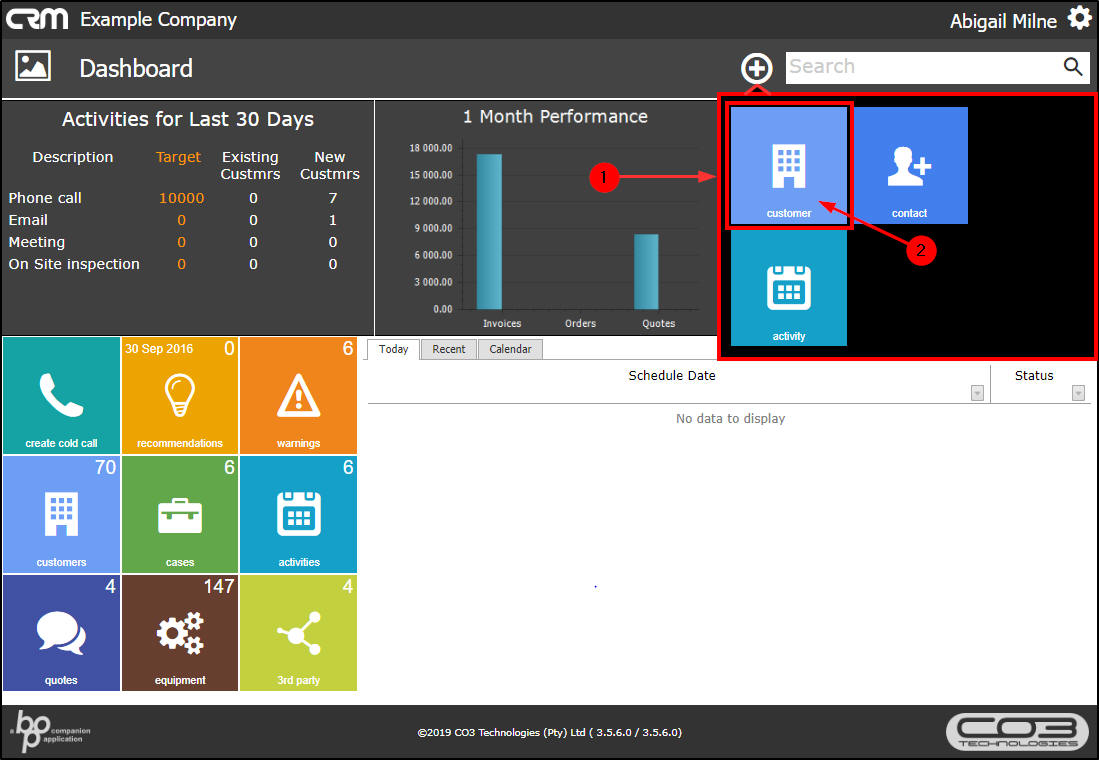
The Save Customer screen will be displayed.
- You will note that the More Details frame is hidden. This is because these 'hidden' fields are not required to be entered before you can save the customer. This ensures the interface is uncluttered and therefore easier and more user-friendly for the salesman when entering mandatory customer information.
- Click in the Customer Search text box.

- Type in the customer name. As you type the system will search for similar customer names.
- A data grid will pop up for you to check that you are not creating a duplicate customer.
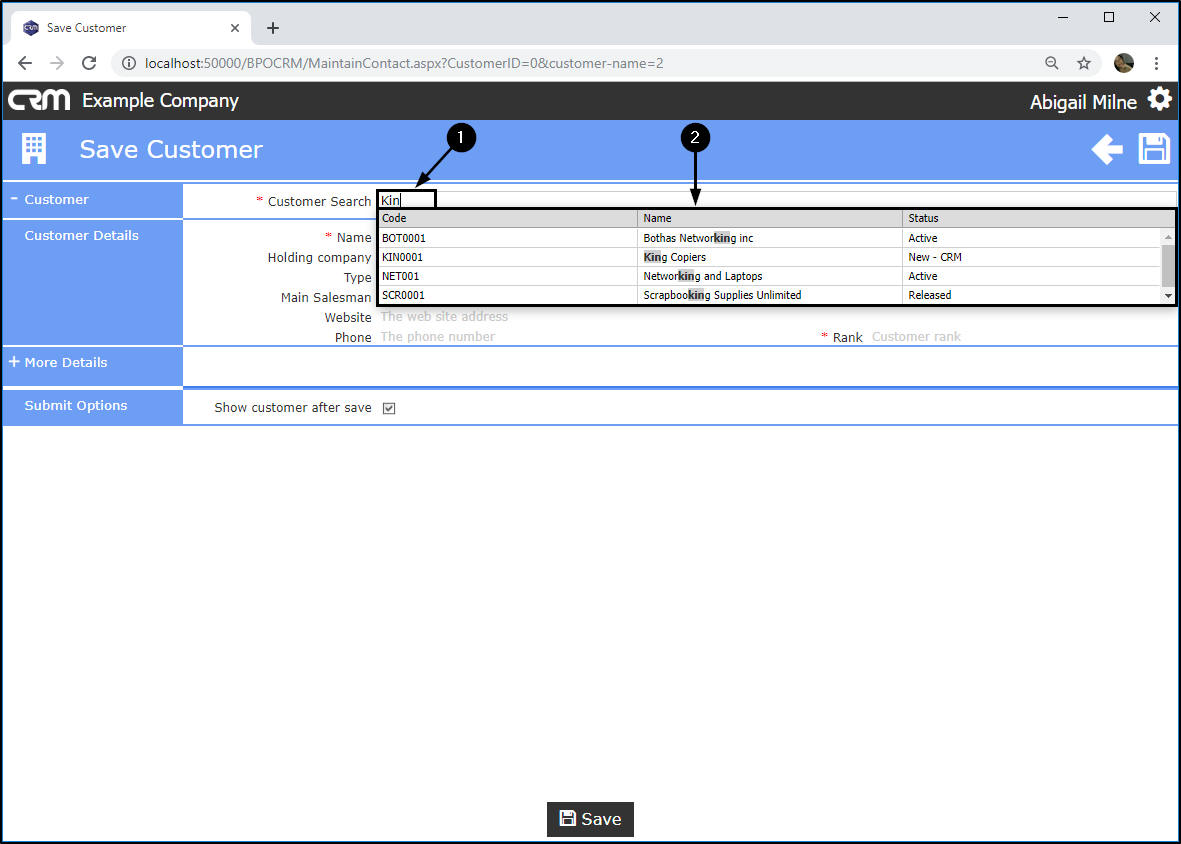
- Once you have typed in the full customer name, click away from the customer search text box.
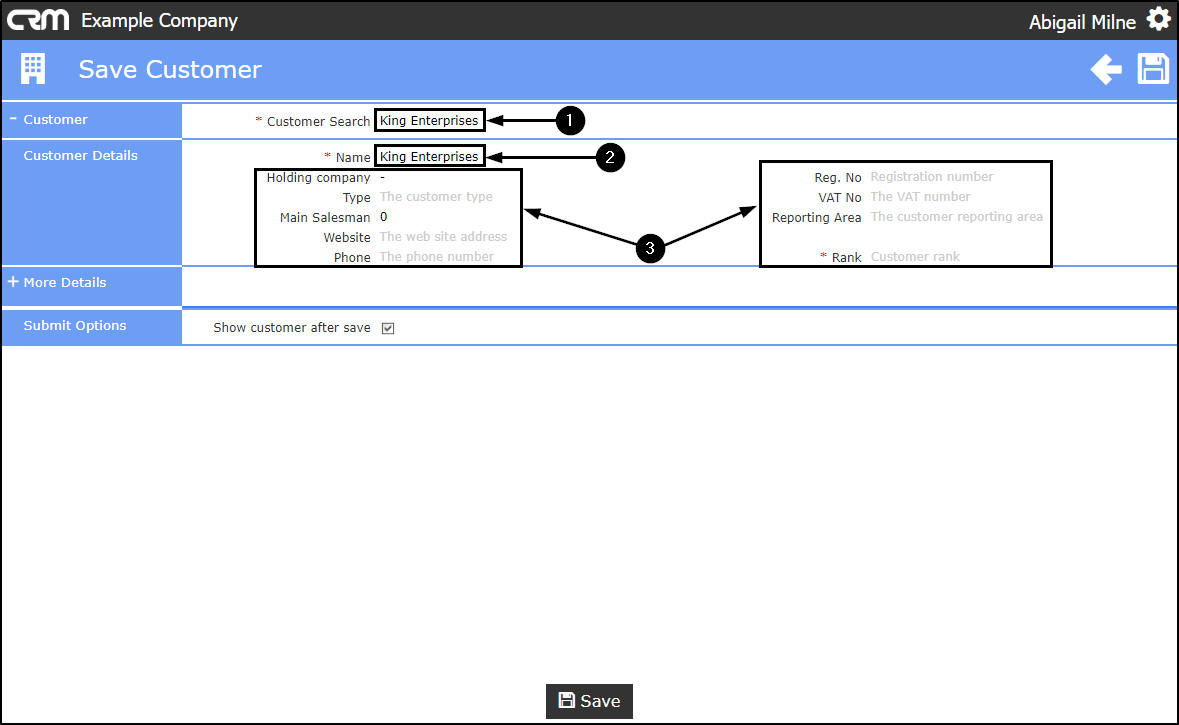
- CRM will populate the Name field based on what was typed into the Customer Search textbox.
- Now you can fill in the rest of the Customer Details.
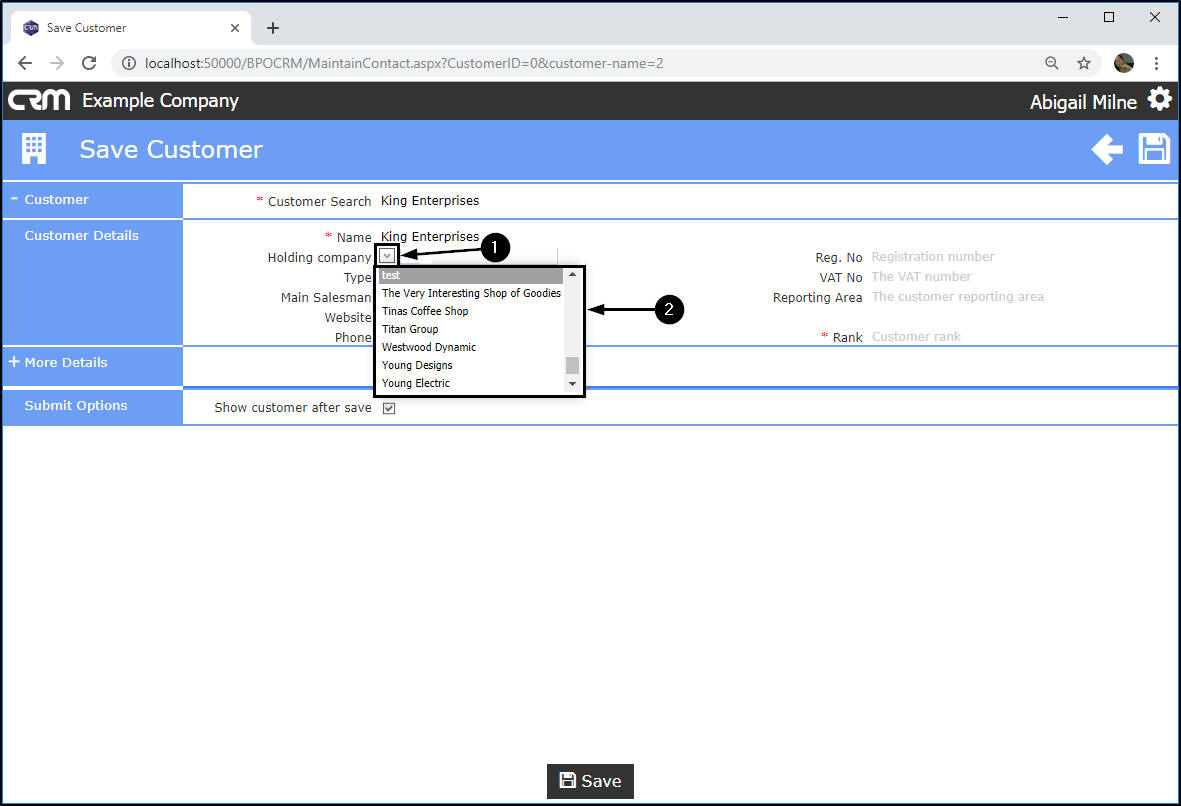
Holding Company
Only populate this field if you wish to set this customer up as a Pastel-linked customer. If you do link an account here, all transactions done for this customer will post to that account - based on what is set in company configuration.
- Click in this field to display a drop-down arrow.
- Click on this arrow to display a list of holding companies. Scroll through this list to search for and select the company that you wish to link to this new customer.
-
In this example, no holding company has been linked.
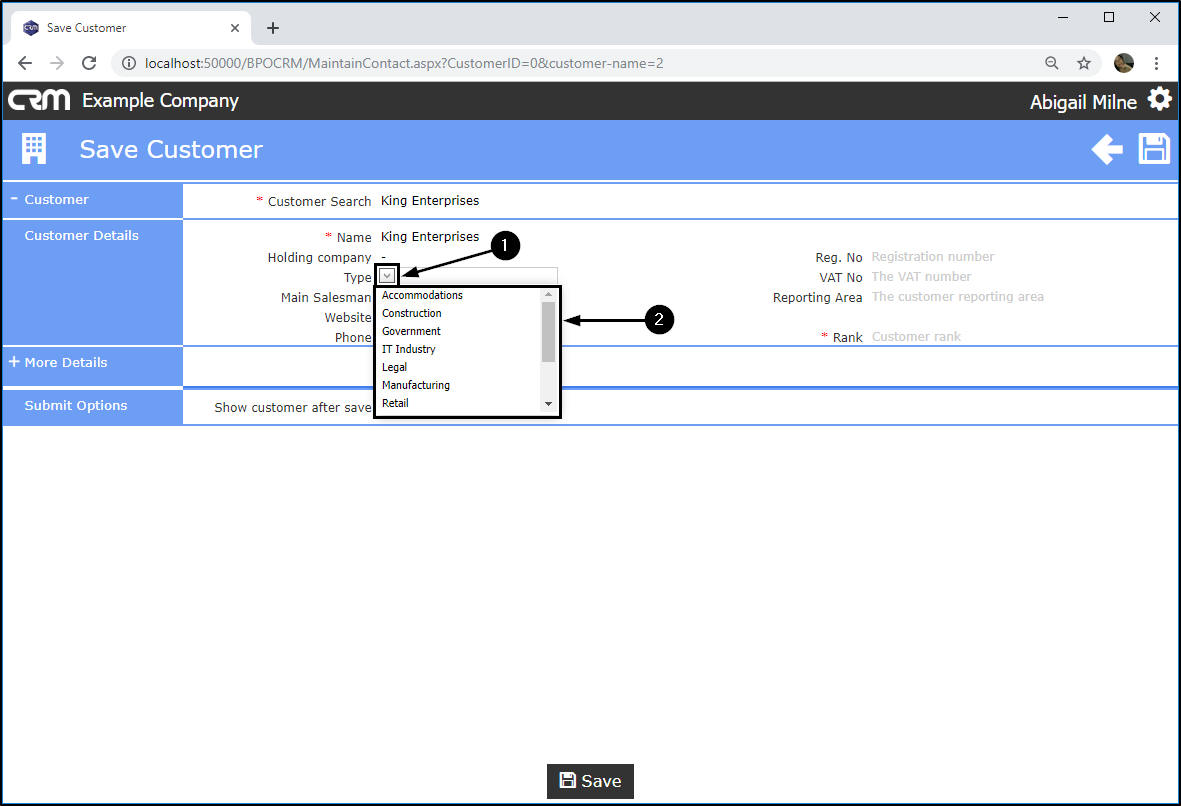
Type
It is useful to link the customer type for reporting purposes.
- Click in this field to display a drop-down arrow.
- Click on this arrow to display a list of company types (Manufacturing, Construction, Retail etc.) Scroll through this list to search for and select the relevant type.
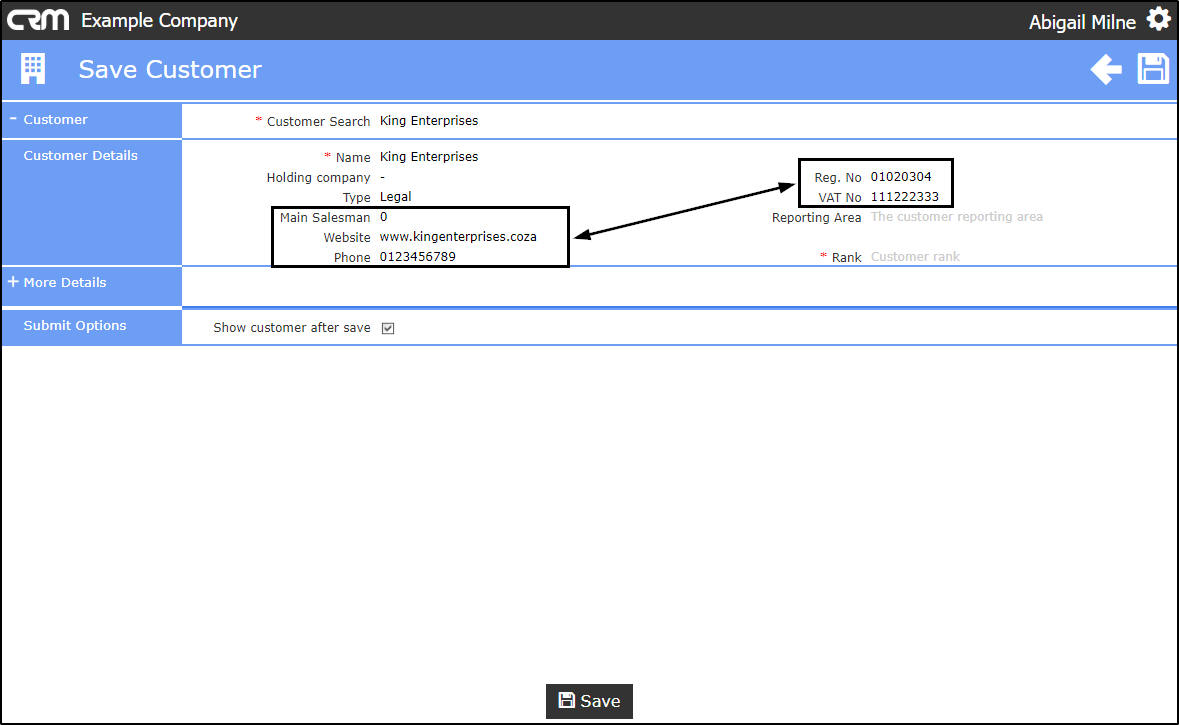
- Salesman: This will auto populate with the salesman who is currently logged into CRM.
- Website: Type in the customer's website.
- Phone: Type in the customer's telephone number.
- Reg. No: Type in the customer registration number.
- VAT No: Type in the customer's VAT number.
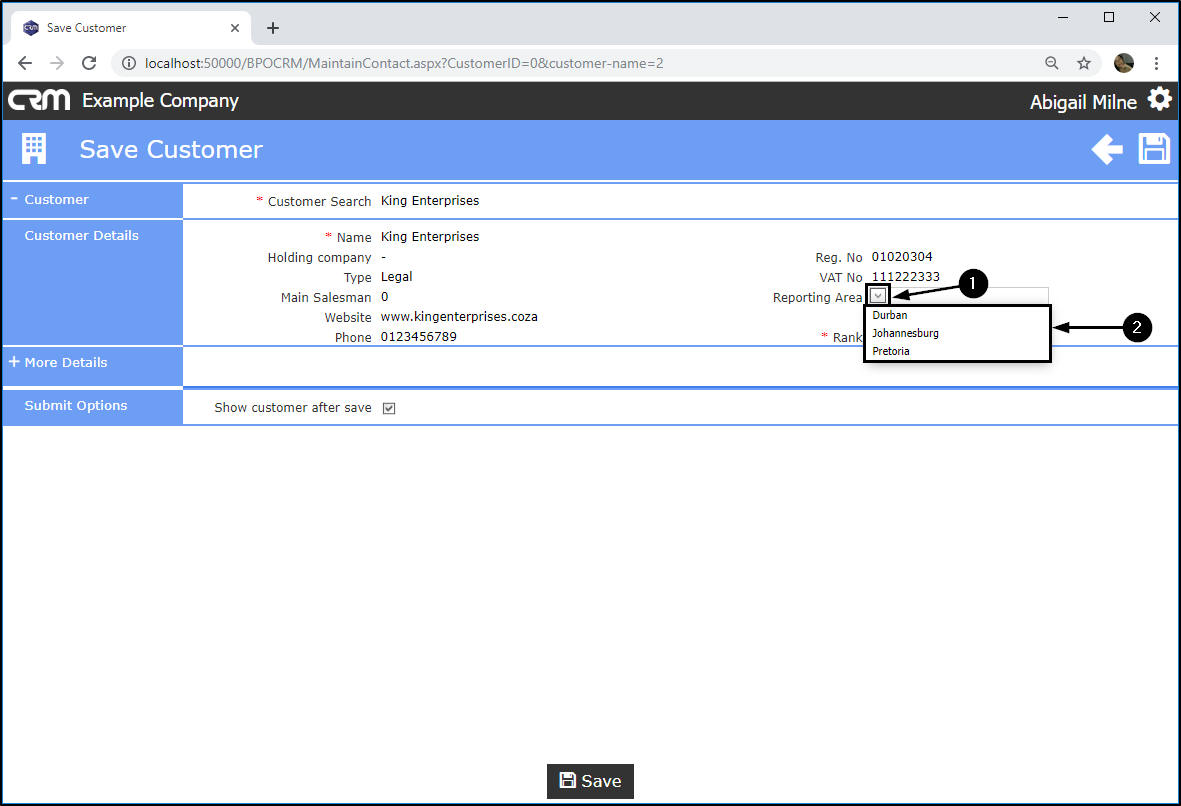
Reporting Area
Each customer must be linked to a reporting area in CRM. These Reporting Areas give you the ability to categorise your clients, or group them into specific physical or otherwise pre-defined areas e.g. Sandton, Nelspruit, etc. Customer Reporting Areas can be set up in the Configurator.
- Click in this field to display a drop-down arrow.
- Click on this arrow to display a list of areas (Durban, Johannesburg, Pretoria etc.) Scroll through this list to search for and select the relevant area.
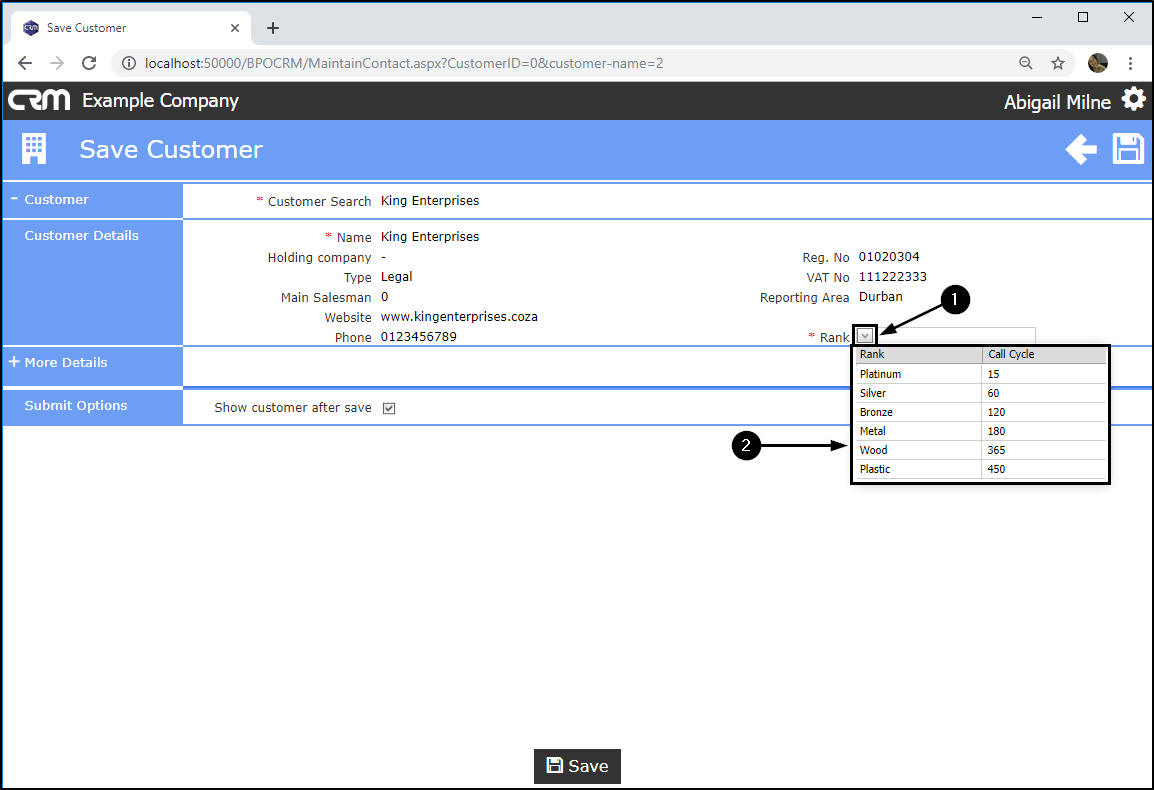
Rank
Rank is based on how much you value this customer and helps to define the call cycle per client. For example, a Wood ranking indicates that you will only contact this customer every 365 days - this customer is not valuable to you. However a Platinum ranking indicates that this is a very important customer that you wish to maintain a good relationship with, therefore you will contact them every 15 days.
Each customer must be linked to a Rank in CRM. Customer Rank can also be linked in the Customer Maintenance screen in Nucleus Service.
- Click in this field to display a drop-down arrow.
- Click on this arrow to display a list of Ranks (e.g. Platinum, Bronze, Wood) with their corresponding Call Cycles (e.g. 15, 120, 365 days). Scroll through this list to search for and select the relevant rank from this list.
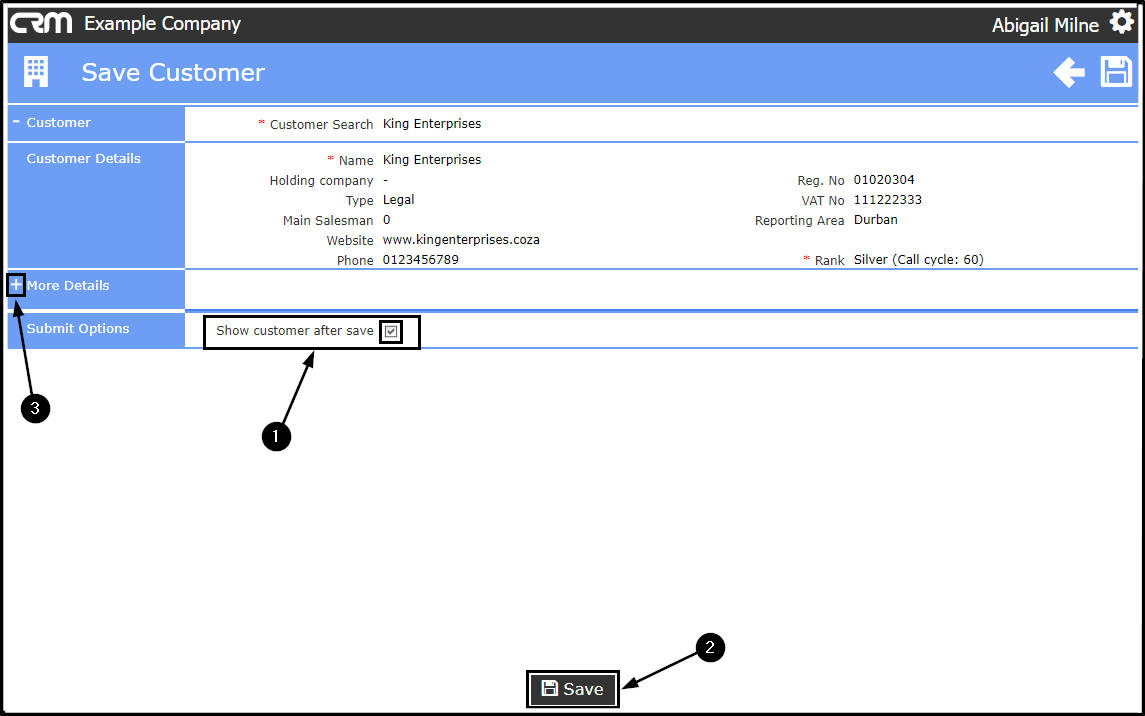
Submit Options
The 'Show Customer After Save' check box
You may decide to save the customer at this point, with these minimum required details.
- Before you click on Save, go to the Show customer after save checkbox.
- If you tick this check box, when you click on Save, you will return to the CRM Dashboard home screen, with the newly created customer details displaying in the Today frame.
- If you do not tick this check box, when you click on Save, you will return to the CRM Dashboard home screen, and the newly entered customer details will not display.
- You can select to Save the customer at this point as you have entered all the required fields.
-
However, for the purposes of this manual, we will now explore the
More Details
frame.
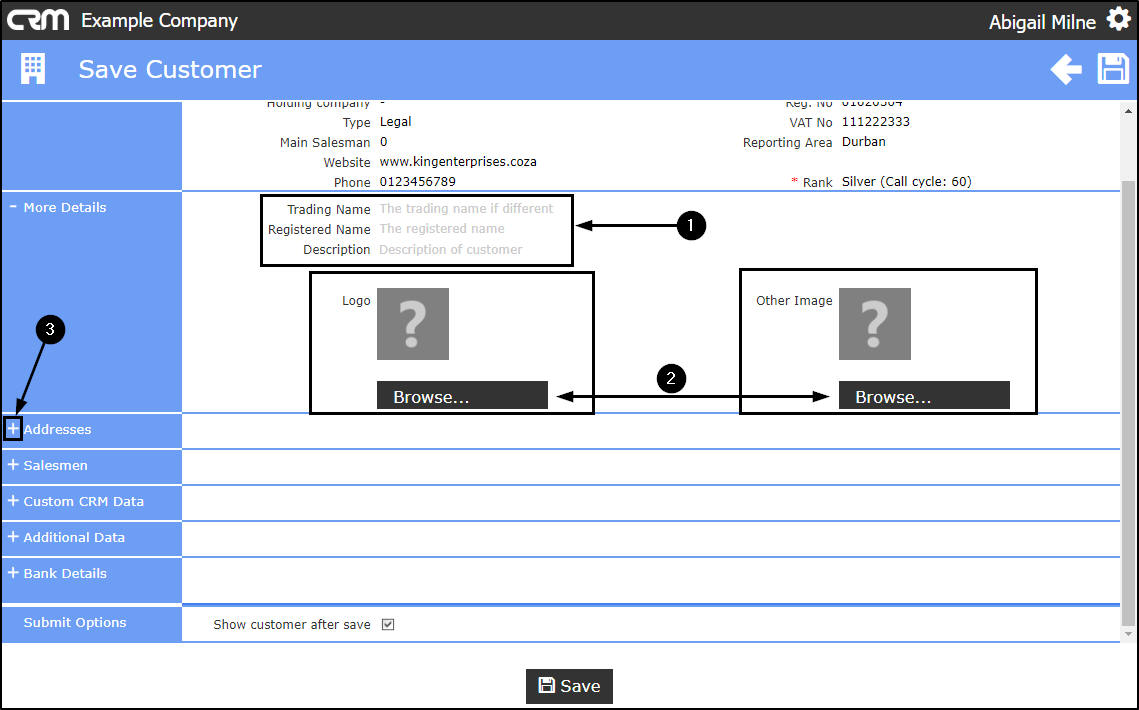
More Details
- Click on the expand icon in front of More Details.
The frame will be expanded.
- Text Fields
- Trading Name: Type in the customer's trading name if this is different from the Customer Name.
- Registered Name: Type in the customer's registered name, if required.
- Description: Type in comment to describe this customer for reference purposes.
- Image Fields
- Logo: You can click on the Browse button to search for and select a main company image for this customer.
- Other Image: You can click on the Browse button to search for and select an additional image for this customer.
Addresses
- When you have finished adding details to this frame, click on the expand icon in front of Addresses.
- The Addresses frame will be expanded.
Billing Address
- Note: There can only be one Billing Address.
- Address Lines 1-5 and Postcode: Click in the Address Line fields and type in the Billing (Postal) Address details.
- Country: Click in the Country field.

- You can either type directly in this field or click on the drop-down arrow that appears.
- A list of countries will display. Select the relevant country from the list.
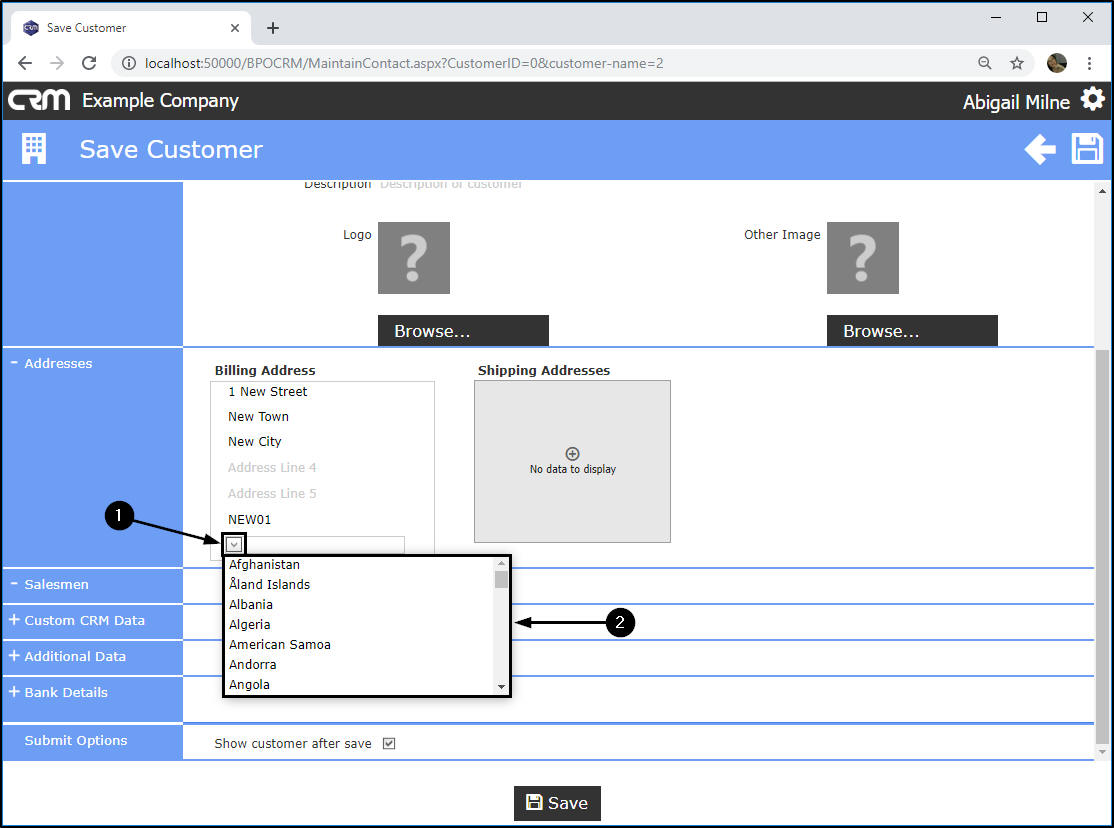
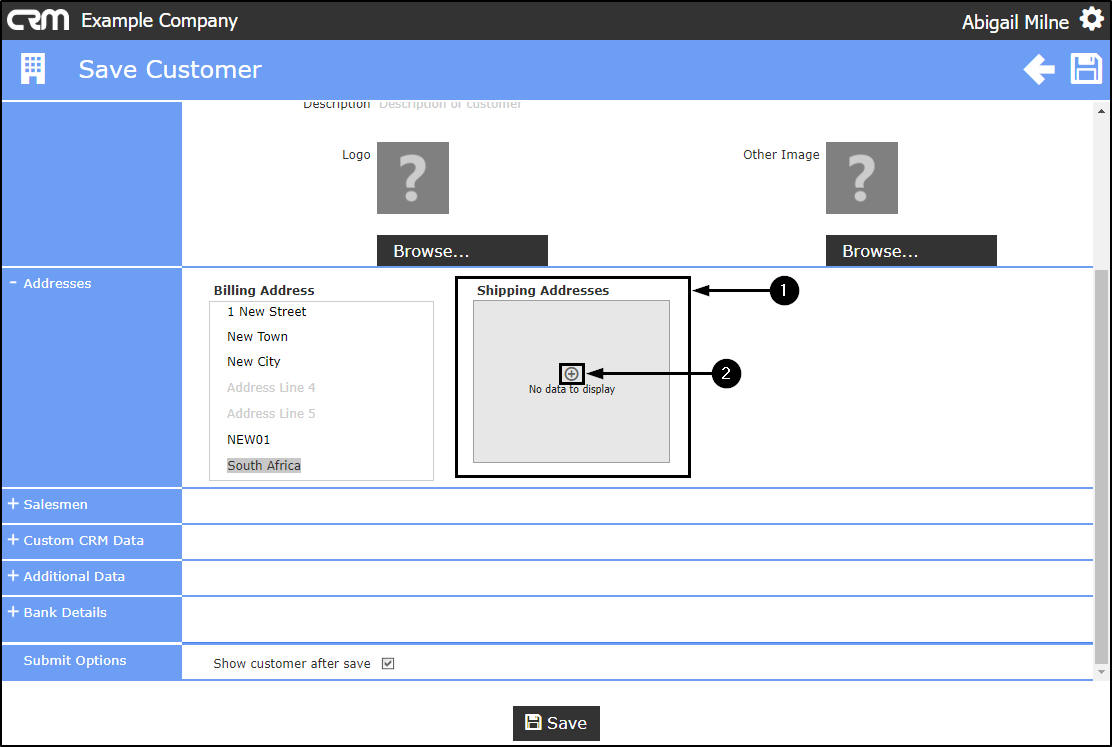
Shipping Addresses
- Note: There can be more than one Shipping Address. For example, one customer can have many sites (shipping Addresses) where machines can be delivered and/or serviced.
- Move across to the Shipping Address text box.
- Click on the expand icon.
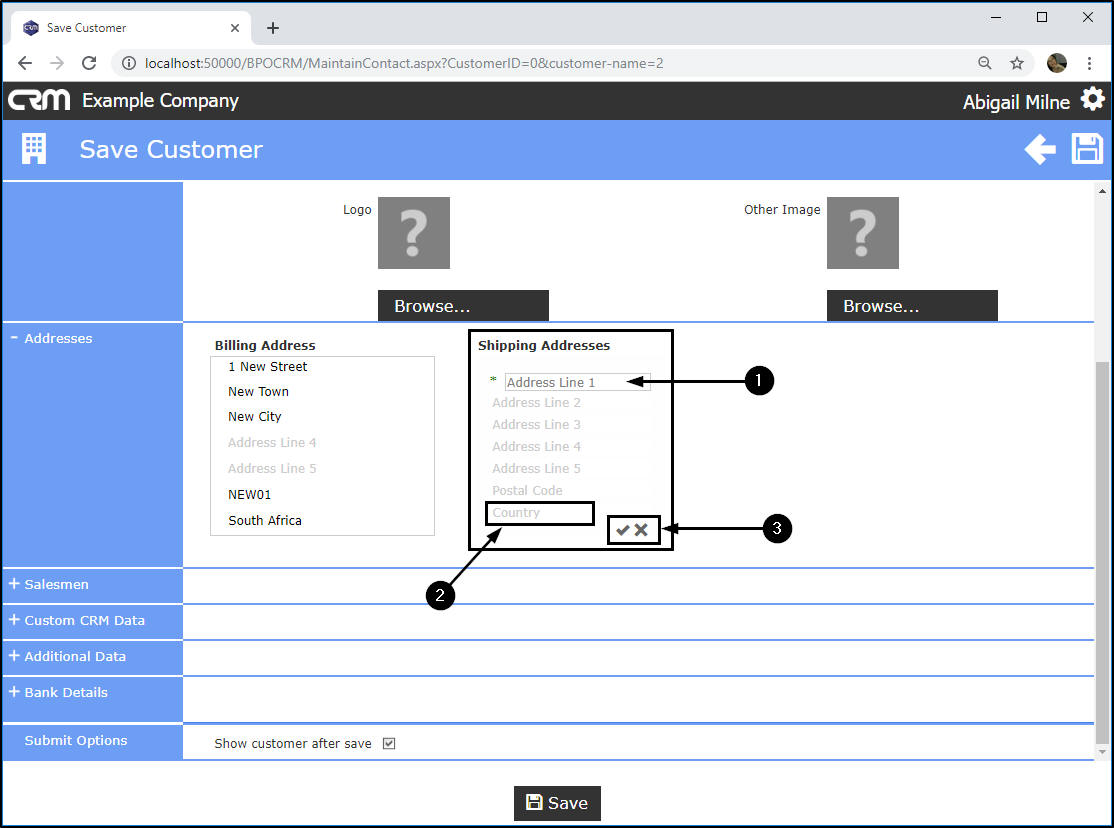
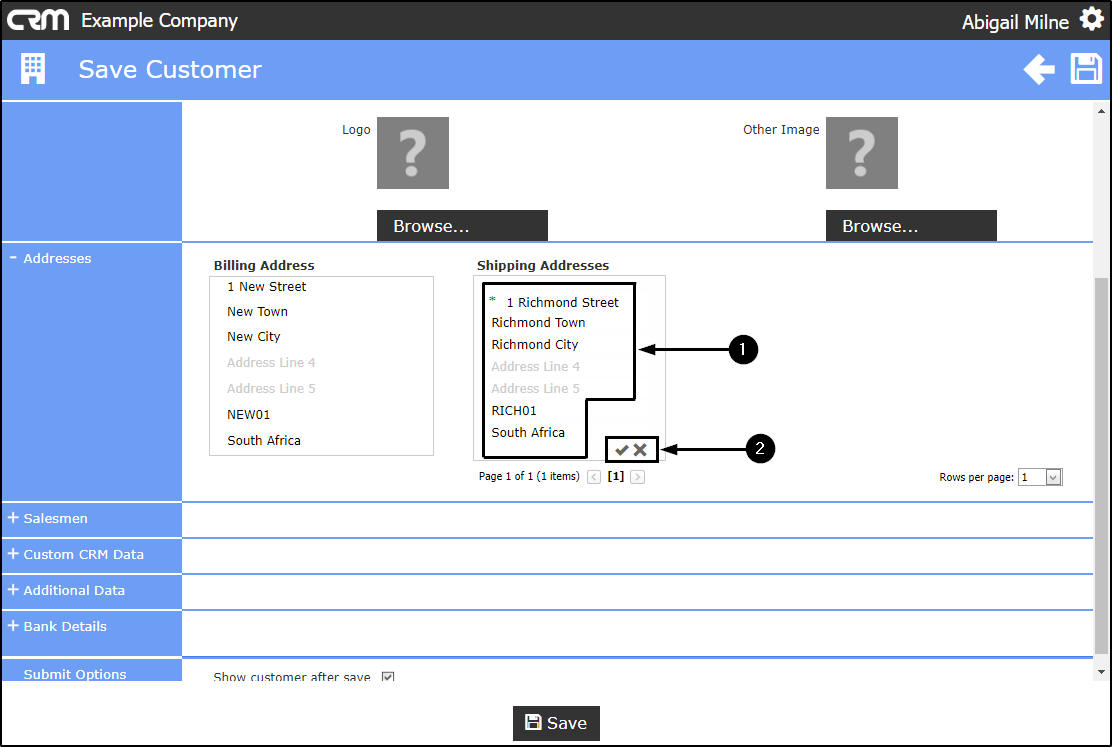
- Address Lines 1-5 and Postcode: Click in the Address Line fields and type in the Shipping Address details.
- Note: This is where the actual work will be done e.g. the machine will be delivered or serviced at this address.
- Country: Click in the Country field and either type directly in the field or select from the list displayed, the relevant country.
- You will note that this frame contains different icons from the Billing Address frame: an Apply Changes icon [ ] and a Cancel icon [x]. This is because of the additional addresses functionality which will be explained in the next few images.
- When you have typed in the Shipping Address details,
- Click on the Apply Changes [ ] icon.
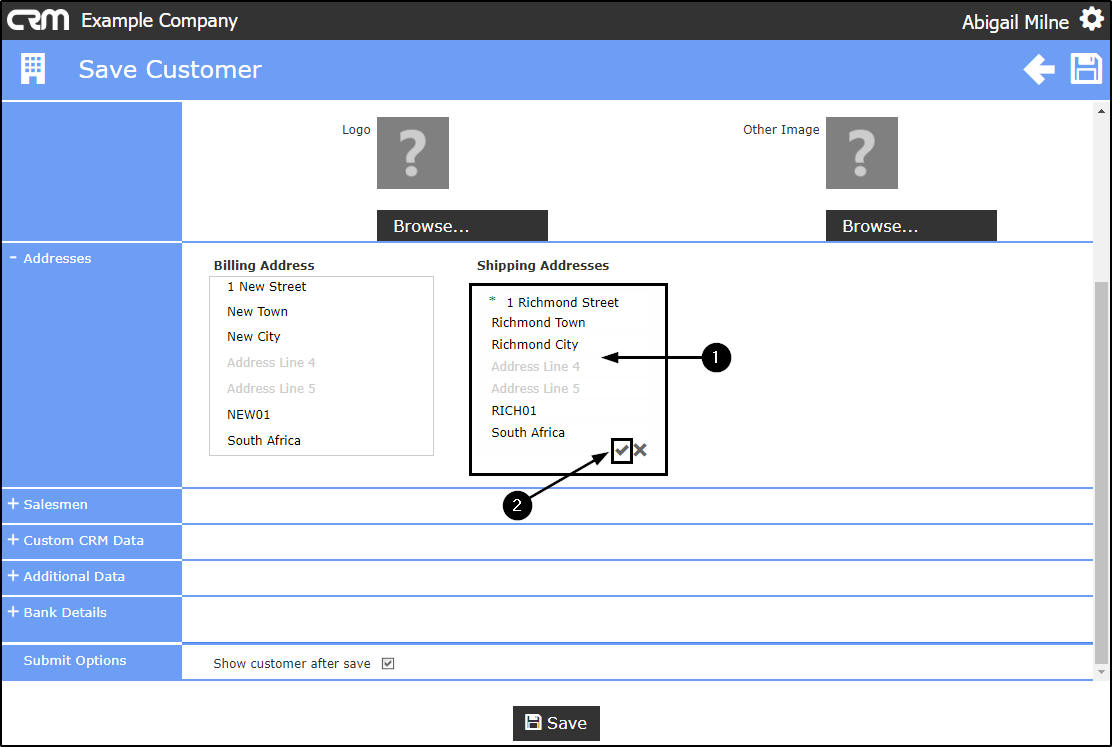
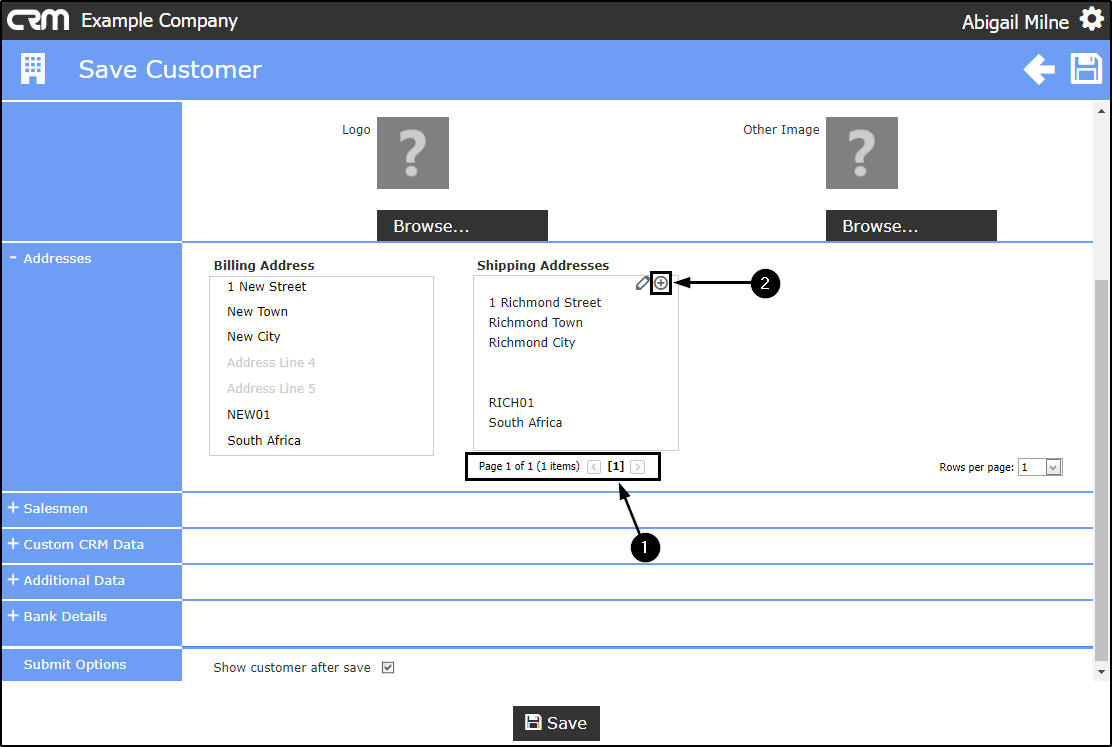
- New fields and icons will now appear in the Addresses frame.
Edit Shipping Address
- Click on the Edit icon.
- You can edit the Shipping Address details as required.
- Then either click on the Apply Changes [ ] icon to save your changes or the Cancel [x] icon to cancel any changes made.
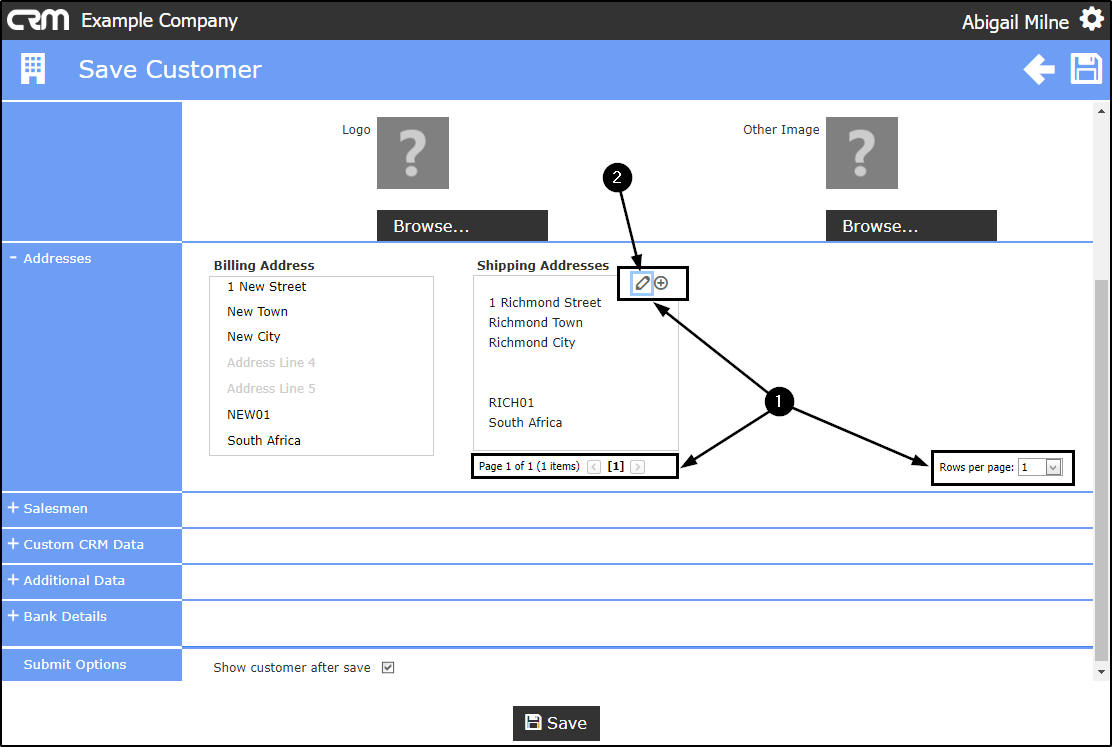
Additional Shipping Addresses
- You will note that this frame contains a Page Reference field.
- In this example, this field displays:
- [Page 1 of 1 (1 items)] [1]
- This is because only 1 Shipping Address has been added to this customer.
- Click on the plus [+] icon in the Shipping Address frame.
- A second Shipping Addresses frame will open.
- Fill in the second shipping details (as explained above).
- Click on the Apply Changes [ ] icon [ ].
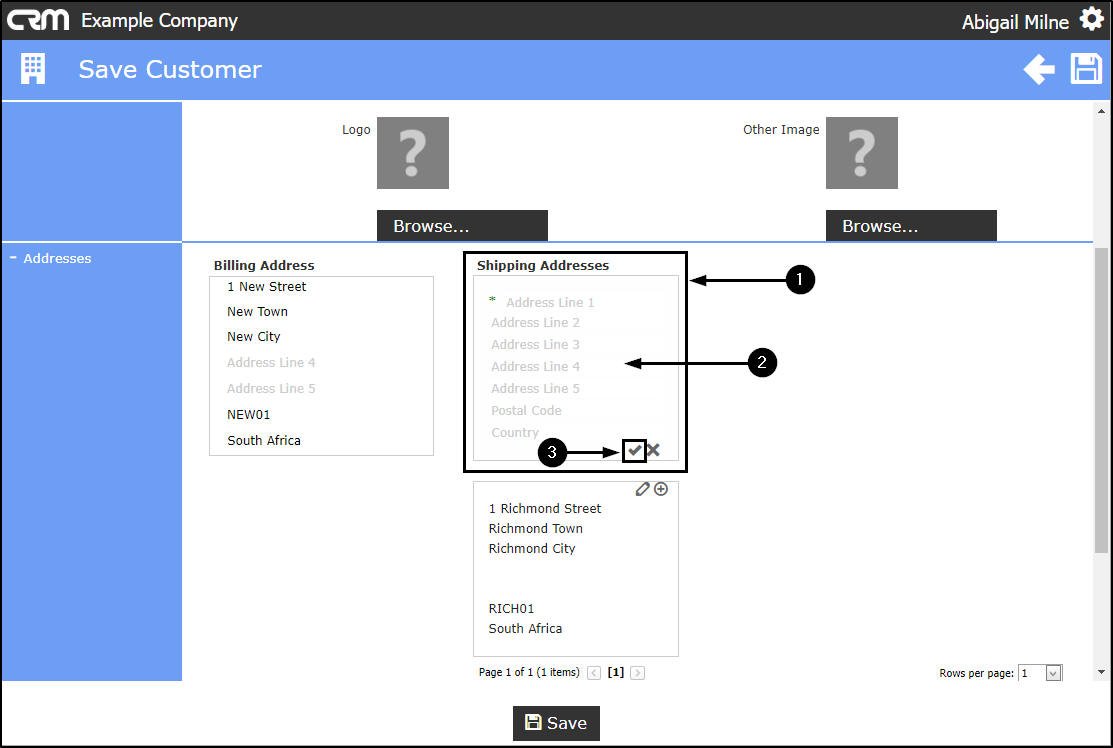
- The second Shipping Address will be added to the Addresses frame.
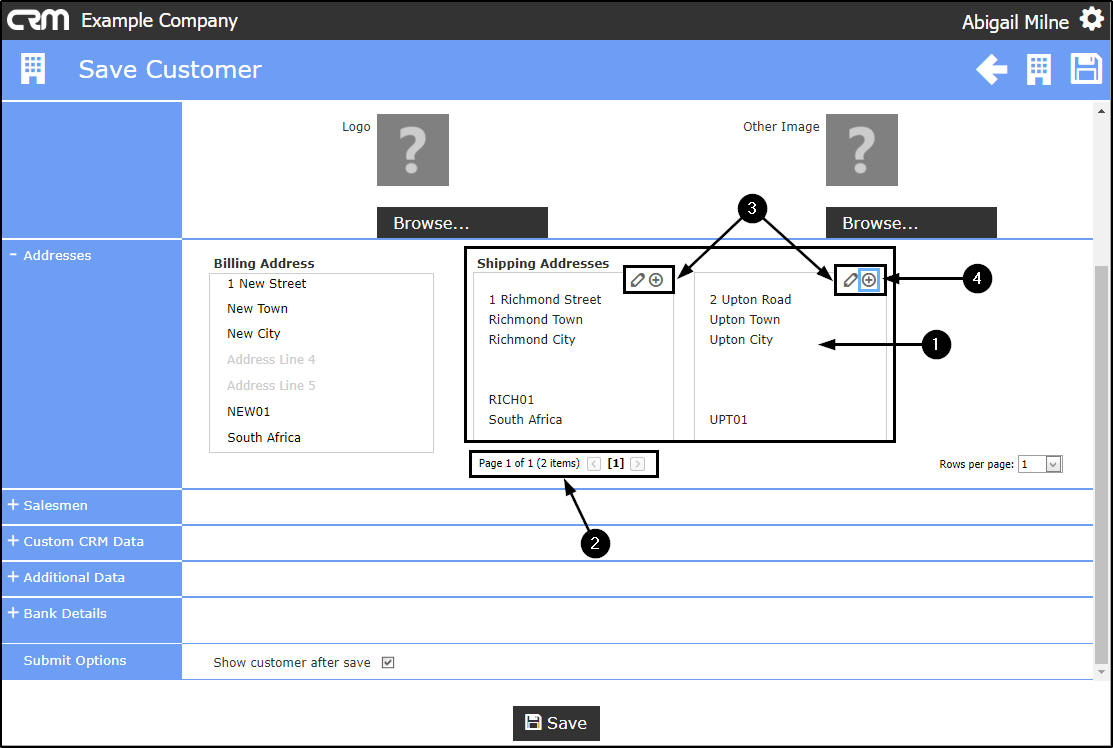
- You will note that the Page References field now displays:
- Page 1 of 1 (2 items) [1]
- You can edit either of these addresses by clicking on the Edit [ ] icon in the relevant Shipping Address frame. You can also click on the Plus[+] icon to add a third shipping address, if required.
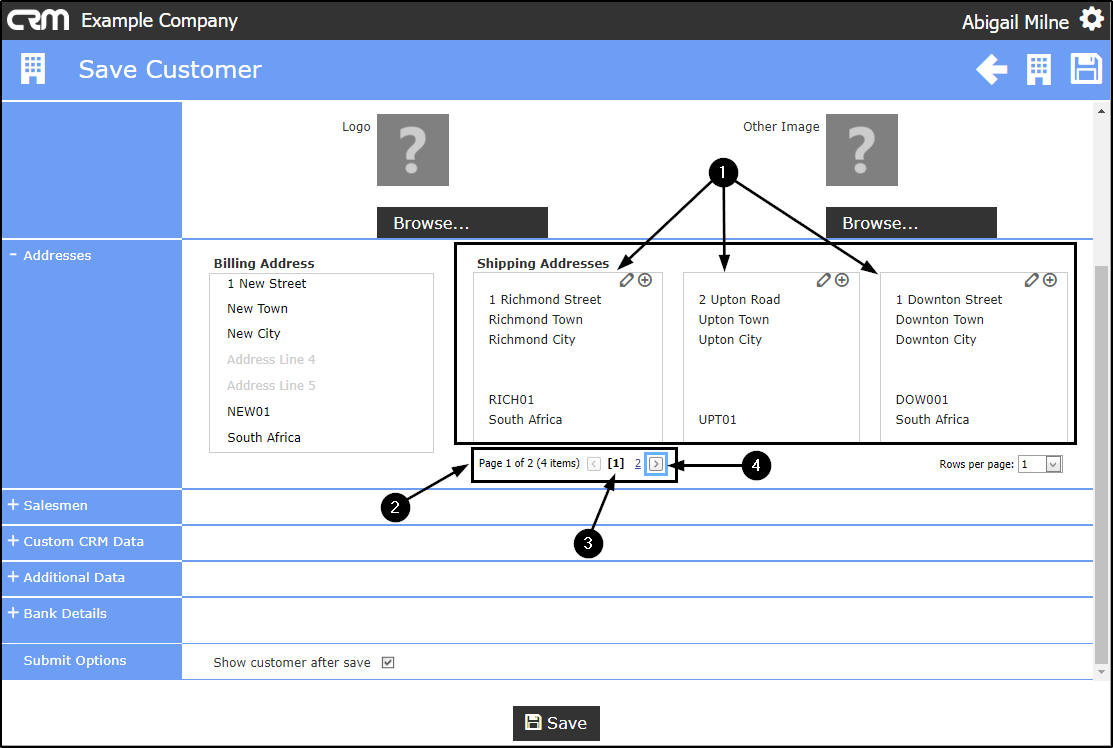
- For the purpose of explaining the Page Reference field further, 2 more Shipping Addresses have been added.
-
as there are now 2 shipping addresses displayed on this page.
- In this example, you can view 3 of the Shipping Addresses in the frame.
- The Page References field will now display:
- Page 1 of 2 (4 items).
- The number in bold will tell you which page you are currently on.
- To view the fourth Shipping Address, click on the right arrow to move onto the next page.
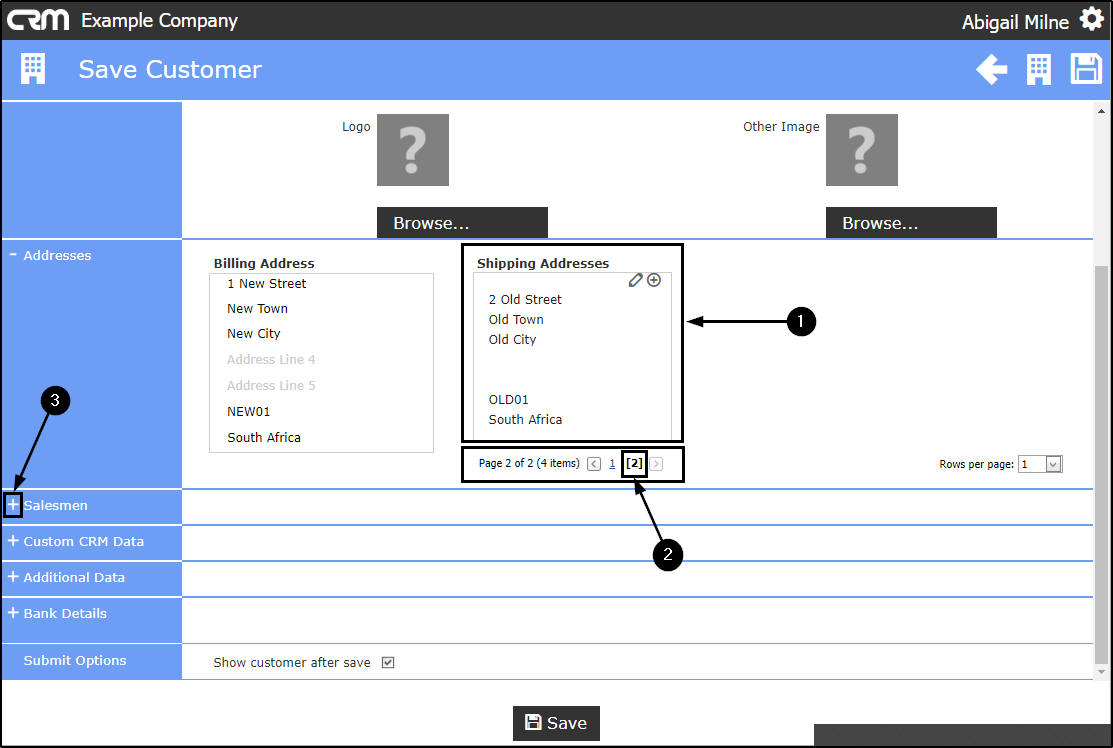
- You can now view the 4th Shipping Address
- The Page Reference field will tell you that you are on the page 2 of the Addresses frame.
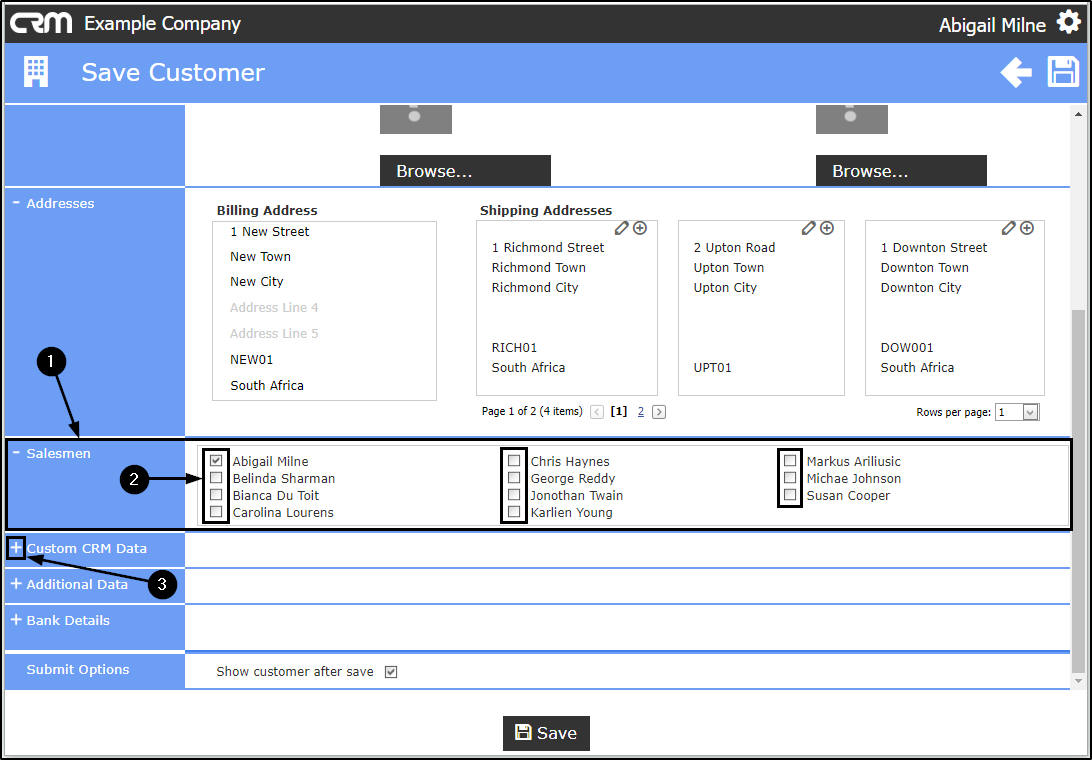
Salesman
- When you have finished entering the Addresses details, click on the expand icon in front of Salesmen.
- This frame will be expanded.
- Select the check box(es) in front of any additional Salesperson(s) that you wish to link to this customer.
- This can be used as a reference from Nucleus Service if the main Salesperson is not available.
- In CRM this also allows selected Salesperson(s) access to the Customer.
-
This is helpful for 2 reasons:
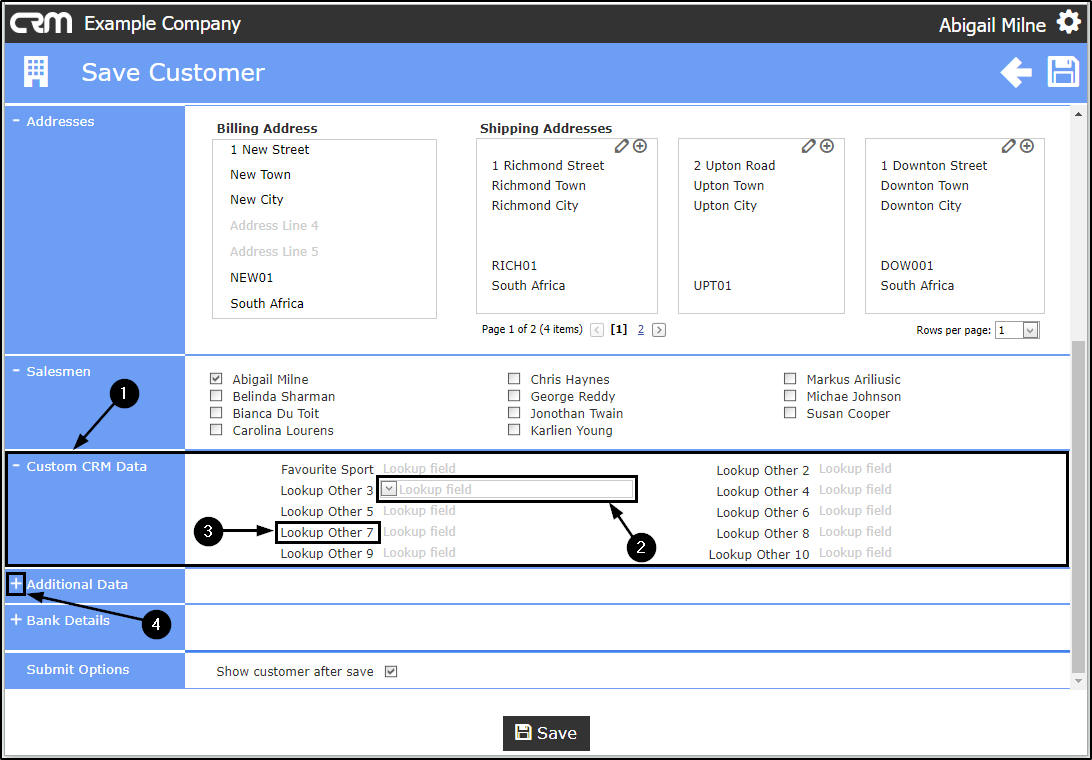
Custom CRM Data
- When you have finished adding Salesmen if required, click on the expand icon in front of Custom CRM Data.
- This frame will be expanded.
- Custom CRM Data field captions and
- CRM Data drop-down field options can be configured specific to your requirements.
-
Note
:
For any Additional Data that you wish to store against your customers, you
can use the
Custom CRM Data fields
(outlined above)
and
Additional Data fields
(outlined below).
Follow the processes hyperlinked to rename the captions for
these fields, depending on the information you need to store.
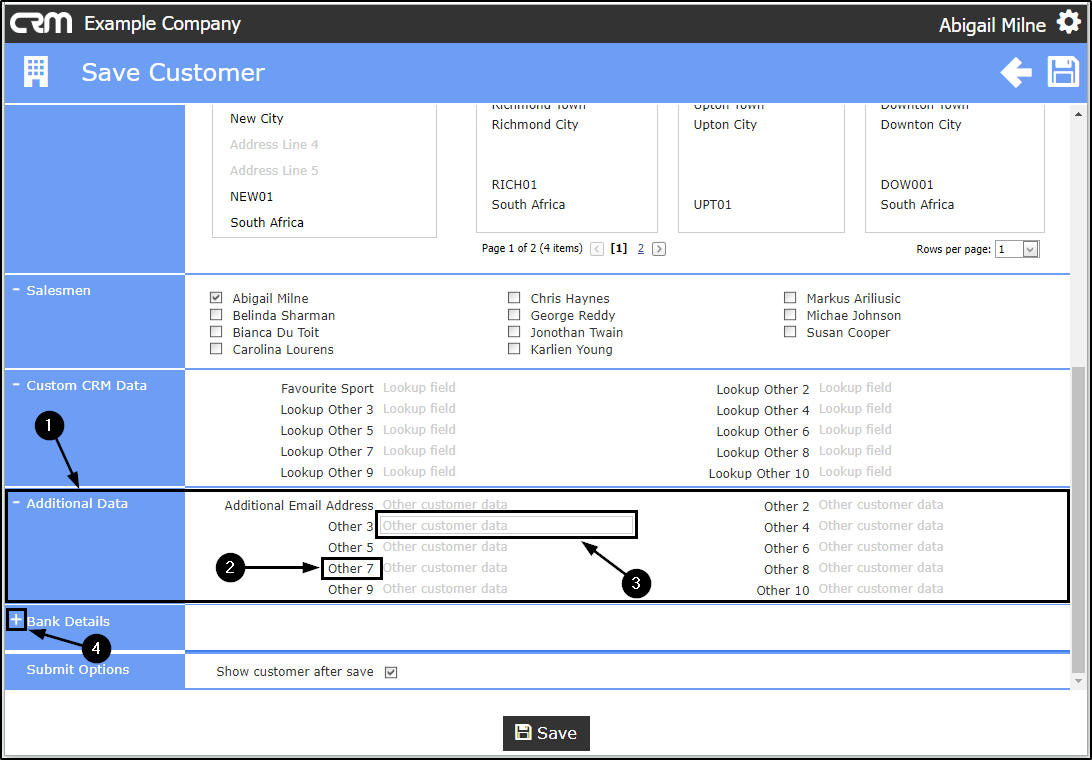
Additional Data
- When you have finished adding Custom CRM Data, click on the expand icon in front of Additional Data.
- This frame will be expanded.
- Custom Additional Data field captions and
- Additional Data drop-down field options can be configured specific to your requirements.
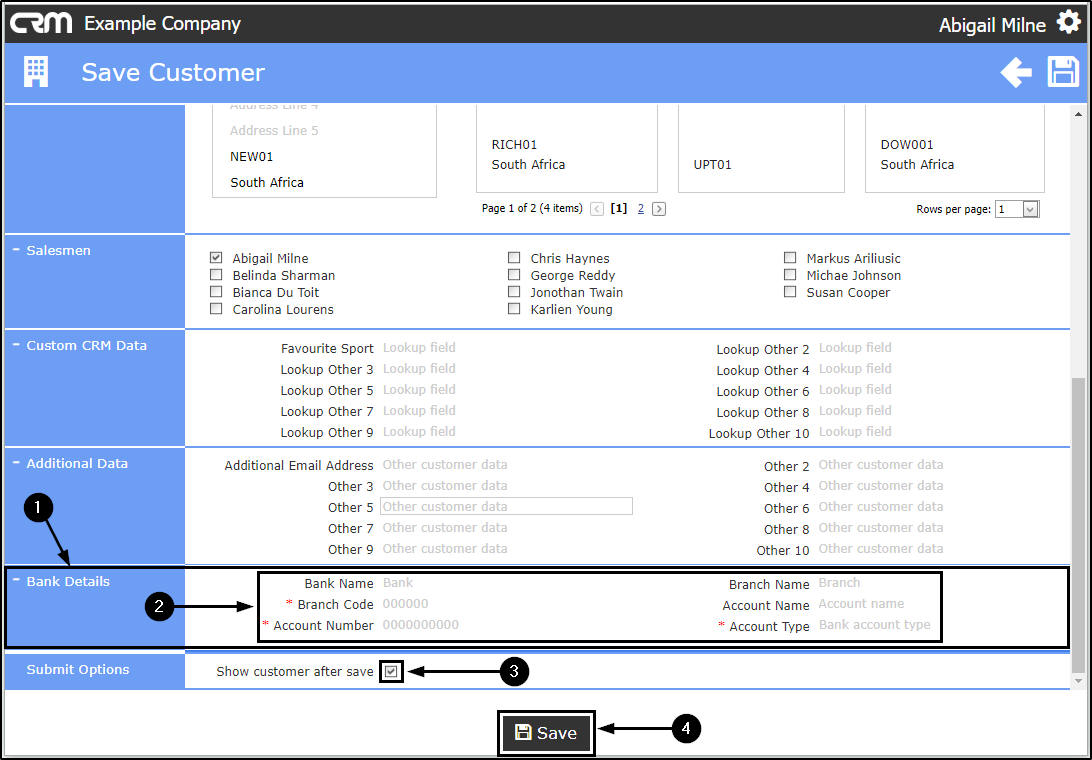
Bank Details
- When you have finished setting up Additional Data as required, click on the expand icon in front of Bank Details.
- This frame will be expanded.
- If you have the customer's banking details, you can type them in here.
Submit Options - Show Customer after save check box selected
- You have the option to view this customers details after save in the home screen.
- If you tick this check box, when you click on Save, you will return to the CRM Dashboard home screen, with the newly created customer details displaying in the Today frame.
- If you do not tick this check box, when you click on Save, you will return to the CRM Dashboard home screen, and the newly entered customer details will not display.
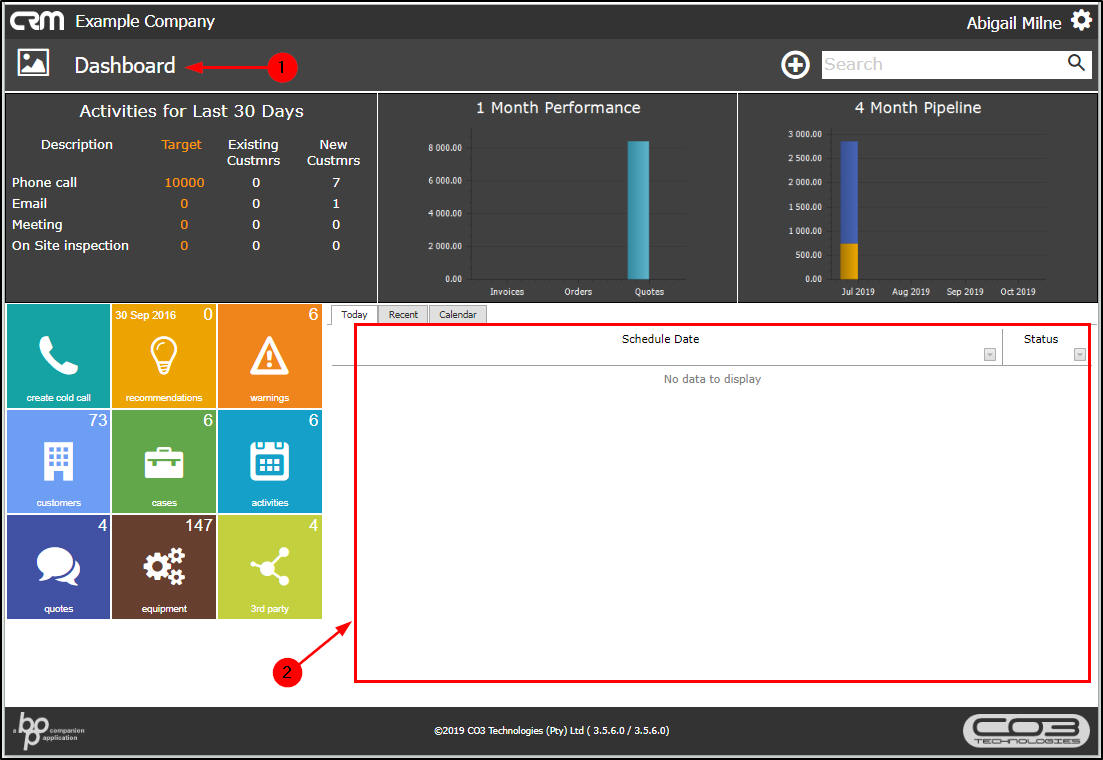
Save New Customer
- Click on Save when you are done.
- If you selected to Show customer after save, you will return to the home screen where it will now display Customer Dashboard in the title bar.
- Here you can view the newly created customer details.
- Note:
- the Sales History graph is now displayed
- there are new icons in this dashboard
- the percentage (%) of information gathered

Submit Options - Show Customer after save check box unselected
- If you did not select the Show customer after save check box, you will return to the CRM home screen Dashboard.
- There will be no customer details displayed on the dashboard.
CRM.000.004