We are currently updating our site; thank you for your patience.
Sales
Customers - Add Customer
You will need to set up customers in order to create:
- Quotes
- Orders
- Calls
- Invoices
- Contracts
- Credit Notes
A customer can be a Debtor or a Cash Sales Customer. By setting up the customer as 'Is Debtor', BPO will create an account for this customer in your financial system. You do not need to specify an account code for the customer in BPO.
If you do not set up the customer as a Debtor, then the customer will be treated as a Cash Sales customer. You will then need to specify a GL Account Code for the customer in BPO, in order to post to your Cash Sales account in your financial system.
When you add a customer, you can set up customer credit limits, credit checks and credit terms. Any changes you make to these, will update in Pastel.
Must Haves when Creating a Customer:
- An Accounts Contact (Pastel account contact)
- A Primary Contact (Pastel account contact if Account Contact is not set up & Call Notification Contact)
- An Invoice Delivery method (for contract billing - invoice emailing)
- One Billing address (and only 1 billing address)
- At least 1 Shipping address (for Sales Shipping and Machine Location links)
![]() If you are using a Customer Code Prefix with the Customer Code - For a detailed handling of this topic refer to Add Customer with Customer Code Prefix
If you are using a Customer Code Prefix with the Customer Code - For a detailed handling of this topic refer to Add Customer with Customer Code Prefix
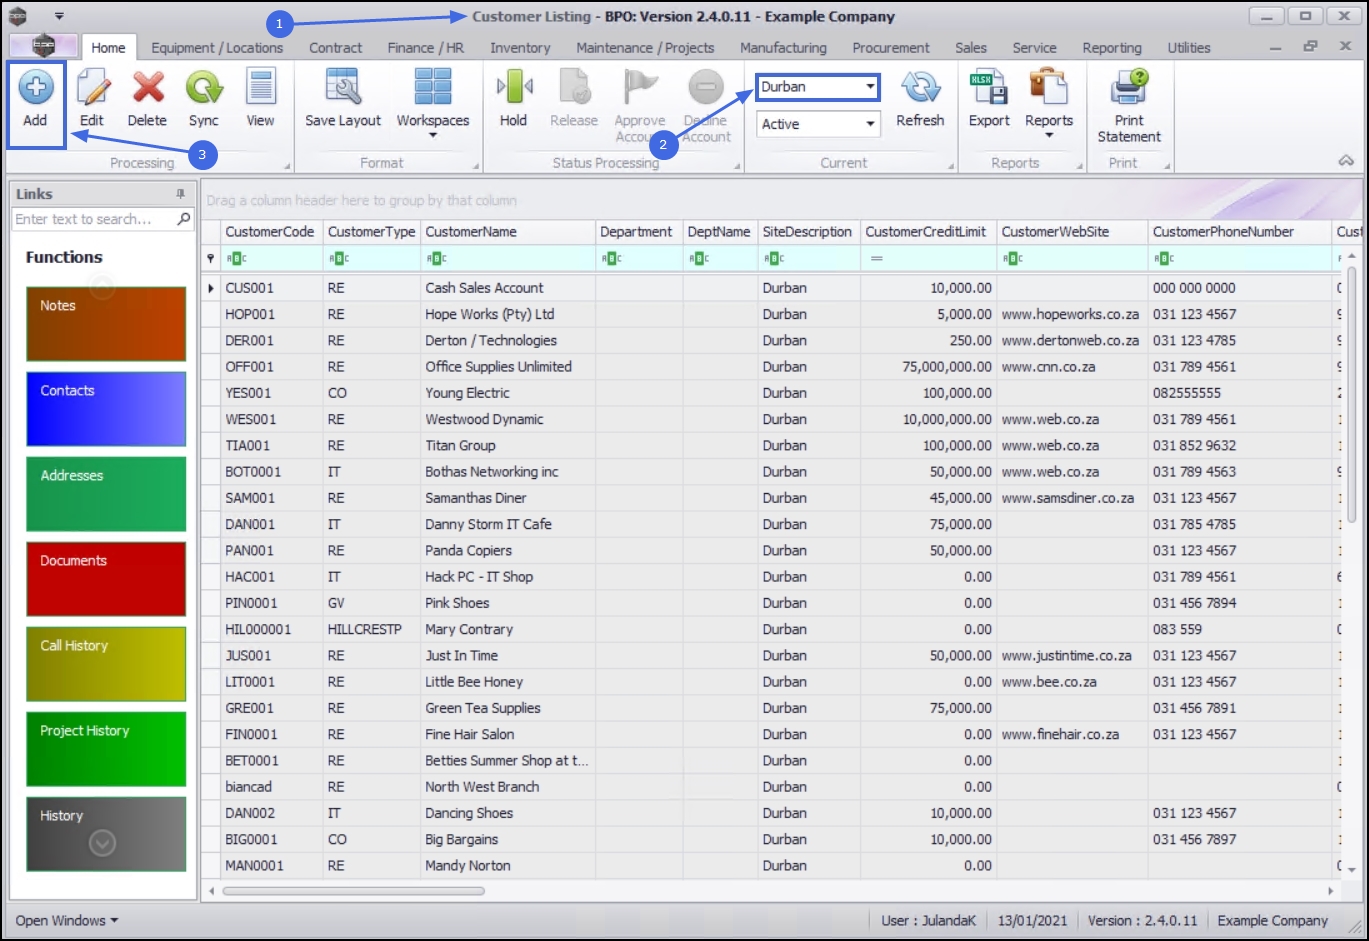
| Ribbon Access: Sales > Customers |

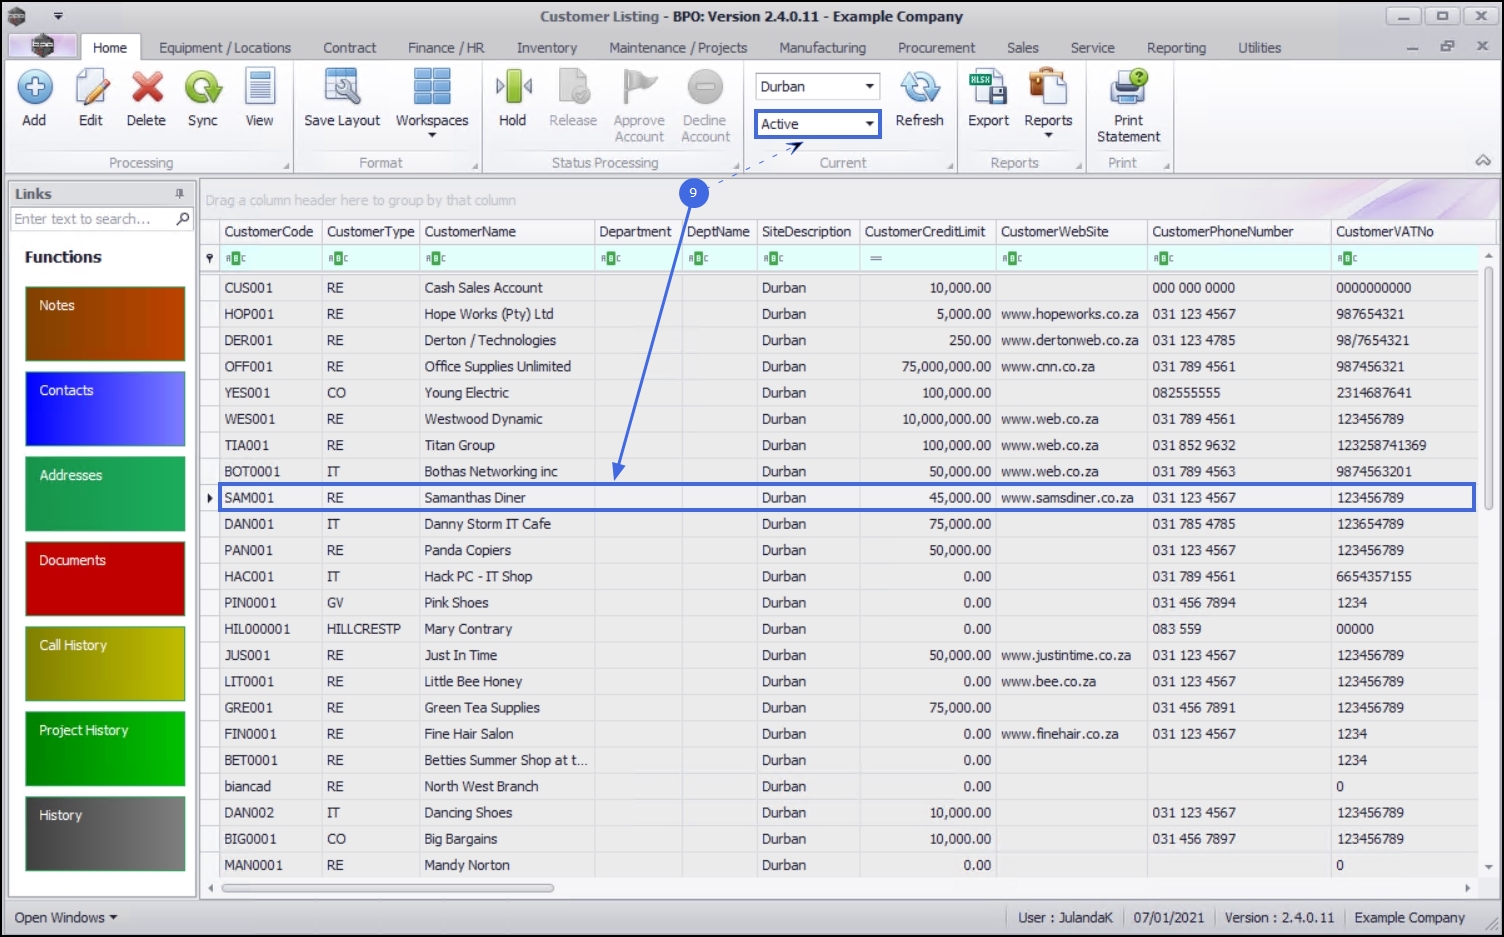
- The Customer Listing screen will be displayed.
- Select the Site where the customer can be located.
- The example has Durban selected.
- Click on Add.
![]() Short cut key: Right click to display the All groups menu list. Click on Add.
Short cut key: Right click to display the All groups menu list. Click on Add.
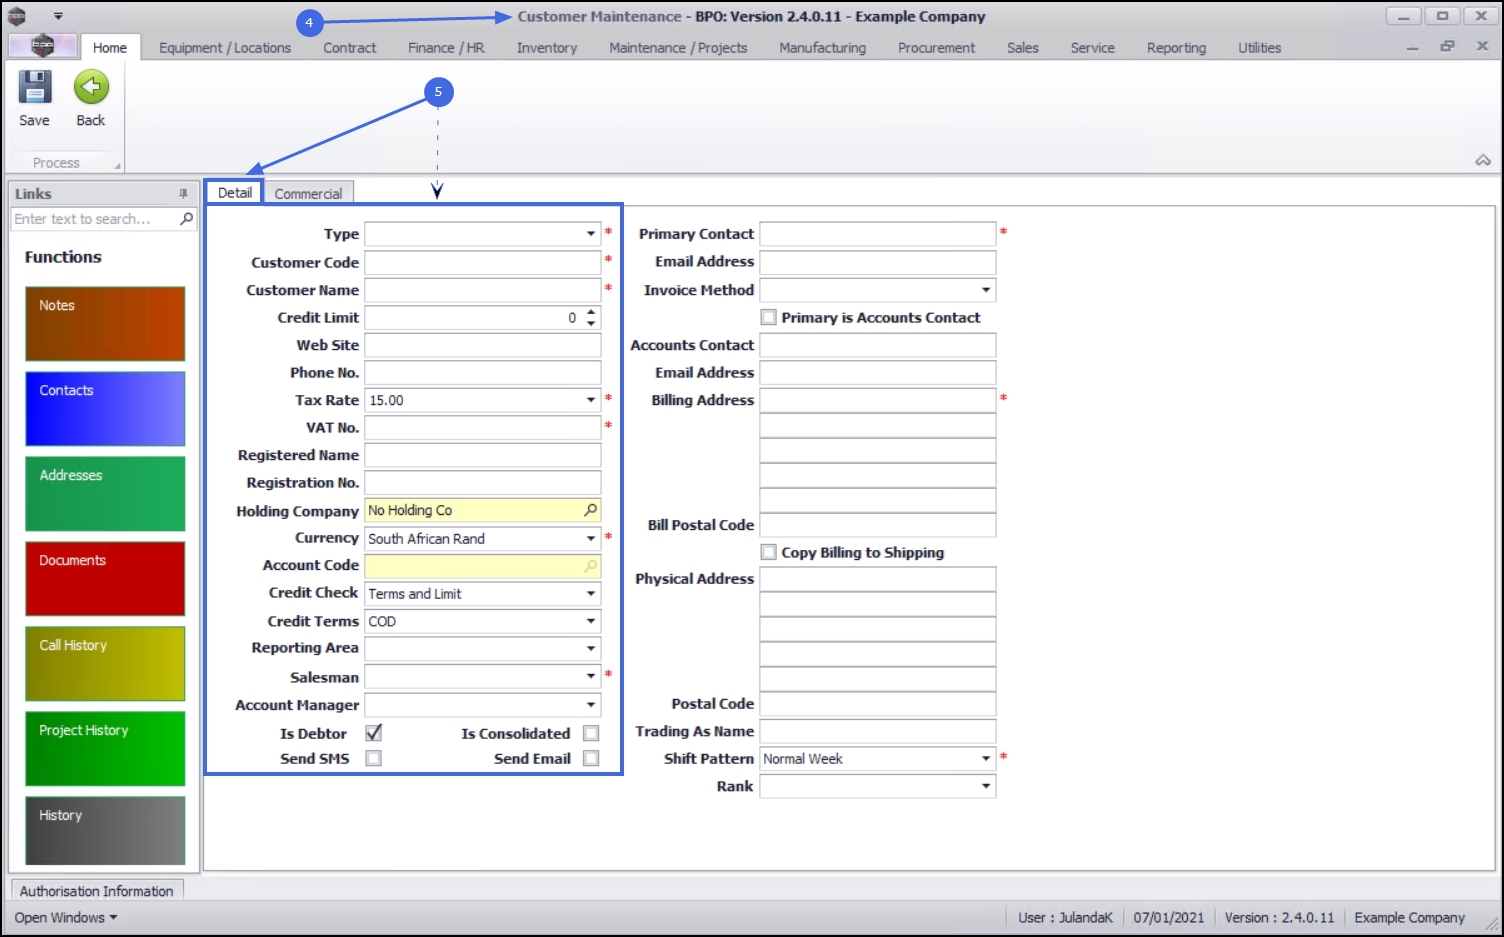
- The Customer Maintenance screen will be displayed.
Customer Details
- Type: Search for and select the type of customer, e.g. Retail.
- Customer Code: Type in the Customer Code / Account No for this client. (not required if the Auto Customer Code Generation is configured).
 Note 1: The Customer Code is very important because it is linked to Pastel Evolution and all the customer information and history will be linked to this code and not the Customer Name. Note 2: If you are manually entering the Customer Code, the recommended standard is using a customer code which is 6 characters long starting with 3 letters and then 3 numbers. Note 3: The recommended setting is to auto generate the customer code. Note 4: From BPO2 v2.5.1.4 restrictions have been put into place to prevent special characters from being saved. You will only be allowed to save upper case characters and digits from 0 to 9.
- Customer Name: Type in the name of the customer.
- Customer Credit Limit: Type in the credit limit for the customer.
- Web Site: Type in the customer's website, if applicable.
- Customer Phone Number: Type in the customer telephone number.
- Customer Tax Rate: This field defaults to the current tax rate, e.g. 15% VAT, but you can search for and select a different tax rate.
- Vat No: Type in the customer's VAT number.
- Registered Name: Type in the registered (legal) company name for the customer.
- Registration No: Type in the customer's registration number, if required.
- Holding Company: Click on the search button and select Is Holding.
- If you need to set this up as a Pastel 'Linked' Customer, then search for the customer you wish to link this new customer to. Note that if you link an account here, all transactions done for this customer will post to that account (based on what is set in Company Configuration).
- If you need to set this up as a Pastel 'Linked' Customer, then search for the customer you wish to link this new customer to.
- Currency: Click on the search button to select the customer currency.
- Account Code: This is the account you will post to in your financial system
- For Debtors: The account code is not required, as a customer account will be created in the financial system and linked to this customer.
- For Cash Sales Customers: Type in the General Ledger account code that will be used in your financial system, to post entries to.
- Alternately, click on the search button to select a Debtor to link this cash sale customer to.
- Credit Check: Click on the search button to select the credit checking required:
- A: Terms and Limit - BPO will check to see whether the customer has exceeded its terms and credit limit before allowing invoicing.
- B: Limit check only - BPO will only check to see whether the customer has exceeded their credit limit before allowing invoicing.
- N: No check - BPO will allow invoicing regardless of whether the customer has exceeded their terms or credit limit.
- Credit Terms: Click on the search button to select the customer 'Terms' required, e.g. 30 day or 60 day.
- Reporting Area: This field is used in conjunction with CRM - Customer Area, e.g. Sandton, Nelspruit, etc.
- Salesman: Click on the search button to select the main salesman linked to this customer. The salesman will be automatically be assigned to Sales Quotes, Orders and Invoices raised for this customer. This can however be changed on the individual documents.
- Account Manager: Click on the search button to select the employee responsible for managing the account. This is the person the customer will contact with regards to queries on their account.
- Is Debtor: This check box will auto populate by default and determines whether your customer is a Debtor or Cash Sales Customer.
- For Debtors: Make sure this item is selected. This means that an account will be created in your financial system.
- For Cash Sales Customers: Do not select this item. Make sure you specify an Account Code.
- Is Consolidated: Relates to Contract billing. If selected, one contract invoice will be created for all contracts linked to this customer. If unselected, one contract invoice will be created per contract.
- Send SMS: Select this option to have the system send a call status change SMS to the customer primary contact.
- Send Email: Select this option to have the system send a call status change email to the customer primary contact. (Refer to Related Topics)
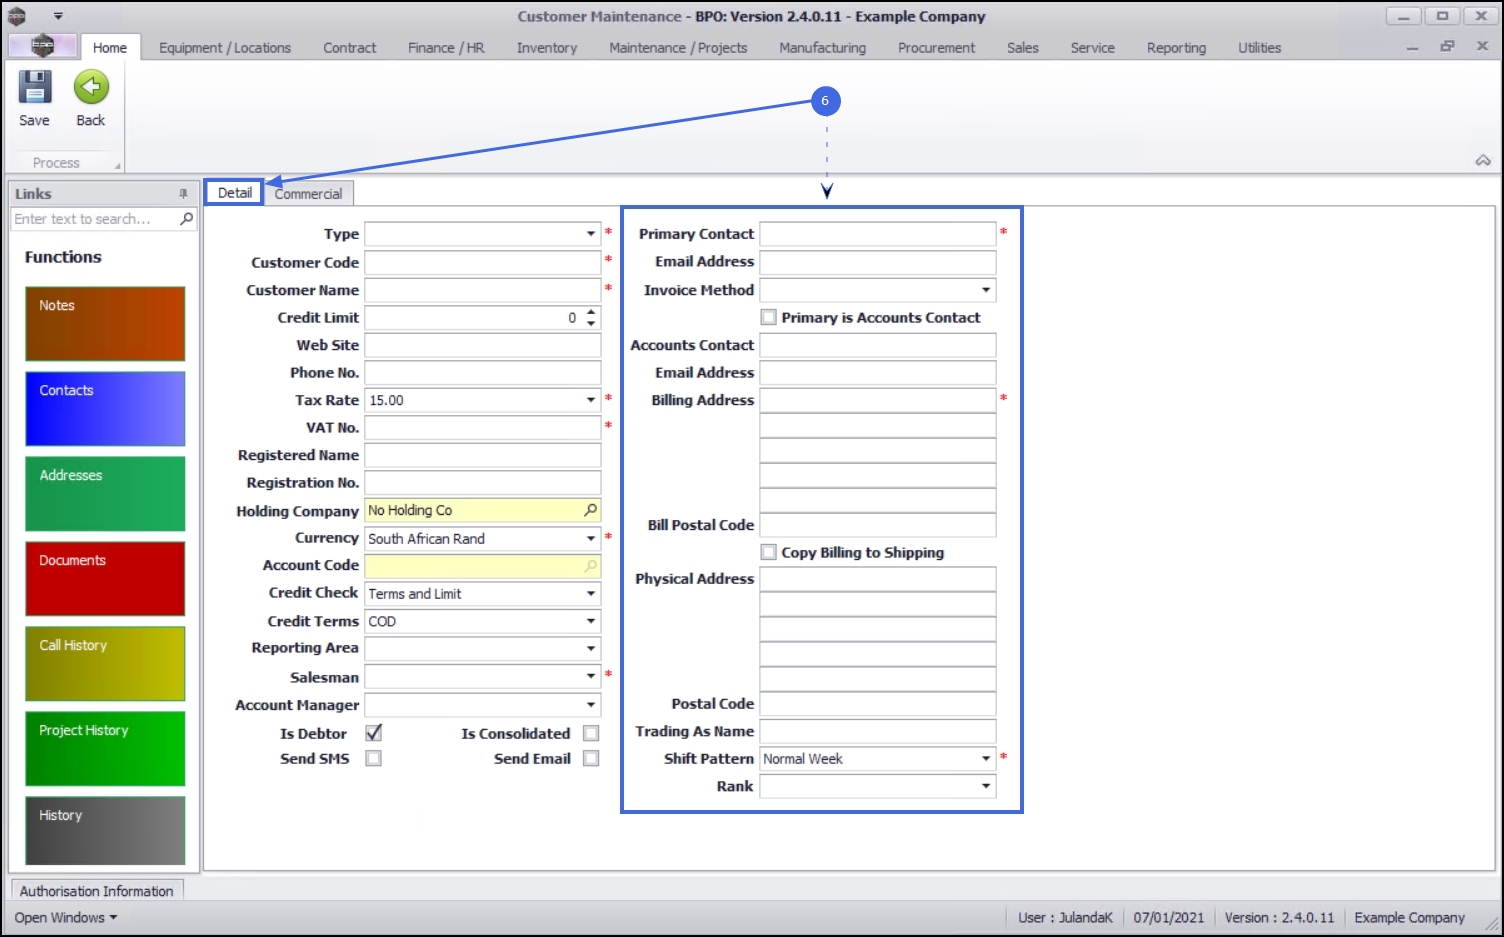
Customer Details continue
- Primary Contact: Type in the name and surname for the customer contact.
- - The primary contact receives all operational or business related emails e.g. Call Status Change emails.
- - The primary contact is also required for customer item task generation and contract closure notification.
- - If an Accounts contact does not exist, then the system will use the primary contact as the default contact in the financial system.
- Email Address: Type in the email address for the primary contact.
- Invoice Method: The Invoice Delivery Method defines how the system will deliver the Invoices during the 'Run Print / Email Batch' step of the Month End Billing Run.
- For Emails: Make sure that the contact you link to the delivery method has a valid email address.
- To Print: These documents will print to the printer specified in the Printer Service Setup.
- Primary is Accounts Contact: This flag identifies and configures the Primary Contact as the Accounts Contact.
- This information will be copied to the Accounts Contact and Email address fields.
- Accounts Contact: Type in the name and surname of the Accounts Contact.
- The Accounts Contact receives all the financial related emails and will be saved as the main contact in the financial system. Month End Contract Billing run emails are usually sent to this contact .
- Email Address: Type in the email address for the accounts contact.
- Complete the Shipping and Billing Address details. Note 1: The Billing Address is mandatory. If the Billing and Shipping addresses are the same, then first type in the Billing Address, then click on the Copy Billing to Shipping check box to quick-populate the Shipping fields. Note 2: The Billing Address is where the invoices are sent. Note 3: The Shipping Address is where an asset or equipment item is located or where services are required. If you are using TechConnect, this is the address where the Technician goes to render services when he accepts a Call.
- Trading As Name: Type in the customer's trading name. This is what the company is known as.
- Shift Pattern: Search for and select the relevant shift. This is the customer's trading (business) hours and is linked to SLA. Refer to Setting up Shifts if the shift required is not on the list.
- Note:SLA will be calculated based on the shift pattern e.g. if the trading hours are from 8 am - 5 pm and a call is logged at 4 pm, SLA will start calculating at 4 pm and stops at 5 pm and resumes again the next day at 8 am.
- Rank: This is used in conjunction with CRM - Call cycle rank. Note that rank is based on how much you value this customer and helps to define the Call cycle per client. For example, a Wood ranking indicates that you will only contact this customer every 365 days - this customer is not valuable to you. However a Platinum ranking indicates that this is a very important customer that you wish to maintain a good relationship with, therefore you will contact them every 15 days.
- Each customer must be linked to a Rank in CRM as well as linked in this Customer Maintenance screen in BPO2.
Commercial Frame
- When you have finished filling in the customer details, click on the Commercial tab.
- Sites: A customer could be linked to a single site or multiple sites. Ensure that the correct site(s) are allocated.
- Banking Details: Type in the Bank Name, Branch Name, Branch Code, Account Name, Account Number and select the Account Type. This is important for customers who use the Debit Order payment method.
- Payment Method: Search for and select the method the customer will use to pay.
- If this customer need to be included in the Debit Order run, you need to ensure a Payment Method is selected where the Payment Method Code Type is DO (Debit Order).
- Commercial: Click on the search button to select the commercial (price list) you wish to link to this customer.
- Department: Search for and select the department for this customer.
- This is important when you use a segmented ledger where department is one of the segments. This is for reporting purposes.
- Salesman: Check this field to link an additional Salesman to this customer.
- Can be used as a reference from BPO if the main salesman is not available, or in CRM - also allows selected Salesman access to the Customer.
- Custom 1-10: You can use these fields to add additional information not currently set up for the customer. The field names can be re-named according to your company requirements. Please contact your BPO specialist or CO3 Support for assistance.
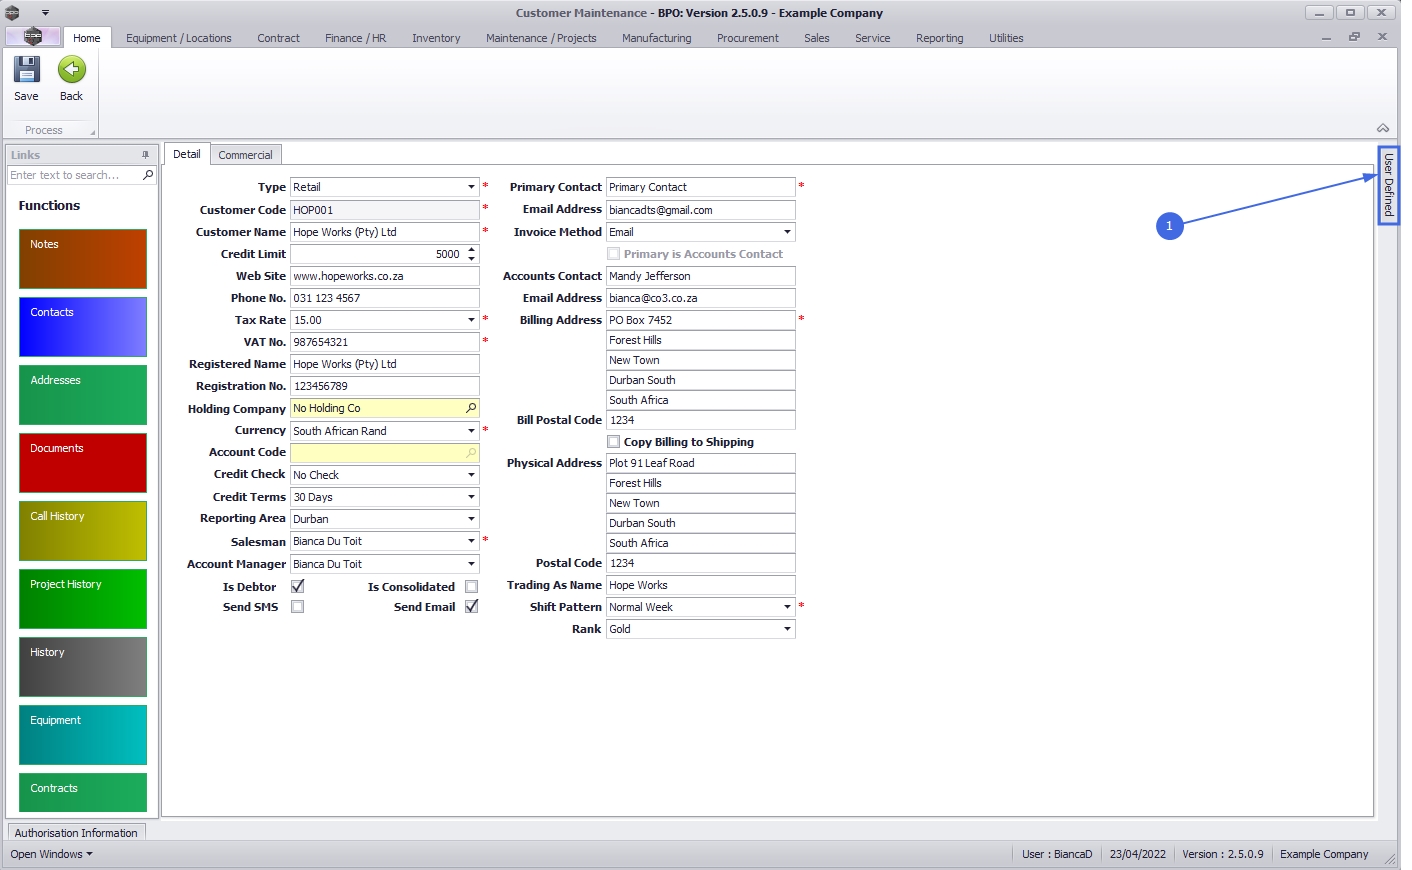
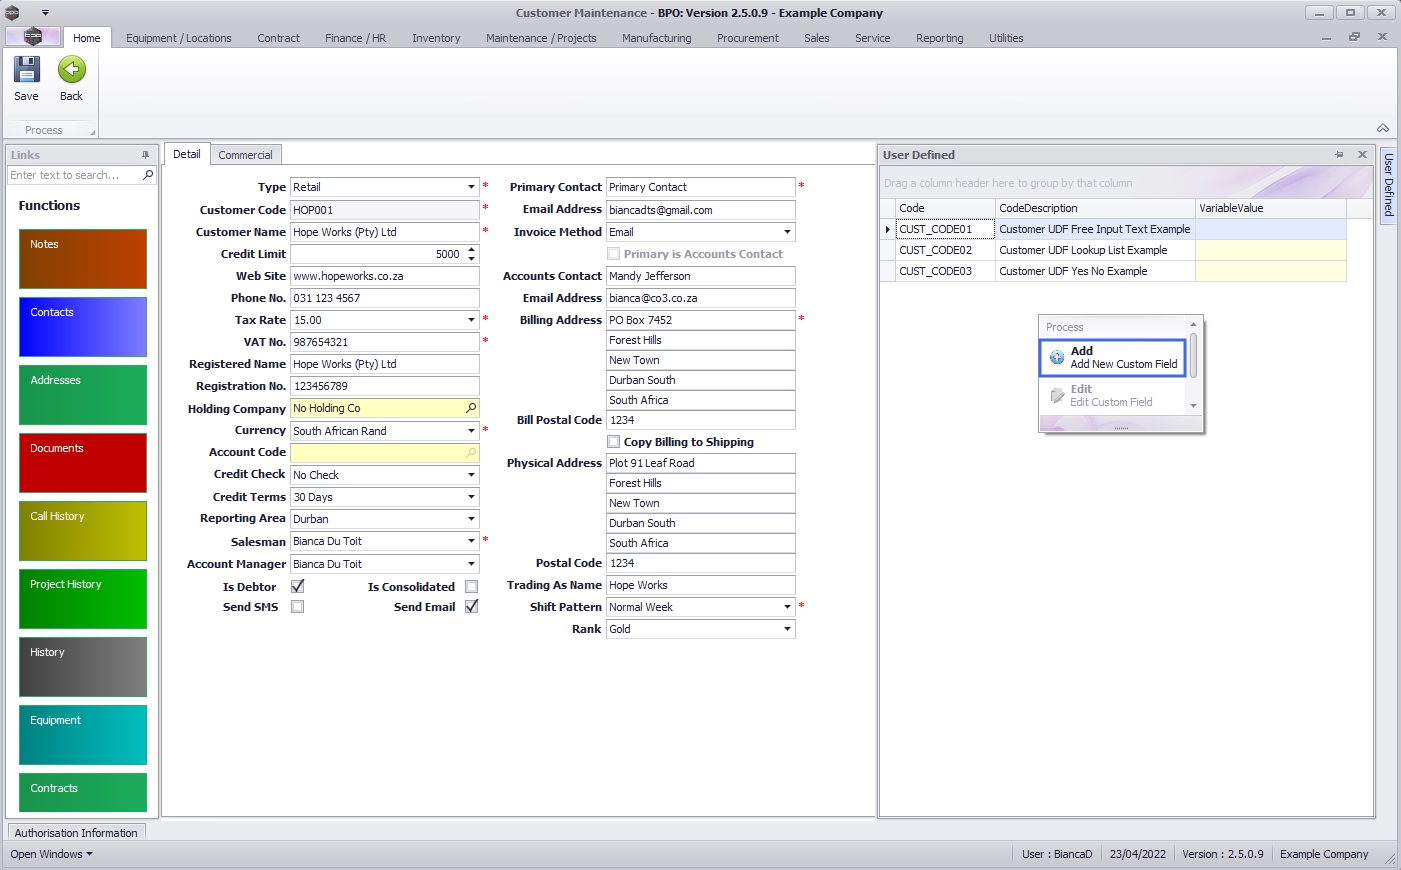
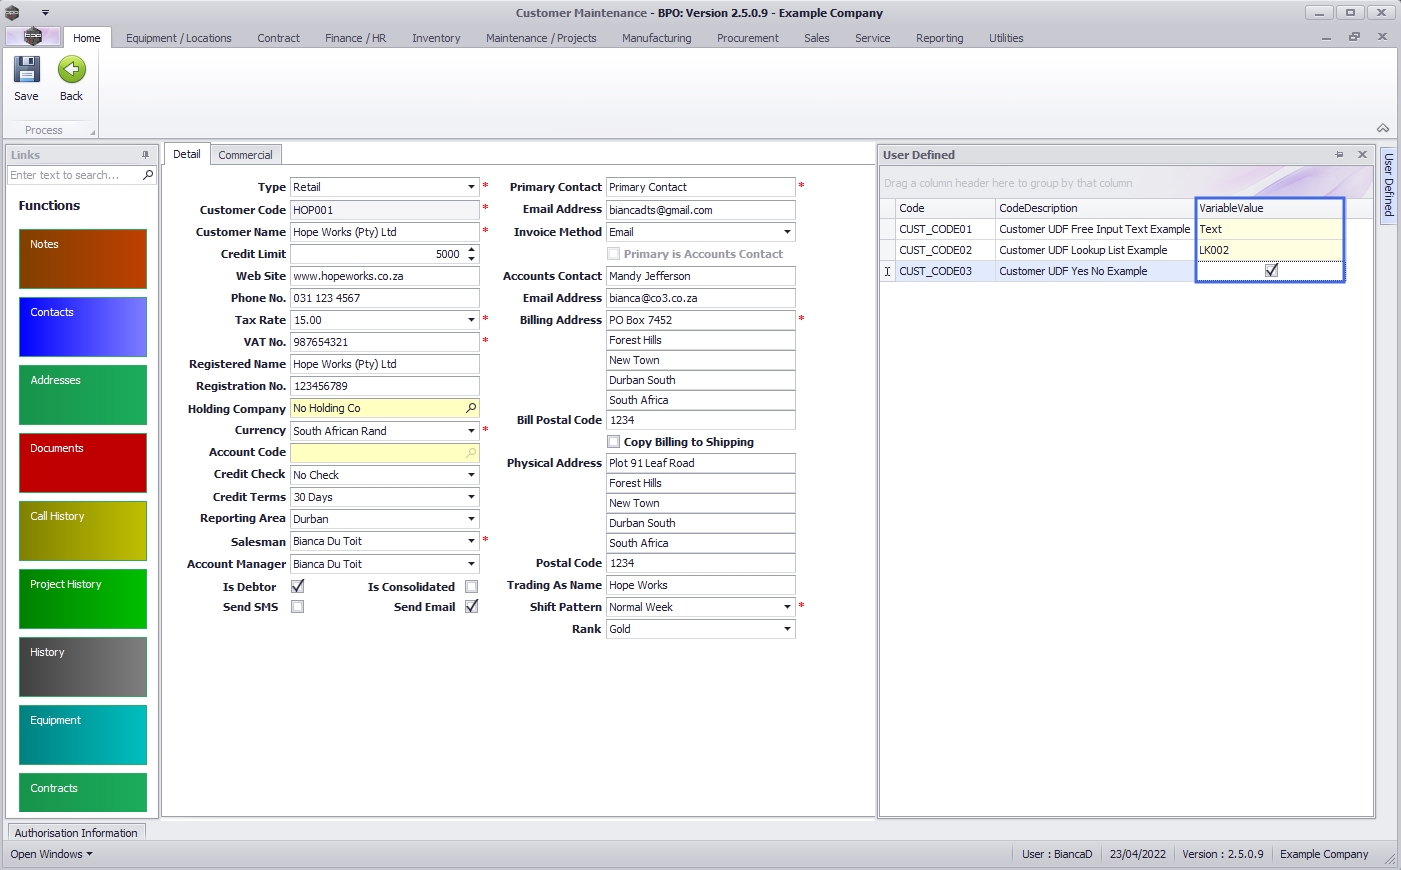
User Defined Fields
The inclusion of User Defined Fields is to provide more information within the Asset, Contract, Customer and Location modules so that associated work/processes can be carried out more efficiently. It will serve as connective tissue between contracts and call center functions to improve call center performance by having readily accessible information.
- Click on the User Defined dock panel tab to open the panel
Add New Custom Field
New User Defined Customer Fields can be created from here. Any User Defined field created will be available for update on all customers.
- Right click in User Defined panel and select Add New Custom Field
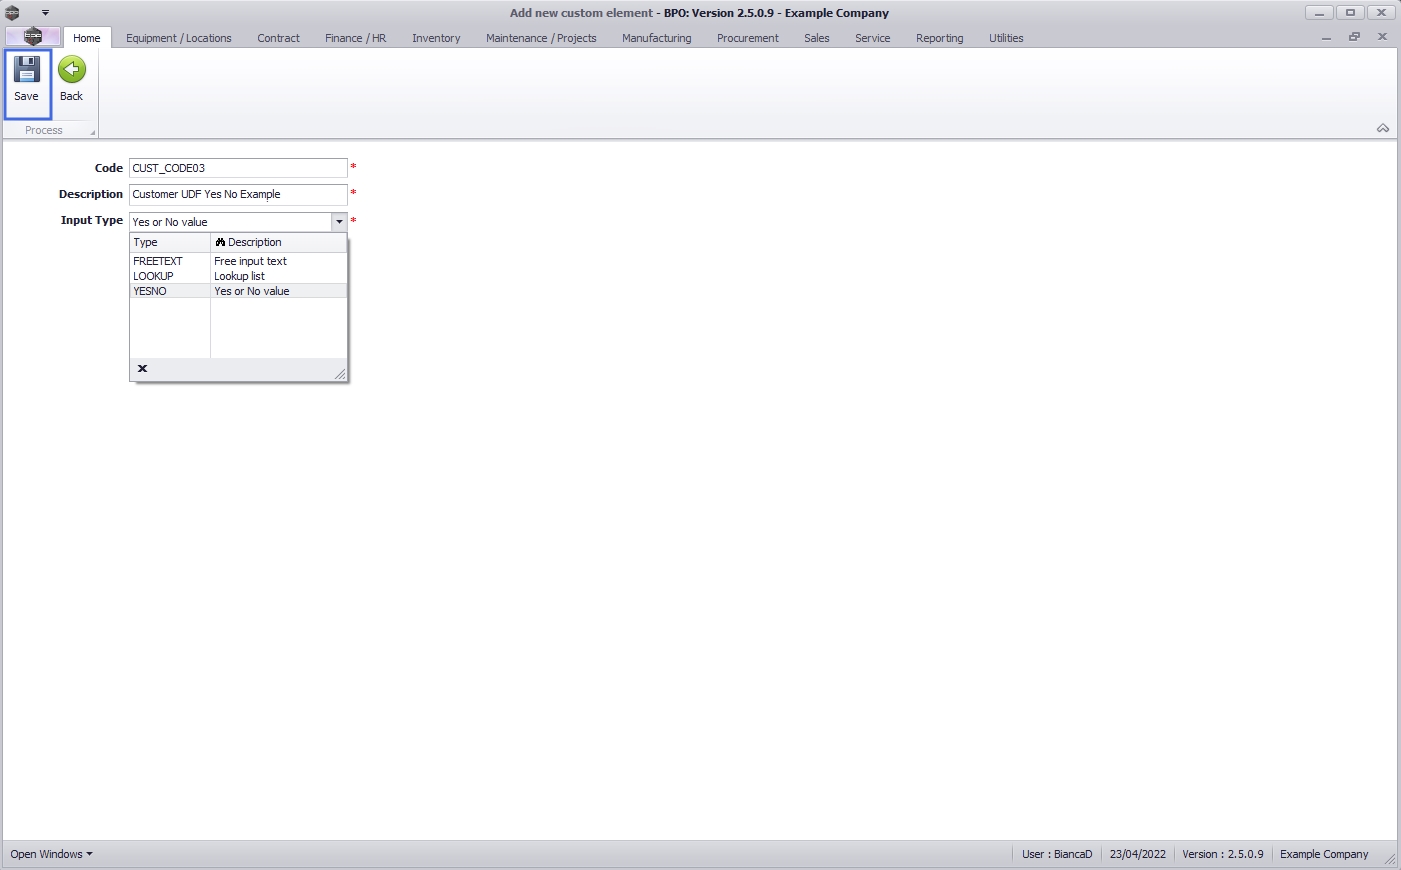
- Type in a Code and Description for the new User Defined Field.
- Select the Input Type.
- Click on the Save button.
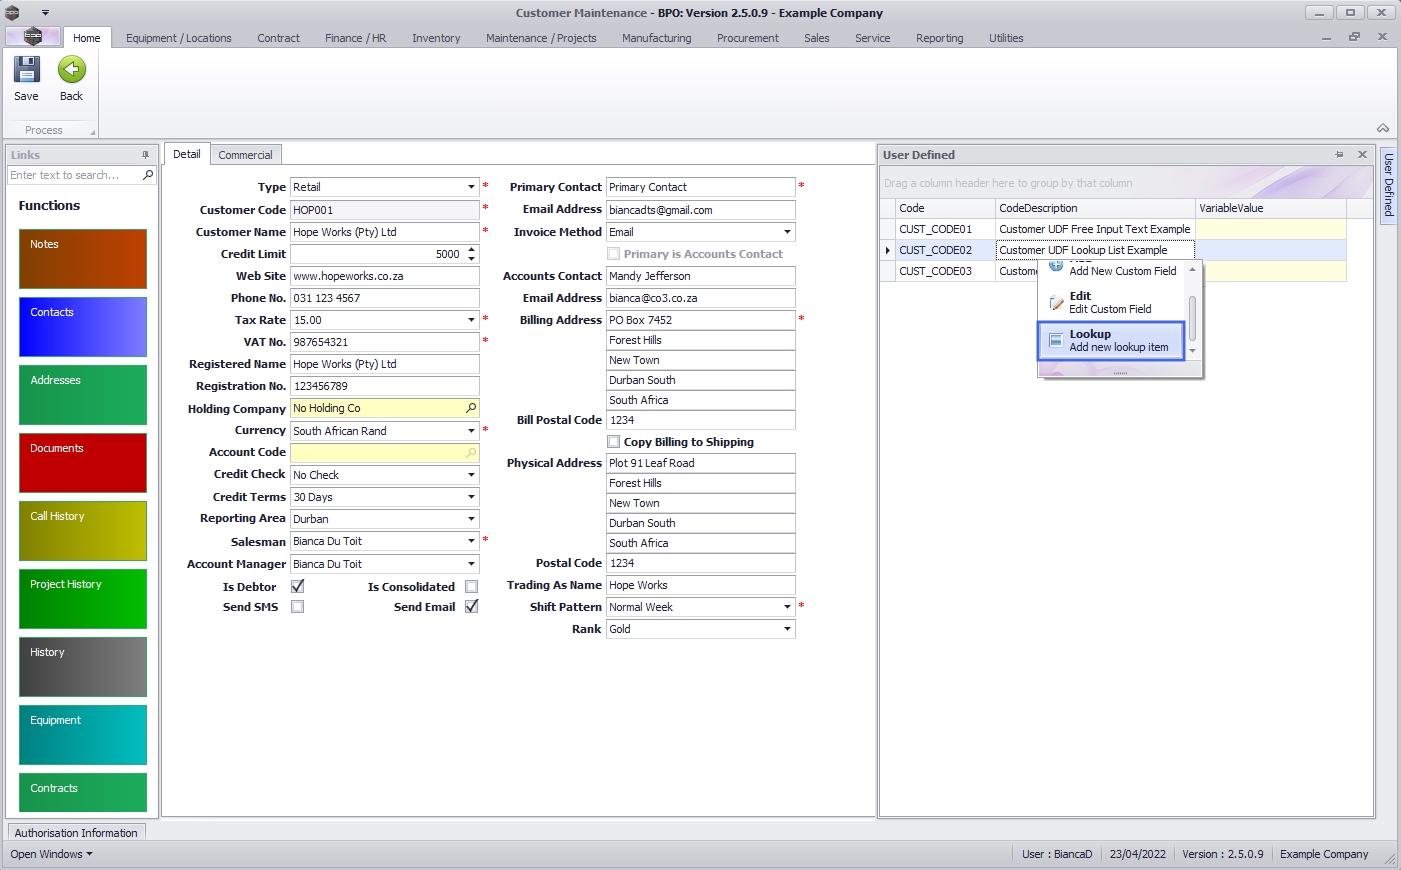
Add Lookup Items
For Lookup Input Variables - the right click context menu includes the option to add items to the Lookup List.
- Right click on Lookup input type Custom Field and select Add new lookup item (you may need to scroll down).
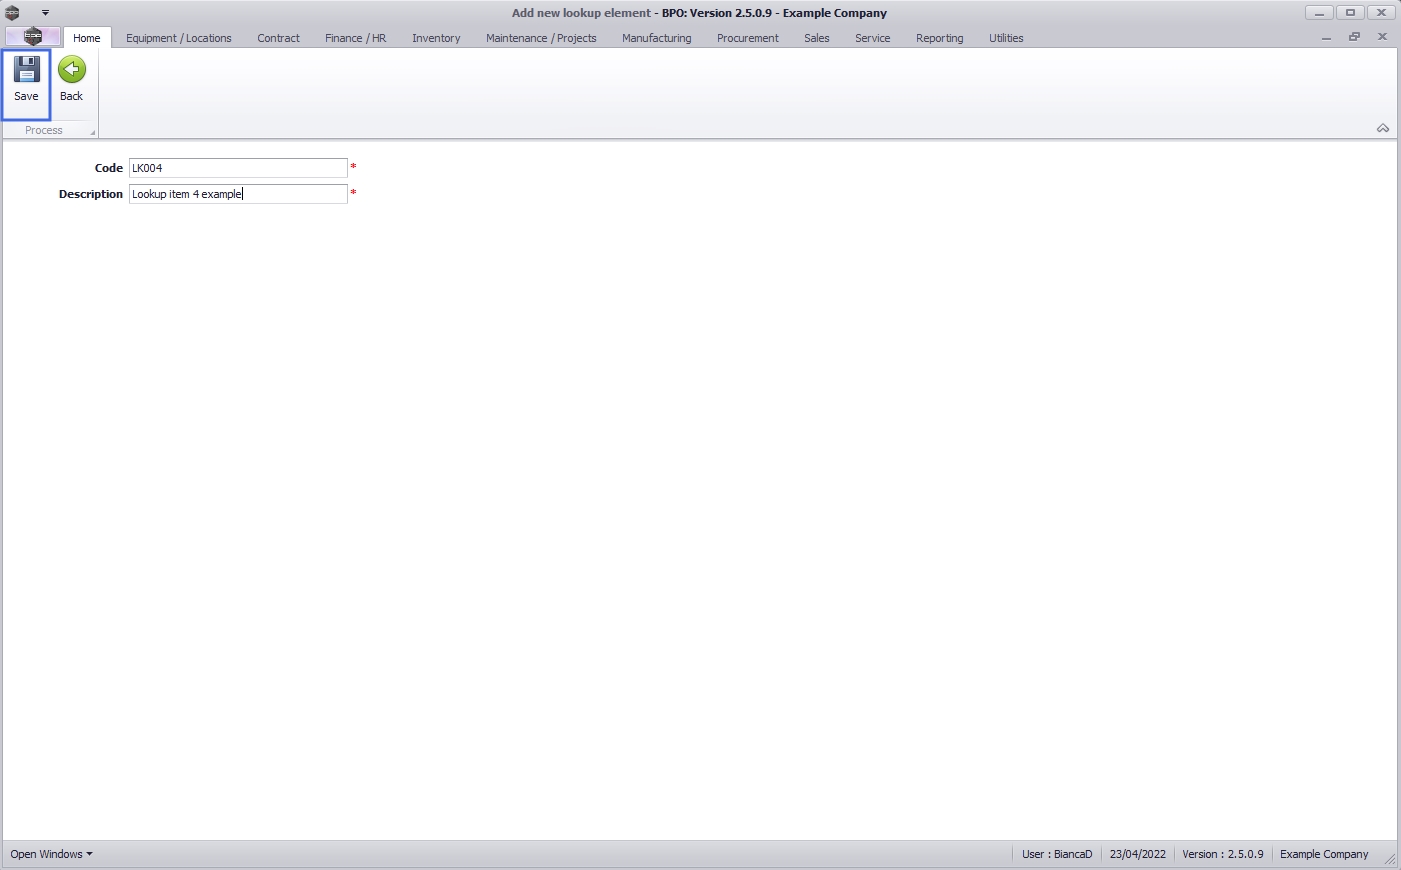
- Type in the lookup item Code and Description.
- Click on the Save button.
Update Custom Field
This will update the detail for the User Defined Field for this contract.
- Variable Value: Type in, pick from the Lookup List or Toggle Yes/No depending on the Input type.
Save Customer Details
- When you have completed the new customer details, click on Save.

- You will return to the Customer Listing screen where you can view the Customer details in the Active status.
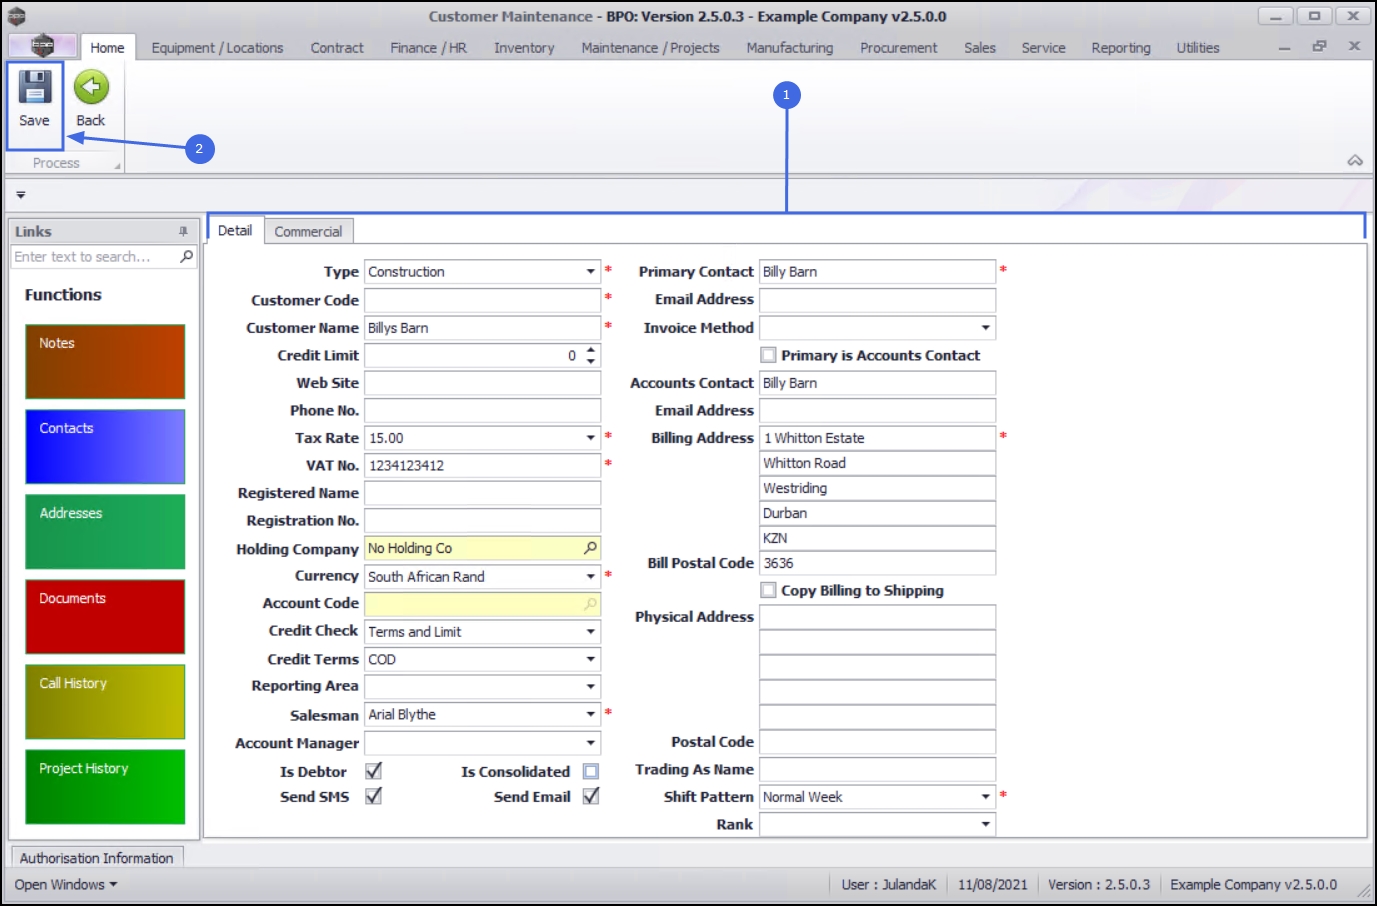
Quick Customer Load
- Quick Customer Load gives you the ability to quickly save a customer without having to enter all the customer details. Using this mode, assumes that the customer being loaded is a person instead of a company.
- In this example, only the mandatory fields have been filled in - a few of these will populate by default.
- The Customer Codehas not been typed in, as the company configuration is set to auto generate the customer code. This means that when saving the customer, the Customer Code will be populated based on the Customer Name.
- Click on Save.
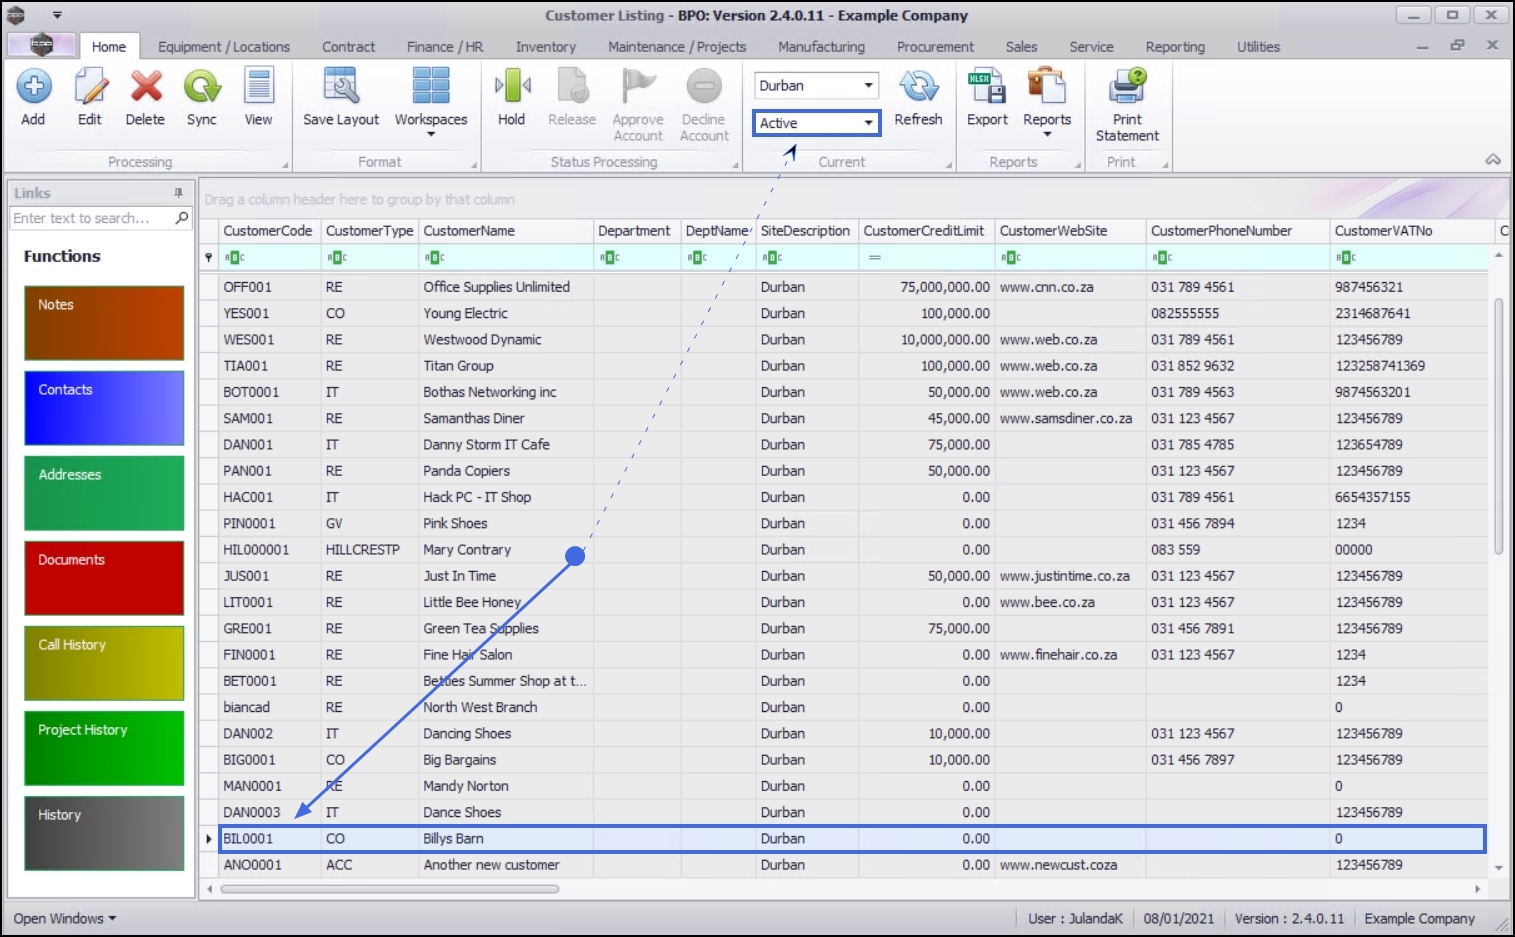
- On saving the 'quick' customer, the system will auto create a Customer Code based on the Customer Name.
- You can now view the Customer in the Customer Listing screen where the status is set to Active.
- You can go back and add to or edit the Customer details at a later stage, if necessary.
MNU.061.001