We are currently updating our site; thank you for your patience.
CRM Basics
Cases
A Case is like an opportunity: a reason to engage with a client in order to fulfill a sale requirement or propose a deal. A case gives rise to a quote and subsequent new deal.
A Case can be viewed as an umbrella over all the underlying activities that work towards achieving a contract with that customer.
There is certain criteria required when dealing with Cases:
- A customer is required in order to create a Case.
- A Case is required to raise an Activity.
- Only one Activity per Case can be open at any one time.
A full list of Cases can be accessed from the CRM Homepage as set out below.
Customer specific Cases can be accessed from the Customer Homepage.
CRM will prompt you to create a new Case, when raising a new Activity for a customer.
Quotes can be added to a Case from the My Cases listing page when using the following Action buttons:
- Viewing Case Info and History
- View / Edit this Case
- New Activity
| Access: Webpage - http://[servername]:[portno]/BPOCRM/User.aspx |
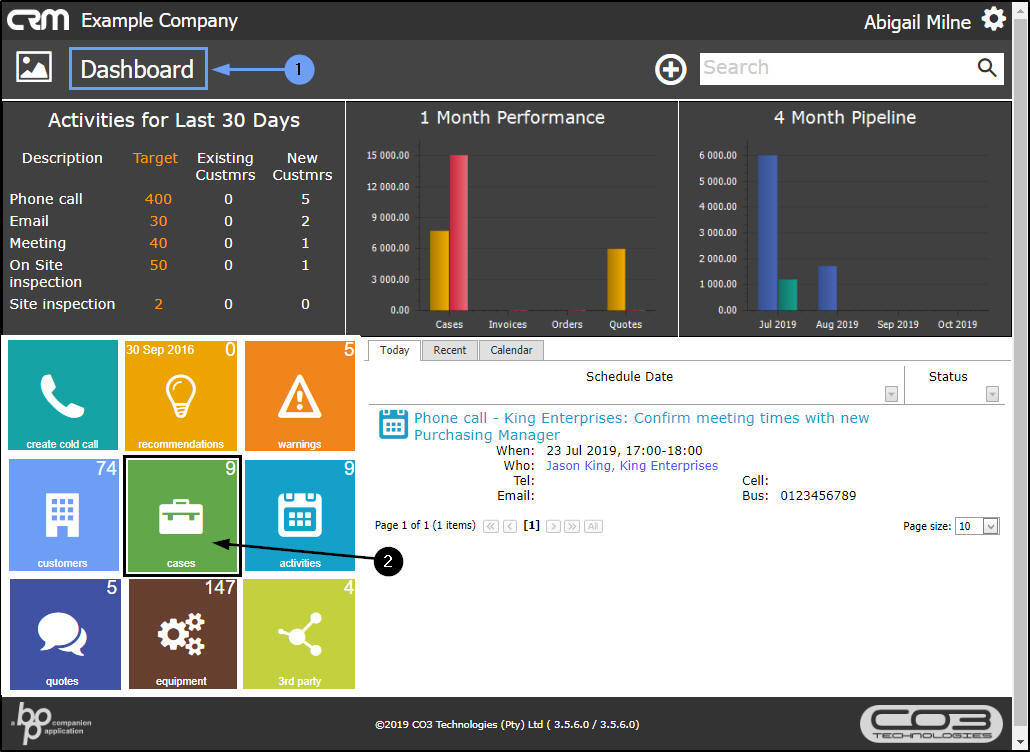
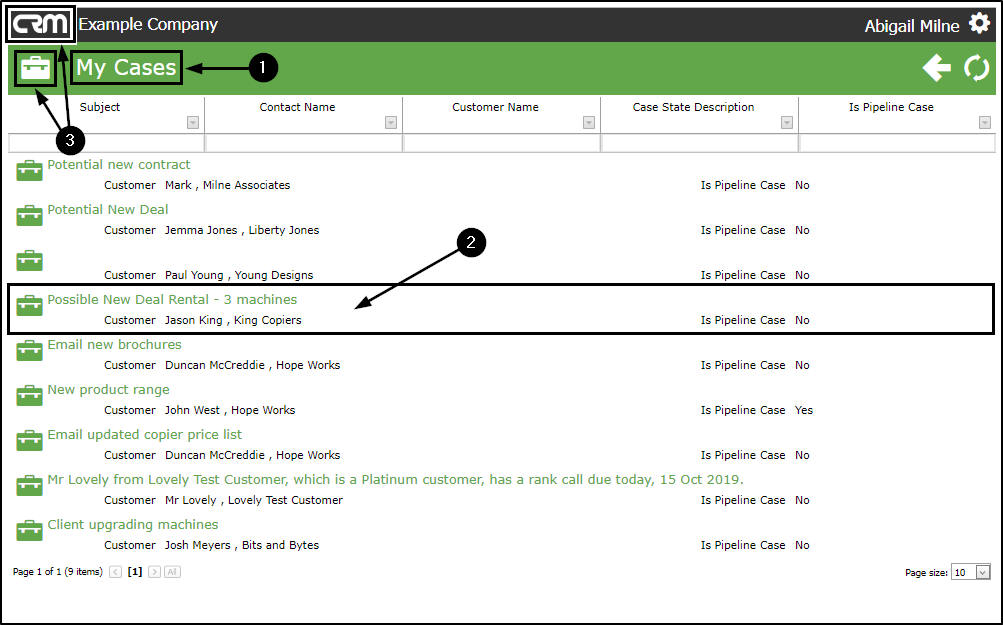
View Entire Case List from Homepage
- In the Home page,
- Click on the Cases tile.
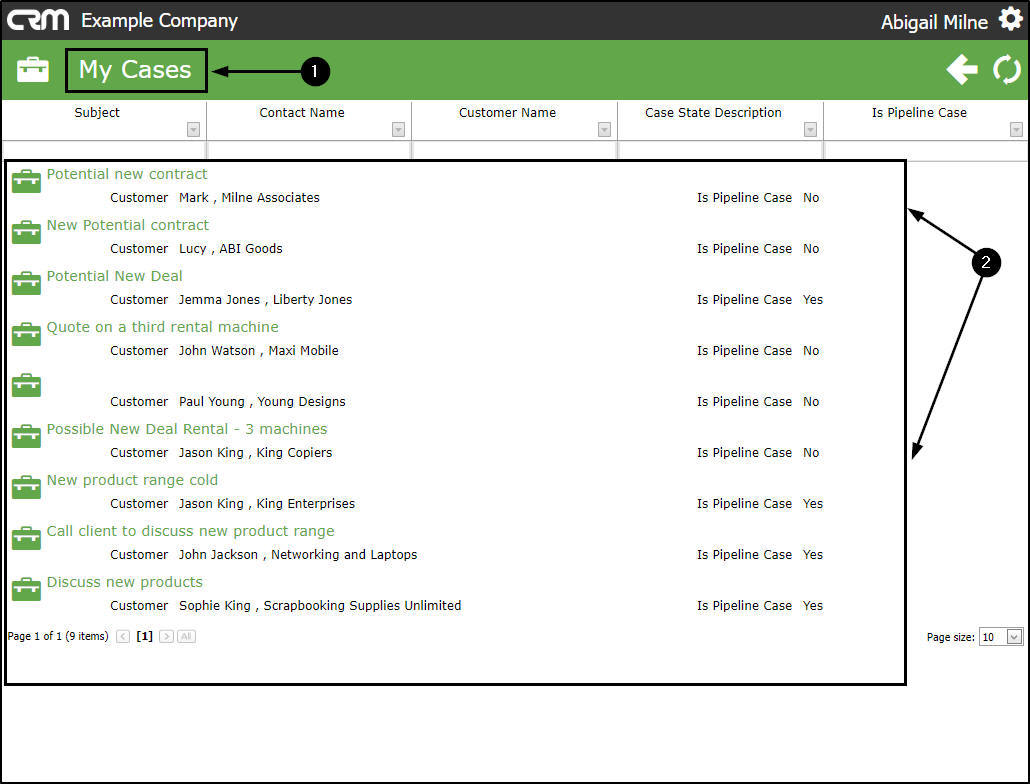
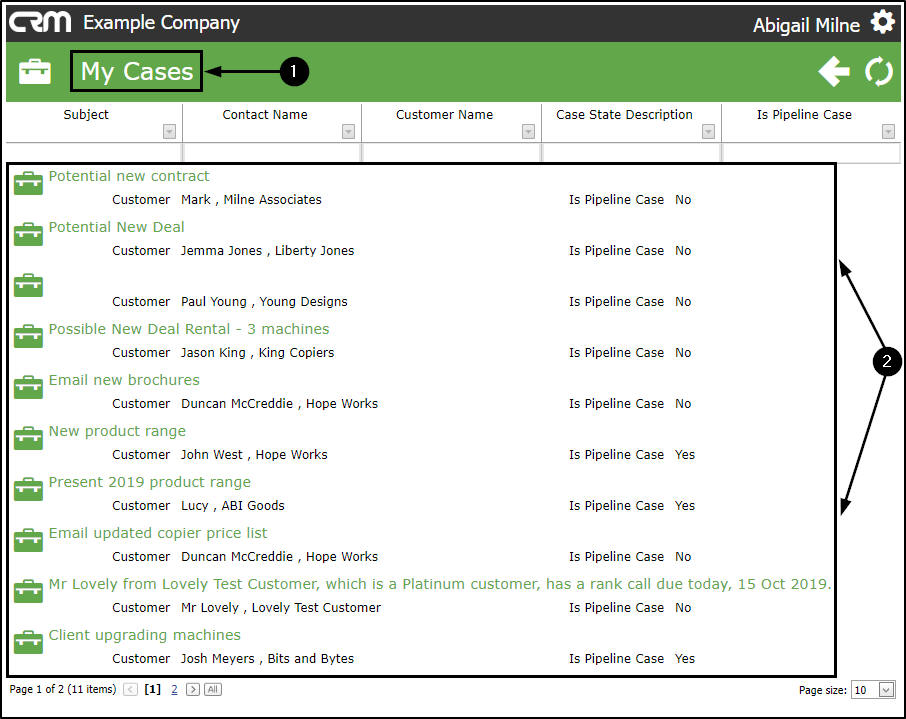
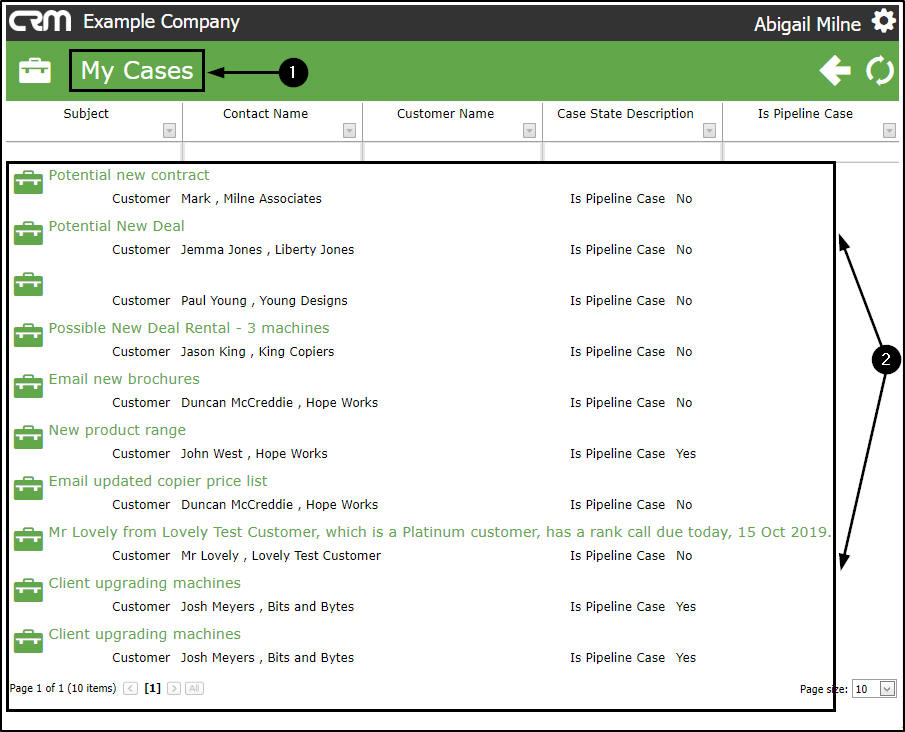
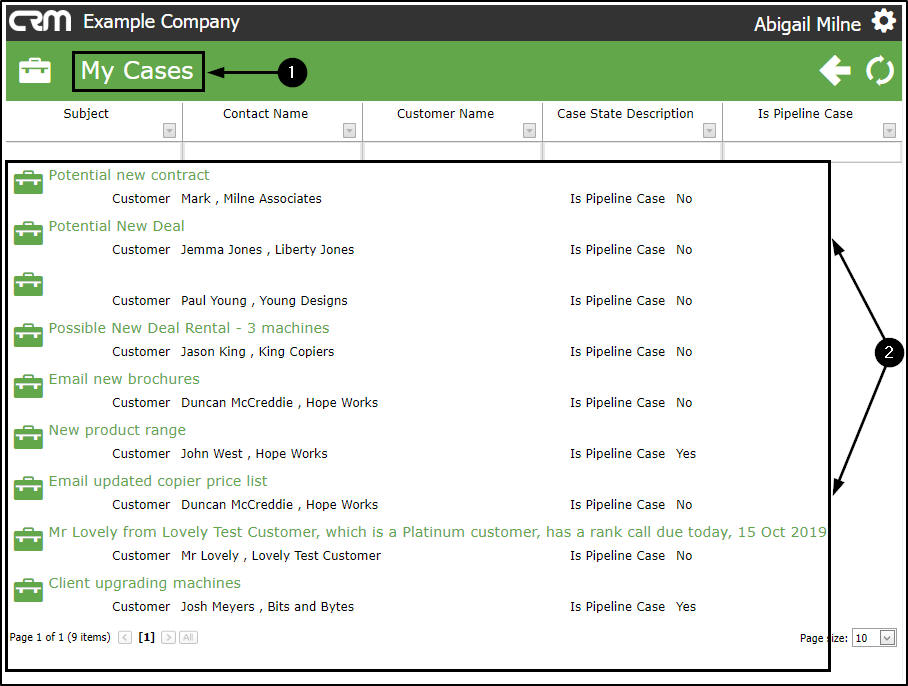
My Cases Page
- The My Cases page will be displayed.
- Here you can view the entire case list for all customers.
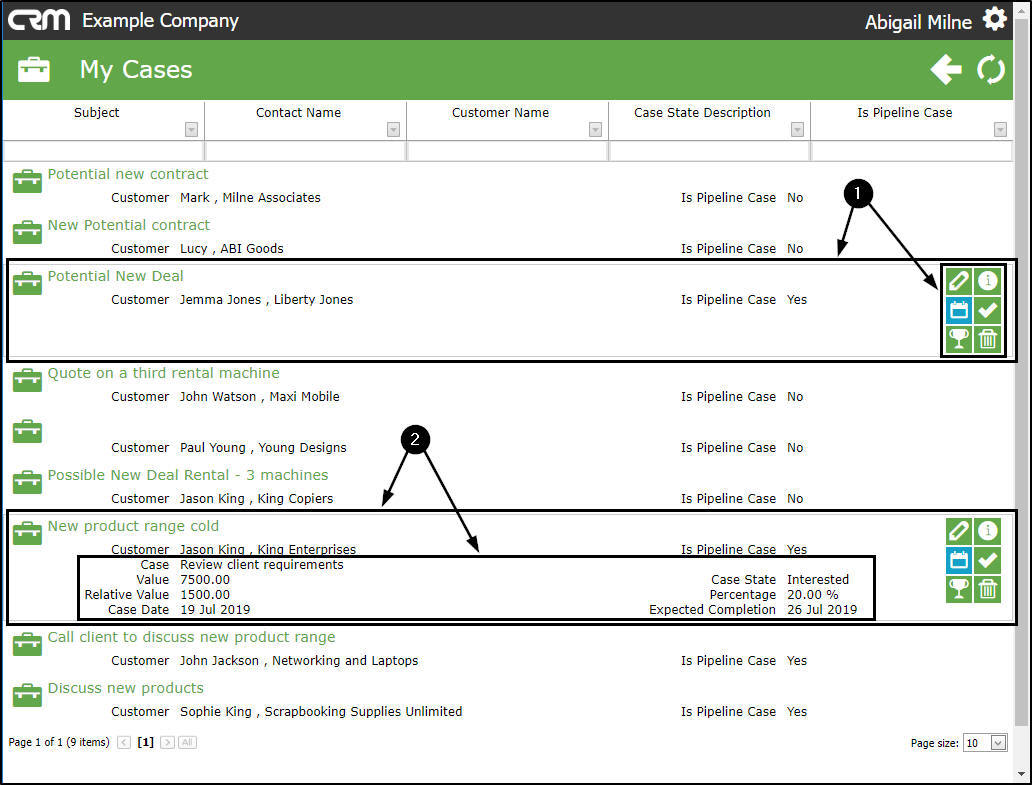
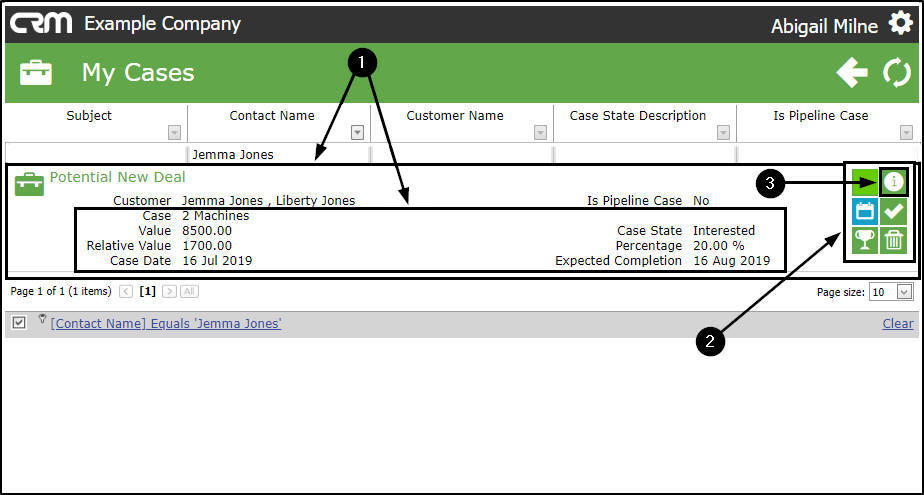
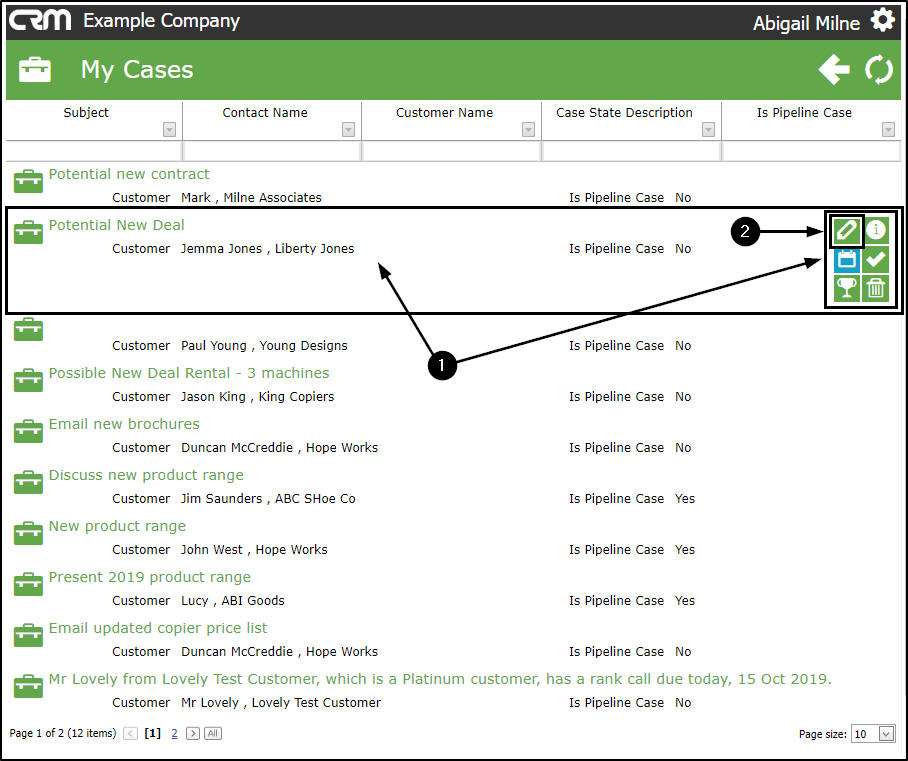
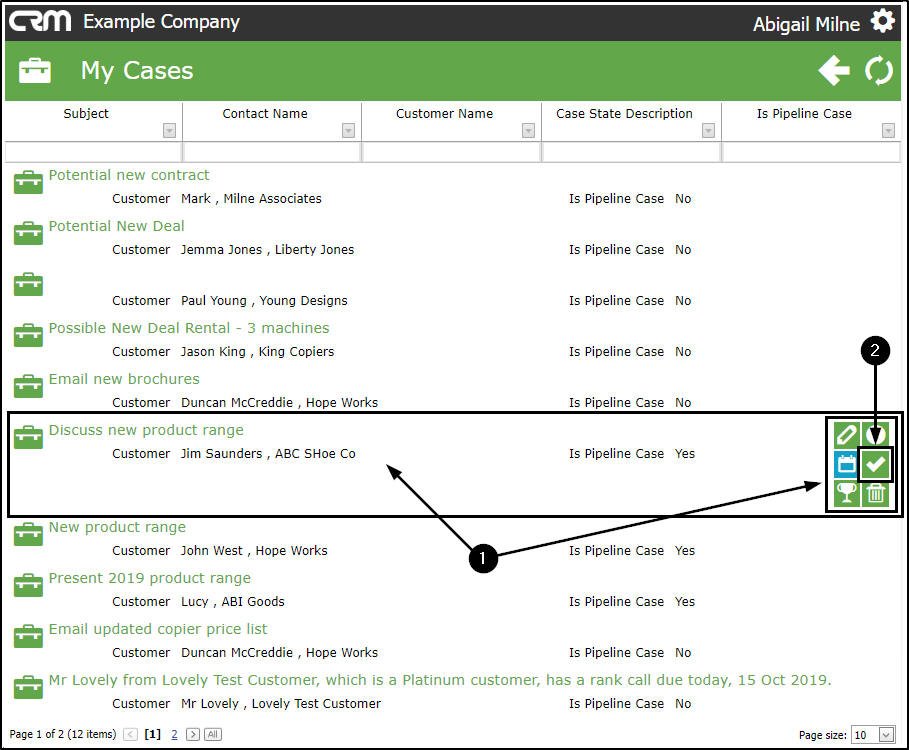
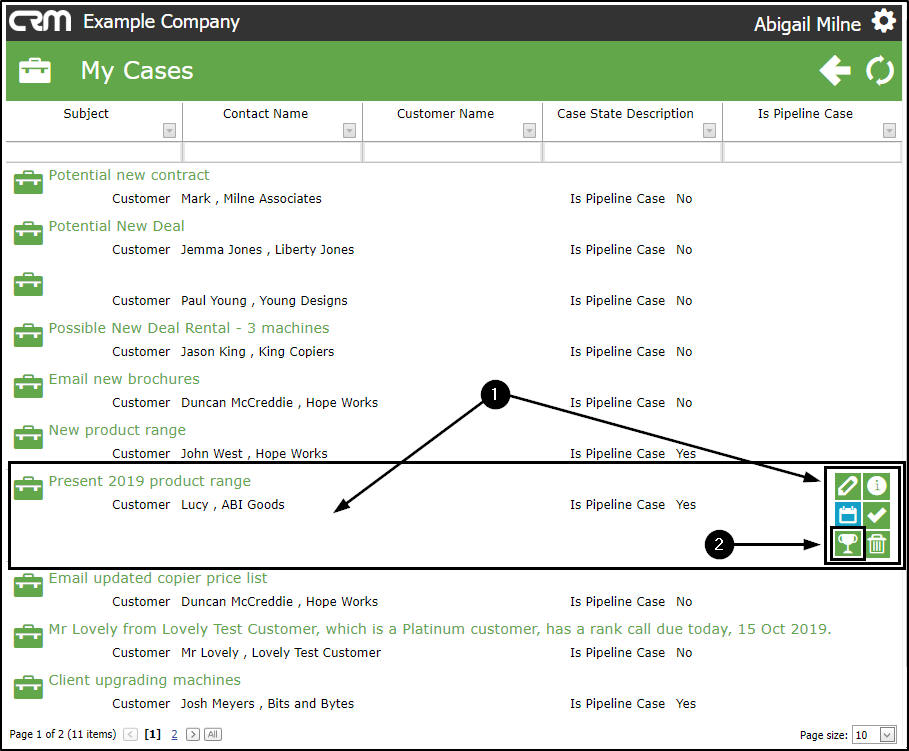
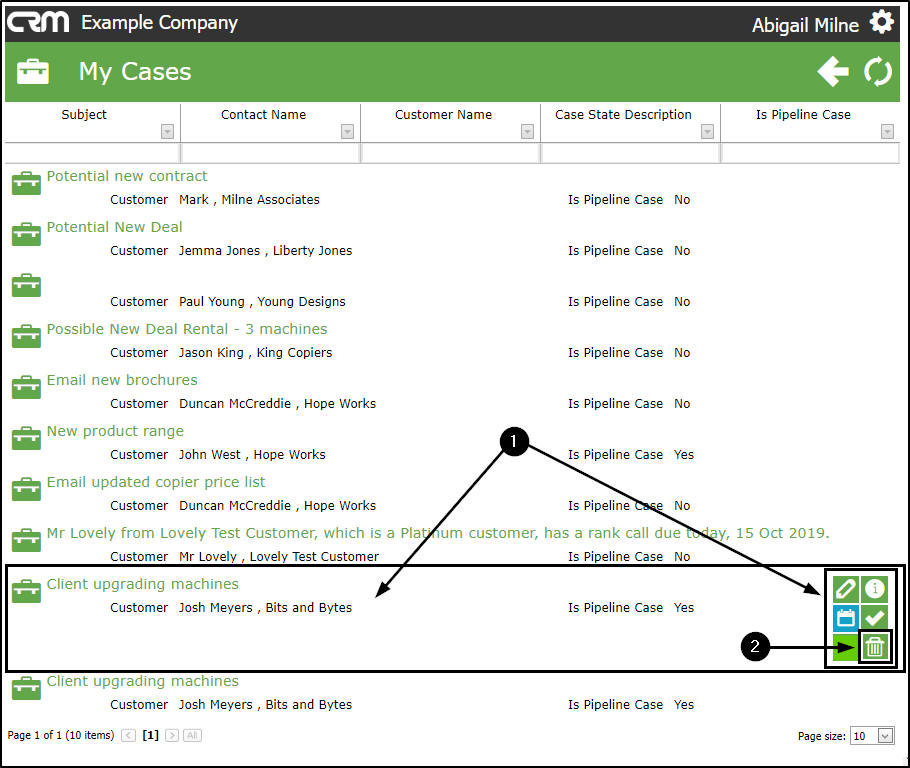
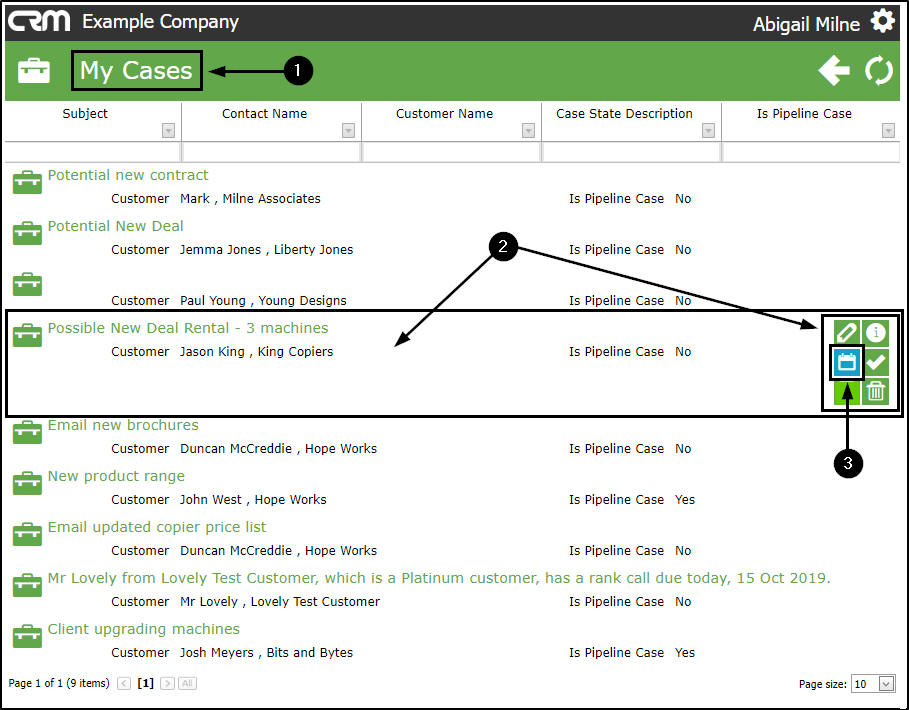
Case Action buttons
- Hover over any Case to reveal the Action buttons:
- View / Edit this Case
- View Case info and history
- New Activity
- Close this case
- Won this Case
- Lost this Case
View Case Summary
- Single click on any Case to access a quick view summary of the Case information.
Search for a Case
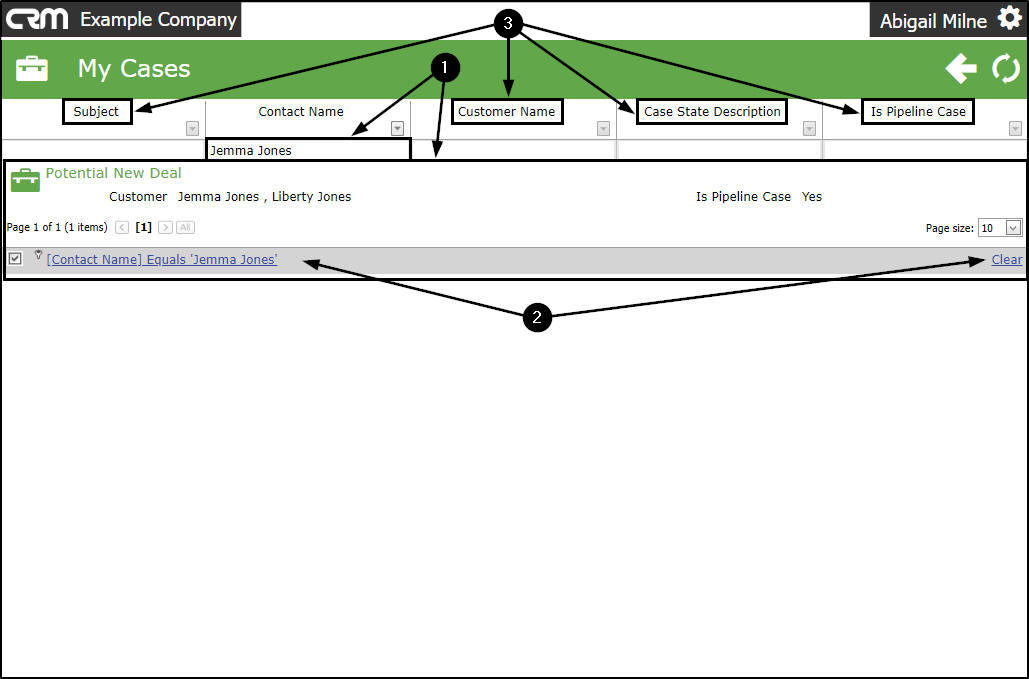
You can search for a specific Case using the Filter Row and Filter List Functionality
- You can click on a filter arrow to display the applicable drop-down menu.
- In this example, the selected filter arrow is in the Contact Name column, therefore the menu displayed will list all the contact names linked to your cases.
- Eitherscroll through the list to find the relevant contact name from the menu.
- Or use the filter box to type in the relevant contact name, the system will search for the name as you type. Click on the name.
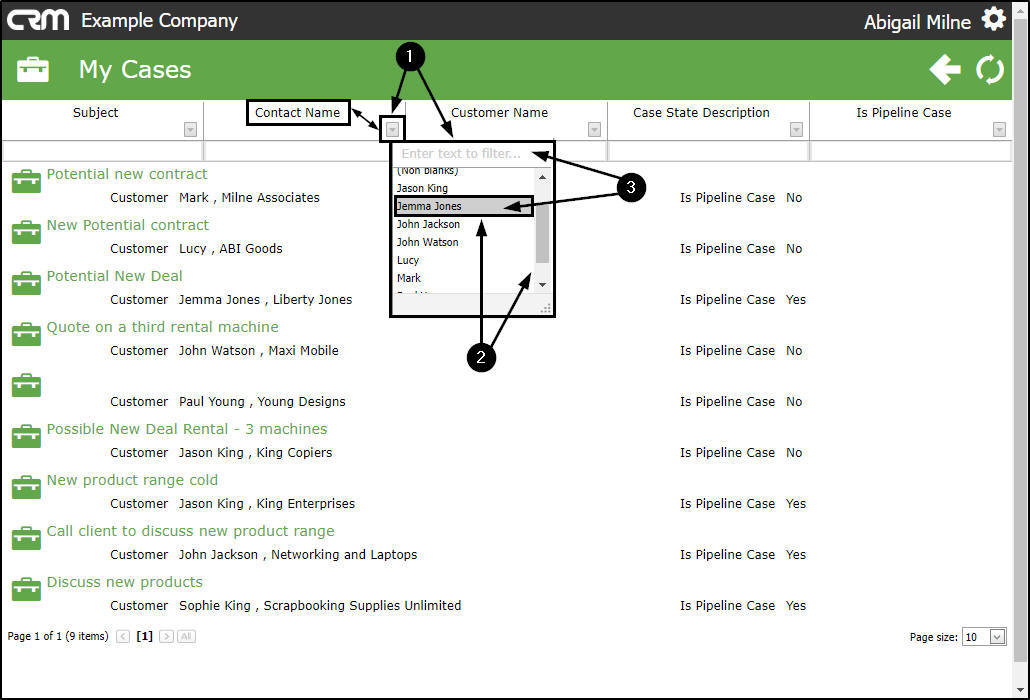
- The My Cases page will now list only the cases linked to this contact name.
- The filter row will display the filter sequence. You can click on Clear to remove any filter(s). The page will then display the full My Cases list again.
-
You can search for specific cases in this way using any of the columns:
- Subject
- Contact Name
- Customer Name
- Case State Description
- Is Pipeline Case
Cases - Action buttons
Case Information and History
- Single click anywhere on this Case to display the summary of the Case information and to reveal the
- Action Item buttons.
- Click on the View Case Info and History icon.
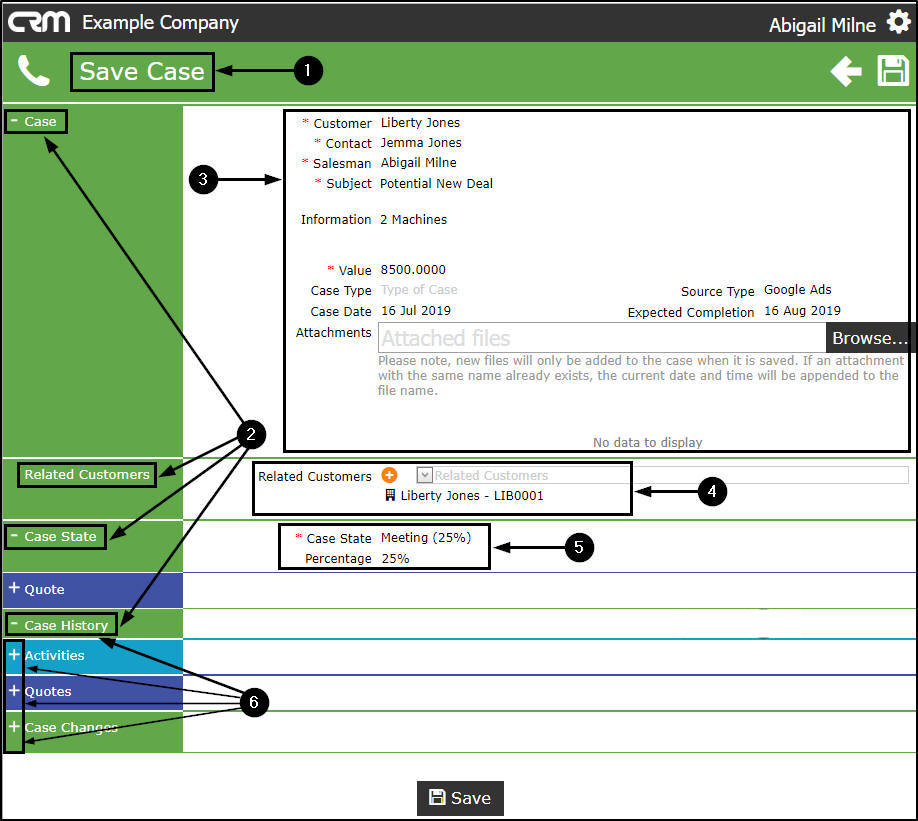
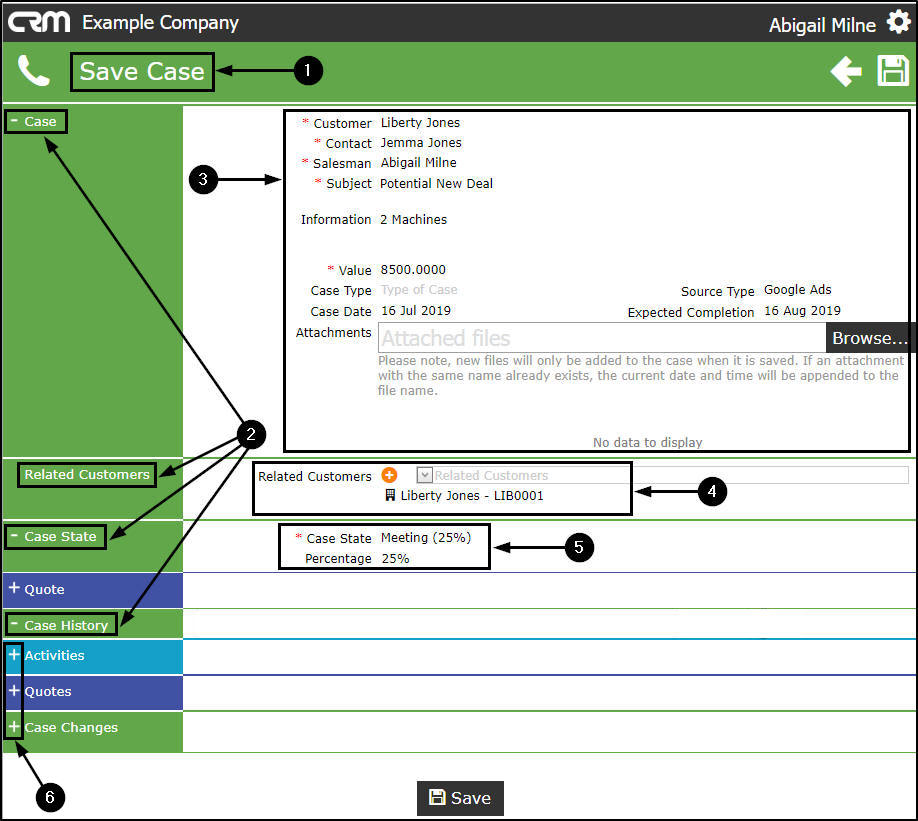
- The Save Case page will open.
- The following frames will be auto-expanded:
- Case
- You will note that the case details are auto populated. You can edit all these details, except for the Customer, Salesman, Subject and Information fields.
- Related Customers
- You will note that the Customer Name will be auto populated, you can add more Related Customers, if required.
- Case State
- The Case State and Percentage will be auto populated. You can edit the Case State, if required (which will update the Percentage).
- Case History
- Here you can expand the three Case History sub-sections to:
- view an historical list of (i) Activities and if an Activity is open it can be actioned using the Action buttons,
- view and edit linked (ii) Quotes and
- view any (iii) Case Changes.
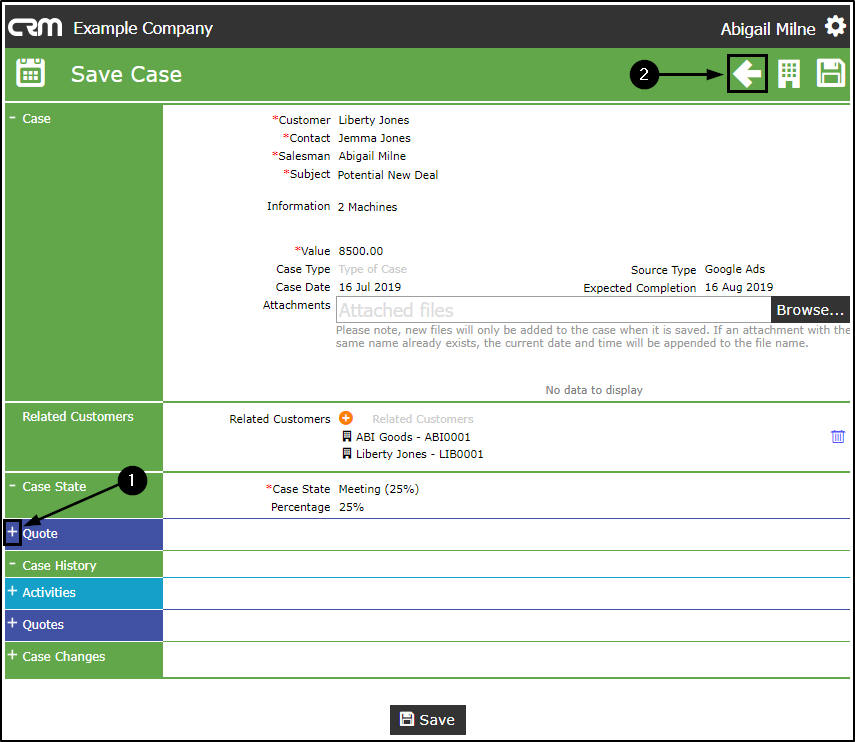
- In this page, you can create a new Quote linked to to this Case. Refer to Add a new Quote linked to this Case for more information.
- Click on the Back button to return to the My Cases page.
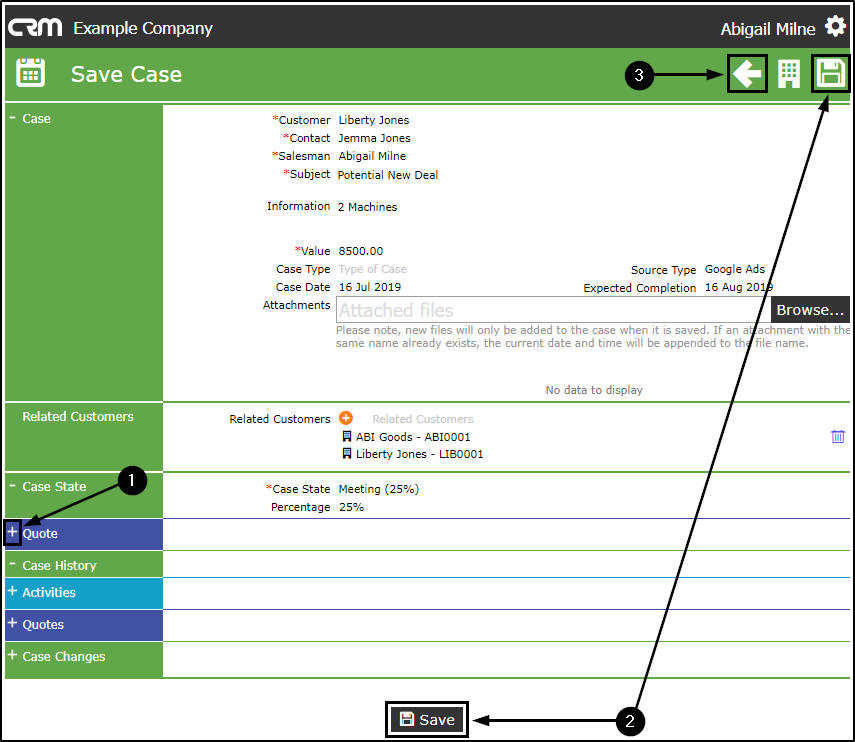
View / Edit this Case
- In the My Cases page, hover anywhere over a Case to display the Action Items buttons.
- Click on the View/Edit this Case icon.
- The Save Case page will be displayed.
- The following frames will be auto-expanded:
- Case
- You will note that the case details are auto populated. You can edit all these details, except for the Customer, Salesman, Subject and Information fields.
- Related Customers
- You will note that the Customer Name will be auto populated, you can add more Related Customers, if required.
- Case State
- The Case State and Percentage will be auto populated. You can edit the Case State, if required (which will update the Percentage).
- Case History
- Here you can expand the three Case History sub-sections to:
- view an historical list of (i) Activities and if an Activity is open it can be actioned using the Action buttons,
- view and edit linked (ii) Quotes and
- view any (iii) Case Changes.
- In this page, you can link a Quote to this Case. Refer to Add a new Quote linked to this Case for more information.
- Click on Save to apply any changes or
- Click on the Back button to return to the My Cases page.
New Activity
- In the My Cases page, hover anywhere over a Case to display the Action Items buttons.
- Click on the New Activity icon.
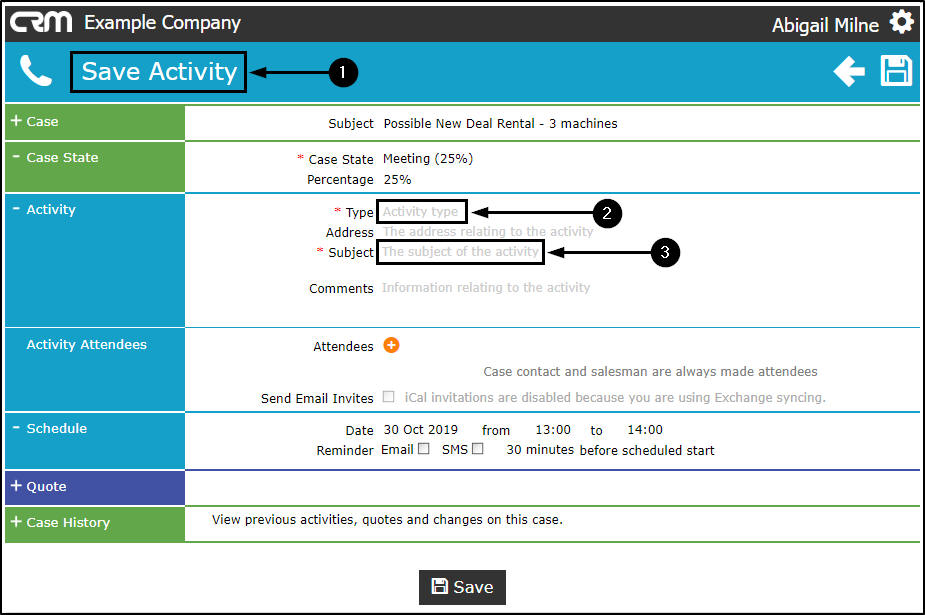
- The Save Activity page will be displayed.
- The following frames will be auto-expanded:
- Case State The Case State can be edited, if required.
- Activity
- Activity Attendees and
- Schedule
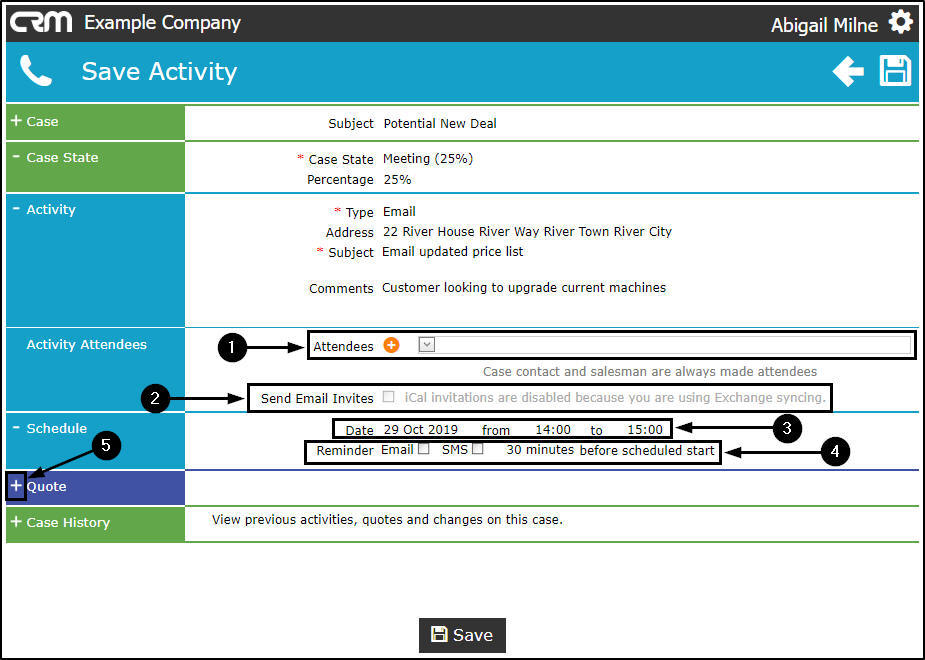
- Update the Activity Information, if required:
- Type:
- Click in the Type field to display an Activity Type drop-down list.
- Select from this list the applicable type (e.g. Phone call).
- Address:
- Click in the Address field, a list of all addresses linked to the customer will be displayed.
- Select the applicable address from this list.
- Subject:
- Type in the Subject of this activity (e.g. Email updated price list).
- Comments
- Type in a Comment relating to this activity (e.g. Customer looking to upgrade current machines).

-
You can select
Attendees
to link to the activity.
- In this field you can select from employees and the current customer contacts.
- You can select to Send Email Invites in order to have the system send an email invite for this activity, to all attendees.
- Schedule the Date and Time for the activity.
- Set a Reminder Email or SMS as and if required.
- In this page, you can link a Quote to this Case. Refer to Add a new Quote linked to this Case for more information.
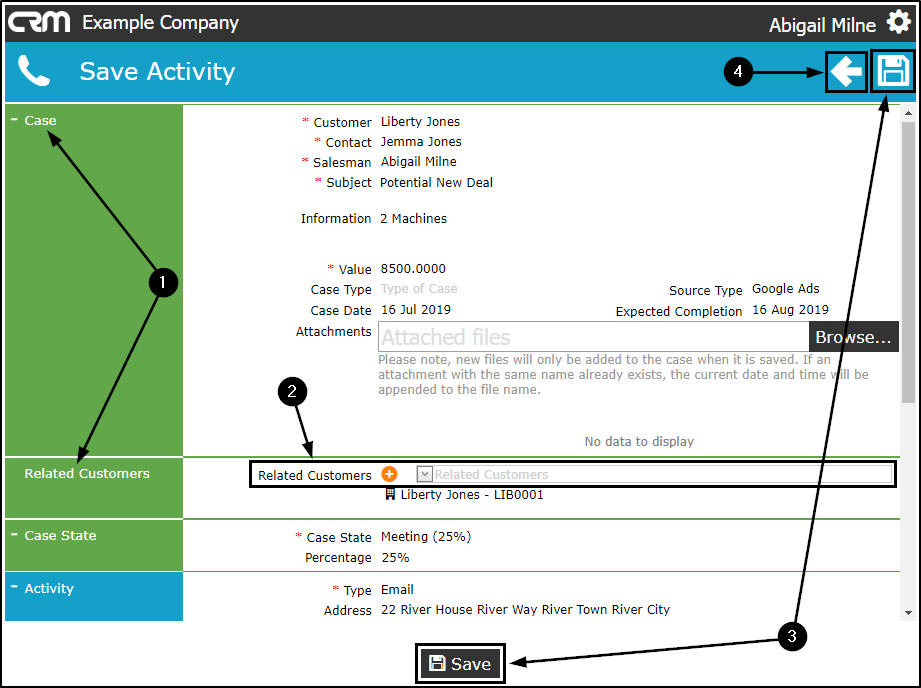
- Once you have added Attendees, you may also wish to link Related Customers in order to invite contacts from various clients to an Activity - such as a meeting or training session. (these are not found in the Attendees list).
- Click on the expand button in the Case frame.
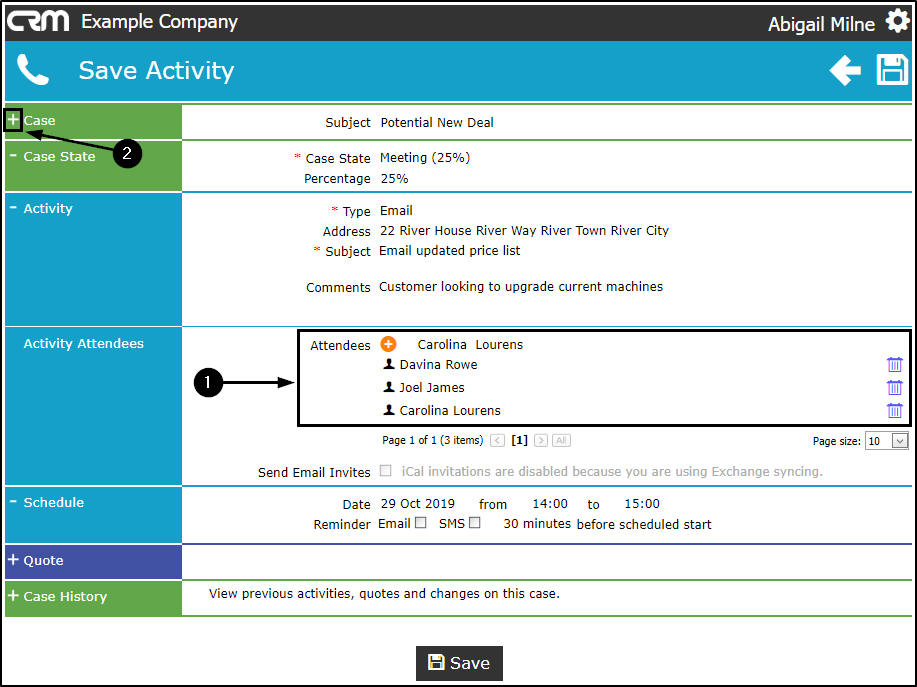
- The Case frame will be expanded to reveal the Related Customers frame.
- Follow the process to add the Related Customer(s), if required.
- When you have finished adding the new activity details for this case, click on Save to return to the My Cases listing page .
- If you do not wish to save any changes, click on the Back button to return to the previous page.
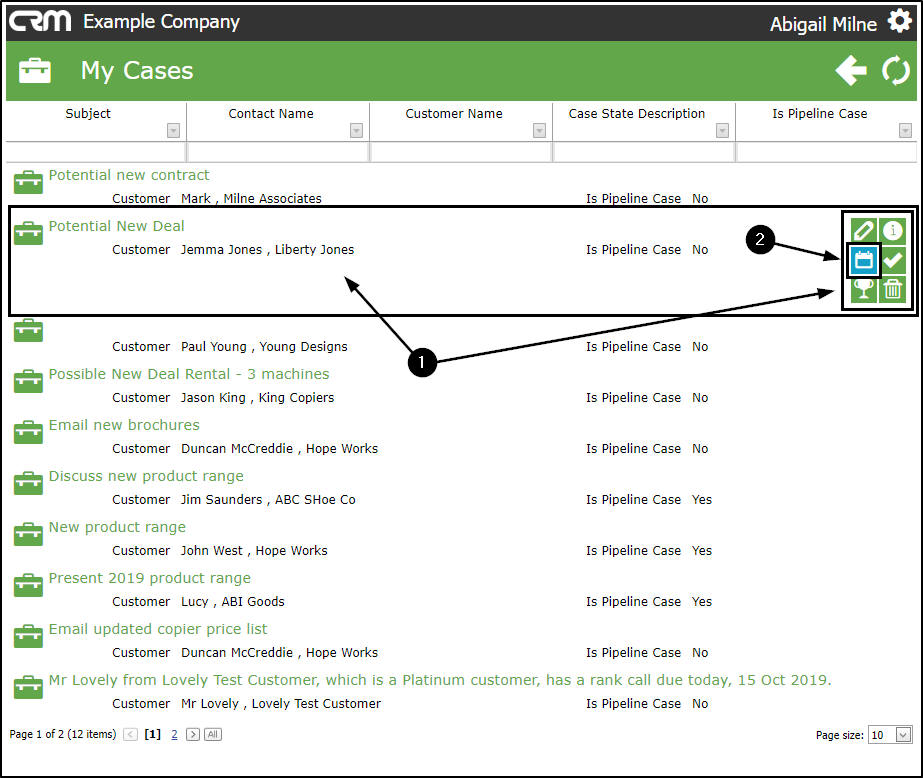
Close this Case
- In the My Cases page, hover anywhere over a Case to display the Action Items buttons.
- Click on the Close this Case icon.
- The Save Case page will be displayed.
- Type a completion note/explanation in the Notes field (e.g. Customer budget not yet approved for machine upgrade).
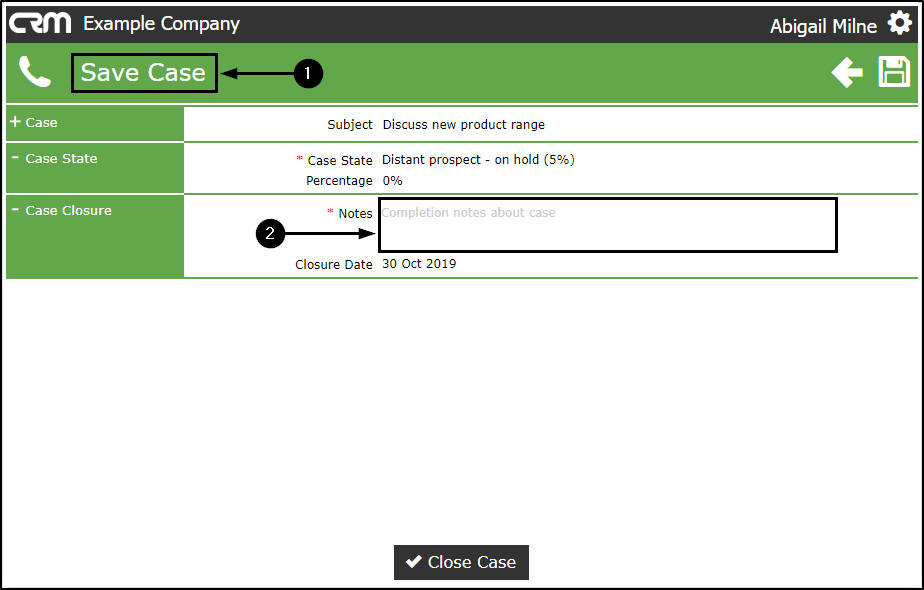
- The Closure Date will auto populate with the current date.
-
If you wish to change this date,
- Either, type the correct date directly in this field,
- Or, click in this field to display a drop-down arrow, click on this arrow to bring up the calendar function.
- Select the applicable alternative date.
- Click on Close Case.
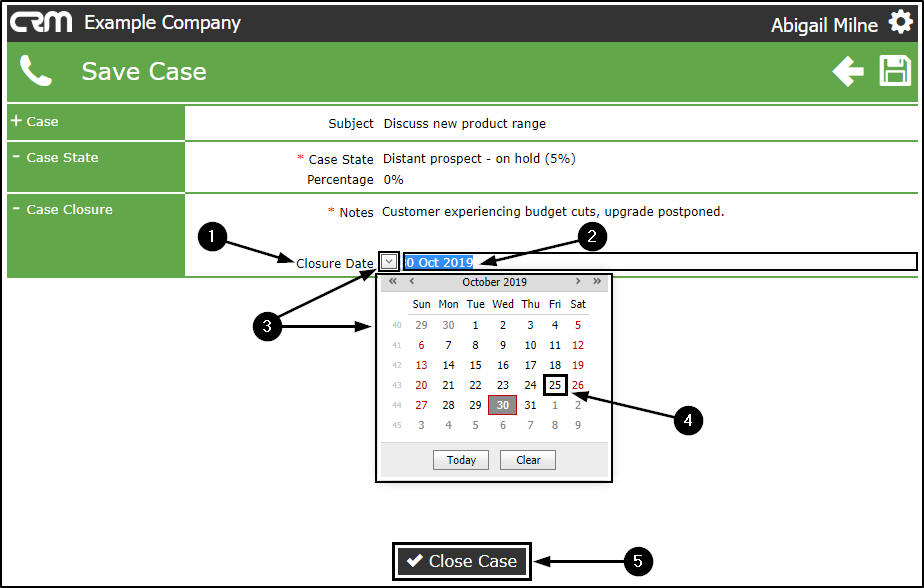
- You will return to the My Cases listing screen.
- The recently closed case (in this example for ABC Shoes Co) will have been removed from this list.
Win this Case
Note on Stage Gates: A Case cannot be Won using the Action Buttons, if this Case Type has Stage Gates Configured / Enabled. All Stage Gate Questions will need to be answered first, in order to 'Win the Case'.
- Hover anywhere over a Case to display the Action Items buttons.
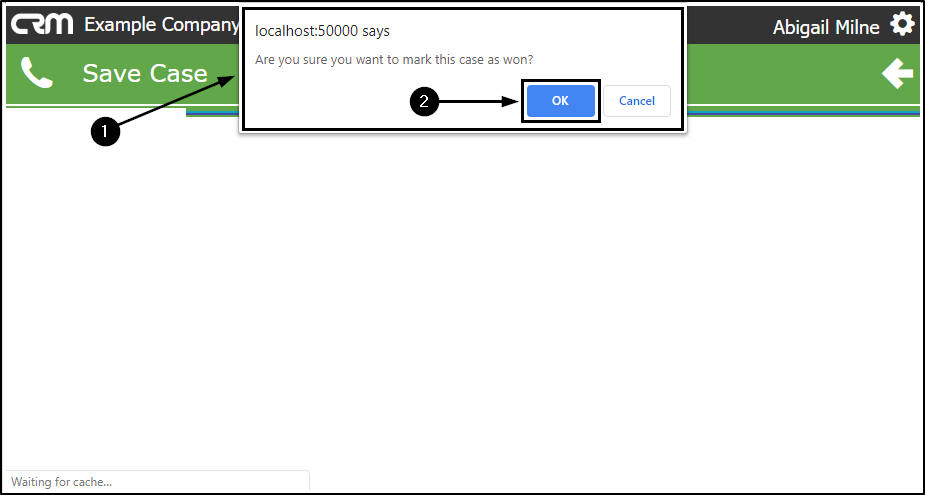
- Click on the Won this Case icon.
- Note:
A Case cannot be Won via Case Action Buttons - if this Case Type has Stage Gates
Enabled. All Stage Gate Questions will need to be responded to, in
order to 'Win the Case'.
- A message box will pop up asking:
- Are you sure you want to mark this case as won?
- Click on OK.
- The system will update the case state.
- A Case Won message with a Trophy image will briefly flash on the screen.
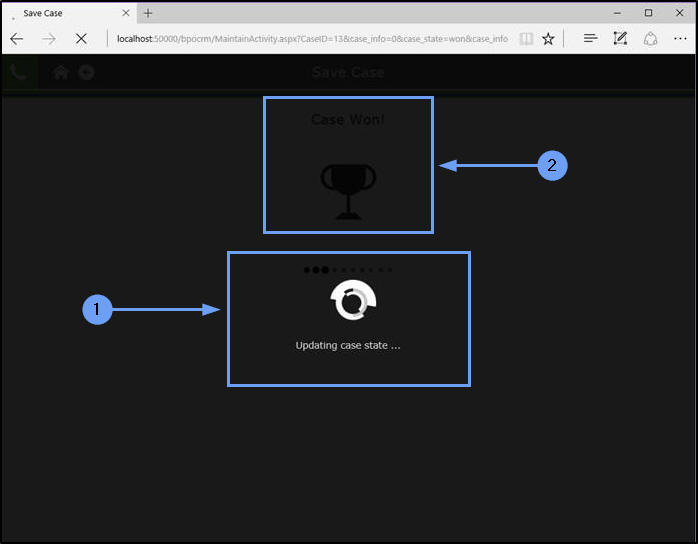
- You will return to the My Cases screen.
- The recently won case will no longer be displayed in this list.
Lost this Case
- Hover anywhere over a Case to display the Action Items buttons.
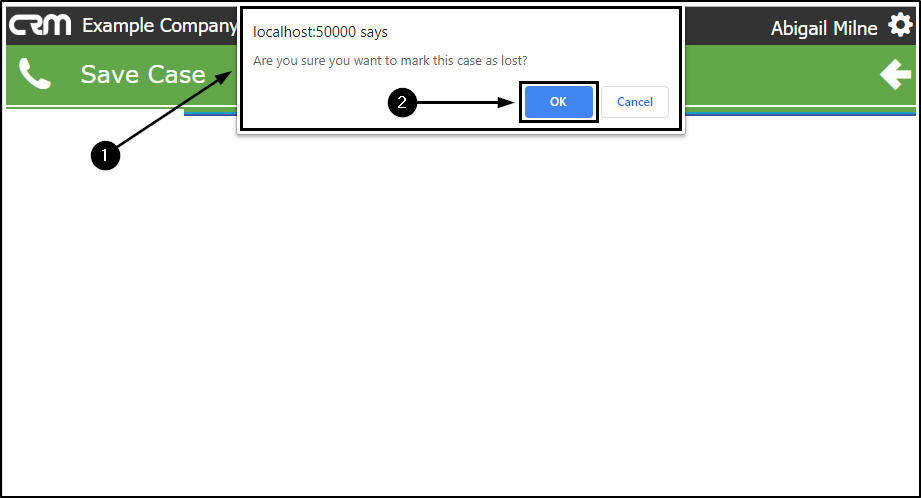
- Click on the Lost this Case icon.
- A message box will pop up asking:
- Are you sure you want to mark this case as lost?
- Click on OK.
- The system will update the case state.
- A Case Lost message with a Trash Bin image will briefly flash on the screen.
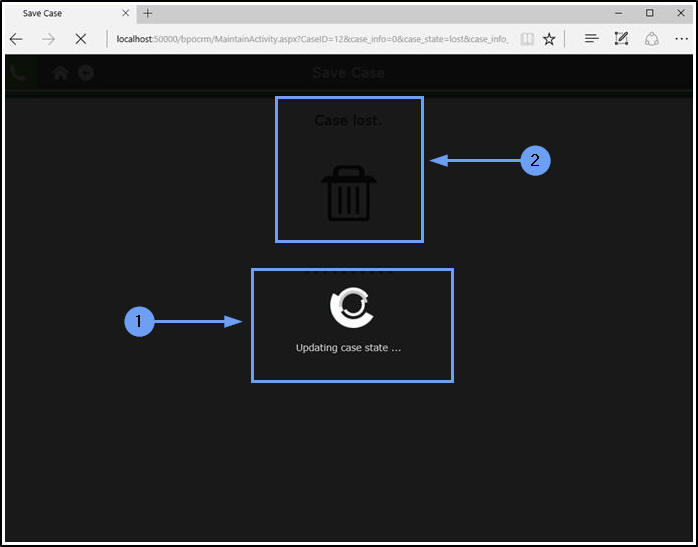
- You will return to the My Cases screen.
- The recently lost case will no longer be displayed in this list.
Link a Quote to Case
- From the (existing) My Cases page, you can link a Quote by navigating via the following Action buttons:
- View Case Info and History
- The Save Case page will open, expand the Quote frame.
- View/Edit this Case
- The Save Case page will open, expand the Quote frame.
- New Activity
- The Save Activity page will open, expand the Quote frame.
-
For the purpose of this manual we will
navigate from the
Save Activity
page but the
link quote process
is the same from
either
page.
- Hover anywhere over a Case to display the Action Items buttons.
- Click on the New Activity button.
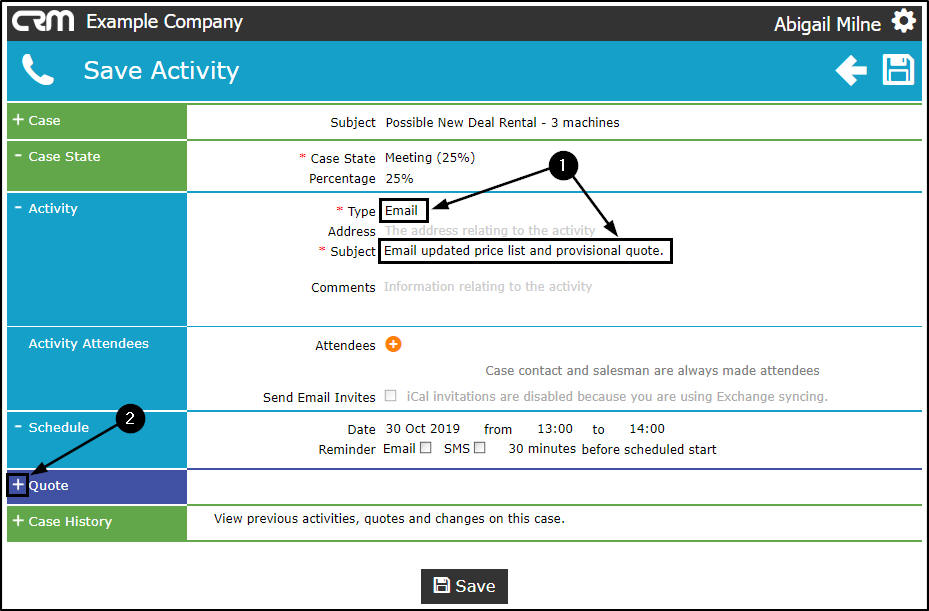
- The Save Activity page will be displayed.
-
In this particular page, before moving down to the
Quotes
frame, the following mandatory fields must be filled in:
- Type: Click in this field to display an Activity Type drop-down list. Select from this list the applicable type (e.g. Email).
- Subject: Type in the Subject of this activity (e.g. Email to discuss present client requirements and give overview of new product range).
- When you have filled in the mandatory fields,
Link Quote Process
- Click on the expand icon in the Quote frame.
- The Quote section will be expanded to expose the:
- Quote Financials
- Add Quotes Items
- and Quote Items frames.
- Quote Settings: As the Quote section is expanded, the system will pull through the customer default information and populate the following fields:
- Quote Contact: This will populate with the contact selected in the Case section.
- You can click on the drop-down arrow and select an alternative contact from the drop-down list, if required.
- Date: This will populate with the current date.
- You can either type directly in this field to change the date, or click on the drop-down arrow and use the calendar function to select an alternative date if required.
- Site: This will auto populate with the site set up on the customer. If the Customer is linked to more than one site, there will be an active drop-down arrow - you can click on this and select the correct site from the list displayed.
- Print Layout: This will auto populate with Sales Quote.
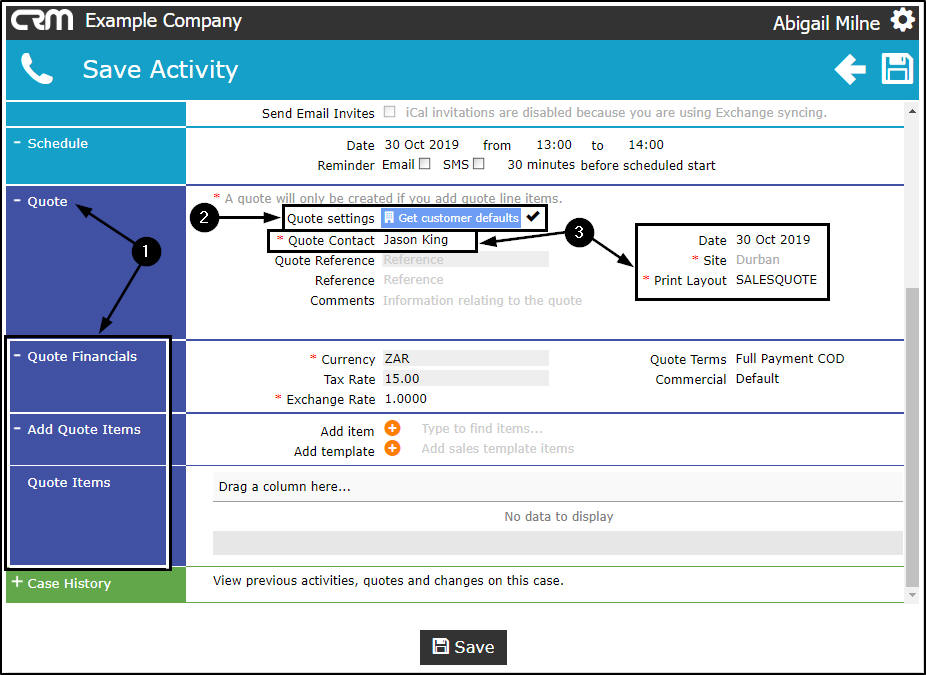
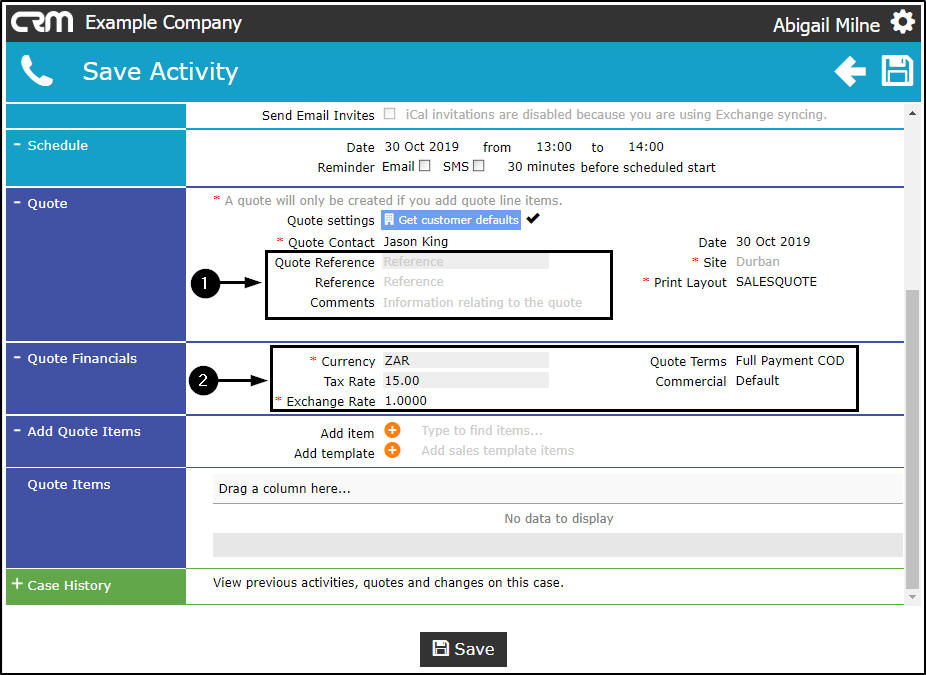
- Quote Reference: The system will allocate a reference number as the quote is saved.
- Reference: Type in a reference for this quote.
- Comments: Type in a comment/additional information relating to this quote.
Quote Financials
- Currency: This will auto populate with the currency set up on the customer. You can click on the drop-down arrow and select an alternative currency, if required.
- Tax Rate: This will auto populate with the tax rate set up on the customer.
- Exchange Rate: This will auto populate with the exchange rate set up on the customer.
- Quote Terms:
This is the quote repayment factor and should be configured in
Static Data: Sales Quote Terms or Repayment Method
This will auto populate with Full Payment COD.
- You can click on the drop-down arrow and select an alternative payment period, if required.
- Commercial:
This will auto populate with the
commercial
set up on the customer.
- You can click on the drop-down arrow and select an alternative commercial, if required.
Add Quote Items
-
You now have the ability to add single items to a quote.
- Note:
For Part Numbers to pull through to this list - you need to ensure that the
Quote Products are specified
.
- In the Add item field, start typing the code or description of the item you wish to link to this quote.
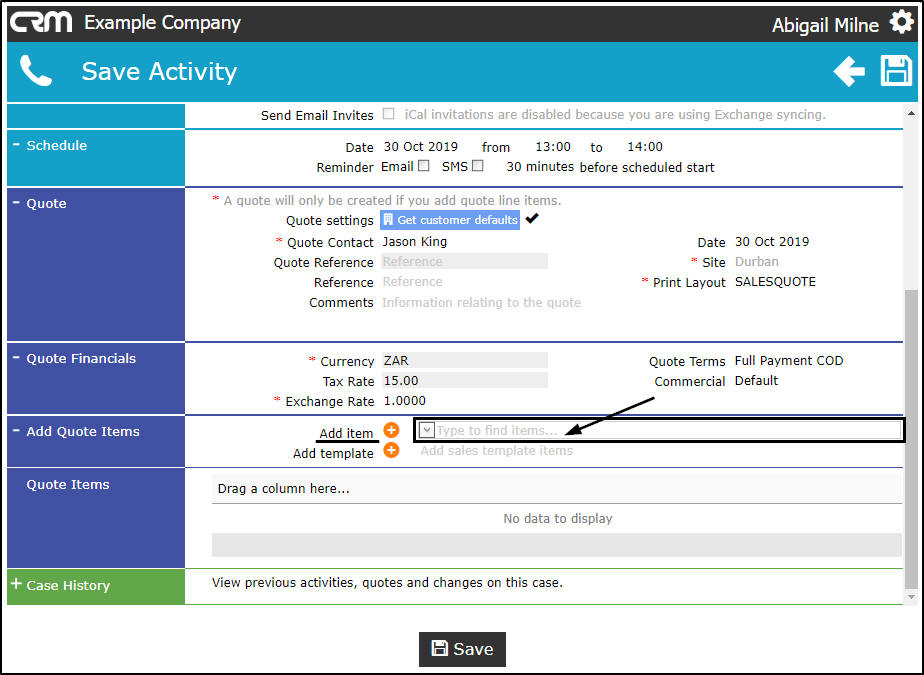
- As you start typing in the field, a Type, Code and Description list of all items on the system, will be displayed.
- The system will filter for the item that you are searching for.
- Select the applicable item from this list.
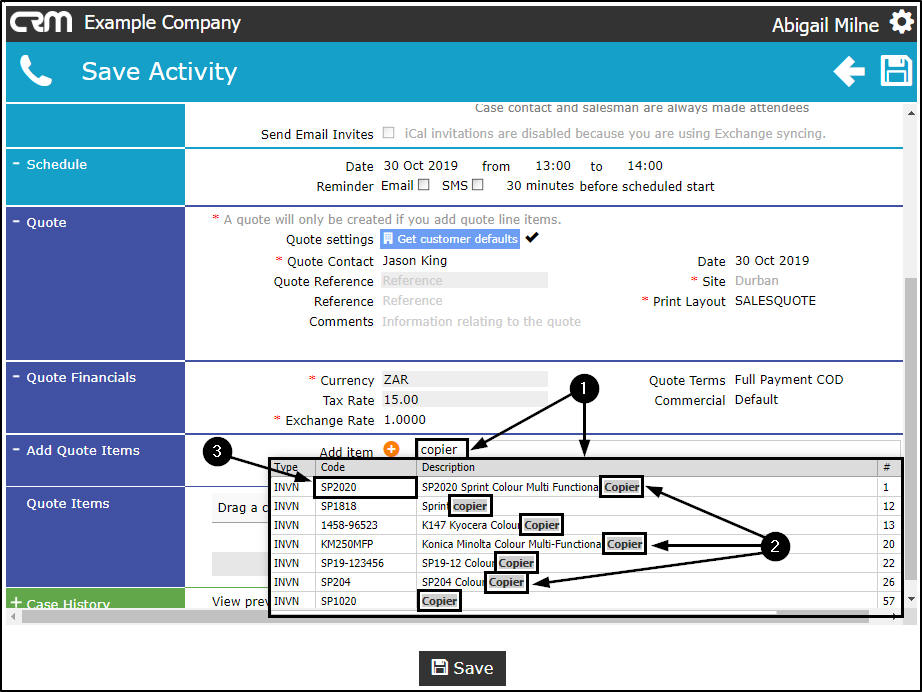
- The selected item code and description will populate the Add item field.
- Click on the plus[+] button.
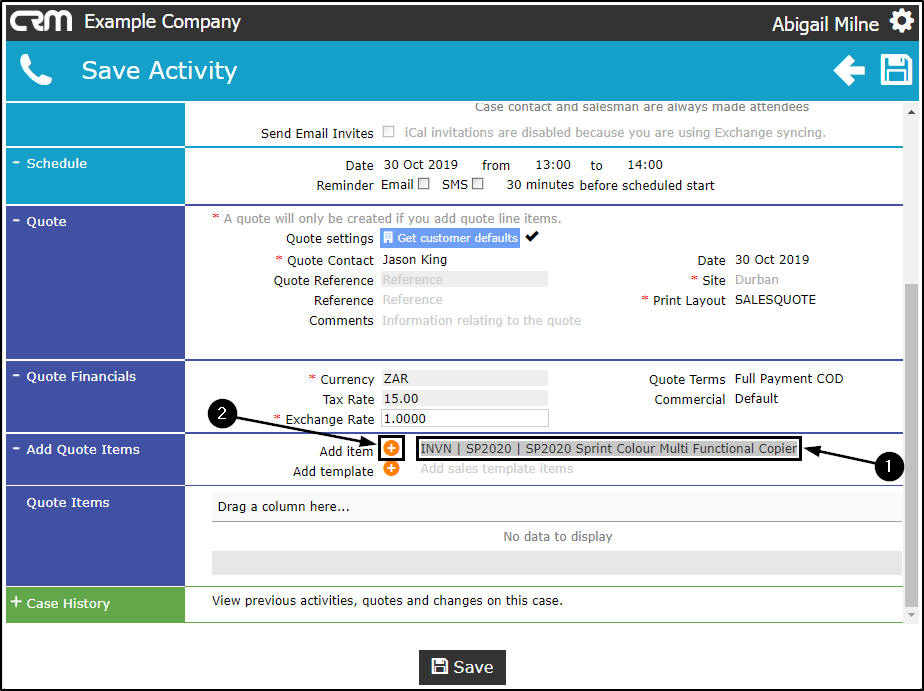
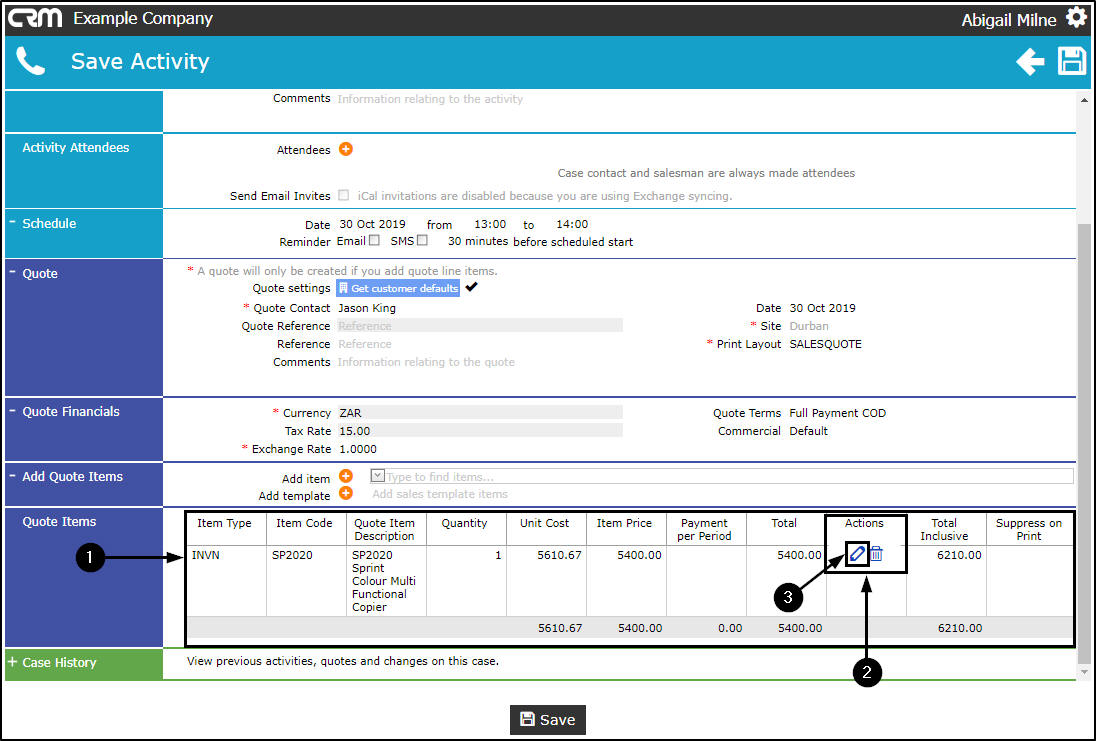
- The item will be added to the Quote Items frame.
- You will note that there are 2 action buttons linked to this item.
- An Edit button. This will enable you to edit the item details e.g. quantity, price, if required.
- A Delete button. This will enable you to delete the item from the quote, if required.
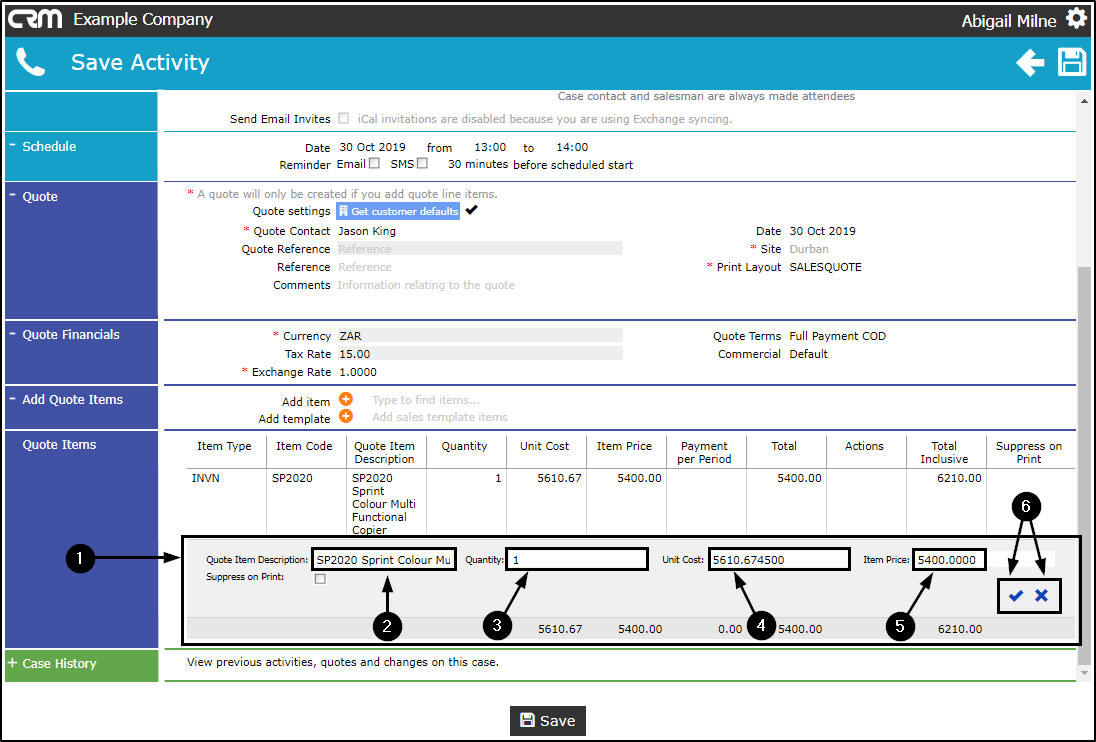
Edit Quote Item
- Click on the Edit button.
- An edit item frame will be displayed.
-
Here you can make changes to the following details:
- Item Description
- Item Quantity
- Item Unit Cost
- Item Price
- Click on the Apply Changes icon [ ] to save your changes or the the Cancel changes icon [x] to cancel the changes, as required.
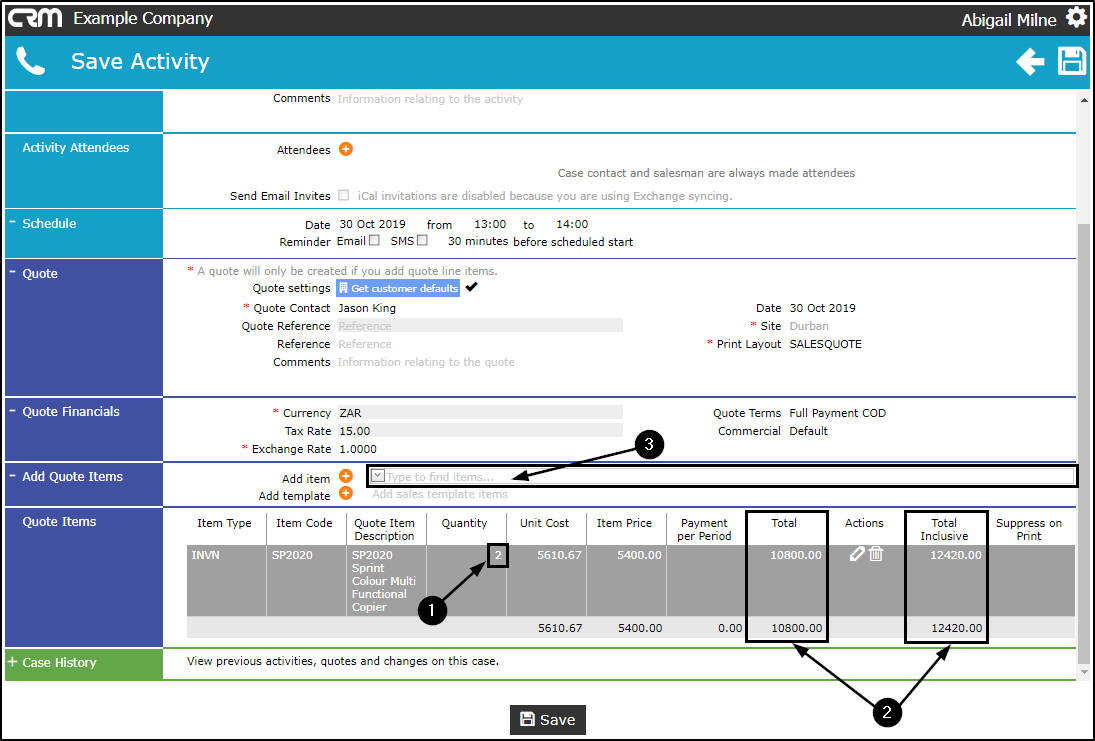
- In this example, the Quantity has been updated to 2.
- The Total and Total Inclusive columns will update accordingly.
Link Additional Quote Items
- In the Add item field, start typing the code or description of the next item that you wish to add to the quote.
- As you start typing in the field, the Type, Code and Description list will again be displayed.
- The system will filter for the item that you are searching for.
- Select the applicable item from this list.
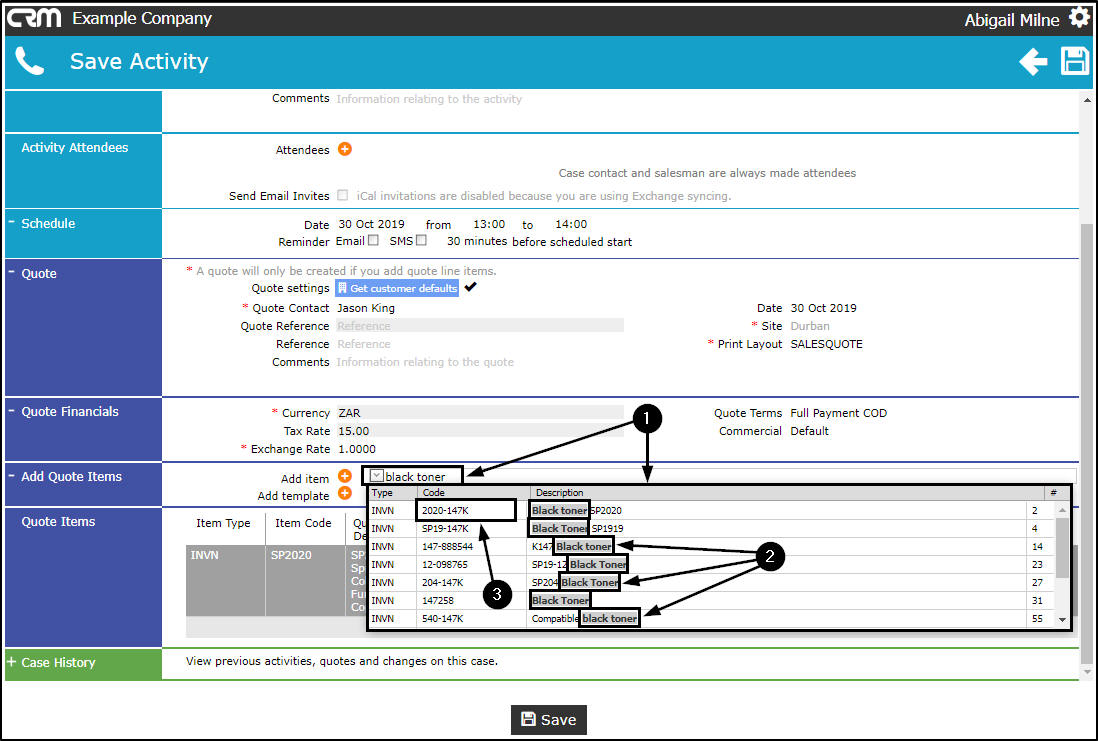
- The additional item code and description will populate the Add item field.
- Click on the plus [+] button.

- The additional item will be added to the Quote Items frame.
- Edit the details, if required.
- The quote Total Inclusive amount will update to include this item.
Save Quote (Save Activity)
- When you have finished adding items to the Quote sections, click on Save.
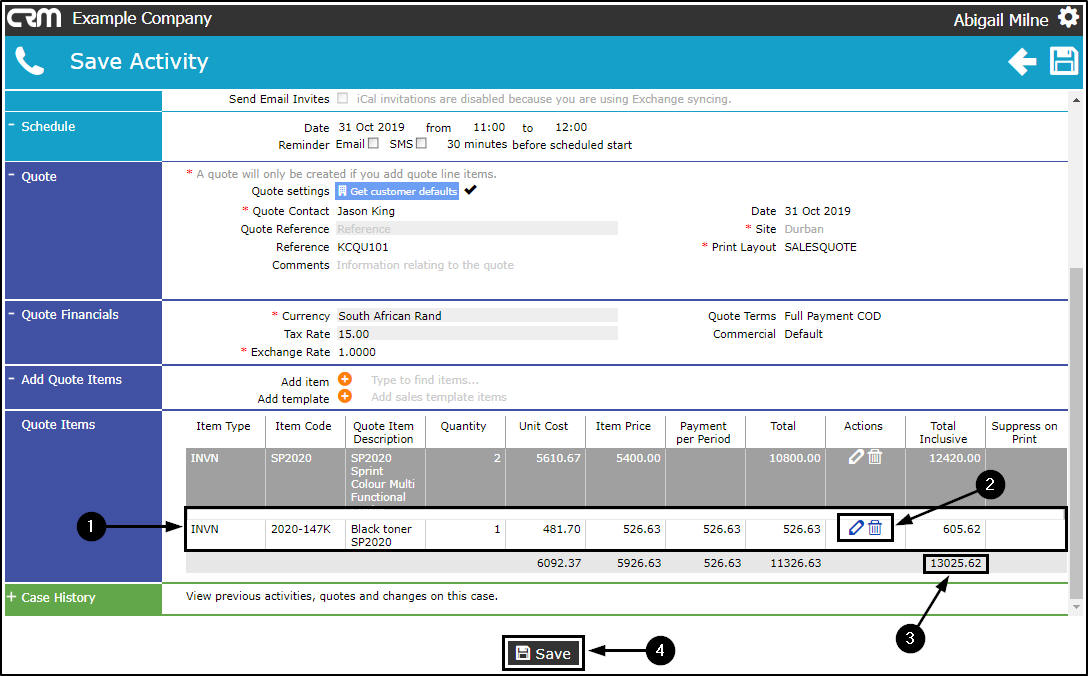
- The quote details will be saved and you will return to the My Cases screen.
- The case that you linked the quote to, can still be viewed in this list.
- Click on the Case icon or CRM logo to return to the Dashboard (Home page).
View Quote
- In the Dashboard (Home page), you can navigate to the Quotes listing page to view the recently added quote.
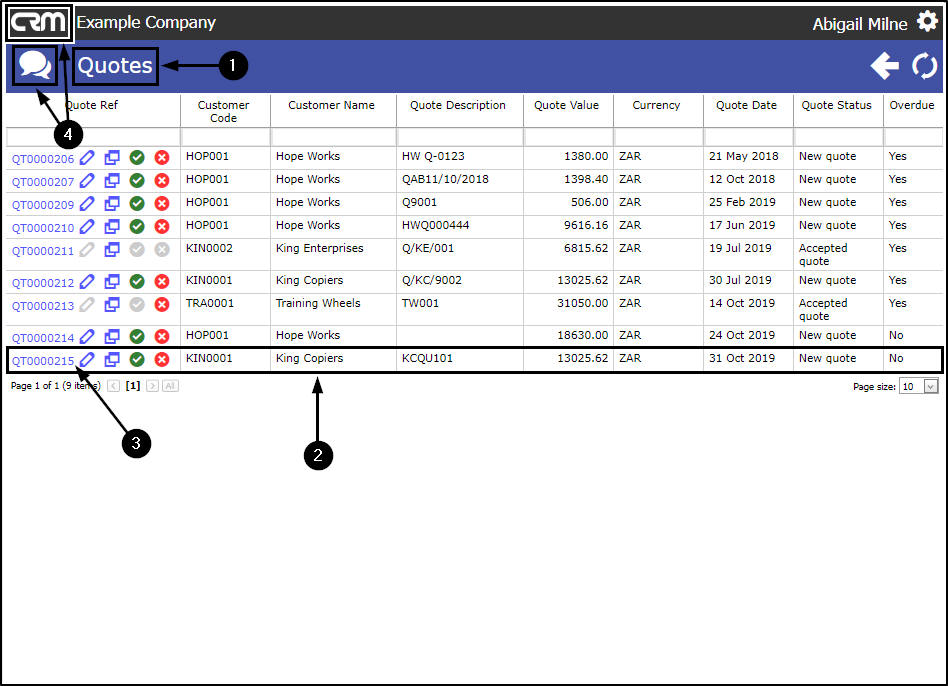
- Click on the Quotes tile.
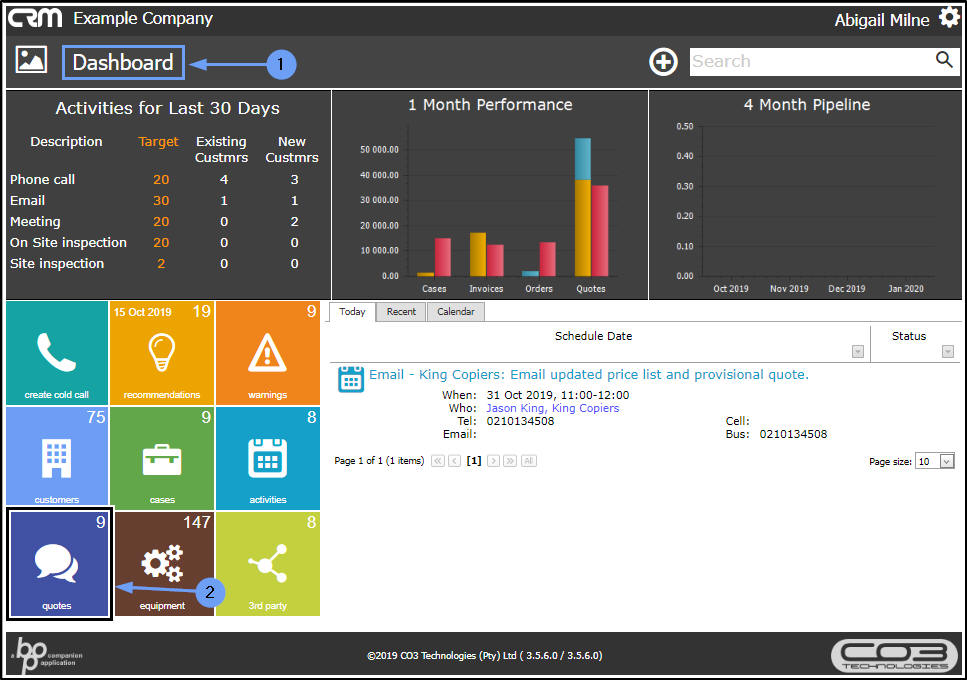
- The Quotes listing page will be displayed.
- Here you can view the newly created quote.
- You will note that the system has now allocated a Quote Reference number.
- Note 1:
Refer to
CRM Quotes
for more information an adding and editing quotes.
- Note 2:
Refer to
View / Print / Email the Quote for Quote processing information.
- Click on the Quotes icon or the CRM logo to return to the Dashboard (Home page).
View Customer-specific Case List
(from the Customer Homepage)
-
You can also access your customer-specific list of Cases from the
Customer Homepage.
You will first need to navigate to a particular Customer Home page.
- In the Homepage,
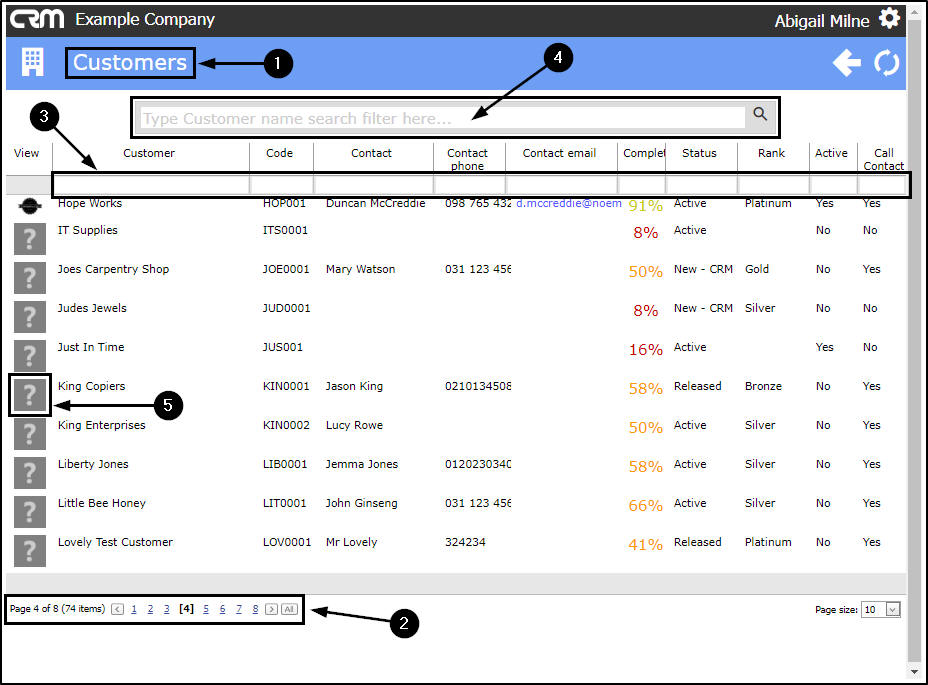
- Click on the Customers tile.
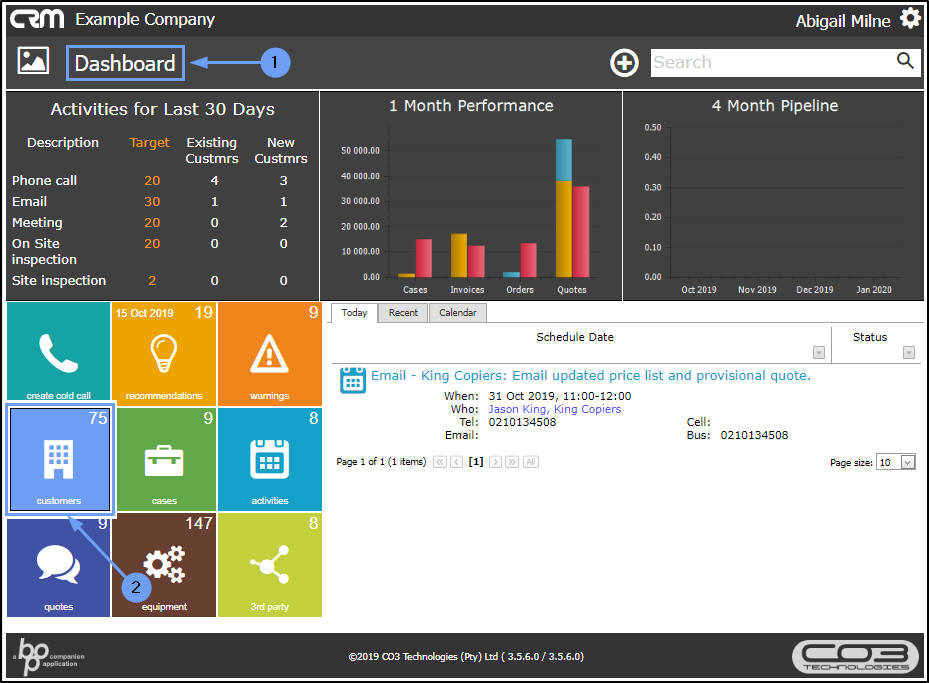
- The Customers listing page will open.
- You can use the Page Reference field ,
- the Filter Row or the
- Filter Text Box to search for your customer.
- Click on the selected customer icon in the View column.
- The selected Customer Homepage will open.
- Click on the Cases tile.
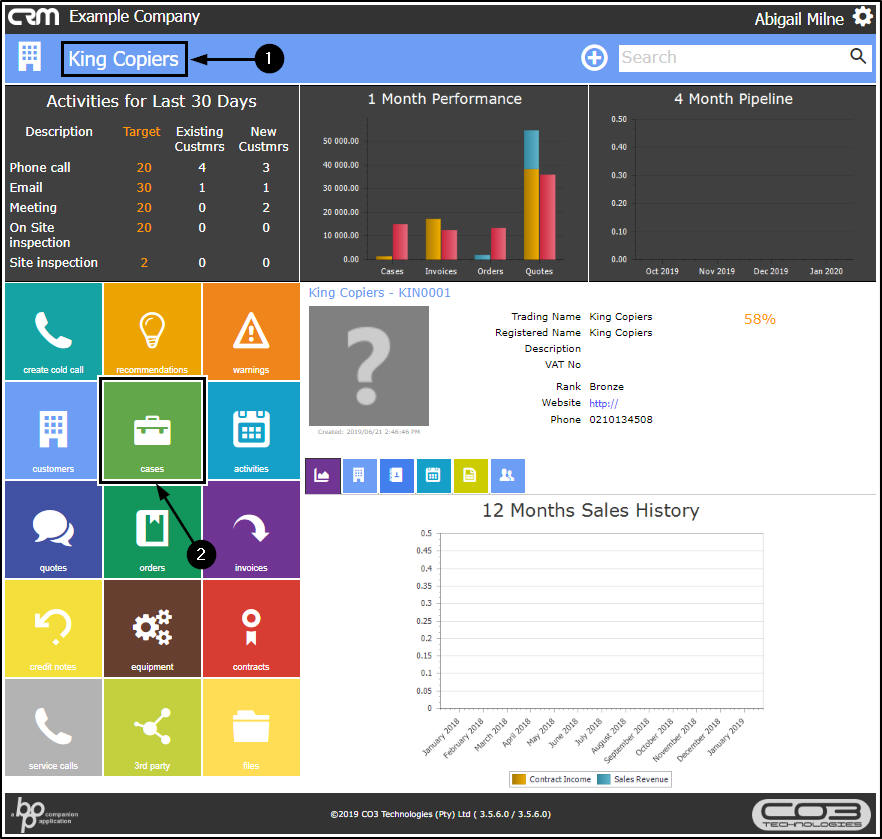
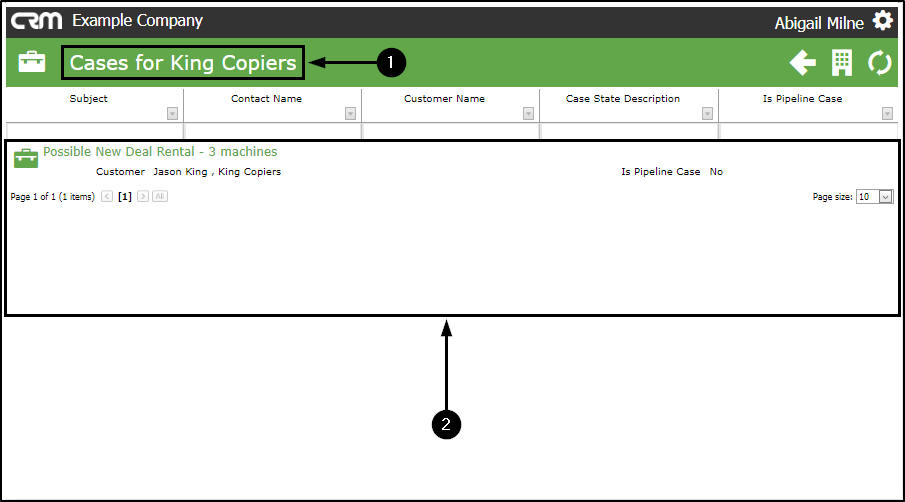
- The Cases for [selected customer] page will open.
- A list of Cases pertaining to that customer will display (where you have Cases pending).
-
In this example, there is only 1 Case linked to this customer.
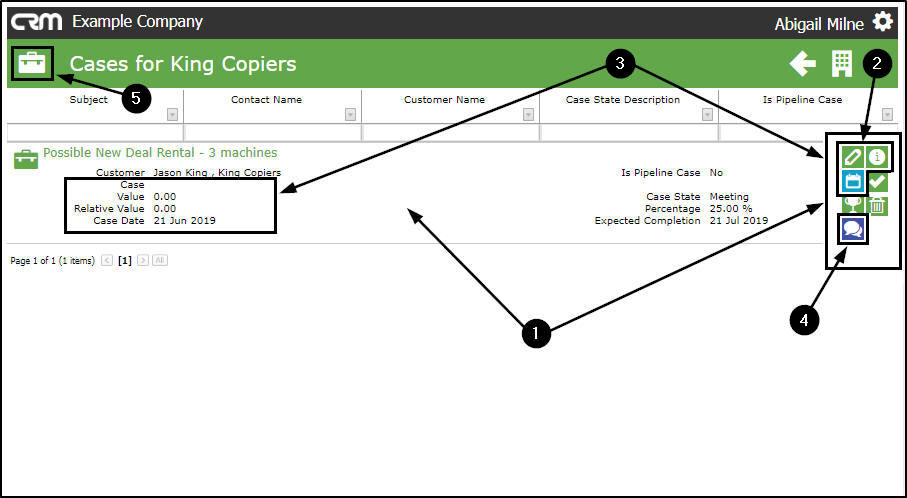
- Hover anywhere over an open Case, where you are the Salesman, to reveal the Case Action buttons.
- You can link a Quote in this page via the following Action buttons:
- View Case Info and History
- View/Edit this Case
- New Activity
- Single click on any Case (open or closed) to access a summary of the Case information and if it is an open Case, the Action buttons will also display. (The Action buttons will not display for Closed Cases.)
- You will note that there is a New Quote Action button in this page (not available in the My Cases listing page).
- This will navigate you to the Save Quote screen - where you can also add a new Quote for this customer, if required.
-
For more information refer to
CRM Customers: Cases.
- Click on the Case icon to return to the Homepage.
CRM.000.012