We are currently updating our site; thank you for your patience.
CRM Customers
Cases
A Case is like an opportunity: a reason to engage with a client in order to fulfill a sale requirement or propose a deal. A case gives rise to a Quote and subsequent New Deal.
A Case can be viewed as an umbrella over all the underlying Activities that work towards achieving a contract with that customer.
There is certain criteria required when dealing with Cases:
- A Customer is required in order to create a Case.
- A Case is required to raise an Activity.
- Only one Activity per Case can be open at a time.
Customer-specific Cases can be accessed from the Customer Dashboard (Customer Home page) as set out below.
A full list of Cases can be accessed from the Dashboard (Home page).
CRM will prompt you to create a new Case, when raising a new activity for a customer.
Quotes can be added to a Case from the Cases for [selected customer] listing page when using the following Action buttons:
- View Case Info and History
- View/Edit this Case
- New Activity
- New Quote
| Ribbon Access: Webpage > http://[servername]:[portno]/BPOCRM/User.aspx |
View Customer Specific Case List
from the Customer Dashboard (Home page)
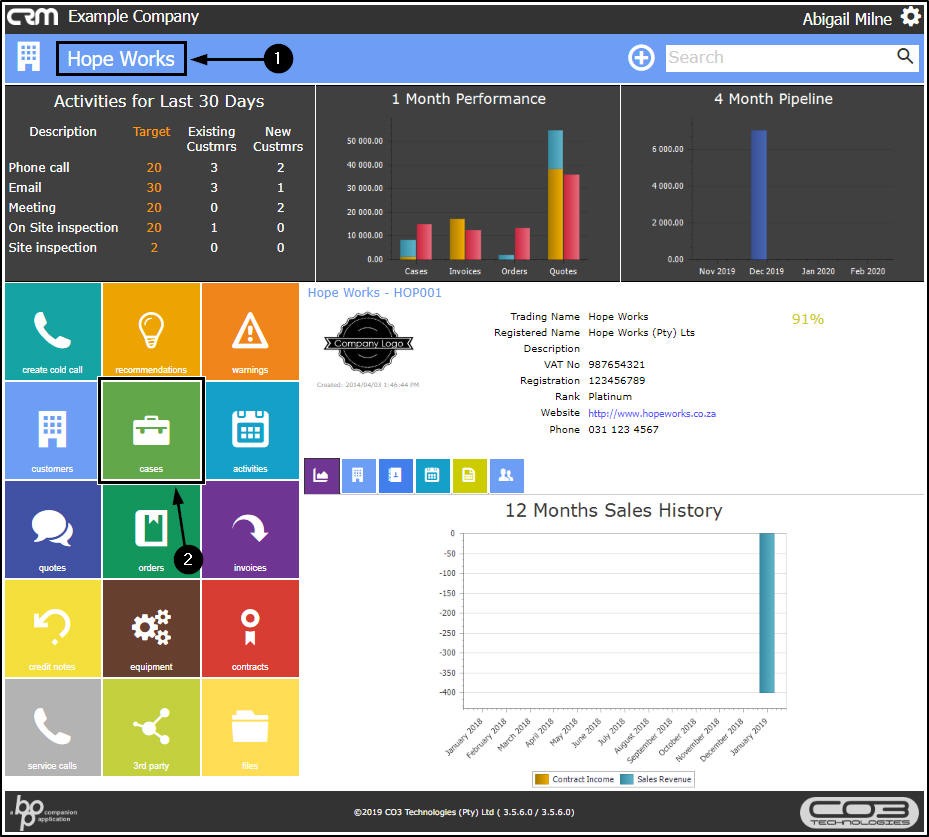
To access a customer specific list of Cases from the Customer Dashboard (Customer Home page). You will first need to navigate to the specific Customer Home page).
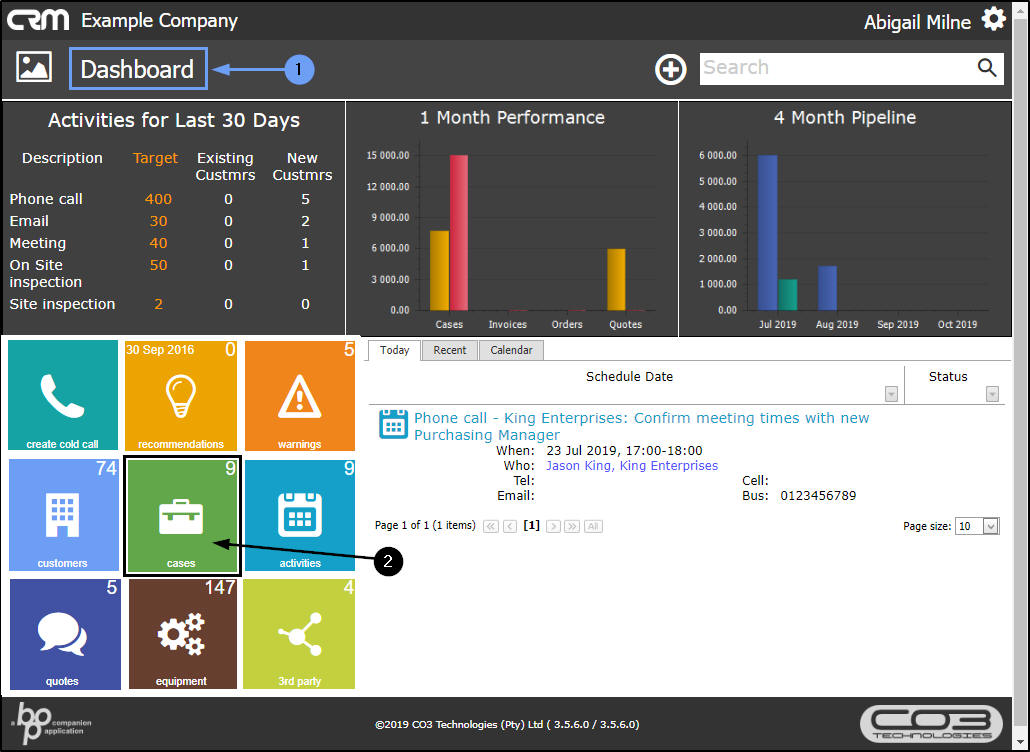
- In the Dashboard (Home page),
- Click on the Customers tile.
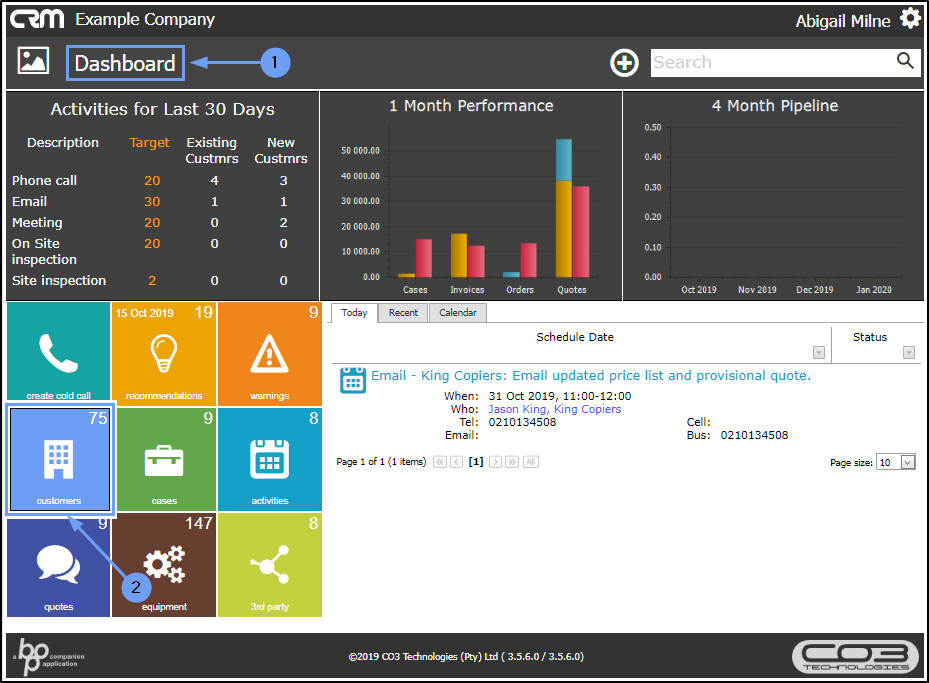
- The Customers listing page will open.
- You can use the Page Reference field ,
- the Filter Row or the
- Filter Text Box to search for a specific customer.
- Click on the selected customer icon in the View column.
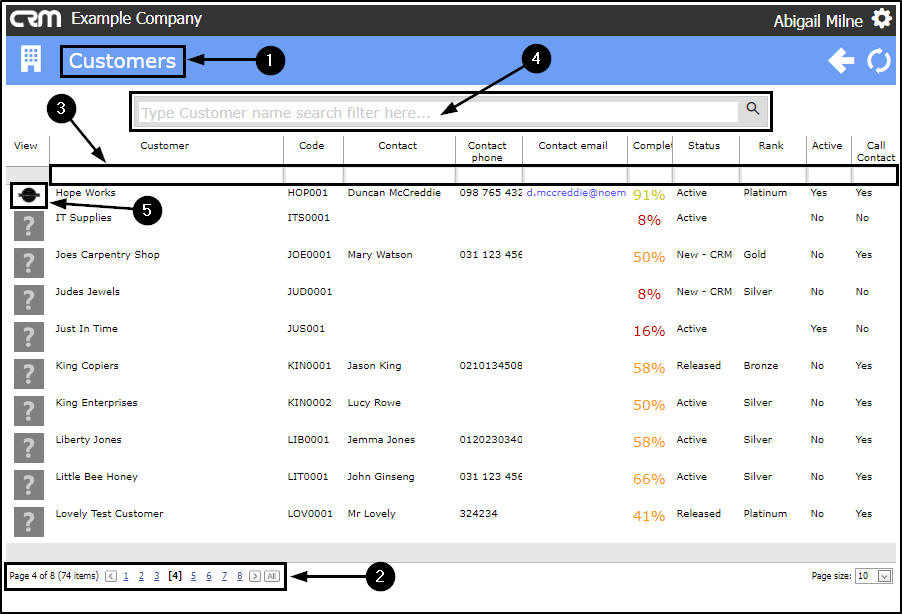
- The selected Customer Dashboard (Customer Home page) will open.
- Click on the Cases tile.
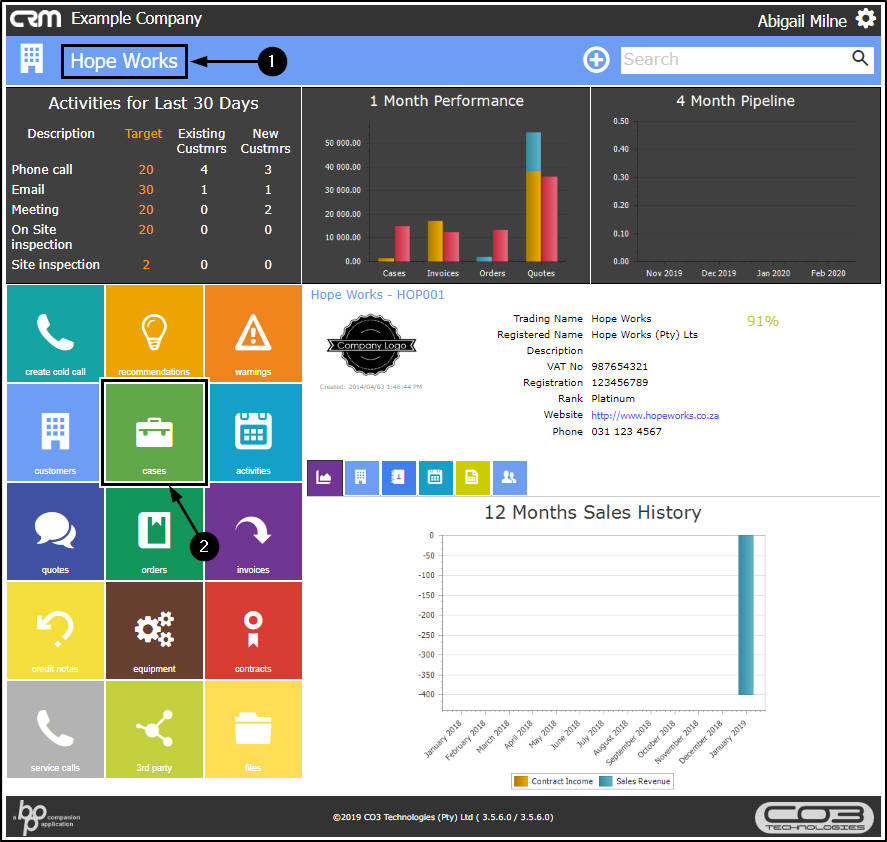
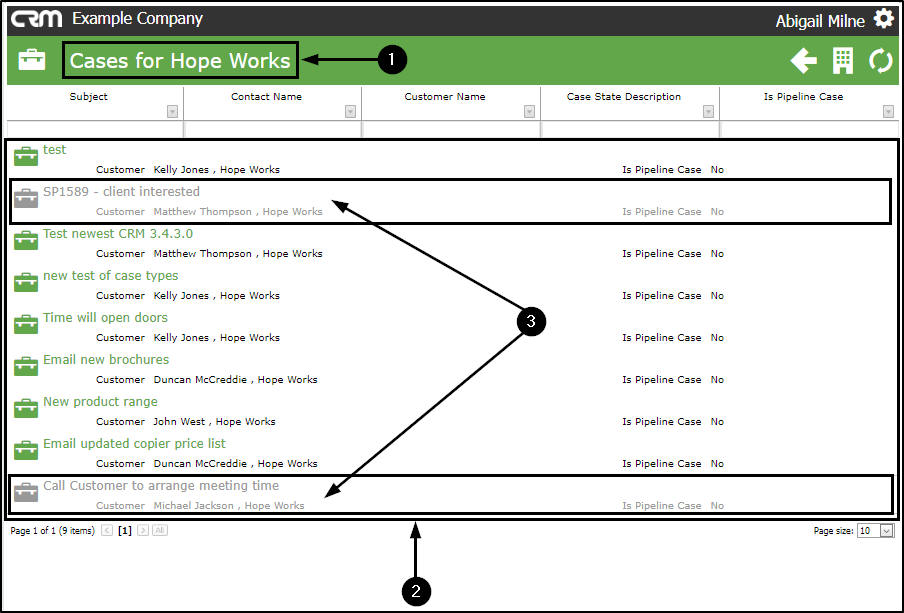
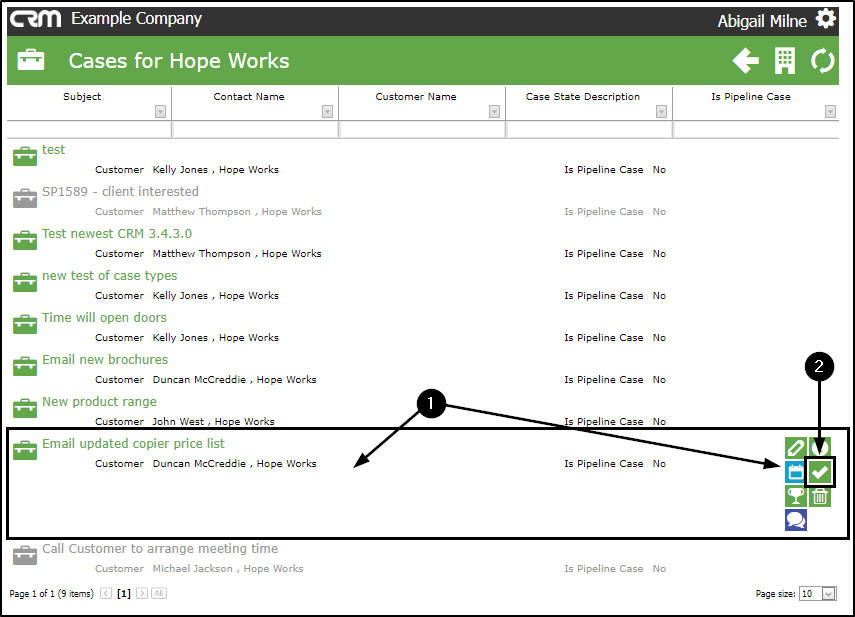
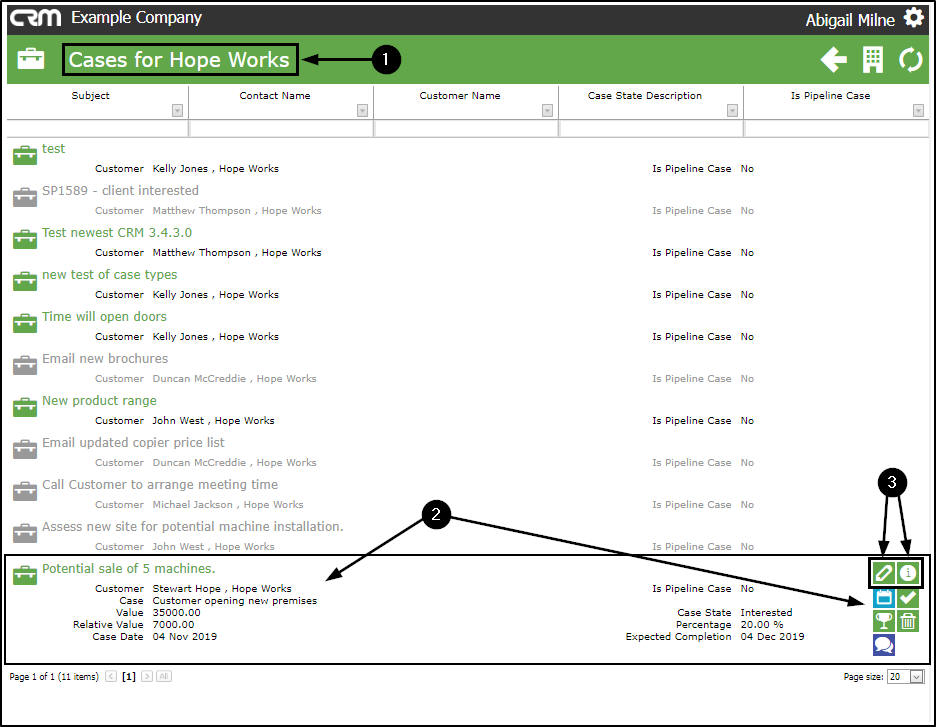
- The Cases for [selected customer] page will open.
- A list of cases pertaining to that customer will display.
- Any closed Cases in this list will be greyed out.
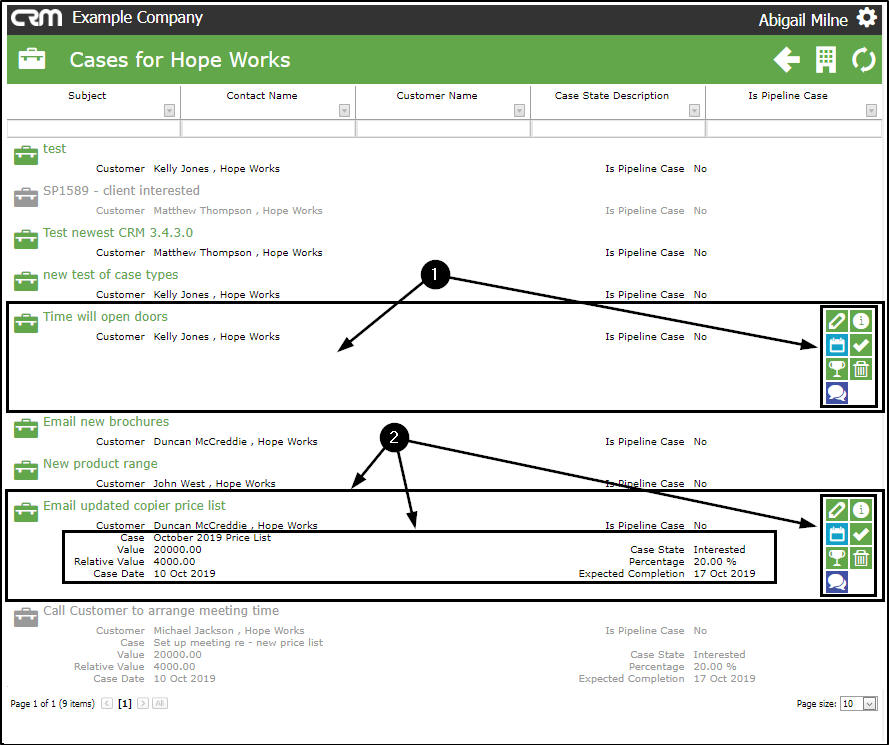
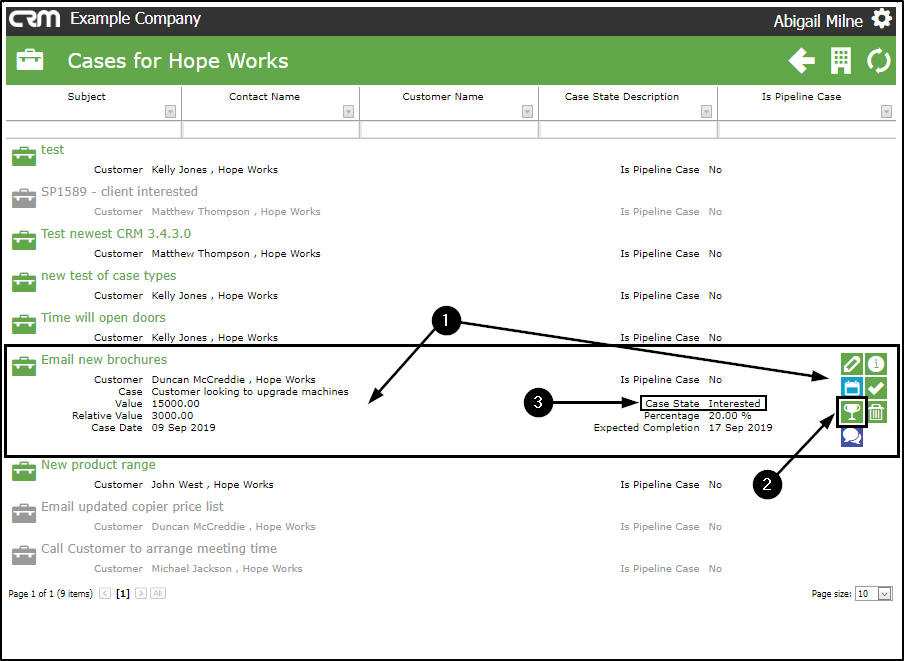
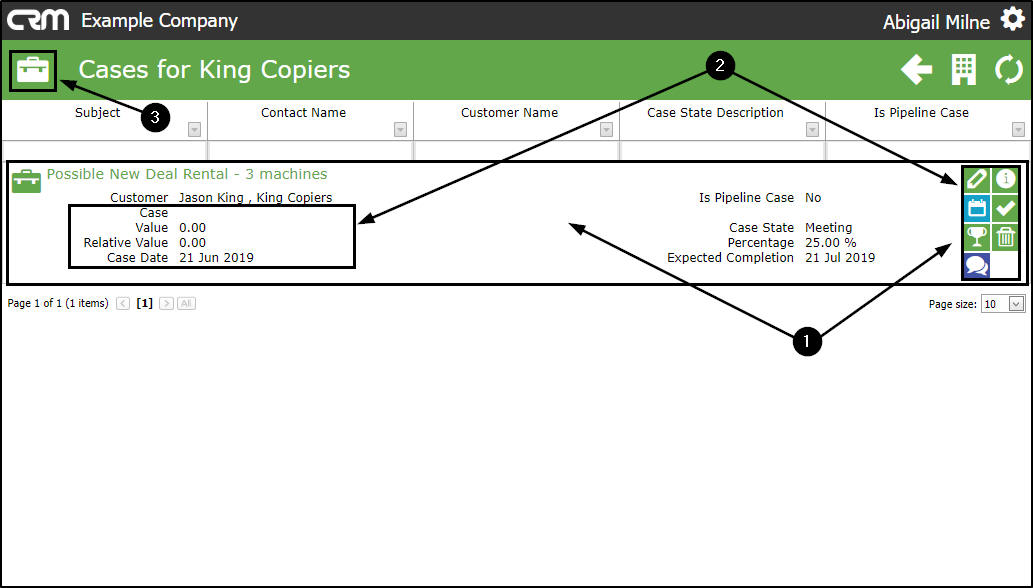
View Case Action buttons
- Hover over any open Case to reveal the Action buttons:
- View / Edit this Case
- View Case info and history
- New Activity
- Close this case
- Won this Case
- Lost this Case
- New Quote
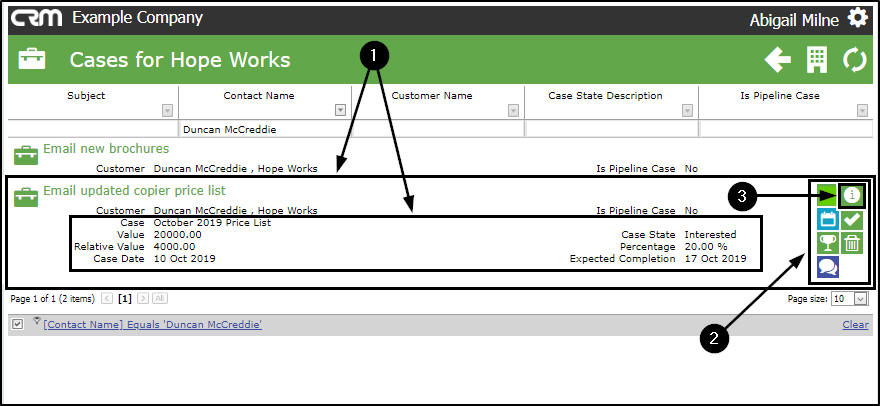
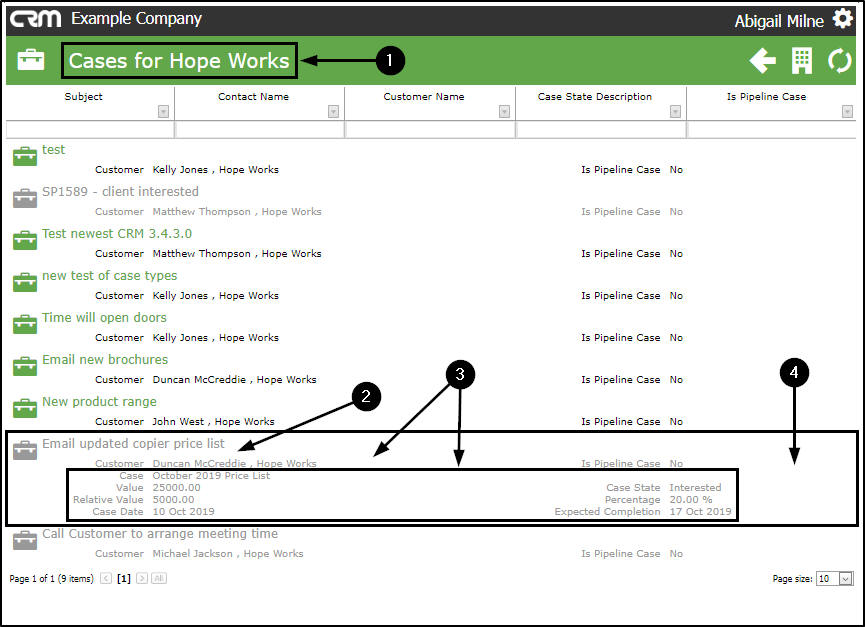
View Case Summary
- Single click on any Case to access a Summary of the Case information and if it is an open case, this will also cause the the Action buttons to be displayed. \ (Closed cases will only display the Summary.)
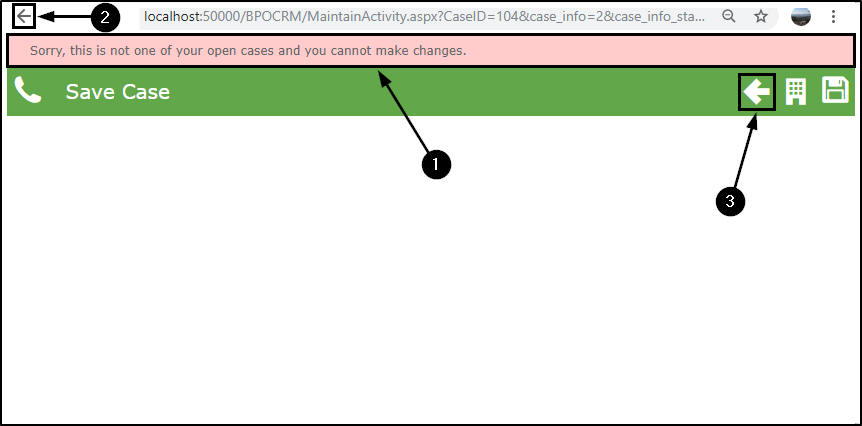
On Cases where you are not the Salesman
- If you try and use the Action buttons for a Customer that is linked to another Salesman, then an error message will appear at the top of the page:
- Sorry, this is not one of your open cases and you cannot make changes.
- Click on the Back arrow or
- The Back button to return to the Cases for [selected customer] page.
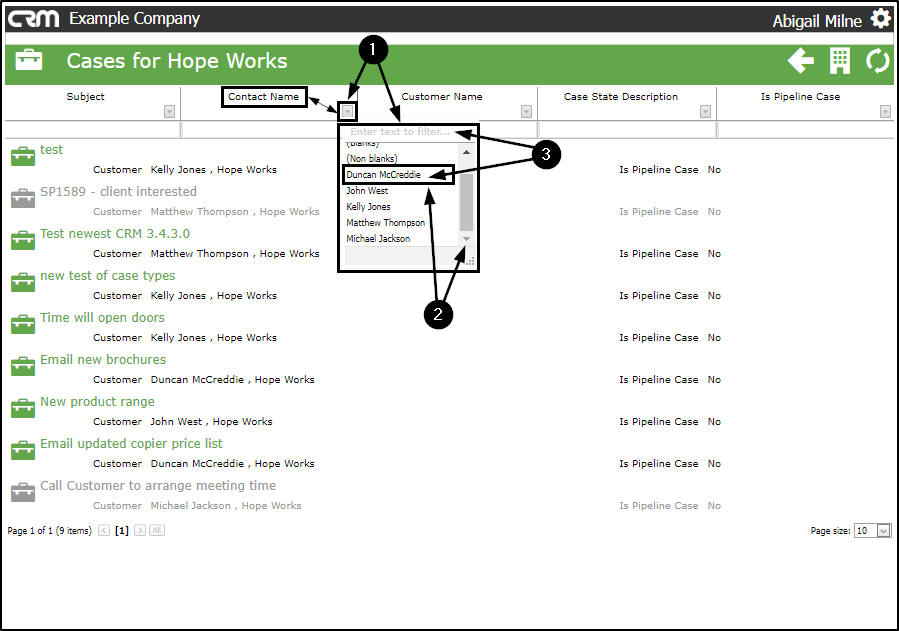
Search for Cases using the Filter Row and Filter List Functionality
- You can click on a filter arrow to display the applicable drop-down menu.
- In this example, the selected filter arrow is in the Contact Name column, therefore the menu displayed will list all the contact names linked to your cases.
- Eitherscroll through the list to find the relevant contact name from the menu.
- Or use the filter box to type in the relevant contact name, the system will search for the name as you type. Click on the name.
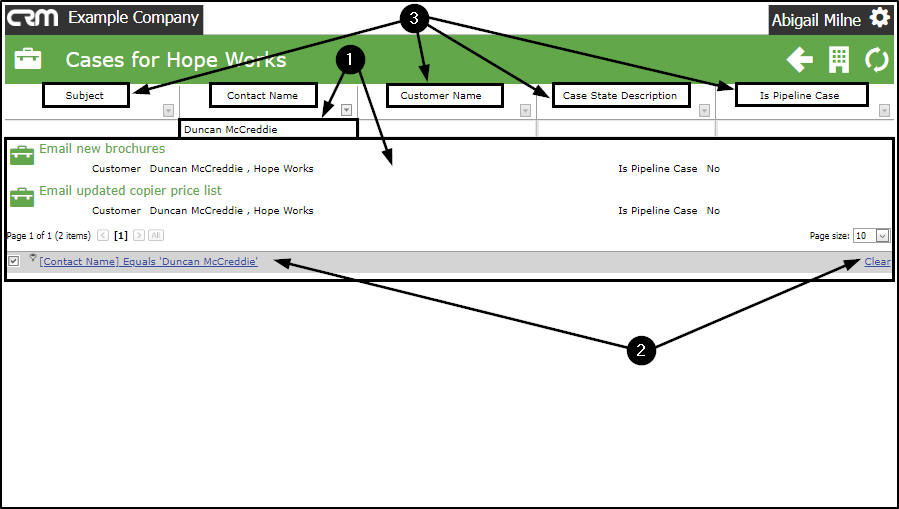
- The Cases for [selected customer] page will now list only the cases linked to this contact name.
- The filter row will display the filter sequence. You can click on Clear to remove any filter(s). The page will then display all the Cases linked to the customer again.
-
You can search for specific cases in this way using any of the columns:
- Subject
- Customer Name
- Case State Description
- Is Pipeline Case
- Single click on an open Case in this page to display the summary of the Case information and to reveal the
- Action Item buttons:
Cases - Action buttons
View Case Information and History
- Click on the View Case Info and History icon.
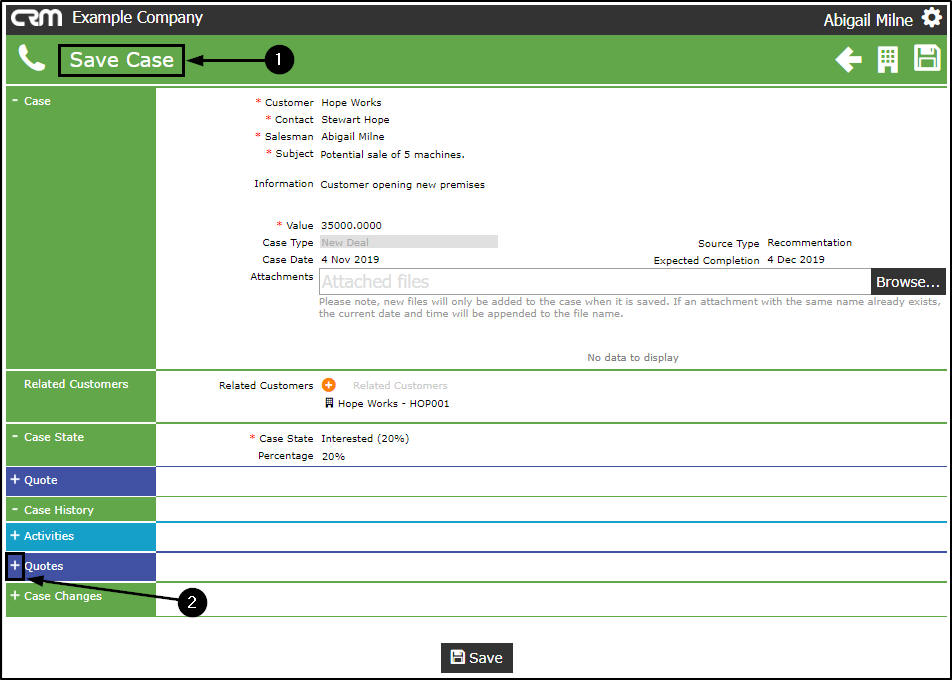
- The Save Case page will be displayed.
- The following frames will be auto-expanded:
- Case
- You will note that the case details are auto populated. You can edit all these details, except for the Customer, Salesman, Subject and Information fields.
- Related Customers
- You will note that the Customer Name will be auto populated, you can add more Related Customers, if required.
- Case State
- The Case State and Percentage will be auto populated. You can edit the Case State, if required (which will update the Percentage).
- Case History
- Here you can view previous activities, quotes and changes on this case, if applicable.
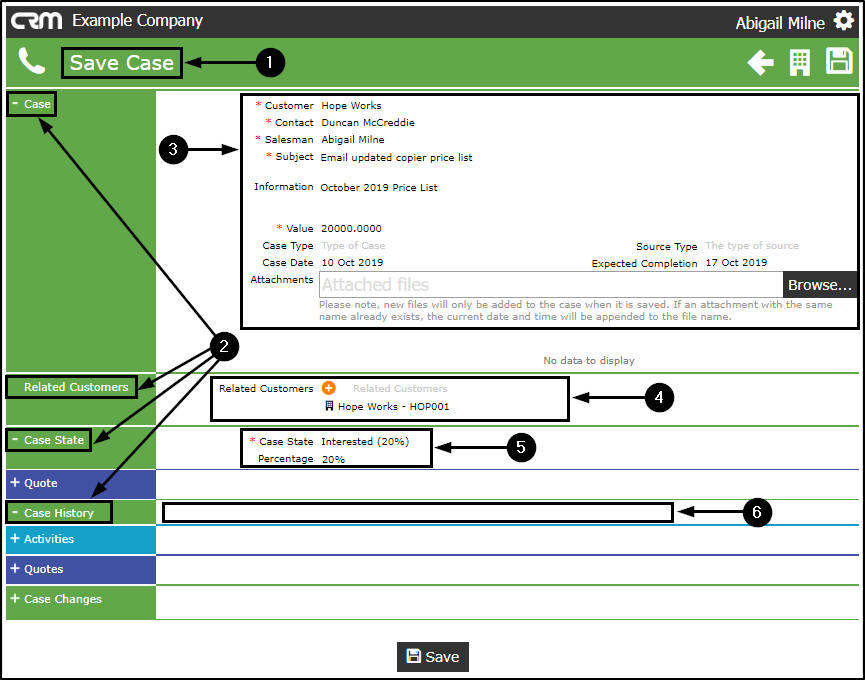
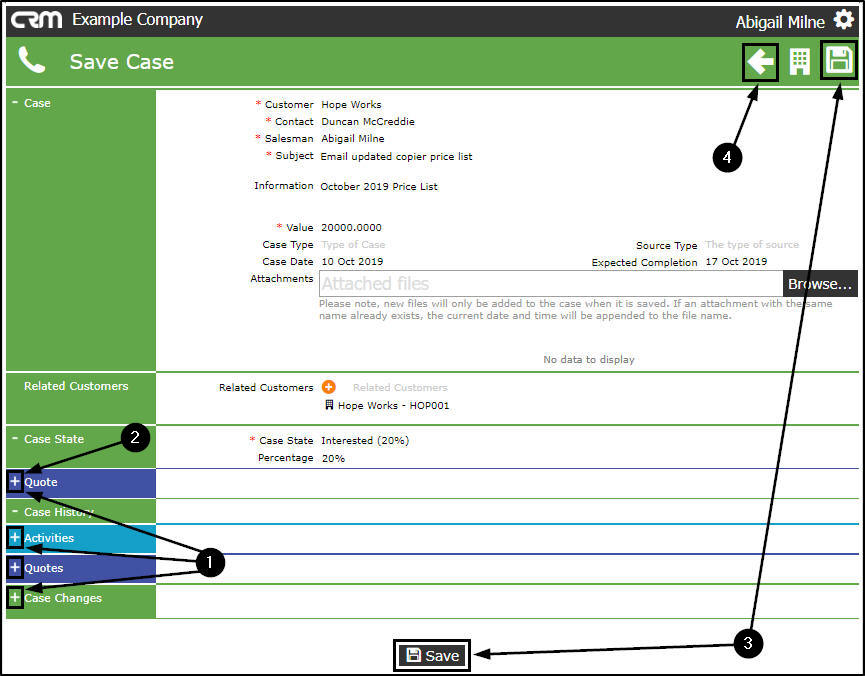
- Click on the expand icon in any of the collapsed frames to view and/or add or edit the content, if required.
- In this page, you can link a Quote to this Case. Refer to Add a new Quote linked to this Case for more information.
- Click on Save to apply any changes.
- Click on the Back button to return to the My Cases page.
View / Edit this Case
- After clicking on Save or Back, you will return to the Cases for [selected customer] page but the page will no longer be filtered, all the Cases linked to the selected customer will again be displayed.
- Hover anywhere over an open Case to display the Action Items buttons.
- Click on the View/Edit this Case icon.

- The Save Case page will be displayed.
- The following frames will be auto-expanded:
- Case
- You will note that the case details are auto populated. You can edit all these details, except for the Customer, Salesman, Subject and Information fields.
- Related Customers
- You will note that the Customer Name will be auto populated, you can add more Related Customers, if required.
- Case State
- The Case State and Percentage will be auto populated. You can edit the Case State, if required (which will update the Percentage).
- Case History
- Here you can view previous activities, quotes and changes on this case, if applicable.

- Click on the expand icon in any of the collapsed frames to view and/or edit the content, if required.
- Click on Save to apply any changes or
- Click on the Back button to return to the previous page.

New Activity
- In the Cases for [selected customer] page,
- Hover anywhere over an open Case to display the Action Items buttons.
- Click on the New Activity icon.
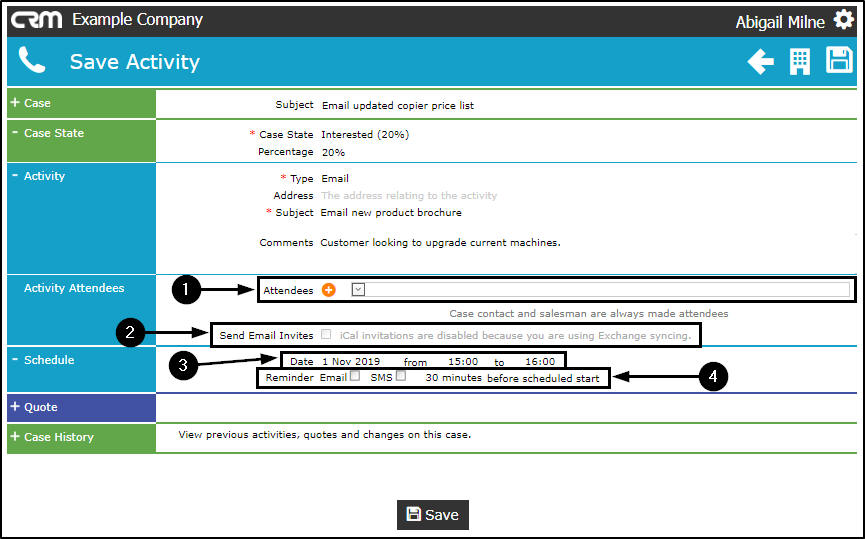
- The Save Activity page will be displayed.
- The following frames will be auto-expanded:
- Case State
- Activity
- Activity Attendees and
- Schedule
- Update the Activity Information:
- Type:
- Click in the Type field to display an Activity Type drop-down list.
- Select from this list the applicable type (e.g. Phone call).
- Address:
- Click in the Address field, a list of all addresses linked to the customer will be displayed.
- Select the applicable address from this list.
- Subject:
- Type in the Subject of this activity (e.g. Email new product product range catalogue).
- Comments
- Type in a Comment relating to this activity (e.g. Customer looking to upgrade current machines).

-
You can select
Attendees
to link to the activity.
- In this field you can select from employees and the current customer contacts.
- You can select to Send Email Invites in order to have the system send an email invite for this activity, to all attendees.
- Schedule the Date and Time for the activity.
- Set a Reminder Email or SMS as and if required.
Add Related Customers
- Once you have added Attendees, you may also wish to link Related Customers in order to invite contacts from various clients to an Activity - such as a meeting or training session. (these are not found in the Attendees list).
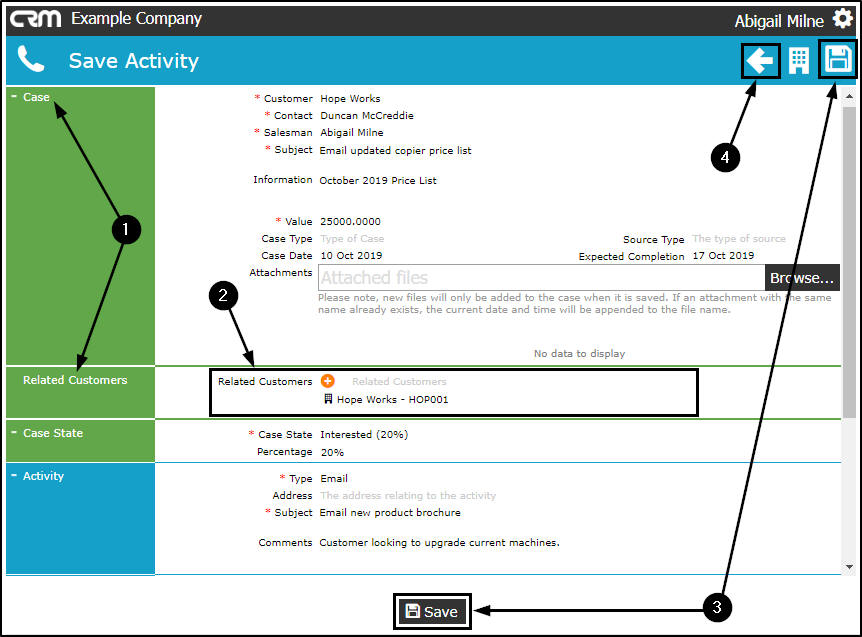
- Click on the expand button in the Case frame.
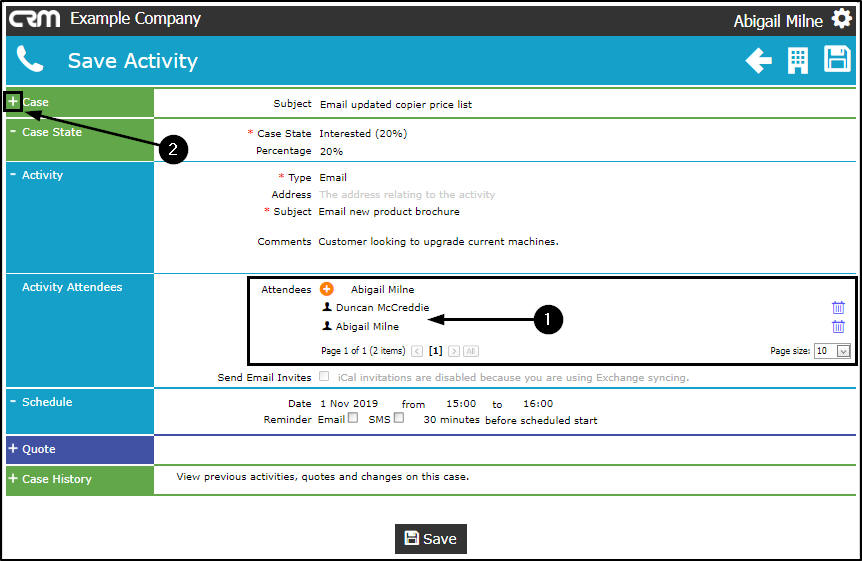
- The Case frame will be expanded to reveal the Related Customers frame.
- Follow the process to add the related customer(s), if required.
- When you have finished adding the new activity details for this case, click on Save to return to the previous page .
- If you do not wish to save any changes, click on the Back button to return to the previous page.
Close this Case
- In the Cases for [selected customer] page, hover anywhere over an open Case to display the Action Items buttons.
- Click on the Close this Case icon.
- The Save Case page will be displayed.
- Type a completion note/explanation in the Notes field (e.g. Customer budget not yet approved for machine upgrade).
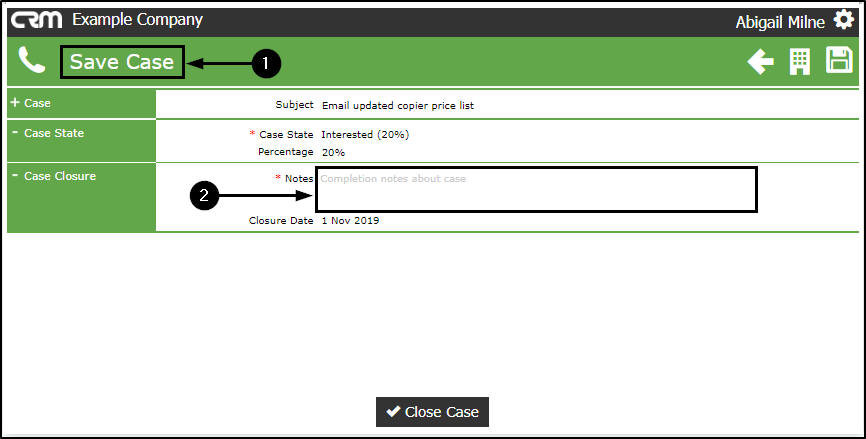
- The Closure Date will auto populate with the current date.
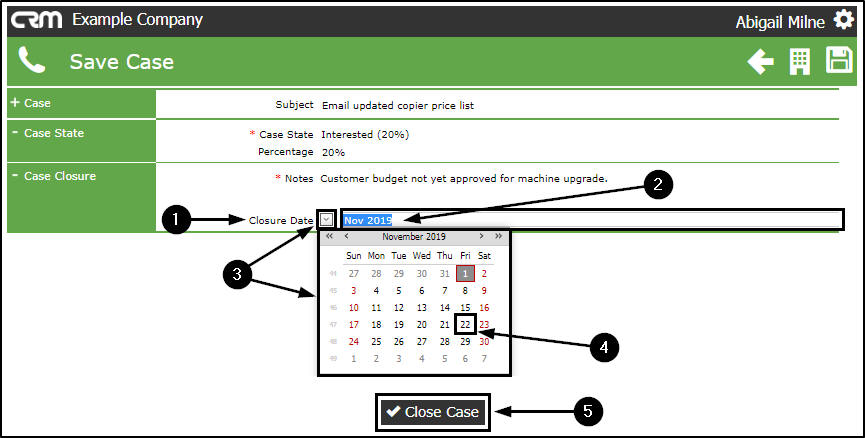
-
If you wish to change this date,
- Either, type the correct date directly in this field,
- Or, click in this field to display a drop-down arrow, click on this arrow to bring up the calendar function.
- Select the applicable alternative date.
- Click on Close Case.
- You will return to the Cases for [selected customer] listing page.
- The recently closed Case will now be greyed out in this list.
- You can single click on the closed Case to view the Case Summary.
- You will note that the Action Item buttons are no longer available for this Case.
Win a Case
- In the Cases for [selected customer] page, hover anywhere over an open Case to display the Action Items buttons.
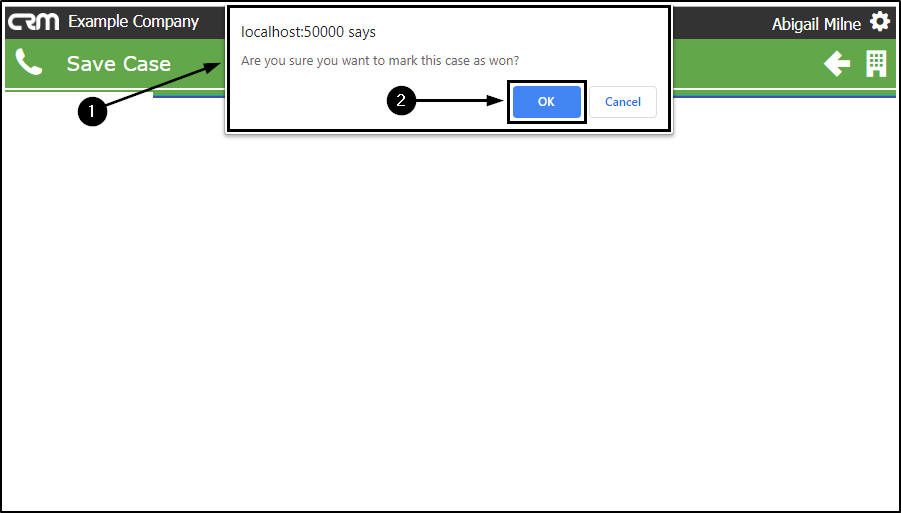
- Click on the Won this Case icon.
- Note that the Case State is currently Interested.
- Note:
A Case cannot be Won via Case Action Buttons - if this Case Type has Stage Gates
Enabled. All Stage Gate Questions will need to be responded to, in
order to 'Win the Case'.
- A message box will pop up asking:
- Are you sure you want to mark this case as won?
- Click on OK.
- The system will update the Case State.
- A Case Won message with a Trophy image will briefly flash on the screen.

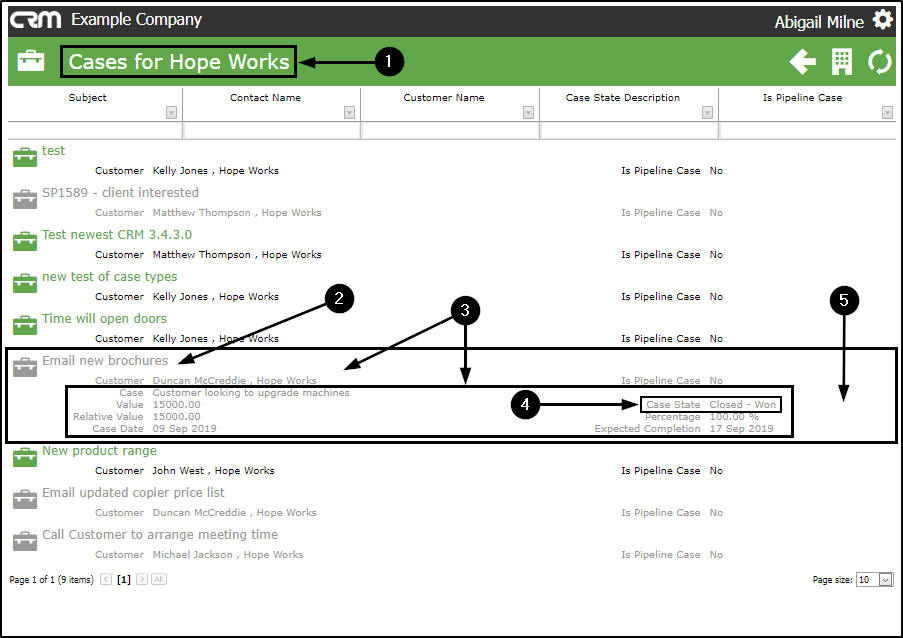
- You will return to the Cases for [selected customer] listing page.
- The recently won Case will now be greyed out in this list.
- You can single click on the won Case to view the Case Summary.
- The Case State has updated to Closed - Won.
- You will note that the Action Item buttons are no longer available for this Case.
Lost this Case
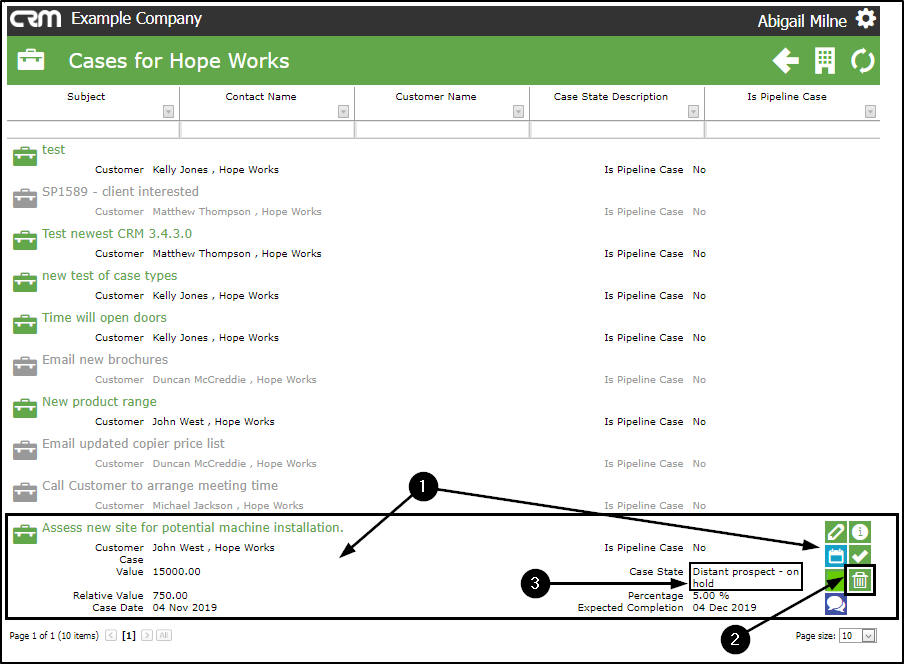
- In the Cases for [selected customer] page, hover anywhere over an open Case to display the Action Items buttons.
- Click on the Lost this Case icon.
- Note that the current Case State is Distant Prospect - on hold.
- A message box will pop up asking:
- Are you sure you want to mark this case as lost?
- Click on OK.
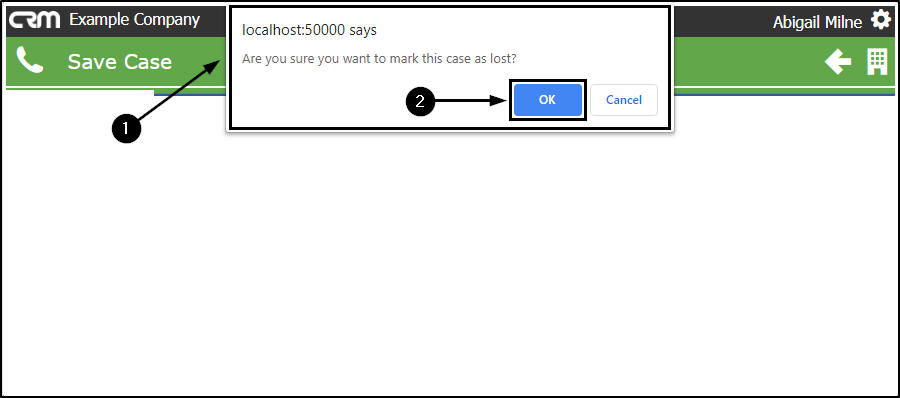
- The system will update the Case State.
- A Case Lost message with a Trash Bin image will briefly flash on the screen.
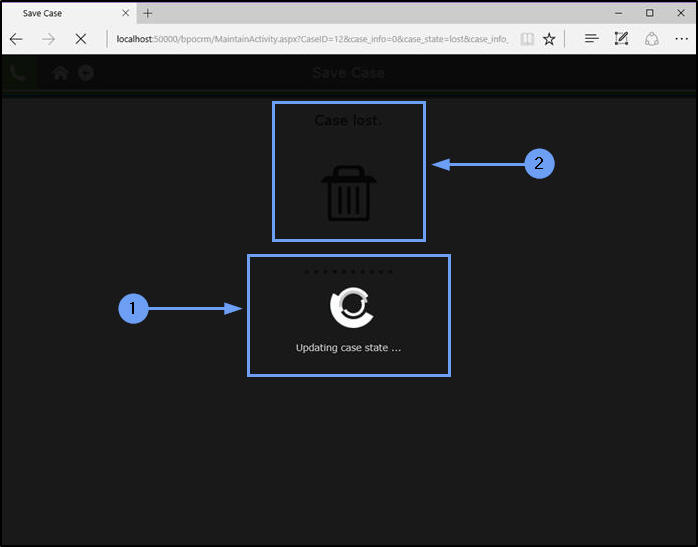
- You will return to the Cases for [selected customer] listing page.
- The recently lost Case will now be greyed out in this list.
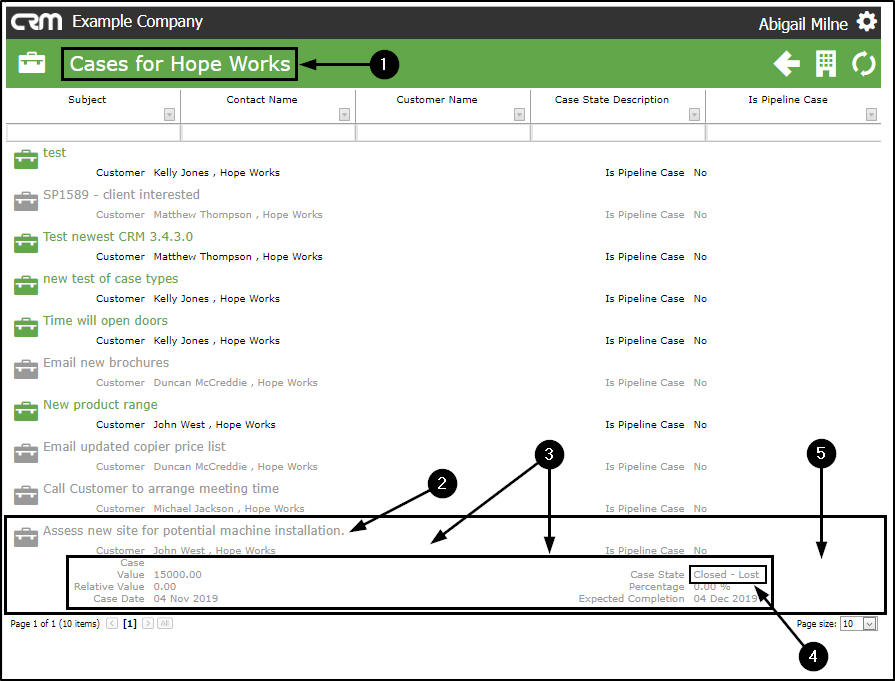
- You can single click on the lost Case to view the Case Summary.
- The Case State has updated to Closed - Lost.
- You will note that the Action Item buttons are no longer available for this Case.
Add a new Quote linked to a Case
- From the Cases for [selected customer] page page, you can link a Quote by navigating via the following Action buttons:
- View Case Info and History
- The Save Case page will open, expand the Quote frame.
- View/Edit this Case
- The Save Case page will open, expand the Quote frame.
- New Activity
- The Save Activity page will open, expand the Quote frame.
- New Quote
- The Save Quote page will open, the Quote, Quote Financials and Quote Items frames will be expanded, ready for you to add the new Quote details.
-
For the purpose of this manual we will
navigate from the
Save Quote page
page but the
link quote process
is the same from
either
page.
- In the Cases for [selected customer] listing page.
- Hover anywhere over an open Case to display the Action Items tiles.
- Click on the New Quote tile.
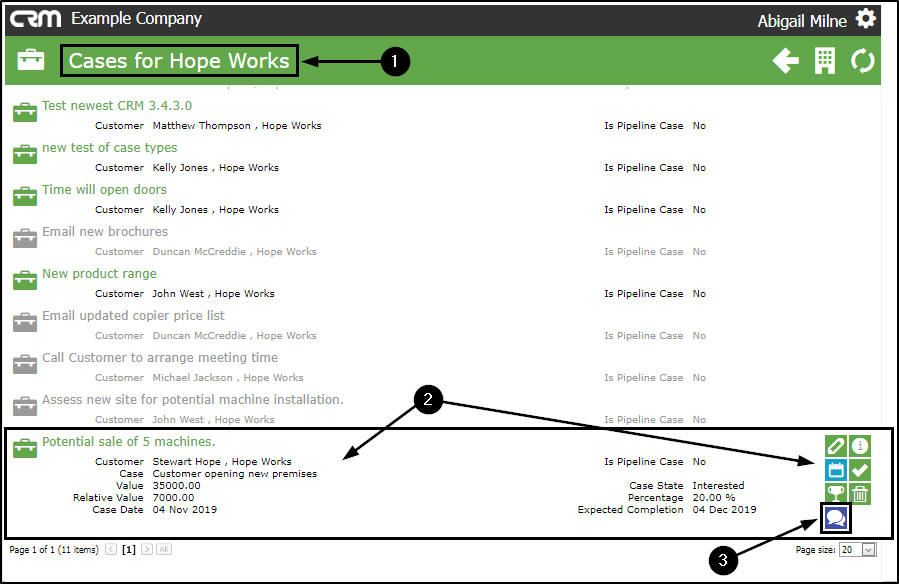
- The Save Quote page will open.
Link Quote Process
- The Subject in the Case frame will be auto populated with the information of the Case selected in the previous step.
- Expand the Case frame if you wish to view the full Case information in this page.
-
The following frames will be auto-expanded :
- Quote
- Quote Financials and
- Quote Items
-
Note:
If you are linking a Quote from the
Save Case
or
Save Activity
pages then you will need to
expand these frames manually.
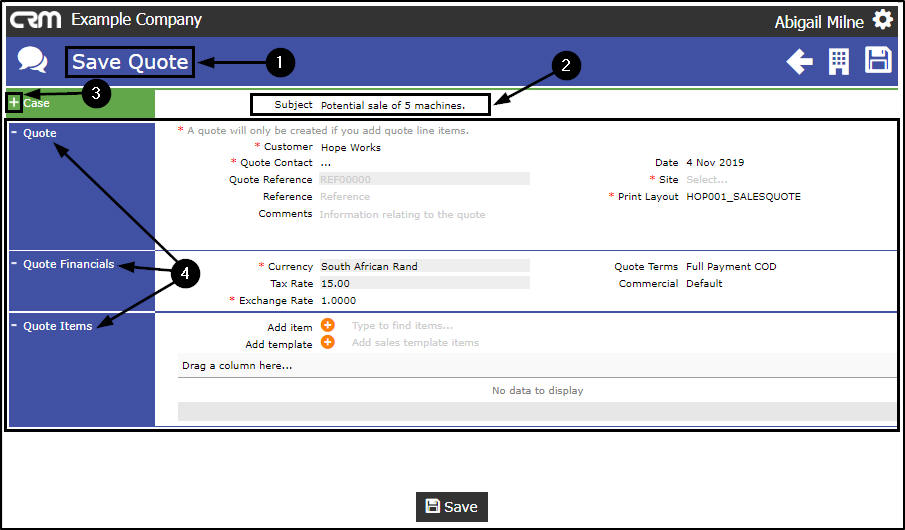
- Note the message at the top of the Quote frame: A quote will only be created if you add quote line items. This will be covered in the Add Quote Items section of this manual.
- Customer: This will populate with the name of the Customer linked to the Case.
- Quote Contact:This will populate with the contact selected in the Case section.
- You can click on the drop-down arrow and select an alternative contact from the drop-down list, if required.
- Quote Reference: The system will allocate a reference number as the quote is saved.
- Reference:Type in a reference for this quote.
- Comments:Type in a comment/additional information relating to this quote.
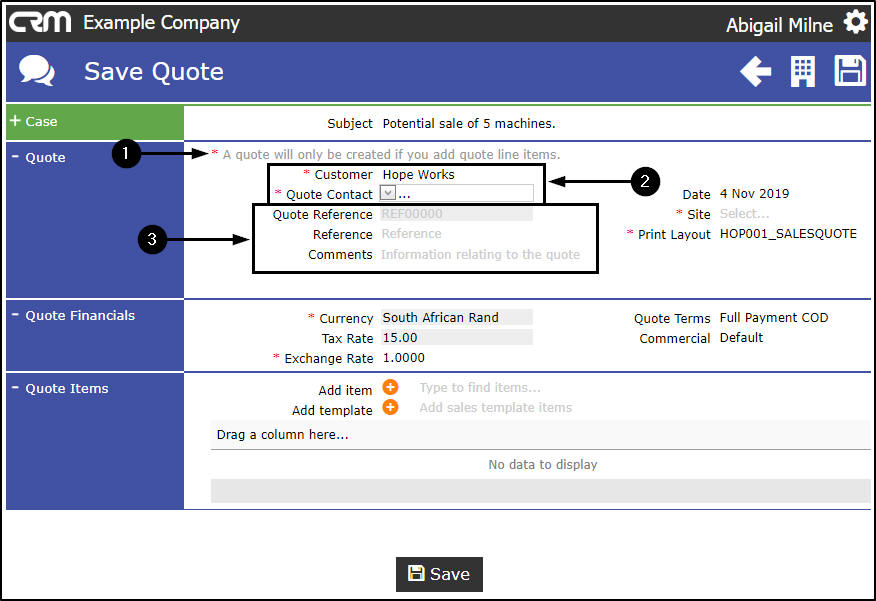
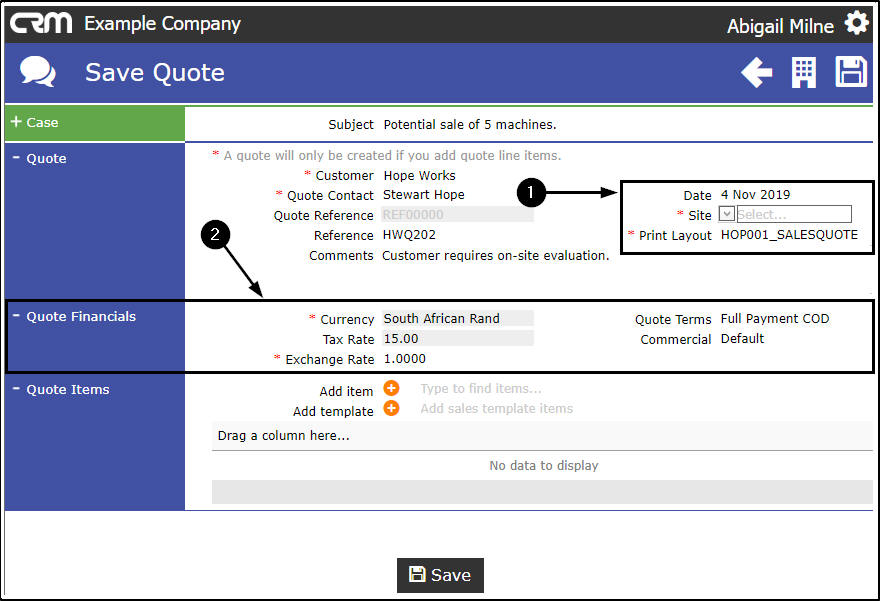
- Date: This will populate with the current date.
- You can either type directly in this field to change the date, or click on the drop-down arrow and use the calendar function to select an alternative date if required.
- Site:This will auto-populate with the site set up on this customer.
- If the customer is linked to more than one site then click on the drop-down arrow and select the correct site for this quote.
- Print Layout:This will auto populate with the Sales Quote print layout set up on the Customer.
Quote Financials
- Currency: This will auto populate with the currency set up on the customer. You can click on the drop-down arrow and select an alternative currency, if required.
- Tax Rate: This will auto populate with the tax rate set up on the customer.
- Exchange Rate: This will auto populate with the exchange rate set up on the customer.
- Quote Terms:
This is the quote repayment factor and should be configured in
Static Data: Sales Quote Terms or Repayment Method
This will auto populate with Full Payment COD.
- You can click on the drop-down arrow and select an alternative payment period, if required.
- Commercial:
This will auto populate with the
commercial
set up on the customer.
- Click in this field to reveal a drop-down arrow and select from the list an alternative commercial, if required.
Add Quote Items
You now have the ability to add single items to a quote.
Note: For Part Numbers to pull through to this list - you need to ensure that the Quote Products are specified.
- Take note of the message at the top of the Quote section: you must add at least one item to this quote for it to be created. This process is set out below.
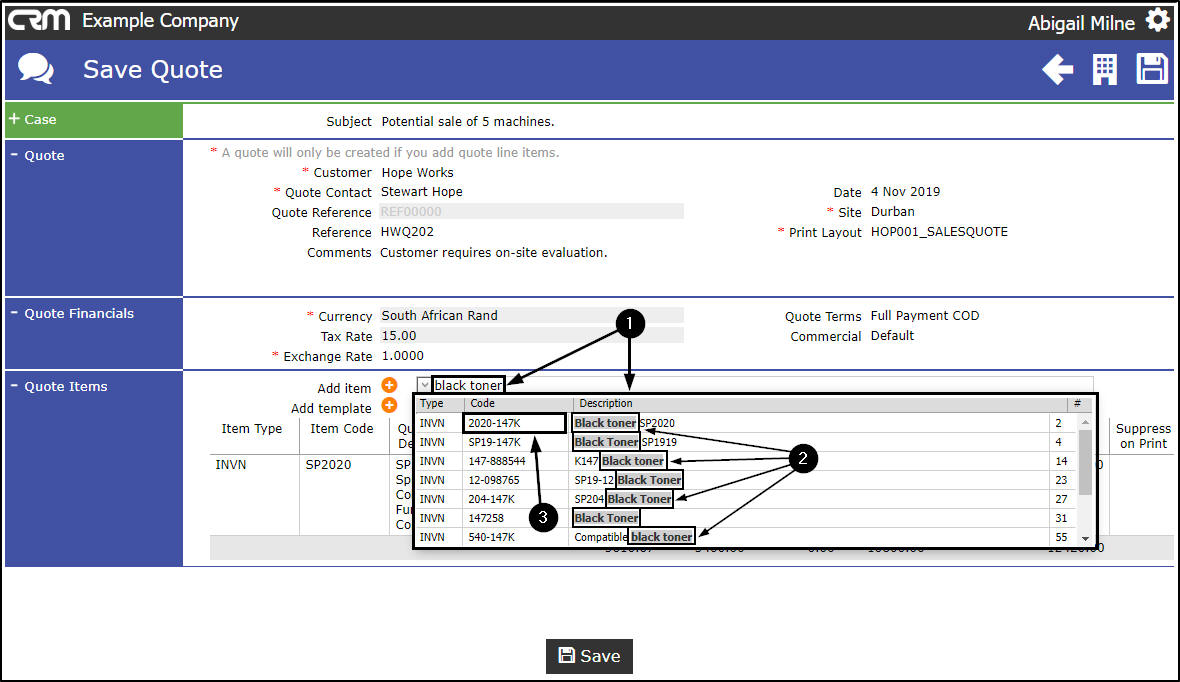
- In the Add item field, start typing the code or description of the item you wish to link to this quote.
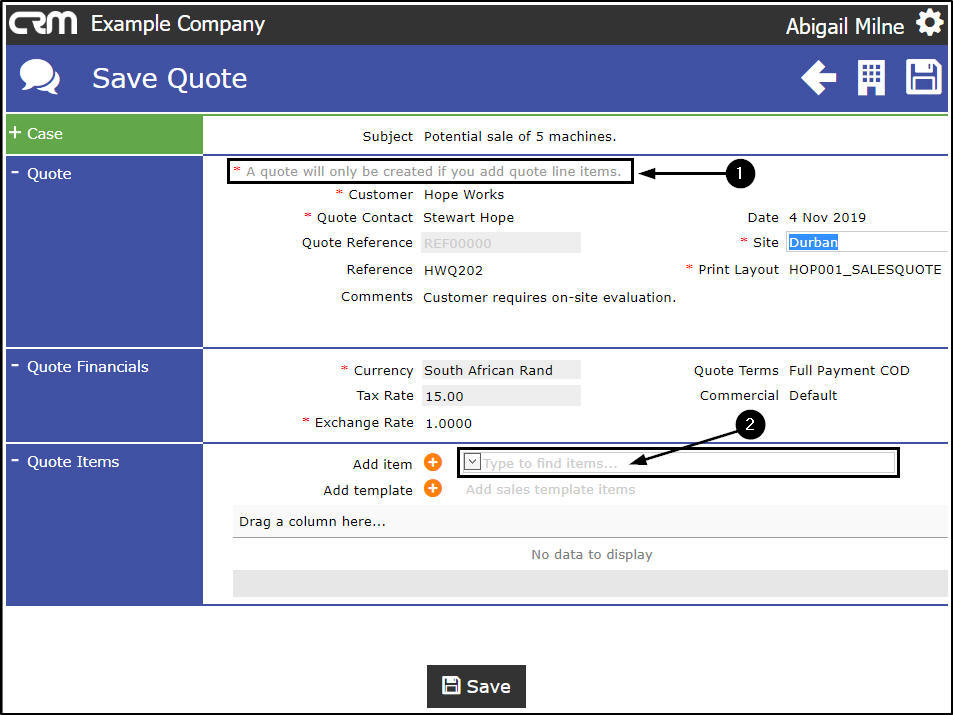
- As you start typing in the field, a Type, Code and Description list of all items on the system, will be displayed.
- The system will filter for the item that you are searching for.
- Select the applicable item from this list.
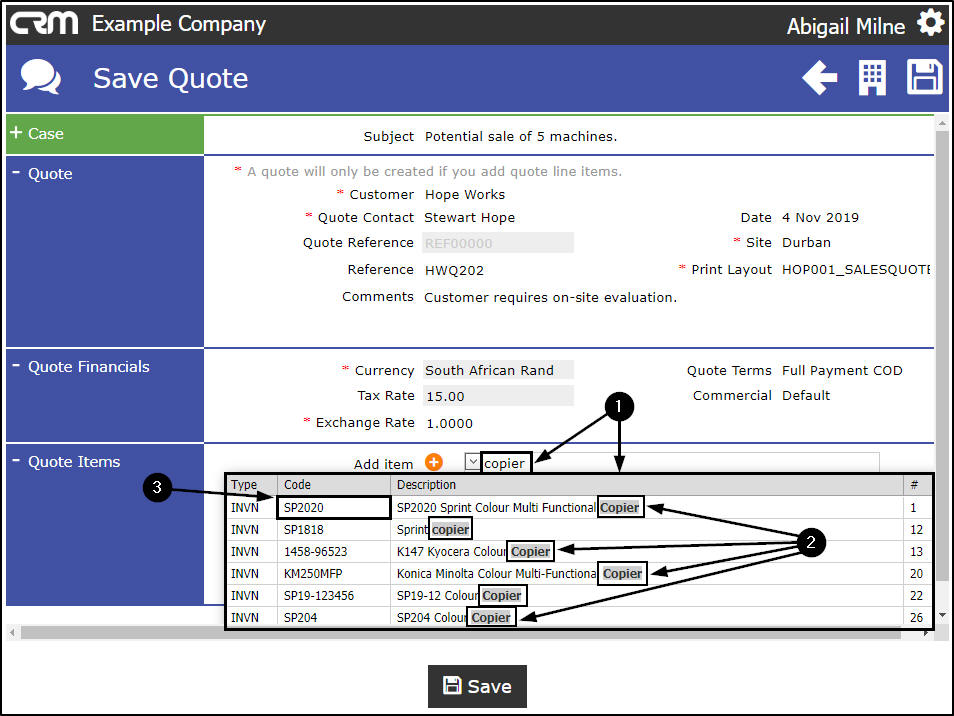
- The selected item code and description will populate the Add item field.
- Click on the plus[+] button.
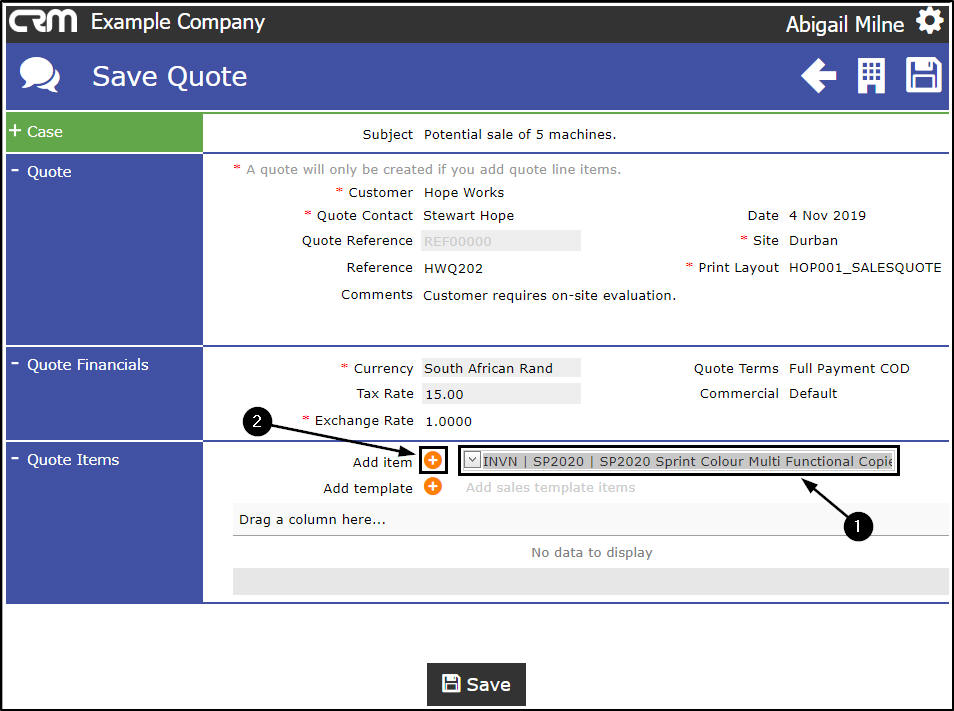
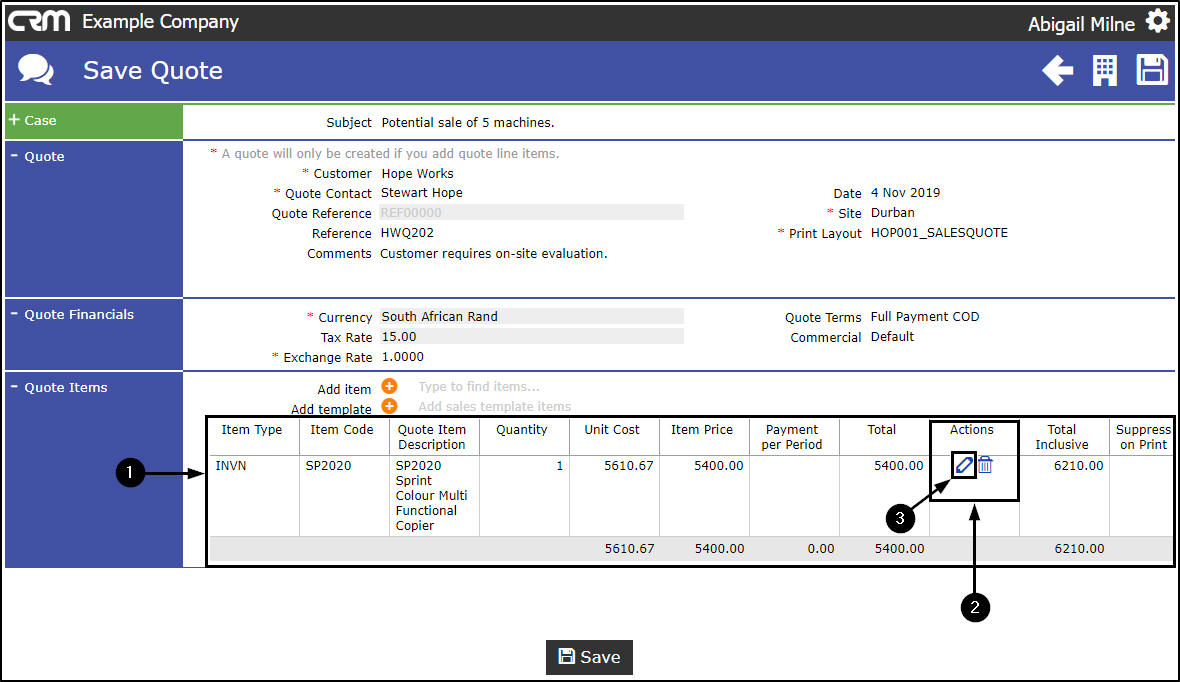
- The item will be added to the Quote Items frame.
- You will note that there are 2 action buttons linked to this item.
- An Edit button. This will enable you to edit the item details e.g. quantity, price, if required.
- A Delete button. This will enable you to delete the item from the quote, if required.
Edit Quote Item
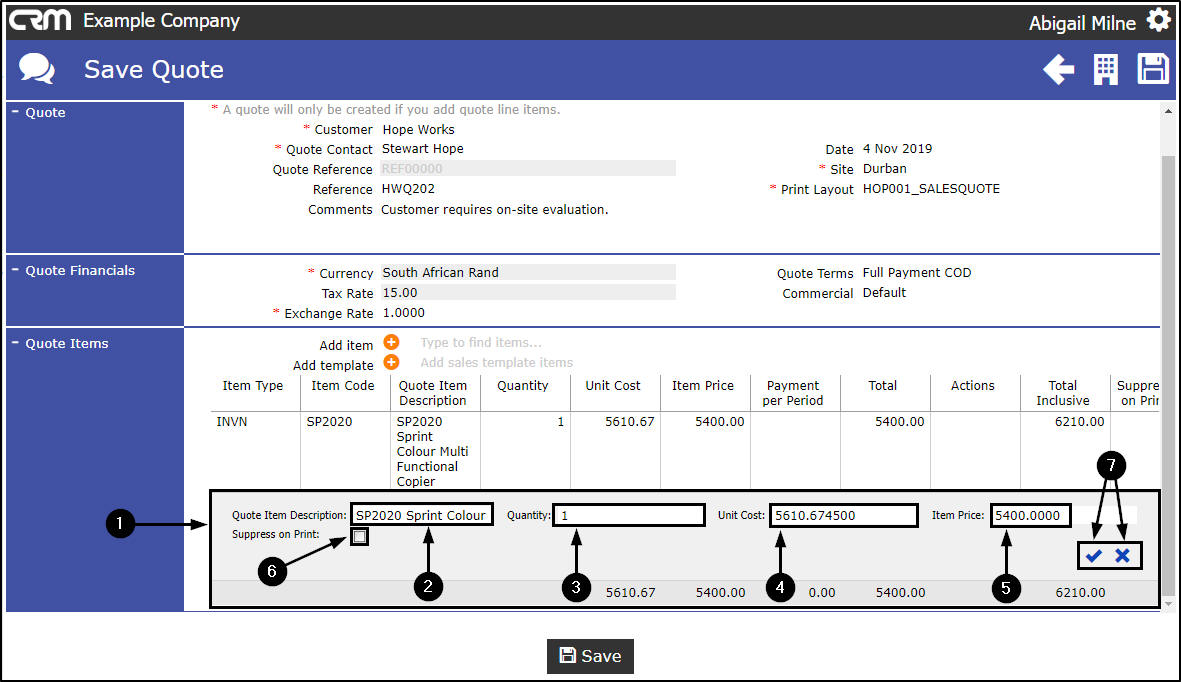
- Click on the Edit button.
- An edit item frame will be displayed.
-
Here you can make changes to the following details:
- Item Description
- Item Quantity
- Item Unit Cost
- Item Price
- Suppress on Print Select this check box if you do not want this line item visible on the printed quote. This will not affect the Sub/Grand Total
- Click on the Apply Changes icon [ ] to save your changes or the the Cancel changes icon [x] to cancel the changes, as required.
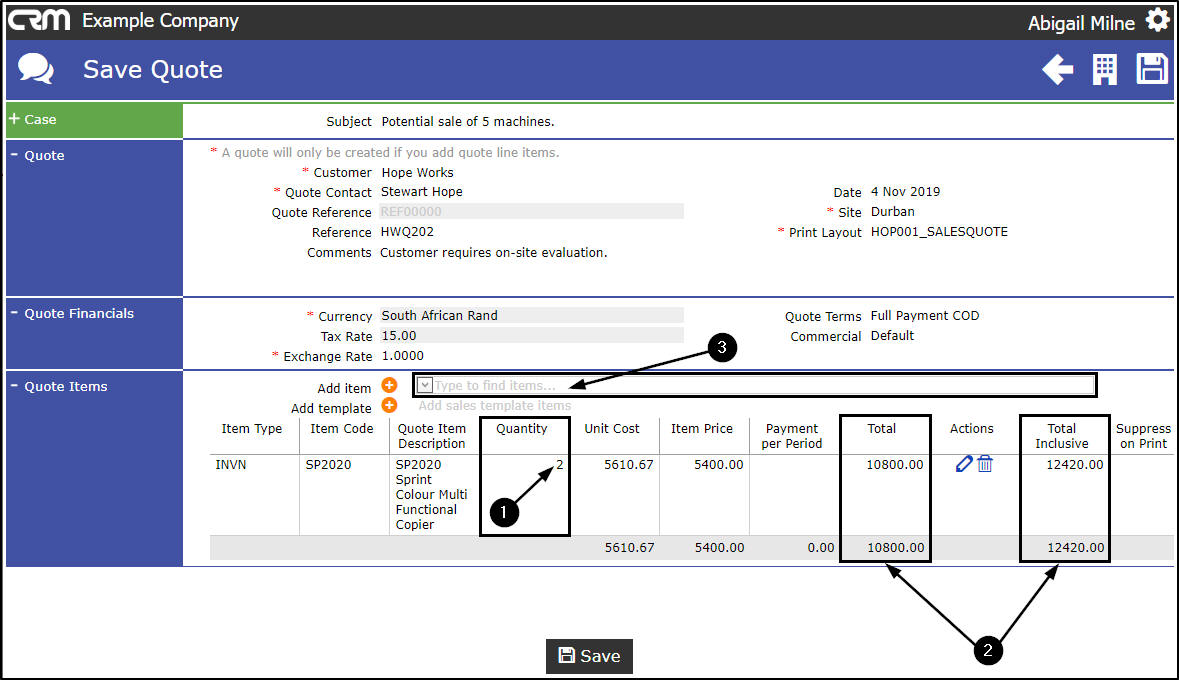
- In this example, the Quantity has been updated to 2.
- The Total and Total Inclusive columns will update accordingly.
Link Additional Quote Items
- In the Add item field, start typing the code or description of the next item that you wish to add to the quote.
- As you start typing in the field, the Type, Code and Description list will again be displayed.
- The system will filter for the item that you are searching for.
- Select the applicable item from this list.
- The additional item code and description will populate the Add item field.
- Click on the plus [+] button.

- The additional item will be added to the Quote Items frame.
- Edit the details, if required.
- The quote Total Inclusive amount will update to include this item.
Save Quote
- When you have finished adding items to the Quote sections, click on Save.
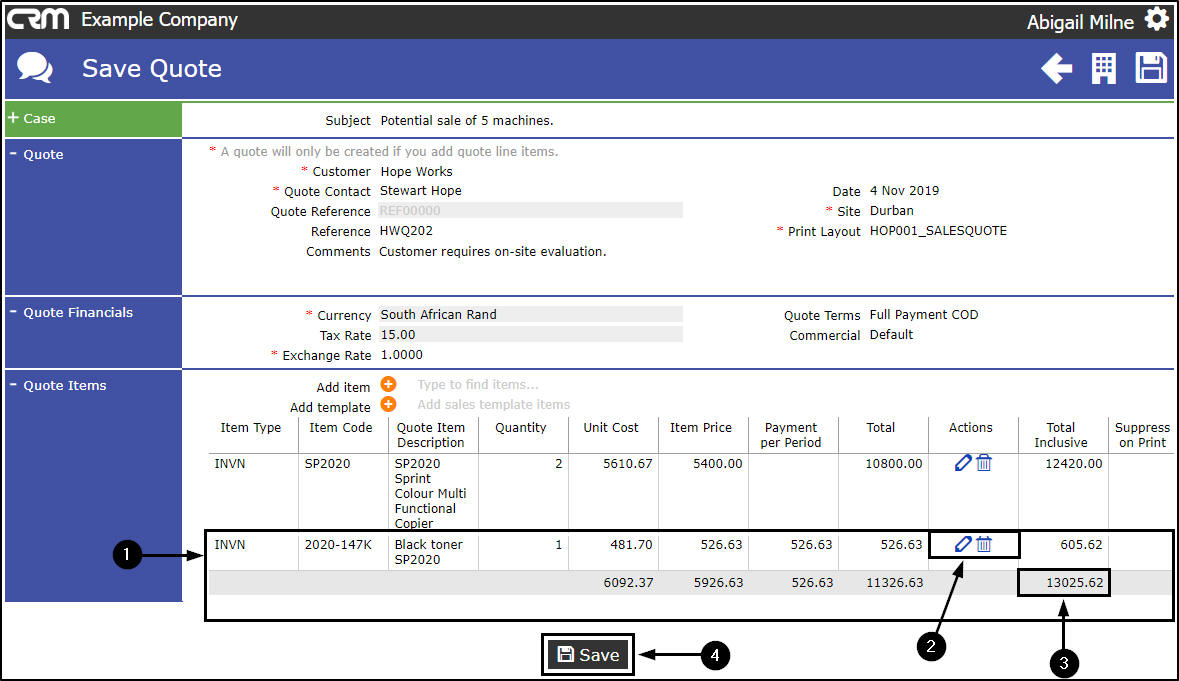
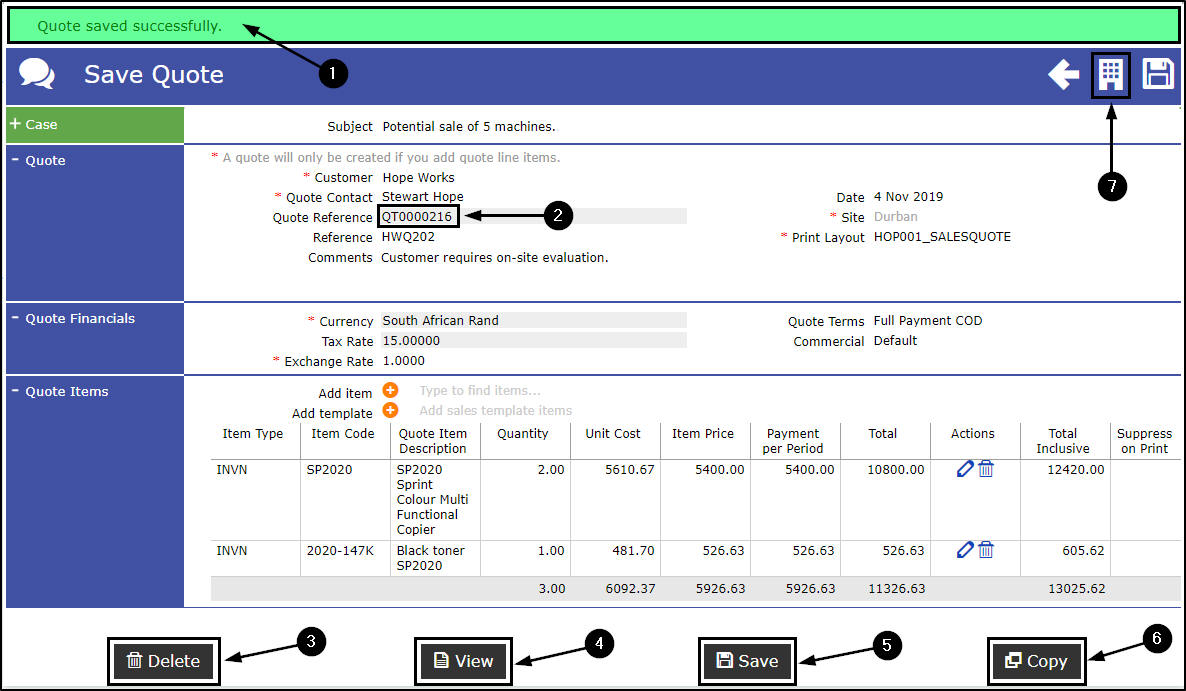
- A message box will appear at the top of the page informing you that:
- Quote saved successfully
- The system will have allocated a Quote Reference Number.
-
There are now 4
processing options available in this page:
- For the purpose of this manual, we have selected the Customers icon to return to the Customer Dashboard (Customer Home page).
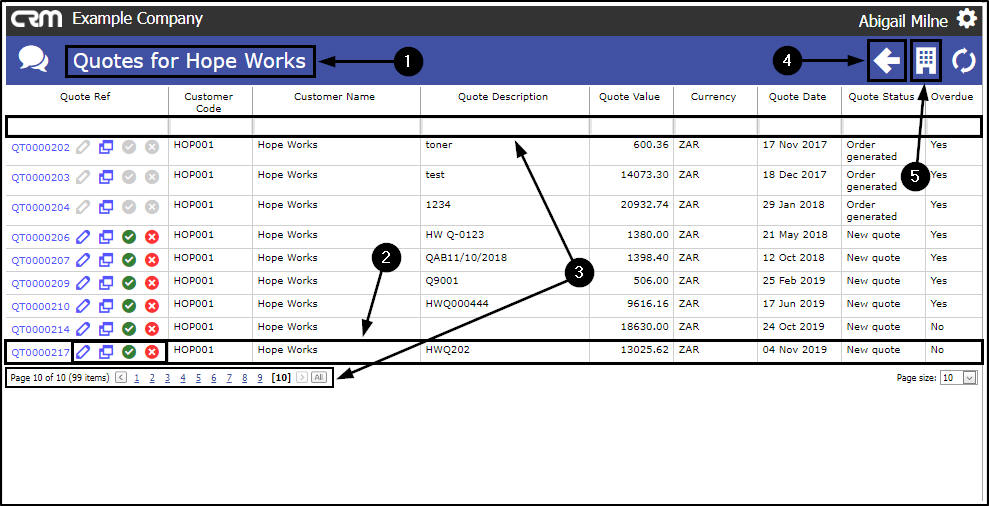
View New Quote from the Customer Dashboard
- In the Customer Dashboard (Customer Home page),
- Click on the Quotes tile.
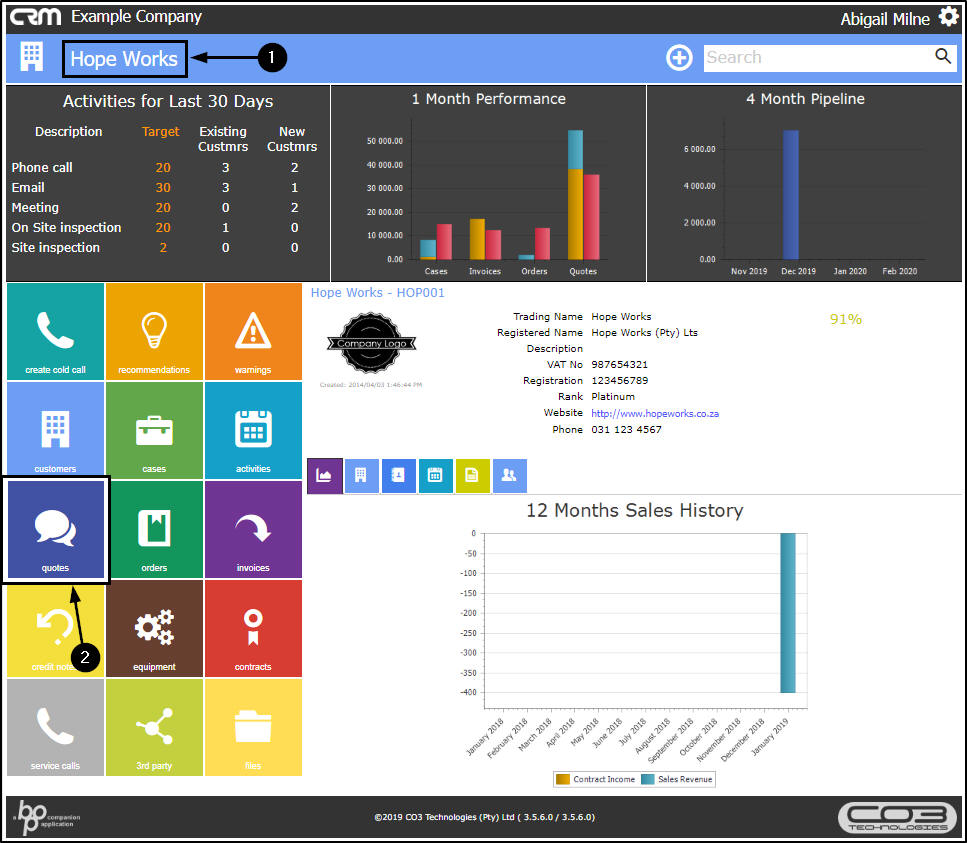
- The Quotes for [selected customer] page will open.
- The quote that you linked to the Case, can still be viewed in this listing page.
- Use the Page Reference field or the Filter Row to search for the quote if it not listed on the first open page.
-
Either
- Click on Back
-
Or
- Click on the Customer icon
-
to return to the
Customer Dashboard (Customer Home page).
View the linked Quote via the Cases tile
- In the Customer Dashboard (Home page),
- Click on the Cases tile.
- The Cases for [selected customer] listing page will open.
- Hover over the Case to display the Action buttons.
- Click on either the View/Edit this Case icon or the View Case Info and History icon.
- Either option will take you to the Save Case page.
- Click on the Expand icon in the Quotes frame.
-
Either
- Click on Back
-
Or
- Click on the Customers icon
-
to return to the
Customer Dashboard (Customer Home page).

View the Entire Case List from the Dashboard (Home page)
- In the Dashboard (Home page),
- Click on the Cases tile.
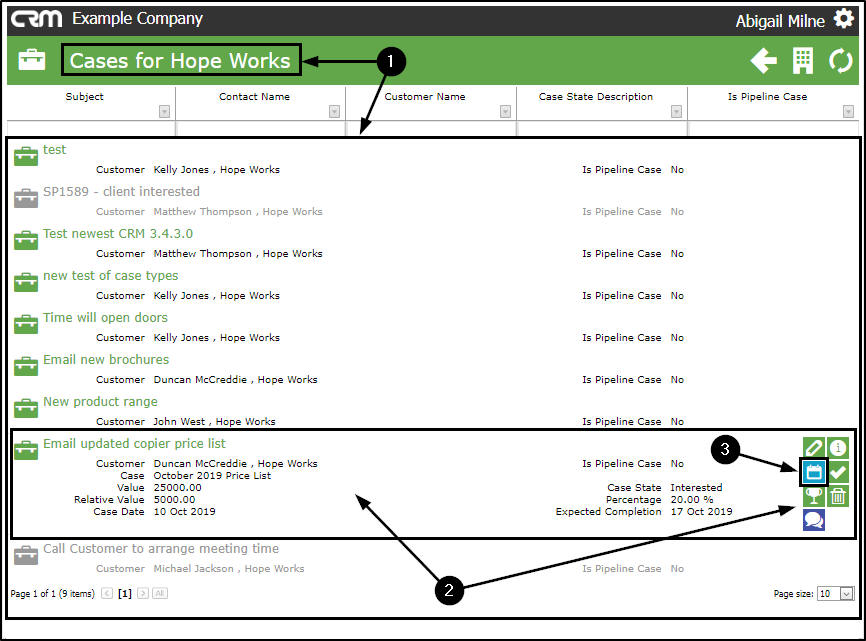
The My Cases listing screen
- The My Cases listing page will be displayed.
- Here you can view the entire case list for all customers.

- Hover anywhere over a case in this list to reveal the Action buttons.
- Single click on a Case to access a quick view summary of the Case information and to view the Action buttons.
- Click on the Case icon to return to the Dashboard (Home page).
CRM.002.004