We are currently updating our site; thank you for your patience.
Sales
Customers - Locations
A Customer Location can be created when using the system to keep track of, and bill clients, on services relating to items that are not serialised assets, e.g. building maintenance / cleaning and hygiene maintenance / security services.
A customer location can be created in the Customer Listing screen or Functional Locations screen.
To add scheduled maintenance tasks to a customer location - you will need to edit the location in the Functional Location screen.
A customer location can be linked to a contract for billing.
| Ribbon Access: Sales > Customers |
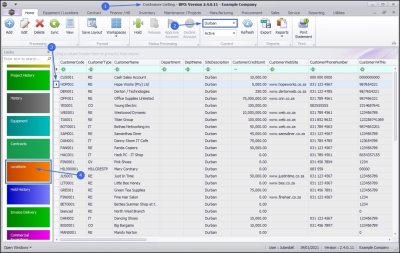
- The Customer Listing screen will be displayed.
- Select the Site where the customer can be located.
- The example has Durban selected.
- Select the row of the customer whose locations you wish to view.
- Click on the Locations tile.
Add Main Location
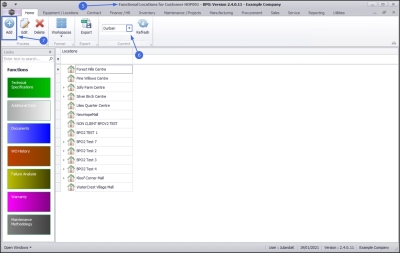
- The Functional Locations for Customer [customer code] screen will be displayed.
- Confirm that the correct Site has been selectFunctional Locations for Customer [ed before continuing.
- Click on Add.
![]() Short cut key: Right click to display the All groups menu list. Click on Add.
Short cut key: Right click to display the All groups menu list. Click on Add.
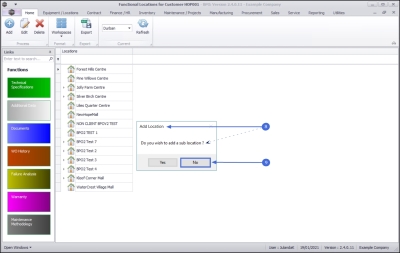
- When you receive the Add Location message requesting;
- Do you wish to add a sub location?
-
Select No for creating the Main Location.
 Note: Select Yes only if you have already set up the main location, and you are creating the sub-locations beneath it.
- The Add new functional location screen will be displayed.
Location Details
- Site: The site will auto populate with your original site selection.
- Location: Type in a description of the Main Location, for example the name of the building name.
- Customer: The customer will auto populate with the name of the customer selected on the Customer listing screen.
- You have the option to change the customer by clicking on the search button, to select an alternative customer, if required.
- Type: Type will link the relevant type items to this location, for example Software, Equipment, etc.
- To select the type, click on the search button to display the Select the type for this Location screen to select and add the type applicable.
- Class: Class will link the relevant class items to this location, for example if you have selected Software as the type, then you can further specify Internal or External software.
- To select the class item, click on the search button to display Select the class for this Location screen, to select and add the relevant class item.
- Category: The category will link the relevant items to categorise this location.
- To select the category, click on the search button to display the Select the category for this Location screen, to select the applicable category.
- Priority: Select the work order priority for this location from 1-5.
Work Order
In the Work Order frame, tick the check boxes, as required:
- Tasks: Tasks for the location will be linked to the task instructions on the Work Order when the check box has been selected, for instance, Clean Machine. Refer to Work Orders - Task Instructions
- WO Notification: A Work Order notification will be sent for scheduled tasks when the check box has been selected. Refer to Work Orders - Maintenance
- WO Default Item: The Default settings will apply to Work Orders for this Customer location, as set out in the Work Order Management. Refer to Introduction to Work Management
Physical Location
In the Physical Location frame:
- Location Lines 1-4: Type in the Address / Location information, as required using the available fields.
Customer Specific Data
- Shipping Address: To select the shipping address, click on the search button to display the Select the shipping address for this customer screen, to select and add the shipping address for the location.
-
A new company config flag (AutoUpdateShippingAddress) is available in BPO2 v2.5.0.8 (or higher) / Nucleus Service to control automated shipping address updates in the system between contract items and equipment shipping addresses/ functional location shipping address and ensures the shipping address correlates to contract items shipping address. When you update the shipping address on a contract the shipping address will reflect on the asset or functional location. If the user updates the asset or functional location’s shipping address, the shipping address will reflect on the contract item.
- SLA Hours
 This is the Service Level Agreement that you have signed with your customer. It is a contract of performance that you have agreed to. For example, if your customer calls with a requirement for a part or service request and your agreed response time to this customer (SLA) is 5 hours then you are required to have the part or technician on site within that time frame.
receive compensation of a pre-agreed type (usually also set up in the SLA).: Specify the Service Level Agreement for the Customer Main Location.
Save Location
- When you have completed adding the information for the Main Location, click on Save.
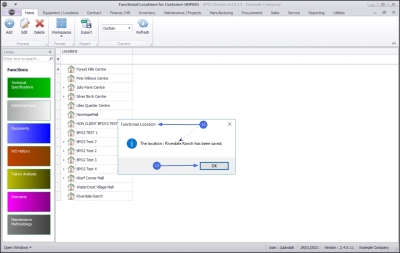
- When you receive the Functional Location message informing you that;
- The location: [functional location name] has been saved.
- Click on OK.
- You can now view the newly added location in the Functional Locations for Customer screen.
Add Sub-Location
To set up a second level of Locations,
- From the Functional Locations for Customer [customer code] screen,
- Ensure that the correct Site has been selected.
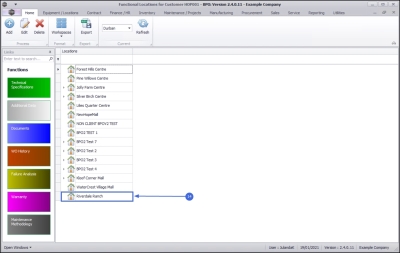
- Select the row of the main location you wish to ad d a sub location(s) to.
- The example has Riverdale Ranch selected.
- Click on Add.
![]() Short cut key: Right click to display the All groups menu list. Click on Add.
Short cut key: Right click to display the All groups menu list. Click on Add.
-
When you receive the Add Location message requesting;
- Do you wish to add a sub location?
- Click on Yes.
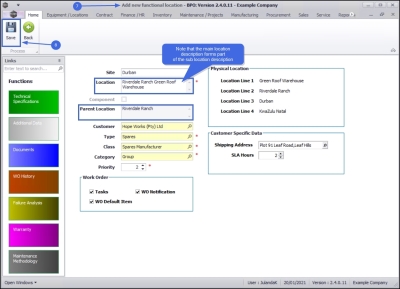
- The Add new functional location screen will be displayed.
Add Sub-location Details
Update the details for the Sub-location as you would for the Main Location.
- Location:
 When entering the location for a sub-location, it will help you to identify it later if the Main Location description forms part
of the Sub-location description.
 - Parent Location: This field will auto populate with the Main Location you initially selected.
Work Order
In the Work Order frame, tick the check boxes, as required:
- Tasks: Tasks for the location will be linked to the task instructions on the Work Order when the check box has been selected, for instance, Clean Machine. Refer to Work Orders - Task Instructions
- WO Notification: A Work Order notification will be sent for scheduled tasks when the check box has been selected. Refer to Work Orders - Maintenance
- WO Default Item: The Default settings will apply to Work Orders for this Customer location, as set out in the Work Order Management. Refer to Introduction to Work Management
Save Sub-location
- When you have finished updating the Sub-location details, click on Save.
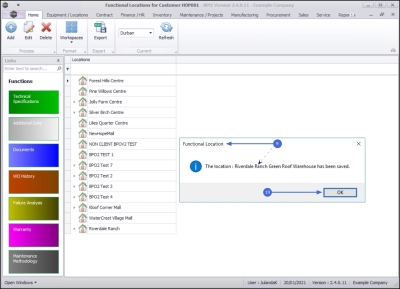
- When you receive the Functional Location message to confirm that;
- The location: [functional sub-location name] has been saved.
- Click on OK.
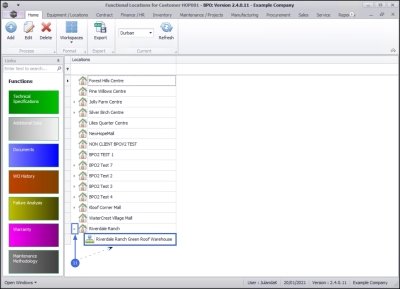
- Click the expand icon next to the Main Location to view the Sub-location you have created.
- Continue adding sub-locations as required, until you have your whole set up completed.
- Note 1: Make sure you have selected the correct Main (Parent) Location before adding a Sub-location.
- Note 2: You only need to link the Main Location, if you are going to add this location tree, to a contract.
Edit Location
Changes can be made to a Main Location, Parent or Sub-location.
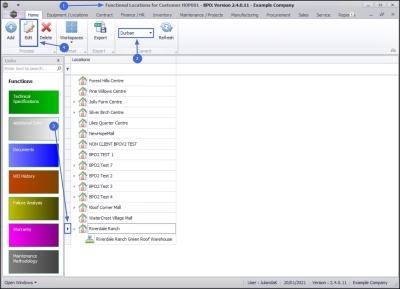
- From the Functional Locations for Customer [customer code] screen,
- Ensure that the correct Site has been selected.
- Select the row of the Main, Parent or Sub-location that you wish to edit.
- Click on Edit.
![]() Short cut key: Right click to display the All groups menu list. Click on Edit.
Short cut key: Right click to display the All groups menu list. Click on Edit.
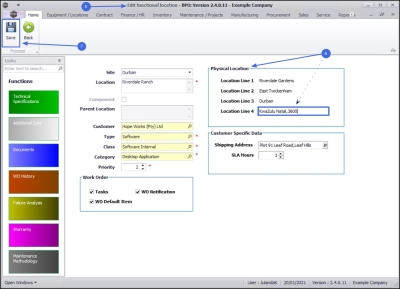
- The Edit functional location- [customer code] screen will display.
- Make the necessary changes to the location information as required.
- The example has an addition to the Physical Location, Line 4.
- Click on Save to update the Location information.
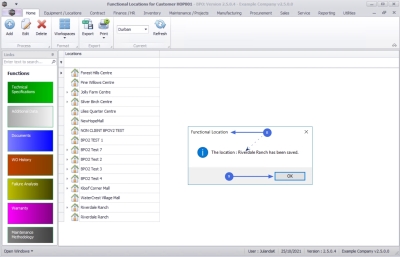
- When you receive the Functional Location message to confirm;
- The location : [functional location name] has been saved.
- Click on OK.
Delete Location
- Note that you will not be able to remove / delete a Customer Location with;
- Open Work Orders or Active Contracts linked to it,
- or a Parent Location with Sub-Locations.
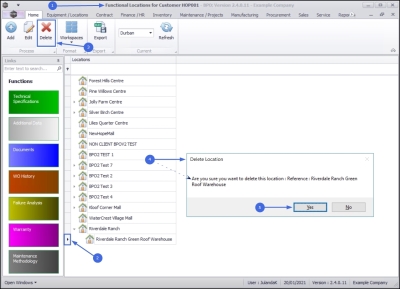
- From the Functional Locations for Customer [customer code] screen,
- Select the row of the Customer Location that you wish to remove.
- The image has Riverdale Ranch Green Roof Warehouse selected.
- Click on Delete.
![]() Short cut key: Right click to display the All groups menu list. Click on Delete.
Short cut key: Right click to display the All groups menu list. Click on Delete.
- When you receive the Delete Location message to confirm;
- Are you sure you want to delete this location: [functional location name]
- Click on Yes if you are certain about your selection.
Customer Location Service History Report
The service history report displays the activities done for a location. This report can also be generated from the Call Listing screen. ![]() Refer to Calls - Functional Location Service History Report
Refer to Calls - Functional Location Service History Report
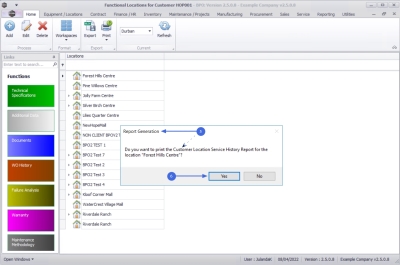
- From the Functional Location for customer [customer code] screen,
- Click on the row of the customer location you wish to print the service history report for.
- Click on Print.
- Click on Customer Location Service History.
- When you receive the Report Generation message to confirm;
- Do you want to print the Customer Location Service History Report for location "[location name]"?
- Click on Yes.
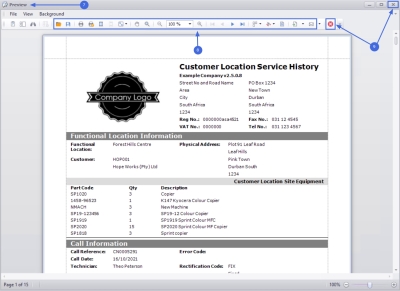
- The Customer Location Service History Report will display in the Report Preview screen.
- From this screen you can make cosmetic changes to the document, as well as Save, Zoom, Add a Watermark, Export or Email the Customer Location Service History Report.
- Click on Close to return to the Functional Location List screen.
Functions Tiles
The Customer Locations screen has its own set of Functions tiles that direct you to additional information related to the Customer Location.

|
The Technical Specifications tile directs you to technical information about the customer location. This information can include; the Number of Floors, the Building Type, Security Access, etc. Refer to Functional Location Technical Specifications |

|
The Additional Data tile directs you to 10 additional fields where further information related to the customer location can be entered. Refer to Functional Locations Additional Data |

|
The Documents tile directs you to a list of all the digital documents that have been linked to the customer location. Refer to Functional Location Documents |

|
The Work Order History tile directs you to a list of all Work Orders linked to the customer location. From the Work Orders for location screen you can Add, Edit, Delete, Close and Complete a work order. Refer to Functional Location Work Order History |

|
The Failure Analysis tile directs you to a list all the failures logged against the customer location. Refer to Functional Location Failure Analysis |

|
The Warranty tile directs you to the Warranty for Functional Location screen. If there is a warranty linked to this customer location, the details will be displayed here. Refer to Functional Location Warranty |

|
The Maintenance Methodology tile directs you to all the Maintenance Methodology tasks linked to the customer location, with the dates of the Last and Next Performance displayed. Refer to Functional Location Maintenance Methodology |
MNU.061.018

