Sales
Invoices - Edit Sales Invoice
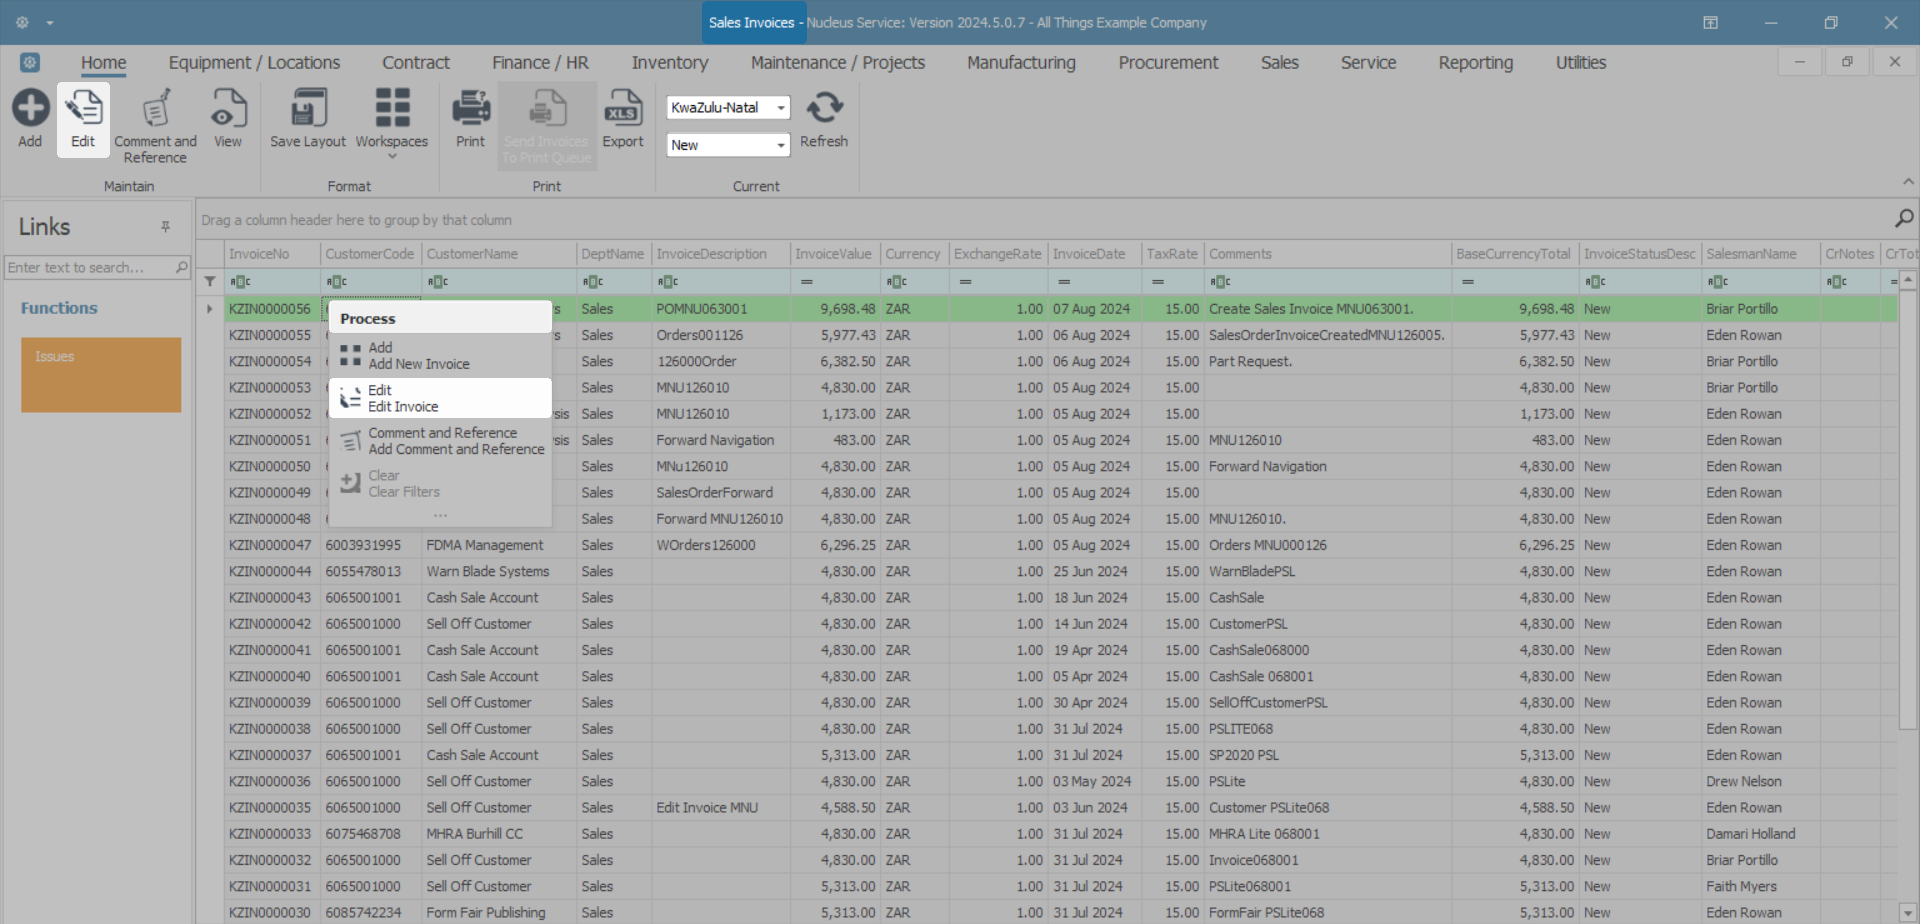
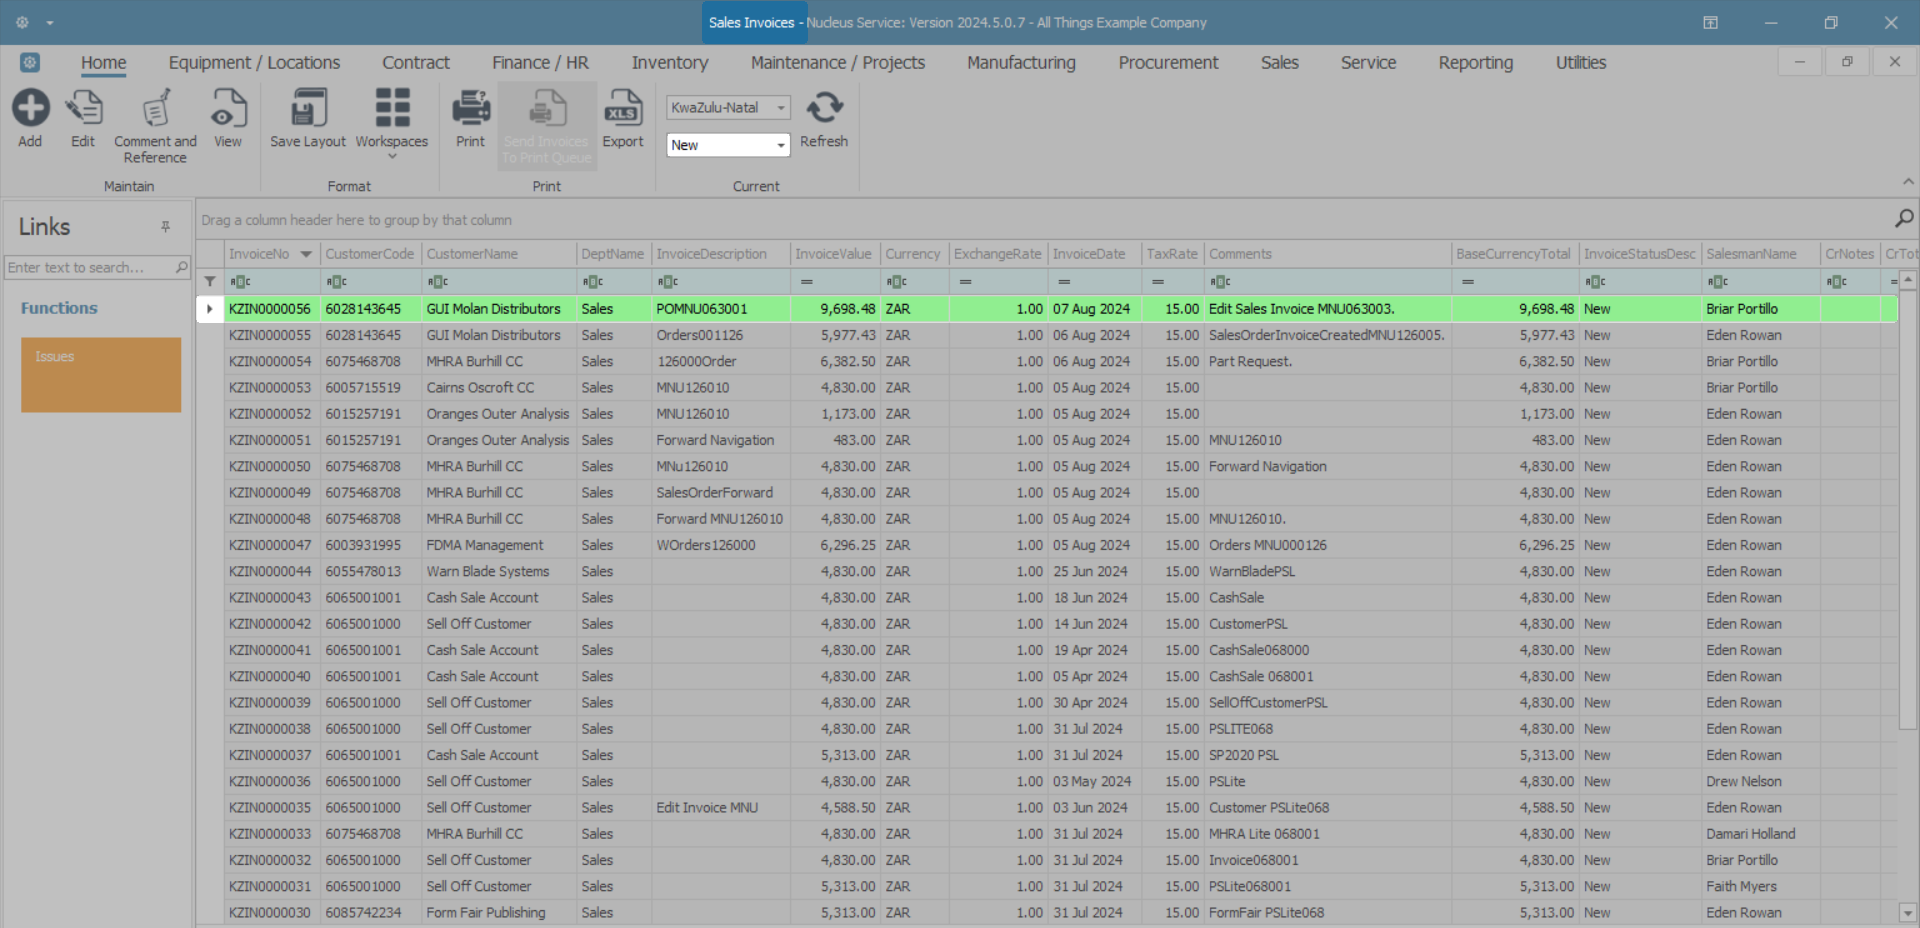
Ribbon Select Sales > Invoices

- The Sales Invoices listing screen will be displayed.
- Select the Site where the invoice was created.
- The example has KwaZulu-Natal selected.
- To edit an Invoice, ensure that the Status is set to New.
- Select the row of the invoice you wish to edit.
- Click on Edit.
![]() Short cut key: Right click on a selected row in the data grid to display the Process menu list. Click on Edit.
Short cut key: Right click on a selected row in the data grid to display the Process menu list. Click on Edit.
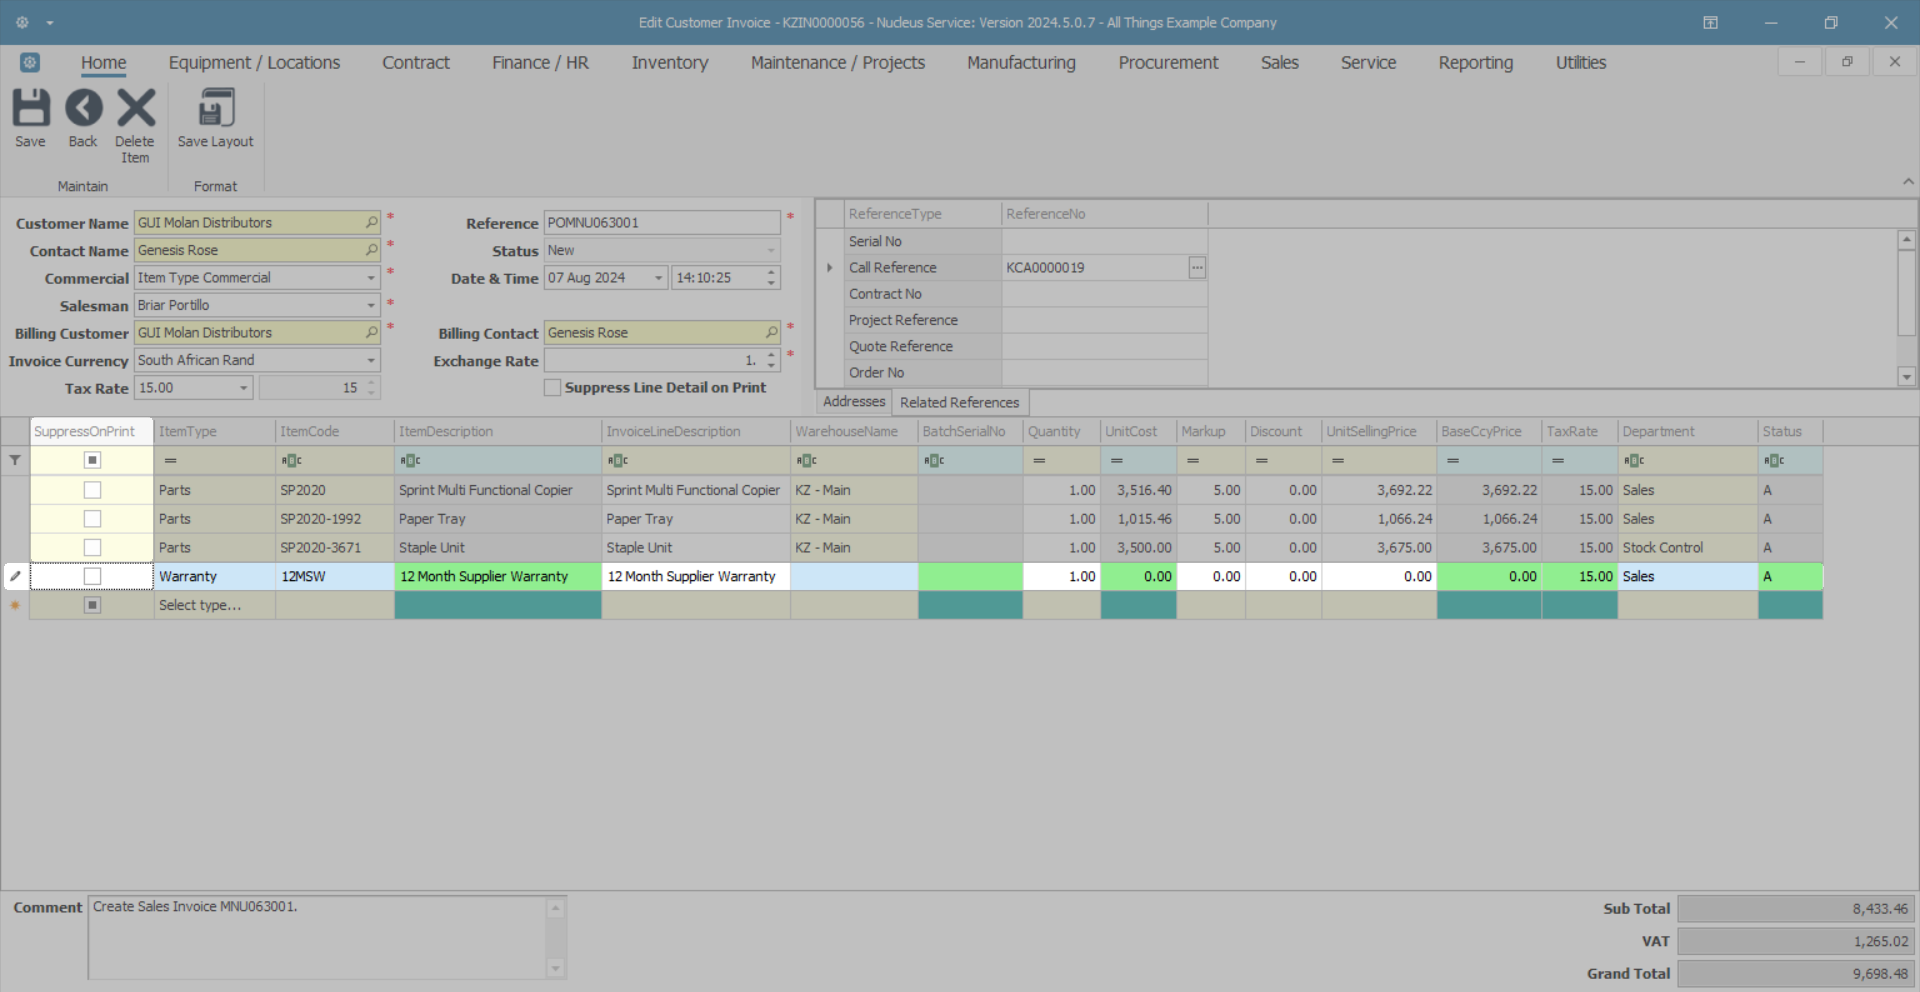
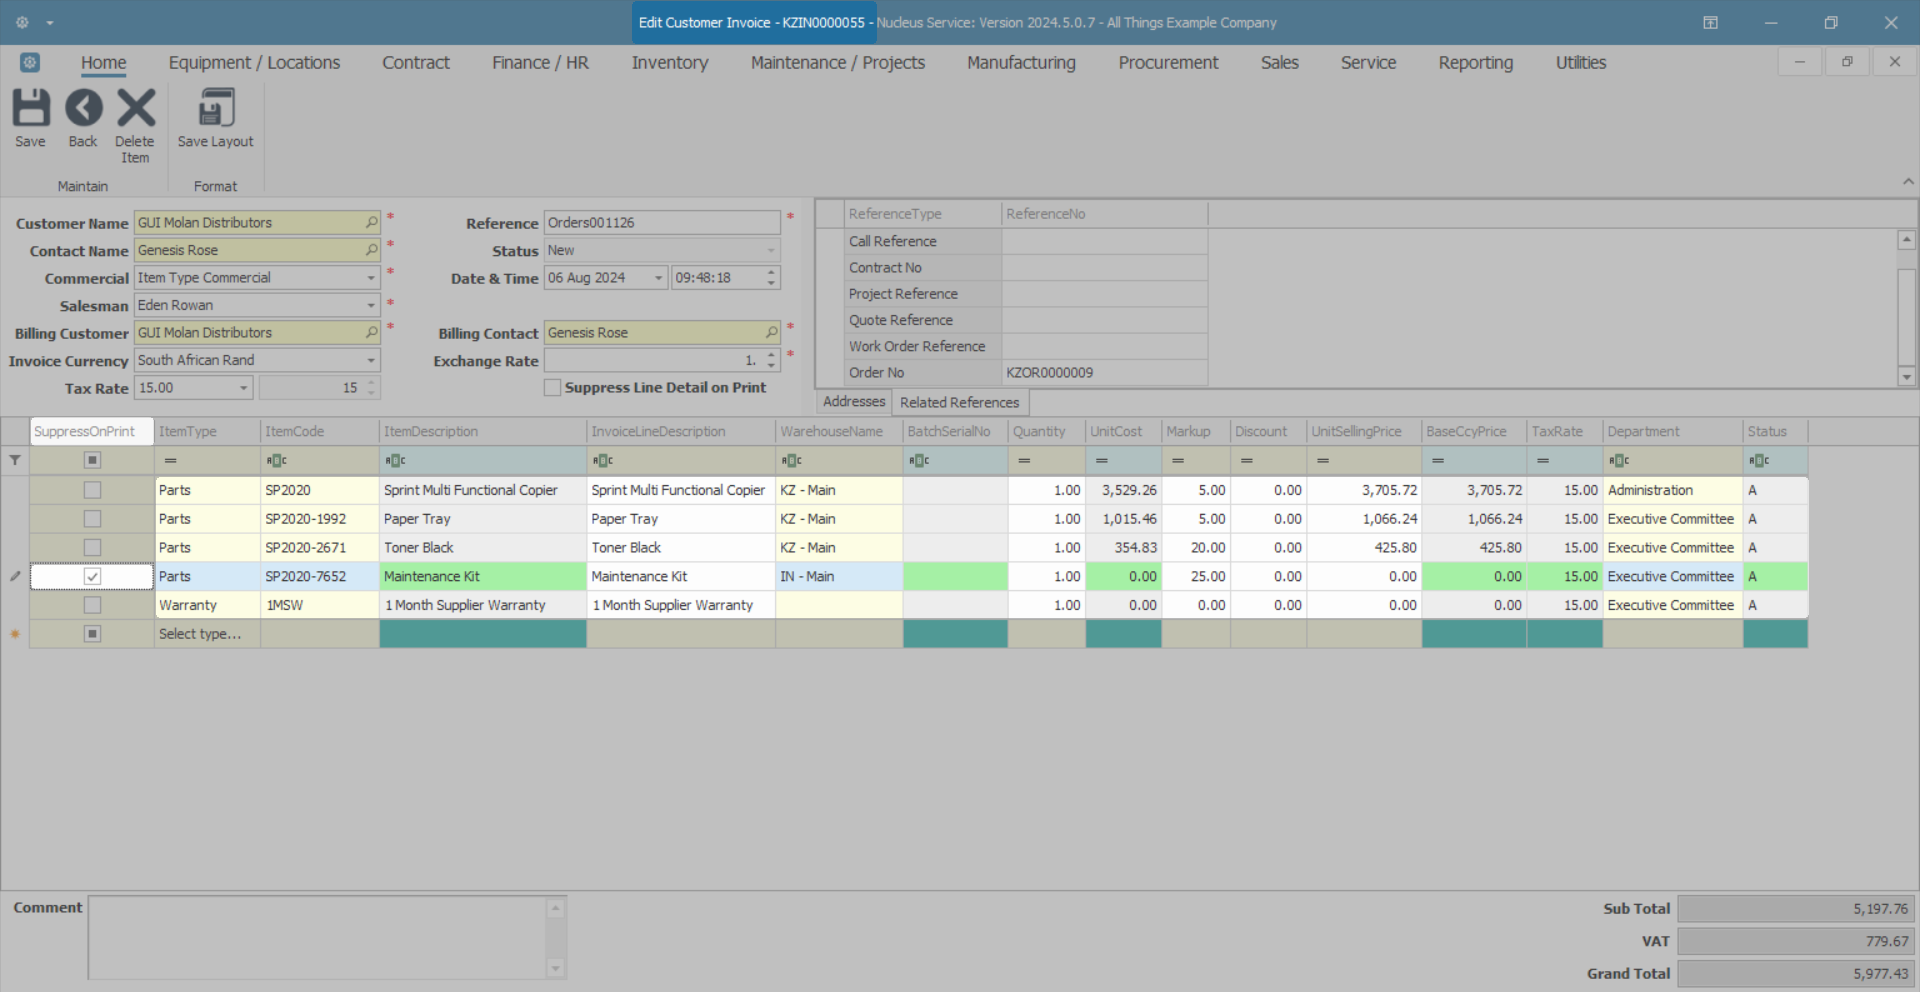
Invoice Header
- Customer Name: Click on the search button to select an alternative customer name.
- Contact Name: Click on the search button to select an alternative contact person at the Customer.
- Commercial: This is the default commercial configured for the customer. Click on the drop-down arrow to select an alternative commercial from the list.
- Salesman: Click on the drop-down arrow to select an alternative salesman from the list.
- Billing Customer: Click on the search button to select and alternative Billing Customer.
- Reference: Click in the text box to update the reference number.
- Status: This field will display New for New Invoice by default and cannot be modified.
- Date and Time: The date and time the Invoice was created will display.
- To change the date, type in or click on the arrows to select an alternative date using the Calendar function.
- To change the time, type in or click on the arrow indicators to adjust the time.
- Billing Contact: Click on the search button to select an alternative billing contact from the drop-down list.
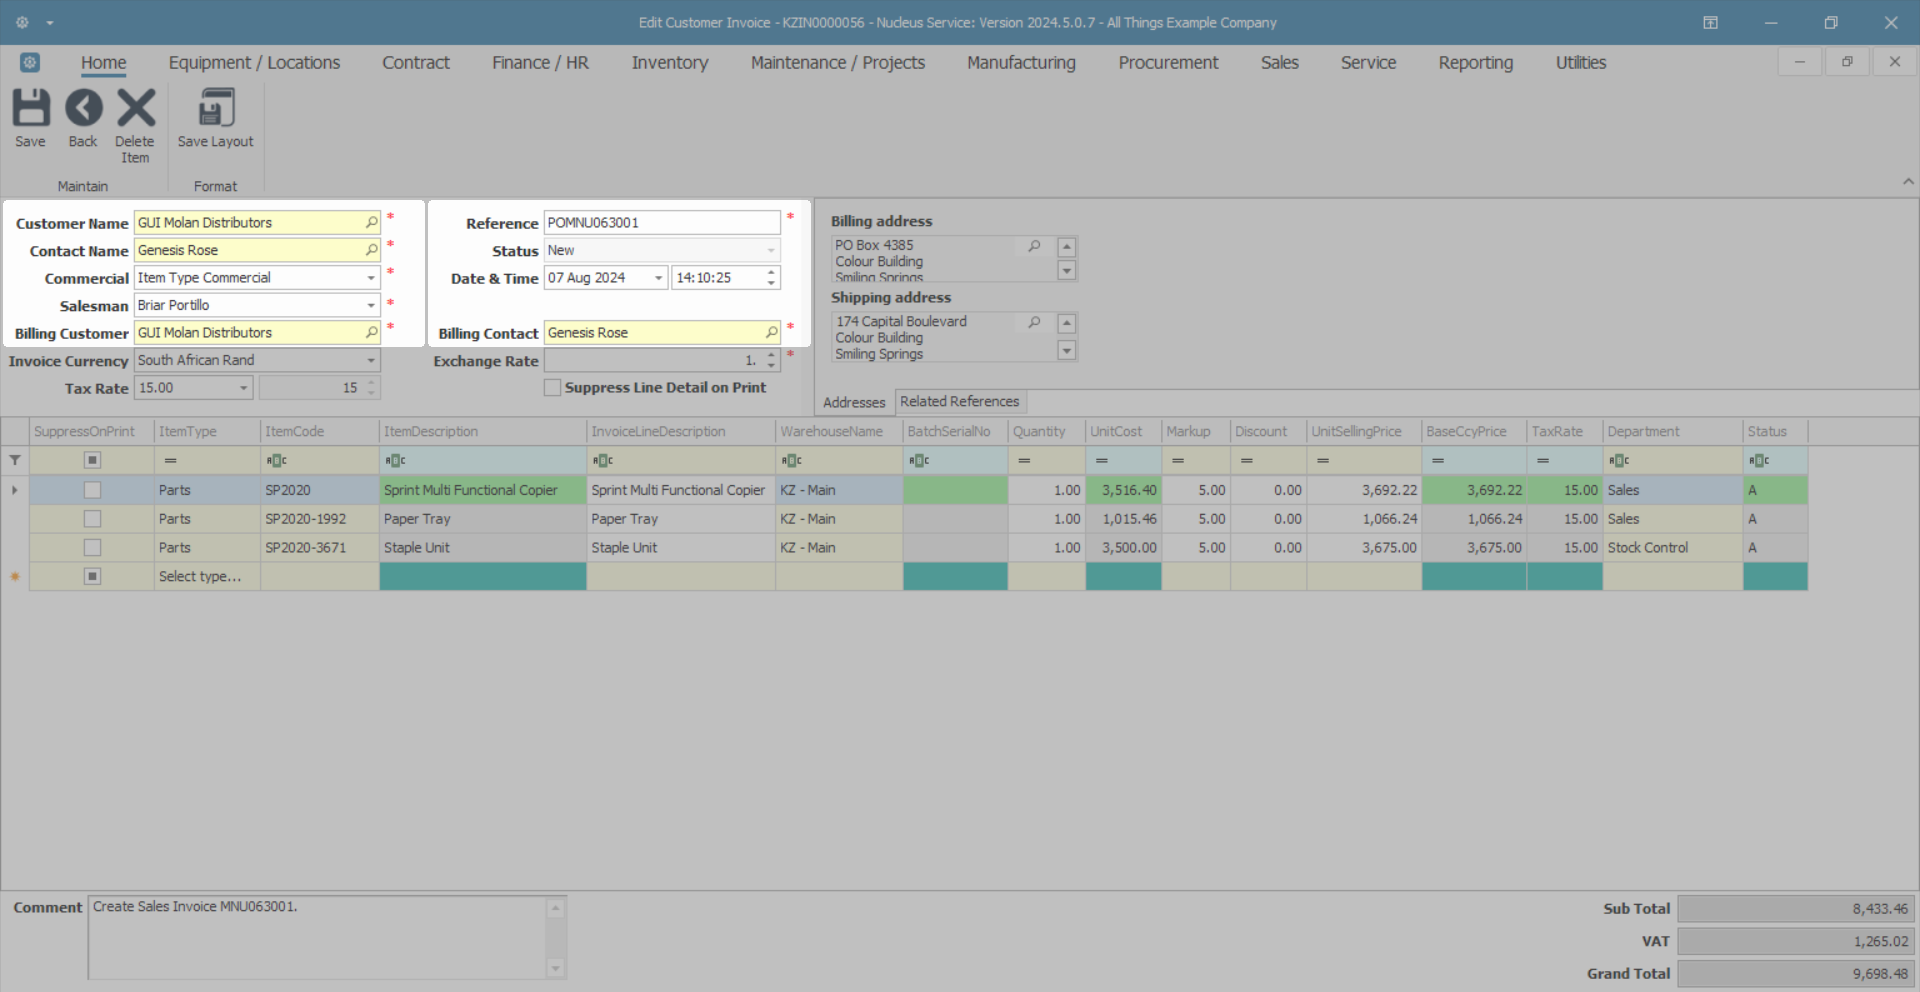
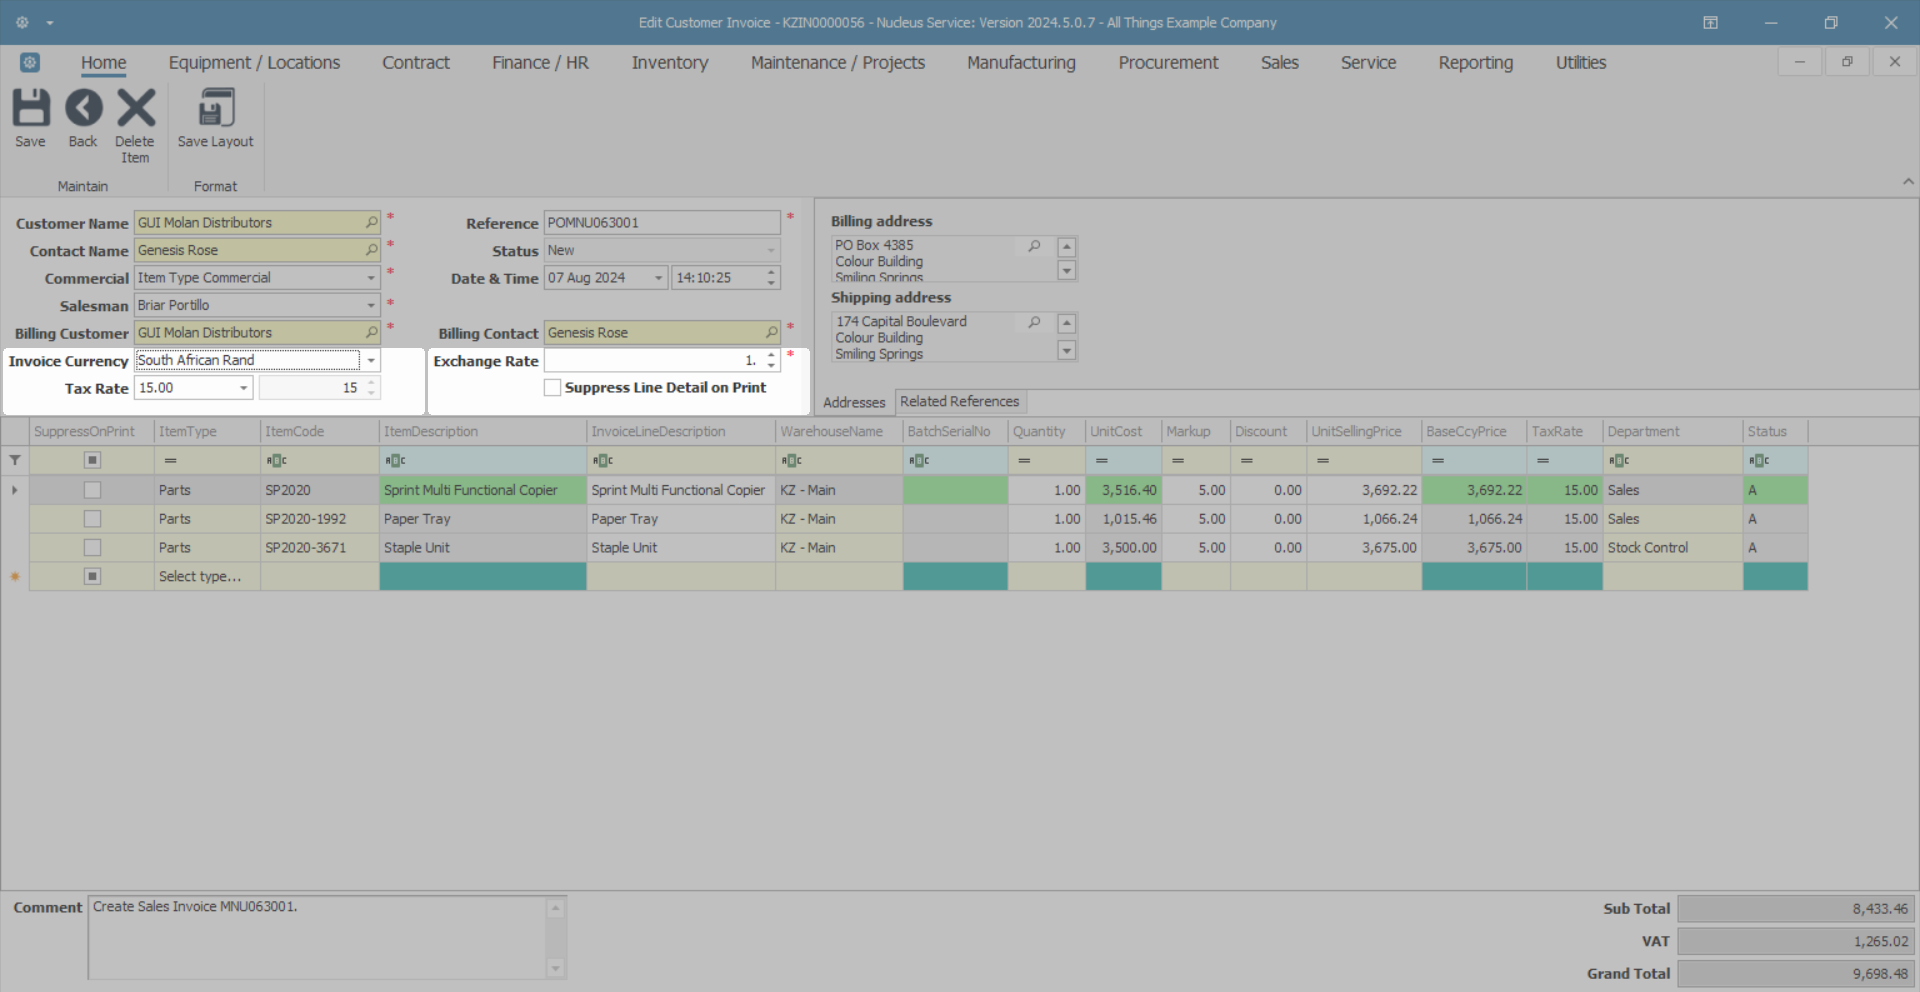
Financial Header
- Invoice Currency: Click on the search button to select a different currency, if required.
- Tax Rate: Click on the drop-down arrow to change the tax rate, if required.
- Exchange Rate: Use the direction arrows to increase or decrease the exchange rate as required.
- Suppress Line Detail on Print: Click the check box to hide the Selling Price and to only show the invoice totals.
 This field cannot be edited after the invoice has been printed.
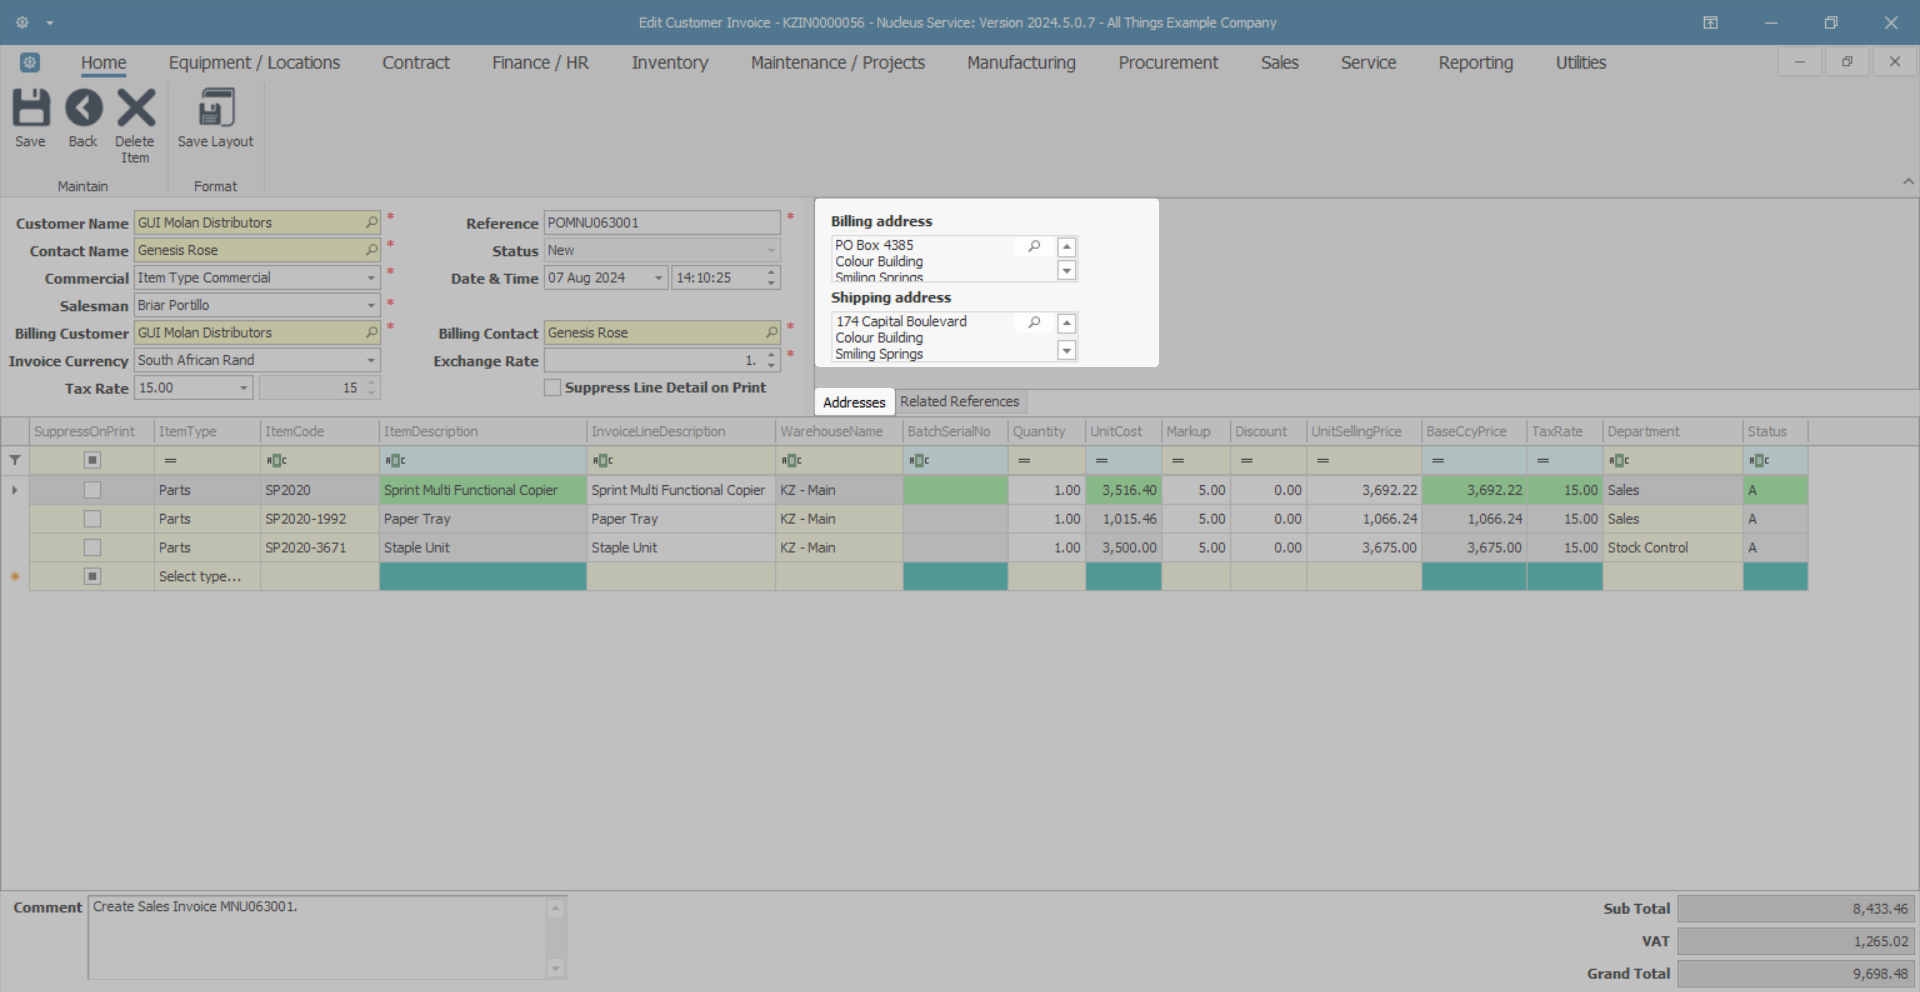
Addresses Tab
![]() If the Billing or Shipping Address does not list for the Customer, then you need to
Customers - Addresses to the customer details before linking it to the invoice.
If the Billing or Shipping Address does not list for the Customer, then you need to
Customers - Addresses to the customer details before linking it to the invoice.
- Billing Address
 A billing address is the address connected to the payment method.: To change or add the billing address, click the search button to select a Billing Address.
 - Shipping Address A shipping address is the address where an order will be sent.: To change or add a shipping address, click on the search button to select a Shipping Address.
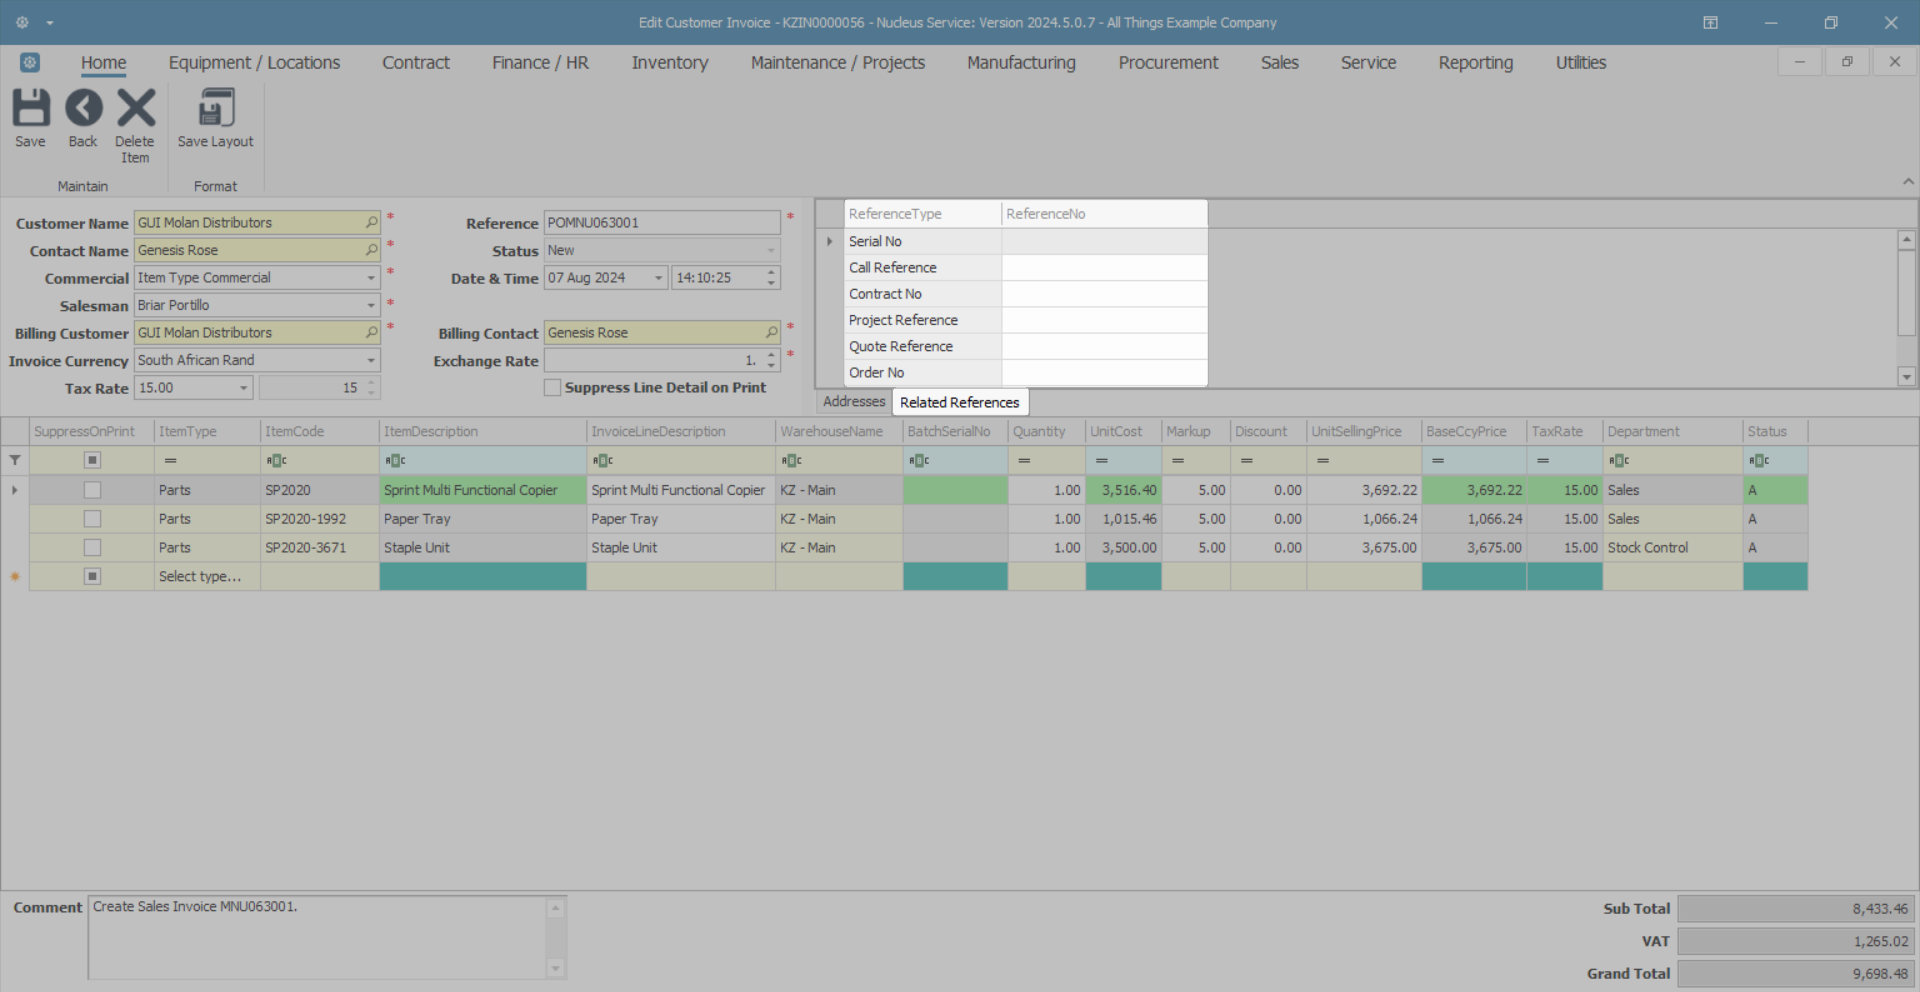
Related Reference Tab
- Click on the Related References tab to display the Reference Type and Reference Numbers. The reference types that have references linked will have the reference numbers listed.
- The example has no reference information linked to the Sales Invoice and therefore the reference fields will be blank.
 If the invoice is linked to a Call or a Project, then the Call or Project Reference Number will be listed.
- The example has no reference information linked to the Sales Invoice and therefore the reference fields will be blank.
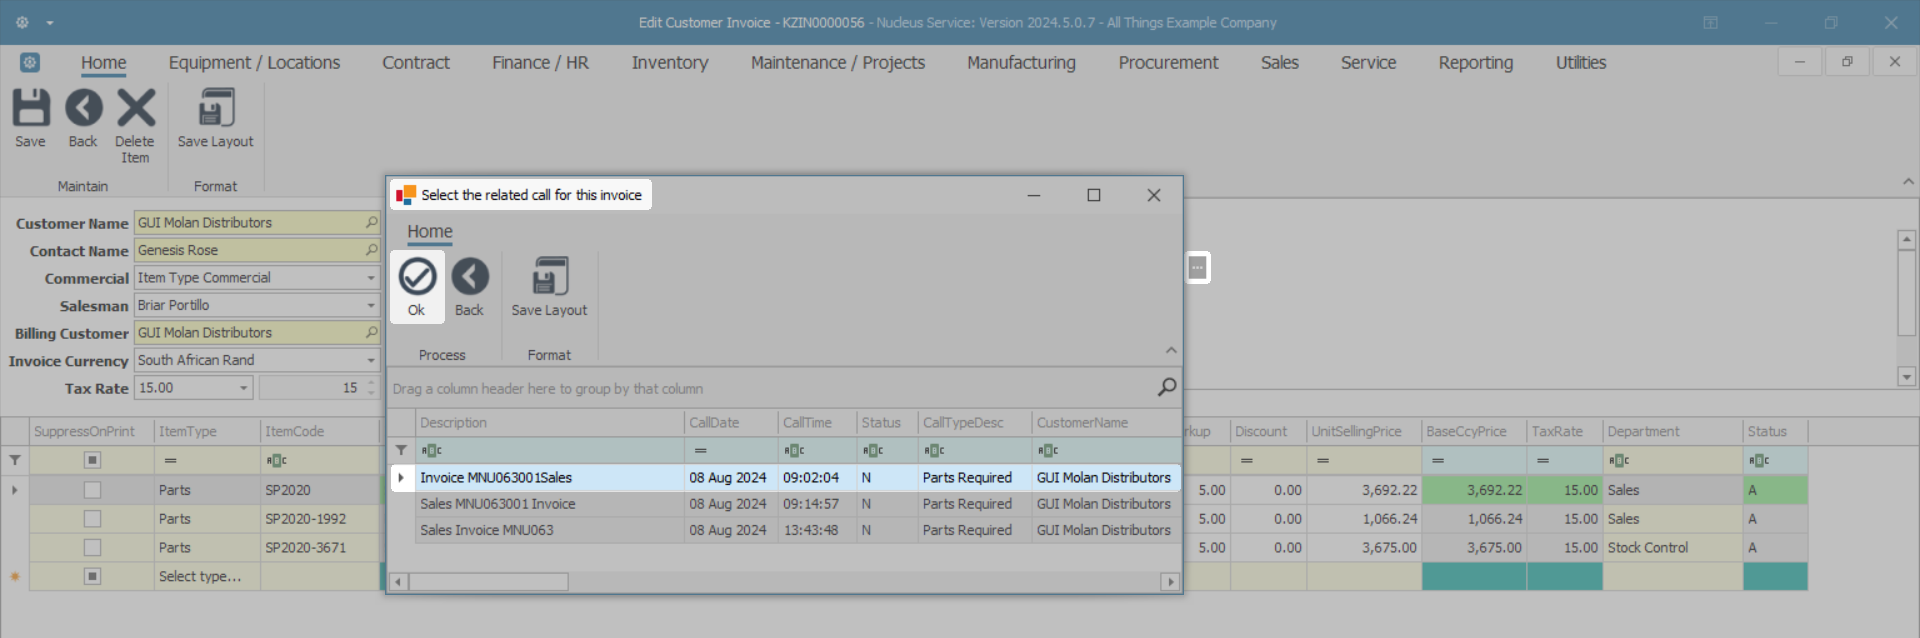
Link Reference(s)
- Click in the ReferenceNo field of the Reference Type you wish to link to this invoice, to display the ellipsis button.
- Click on the ellipsis button to display the Select the related [reference type] for this invoice screen.
- The example has Call reference selected and therefore the "Select the related call for this invoice" screen is displayed.
- Select the row of the reference type you need to link to the invoice.
- Click on OK.
- Click on the ellipsis button to display the Select the related [reference type] for this invoice screen.
![]() More than one reference can be linked to an Invoice. Continue to add the additional references to the invoice as required.
More than one reference can be linked to an Invoice. Continue to add the additional references to the invoice as required.
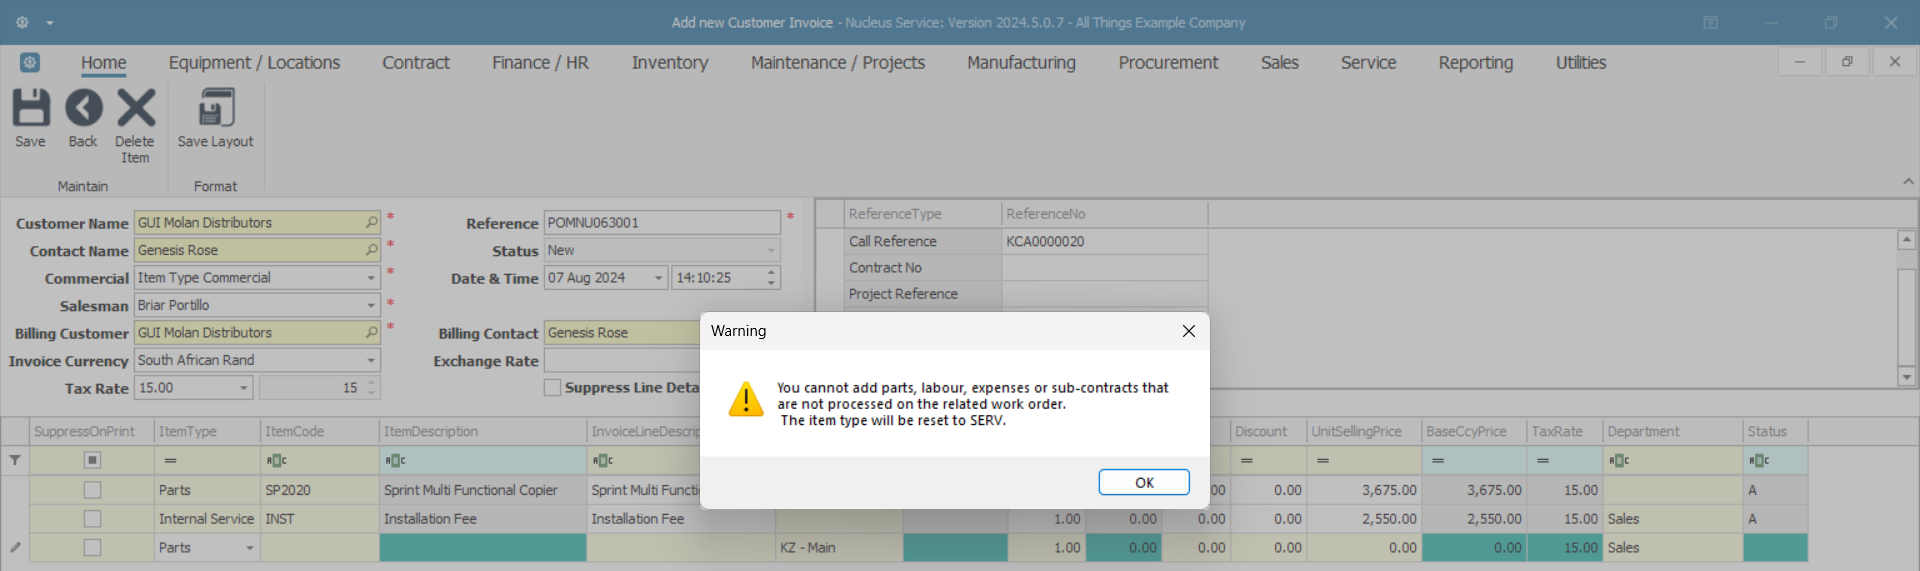
If there is a Reference Type linked to the invoice, the Parts/Items data grid will populate based on the related Reference Type.
 You will receive a Warning message if you attempt to add parts to a linked invoice.
-
 Remember:
- - Parts, Labour, Sub-Contracts and Expenses must be logged against the call before invoicing. These items cannot be added to the invoice.
- - Internal Services, Travel and Warrantiescan be added to the invoice.
Refer to Calls - Create Invoice, Work Orders - Invoices,
If there is no Reference Type linked to the invoice, continue with the process below to add the Item Types to the Invoice.
Edit Invoice Items/Parts
Add Invoice Item line
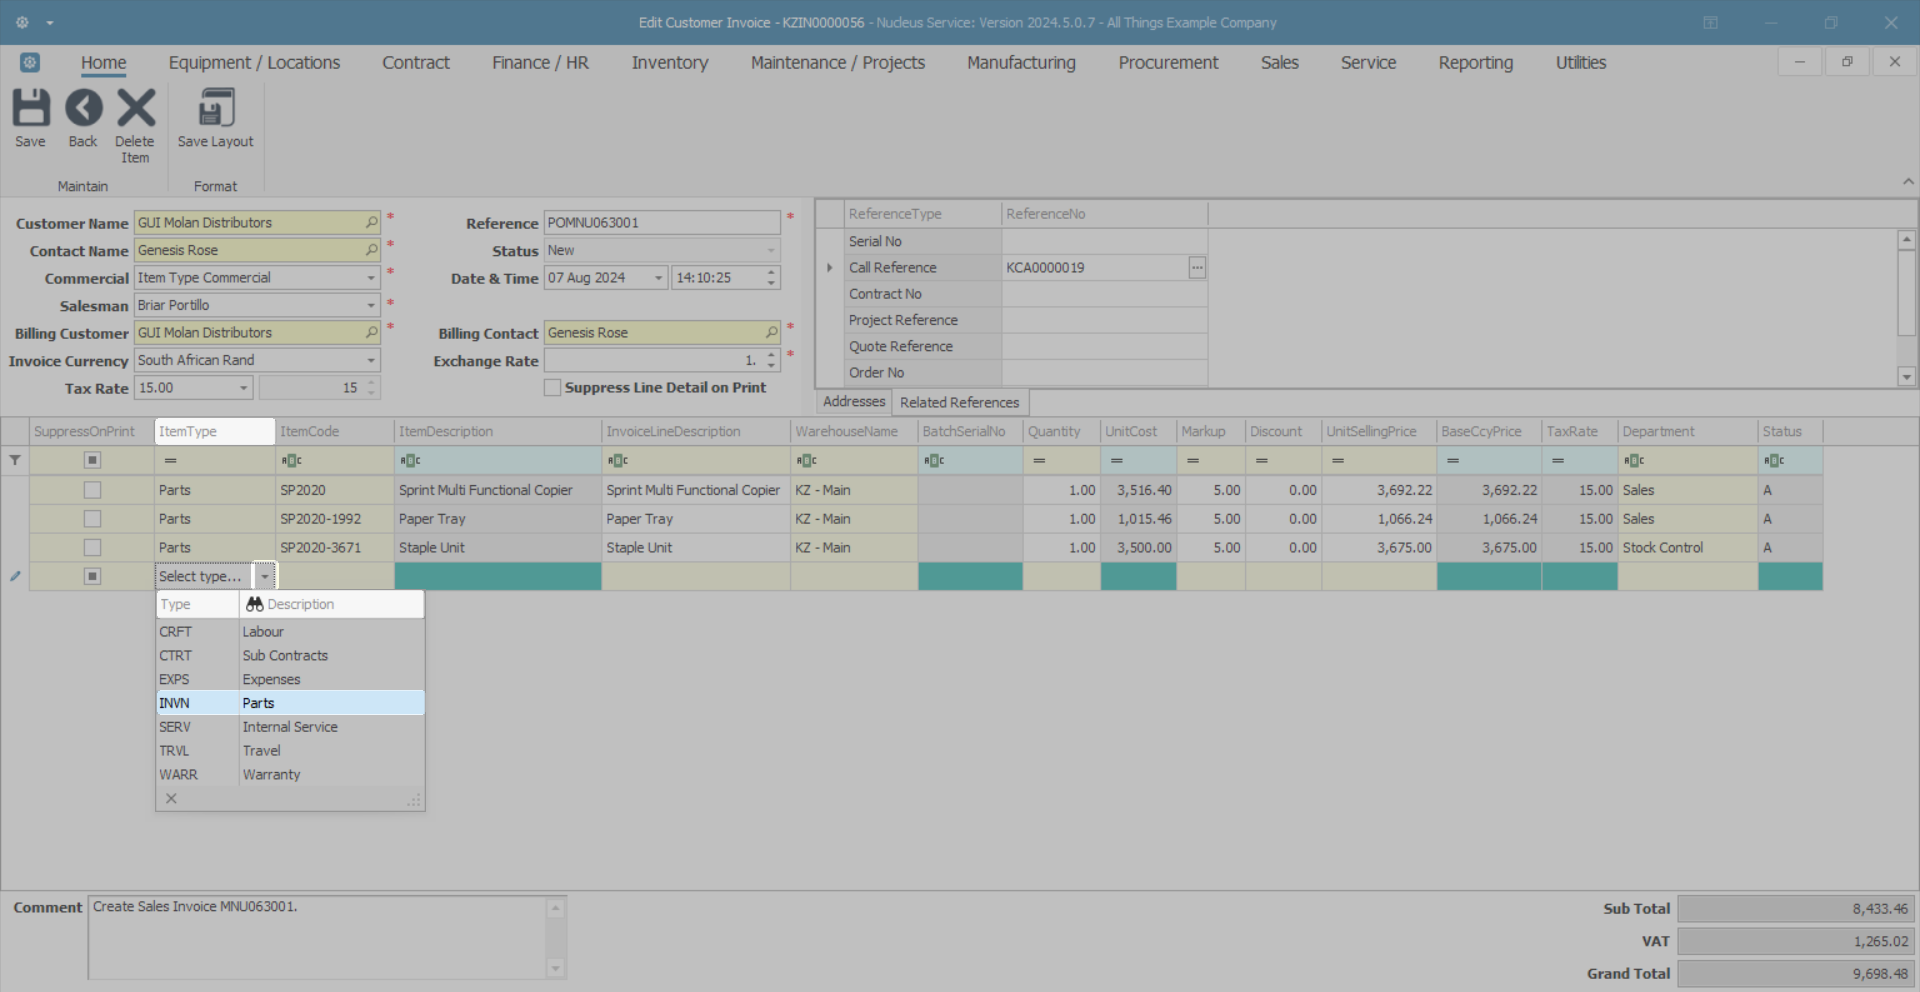
- Click anywhere in the item line data grid or press Tab at the end of the previous item line to display the next available line.
- Click on the Select type field to choose the Item type from the drop-down list.
CTRT (Third Party Labour/Service) cannot be selected for a POS Invoice, as the 'Subcontractor Purchase Process' must be followed by following the New Deal Sale process and then the Non-Stock (Subcontract) Purchase.
- Continue to Add Invoice Items/Parts as required.
Edit Markup, Discount and Unit Selling Price
- The Markup, Discount and Unit Selling Price is updated from the Commercial Details set up when you Commercials - Add Commercial to the customer. You can however make changes, by typing a new Markup or Discount percentage or modify the Unit Selling Price, where applicable.
Suppress Details on Invoice
- Click on the Suppress On Print check box of the item that you do not want to display on the printed Sales Invoice.
- The Sub/Grand Total will not be affected, but the selling prices that are visible will not match up with the invoice totals. This cannot be edited after the invoice has been printed.
- The Sub/Grand Total will not be affected, but the selling prices that are visible will not match up with the invoice totals.
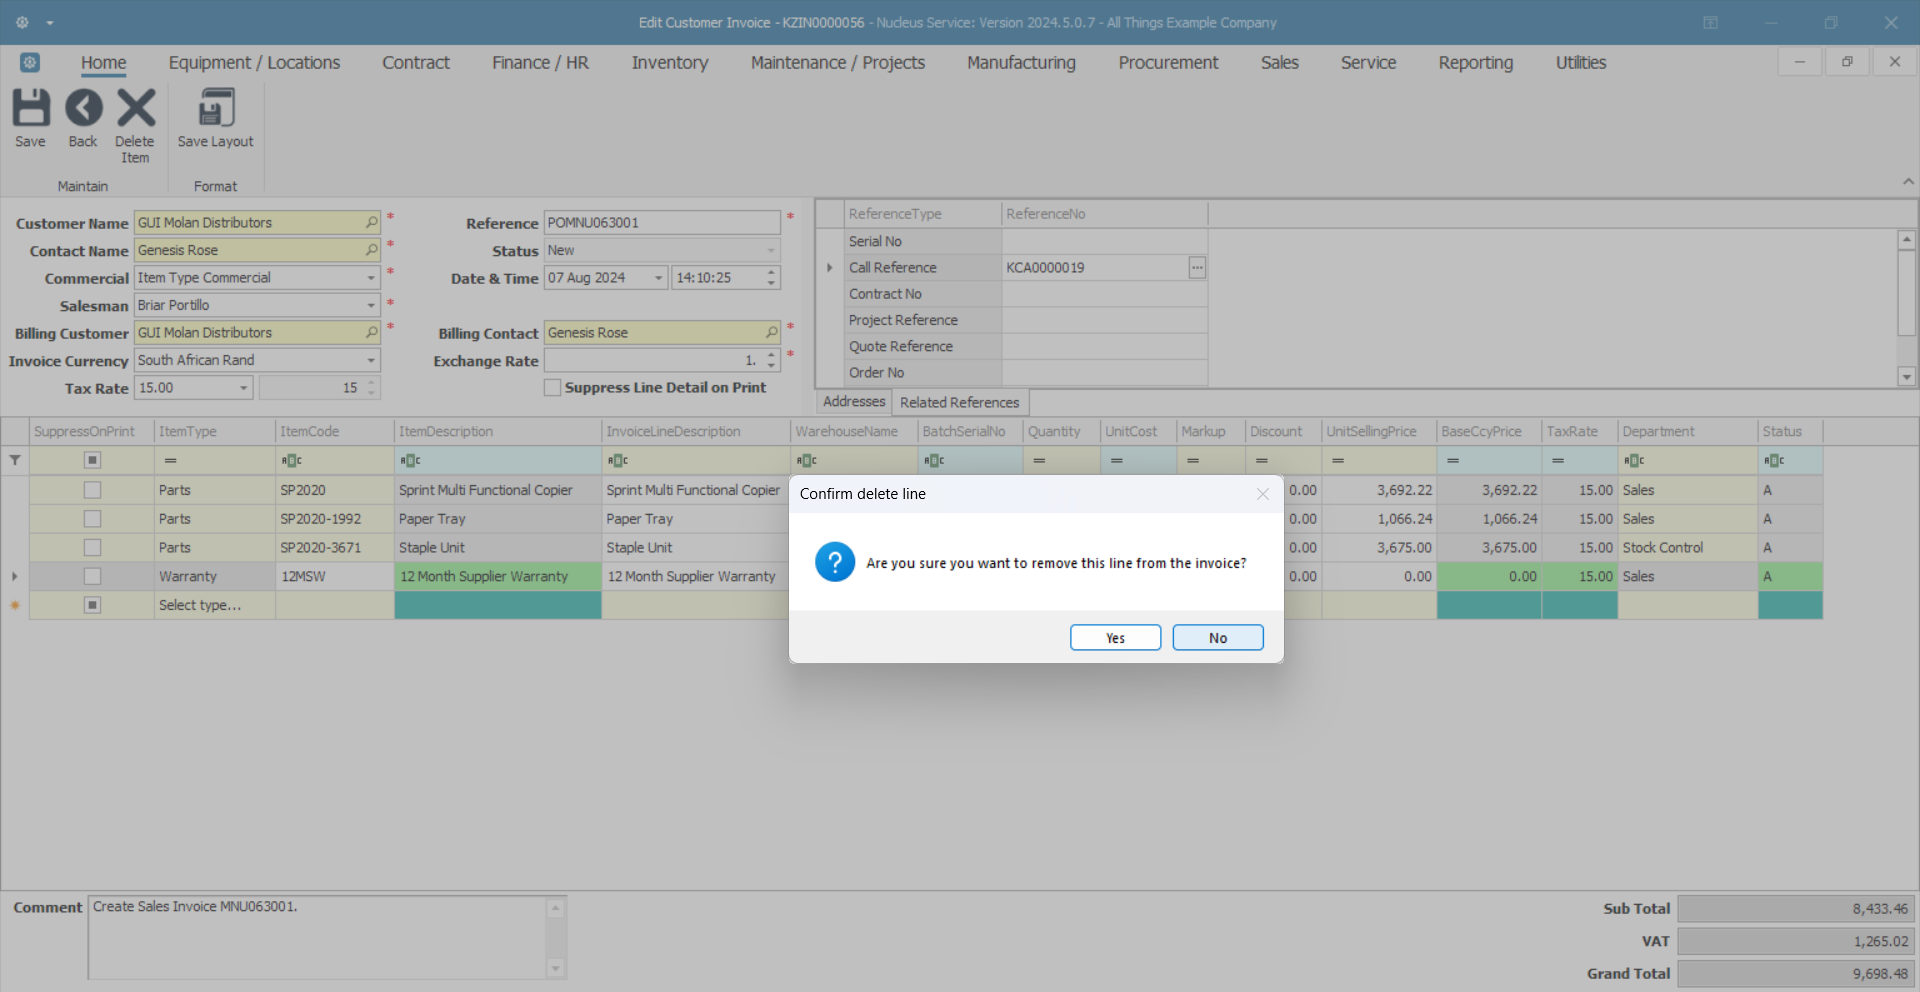
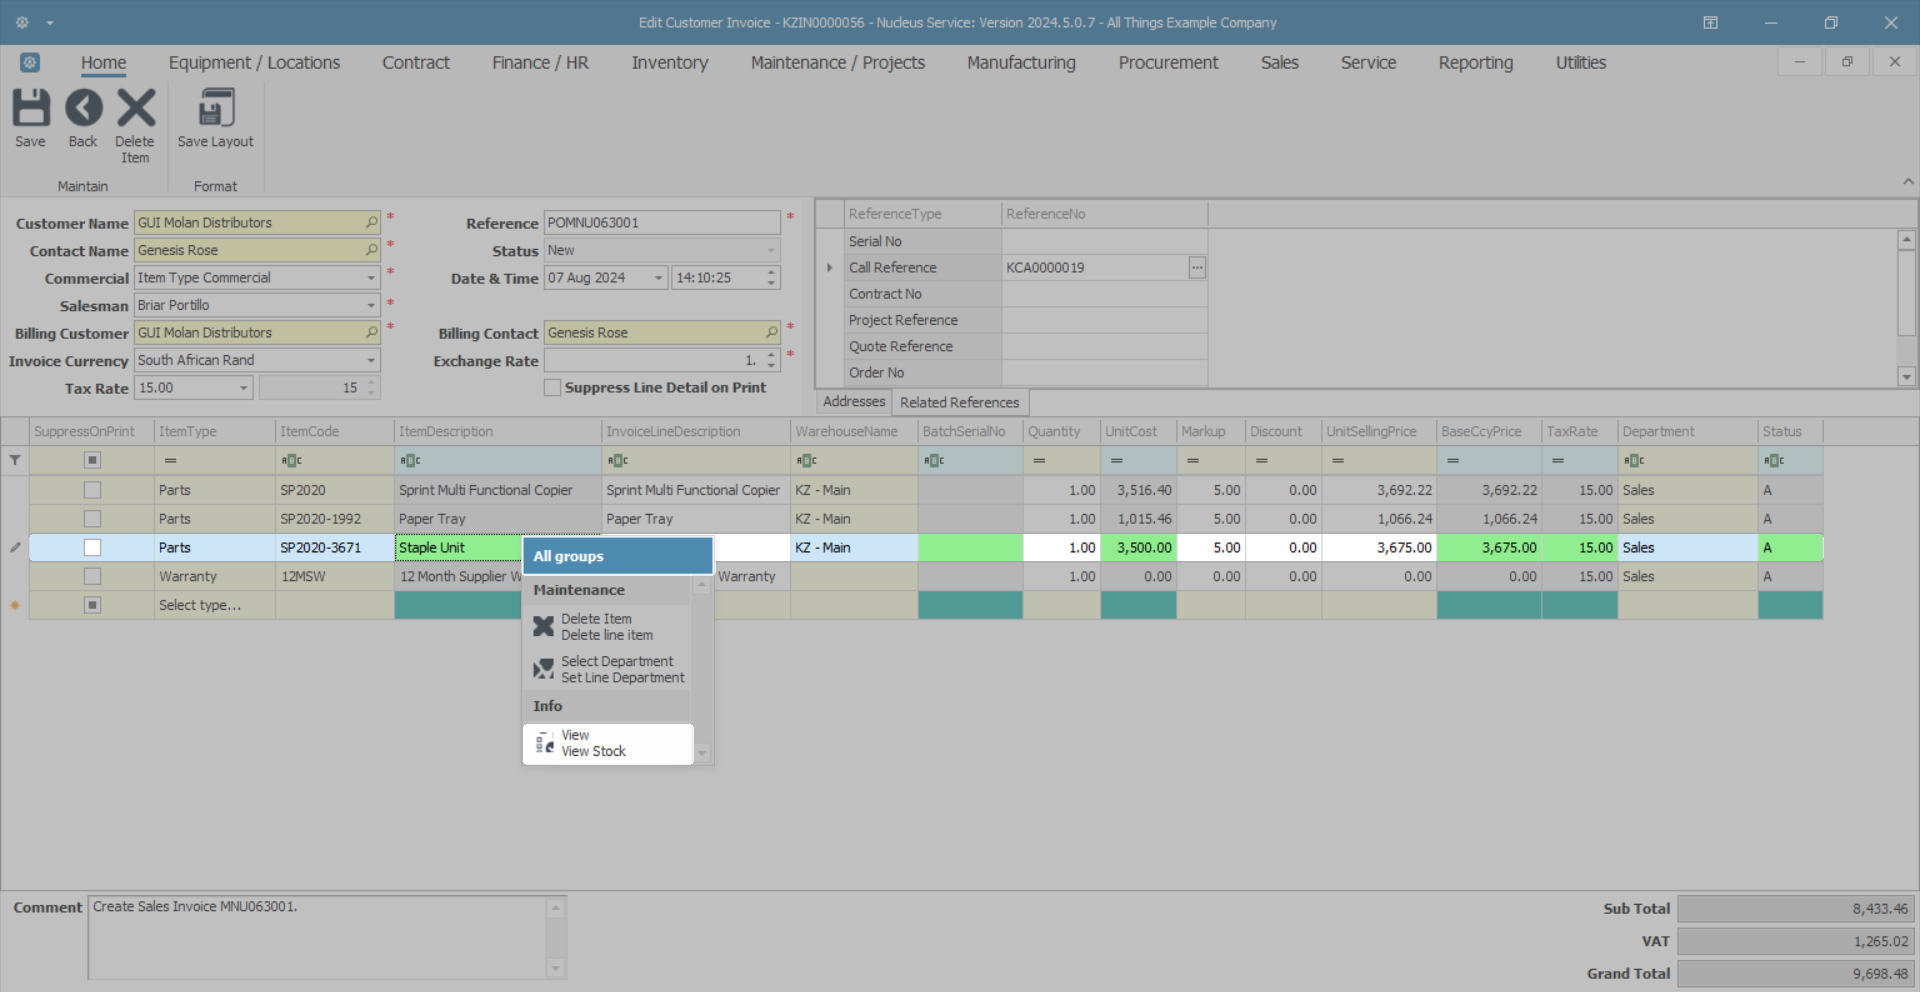
Delete Item
- To delete an item entry from the Invoice, click in the row of the item you wish to remove.
- Click on Delete Item.
![]() Short cut key: Right click on the selected row in the data grid to display the All Groups menu list. Click on Delete.
Short cut key: Right click on the selected row in the data grid to display the All Groups menu list. Click on Delete.
- When you receive the Confirm delete line message to confirm -
- Are you sure you want to remove this line from the invoice?
- Click on Yes if you are certain about your selection, or
- Click on No to ignore the request and leave the line item on the invoice.
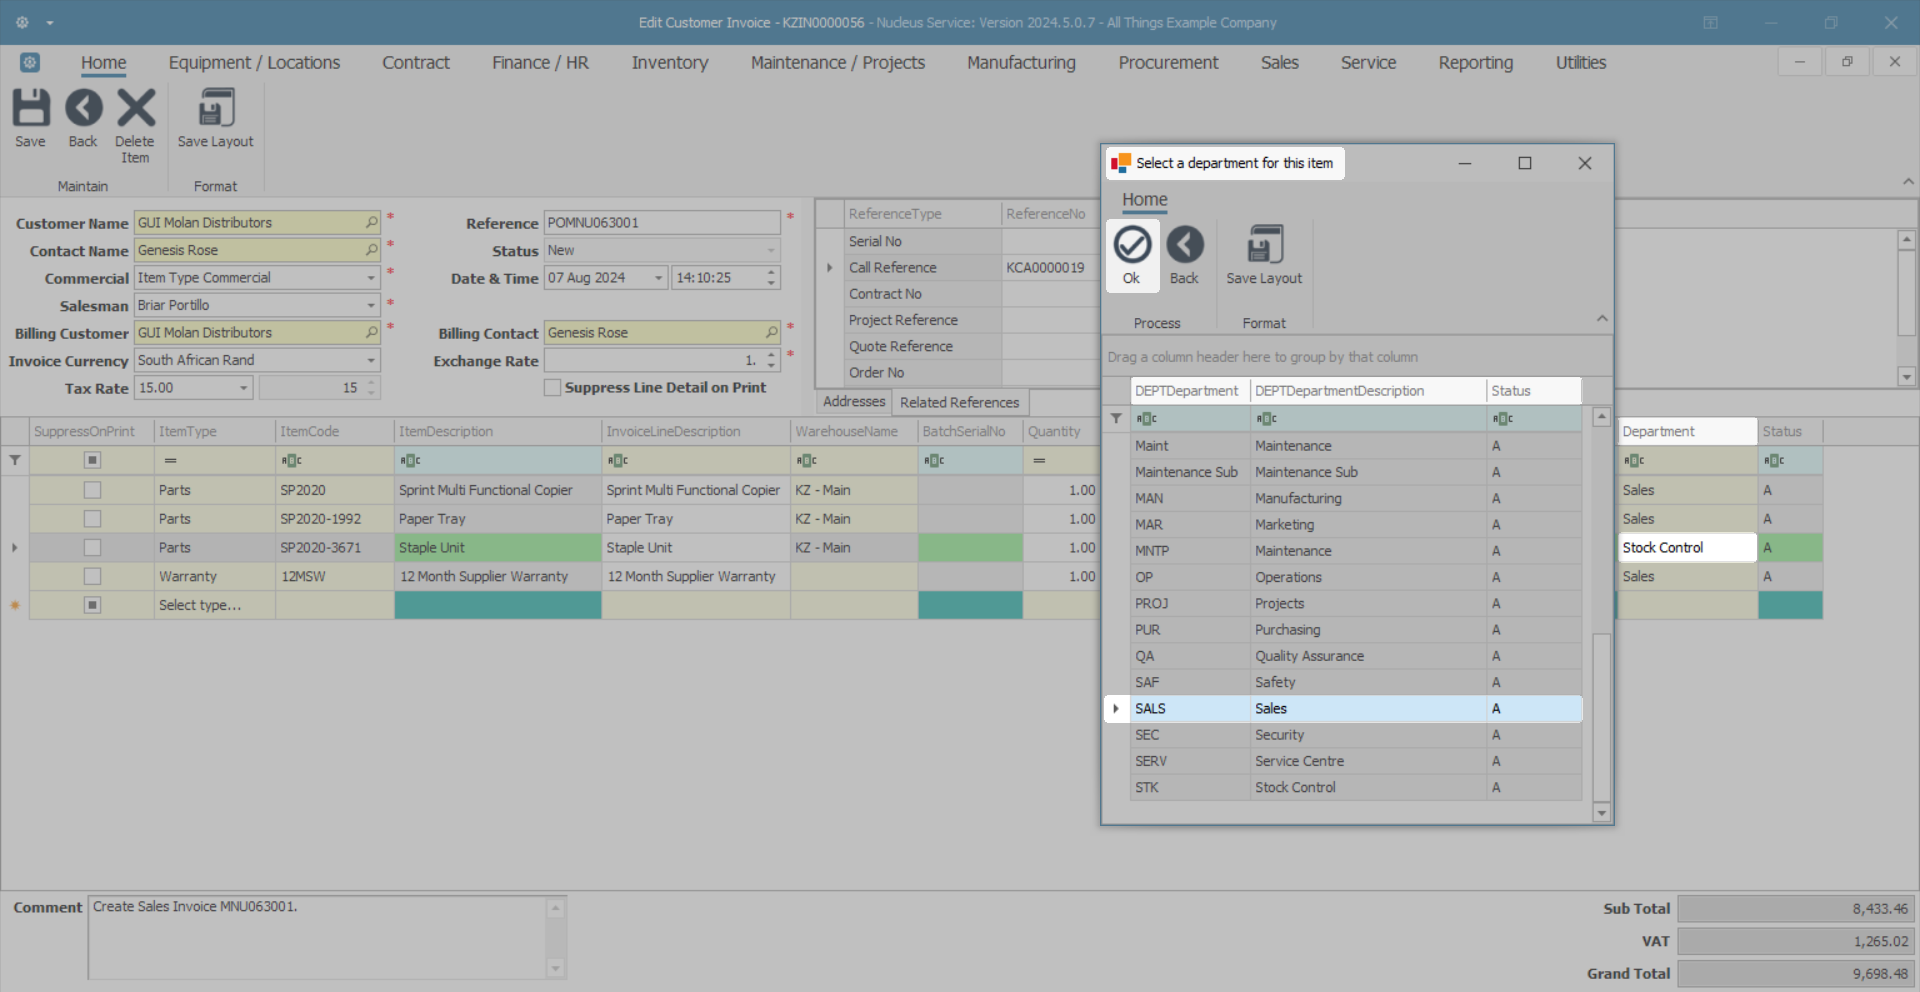
Select Department
- To set the department for the item, use the scroll bar until you can view the Department column.
- Click on the ellipsis button in the selected Department field to display the Select a department for this item screen.
![]() Short cut key: Right click on the selected row in the data grid to display the All Groups menu list. Click on Select Department.
Short cut key: Right click on the selected row in the data grid to display the All Groups menu list. Click on Select Department.
- Select the row of the department you wish to select for the item.
- Click on OK.
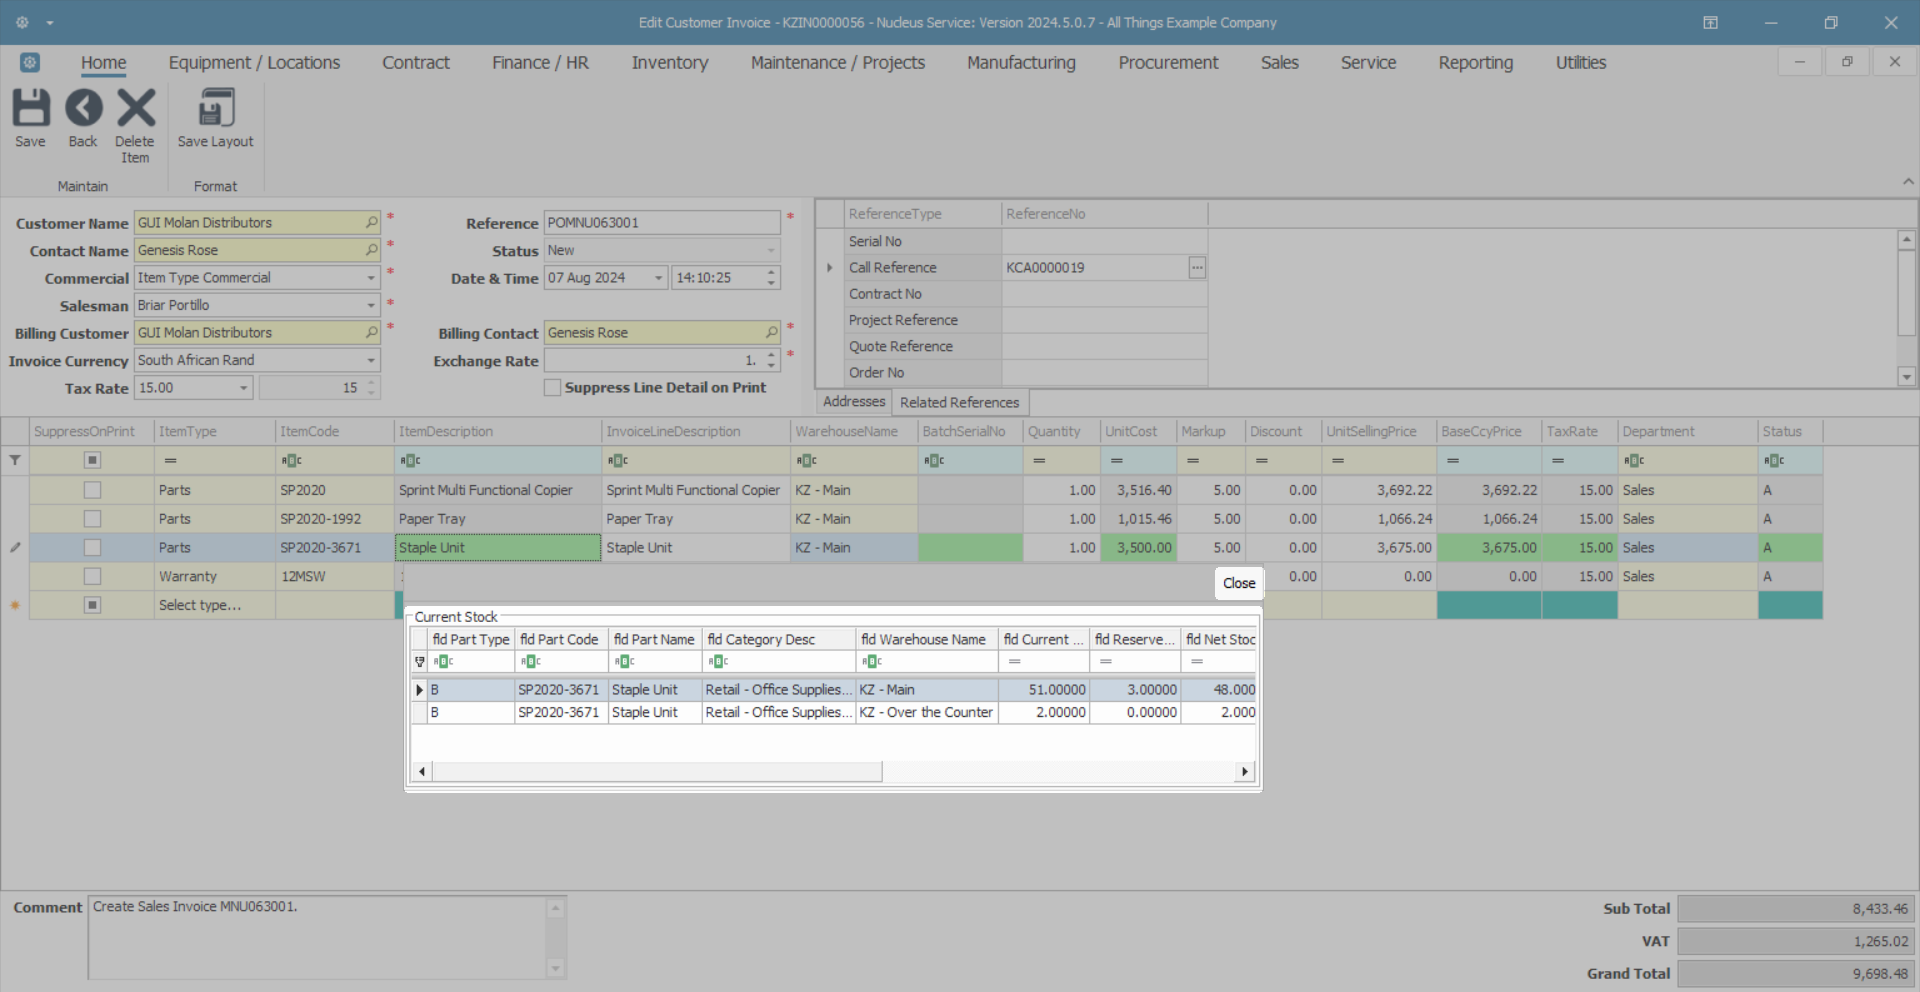
View Stock
-
 Right click on the row item you wish to view the stock availability for to display the All groups screen.
 - Click on View - View Stock.
- The Current Stock frame will display.
- Use the scroll bars to scroll to view the required information.
- This list now also returns alternate parts in stock : Version Compatibility
- Click on Close to close the frame.
Change Item Order
- Drag and drop items lines to set the order you wish the items to be displayed on the sales invoice.
- This order will be pulled into the printed invoice when generated.
. 
Comments
- Click in the Comments text box to type a comment or to make the necessary changes to the existing comment. The comment will appear on the Sales Invoice.
Save Invoice
- When you have finished editing the customer invoice, click on Save to save the changes to the Invoice or,
- Click on Back to discard all changes.
- You will return to the Sales Invoices listing screen.
- The screen will be updated with the changes you have made to the invoice if you have opted to Save the changes.
 You must Print Tax Invoice in order for it to be posted.
MNU.063.003